The maintenance and posting of Costs associated with Items occurs within the Costing section.
For visibility into Costs associated with Items—and to perform routine Cost maintenance—select the "Maintain Item Costs" option. The following screen will appear:

When maintaining Item Costs, you are presented with the following options:
- Item Number
Enter the Item Number of the Item whose Costs you want to maintain.
- UOM
Inventory Unit of Measure.
- Costing Elements
Display lists Item Costs for the specified Item using various categories—or Costing Elements—to distinguish one type of Cost from another.
To the far right of the screen, the following buttons are available:
- CLOSE
Closes the screen, returning you to the application desktop.
- NEW COST
Opens screen for creating a new Item Cost, as shown below.
- EDIT COST
Enables you to edit highlighted Costing Elements. The edit screen is the same as that for creating a new Item Cost—except that when editing, the fields will contain Costing Element information. Double-clicking on a Costing Element will also bring you to the editing screen.
- DELETE COST
Highlight an Item Cost and then select this button to remove the Cost from the list.
Note
If the Costing Element does not contain lower level Costs, you will not be given the option to view Costing detail.
To create a new Item Cost, select the NEW COST button. The following screen will appear:
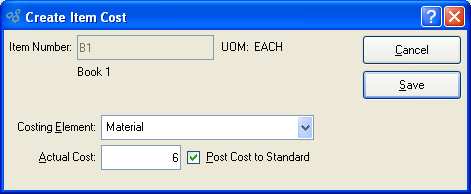
When creating a new Item Cost, you are presented with the following options:
- Item Number
The Item Number specified on the referring screen will display here.
- UOM
Inventory Unit of Measure.
Note
Manufactured Items have no this level material Costs. Material Costs for manufactured Items are absorbed by lower level component Items. The following system-defined Costing Elements are available for manufactured Items:
Direct Labor
Machine Overhead
Overhead
For purchased Items, the following system-defined Costing Elements is available:
Material
If you require additional Elements to describe Costs associated with manufactured or purchased Items, you may create user-defined Costing Elements.
Tip
Use the right-click menu from the Maintain Item Costs screen to post Actual Cost to Standard Cost.
- Actual Cost
Enter the amount of the Actual Cost you want to associate with the specified Costing Element. Actual Costs are the real-time Costs associated with an Item, including current material and production charges. The Actual Cost of an Item may fluctuate given changes in the Cost for materials, or other Costs related to changes in Bills of Materials or Bills of Operations. The Actual Cost provides a current record of charges actually incurred by an Item.
- Post Cost to Standard
Select to post the Actual Cost for the specified Costing Element to its Standard Cost.
This option brings the Actual Cost and the Standard Cost for the Costing Element into alignment with each other. Standard Cost is the Cost used for posting General Ledger transactions. Standard Cost is distinguished from Actual Cost in the sense that Standard Cost is fixed, whereas Actual Cost is subject to fluctuations arising from material or production changes. The two Costs may diverge. However, they can be brought back into alignment by posting Actual Cost to Standard.
To the far right of the screen, the following buttons are available:
- CANCEL
Closes the screen without creating a new Item Cost, returning you to the previous screen.
- SAVE
Adds the Item Cost to the list of Costs for the specified Item.
Update Actual Costs section.
Actual Costs are the real-time Costs associated with an Item, including current material and production charges. The Actual Cost of an Item may fluctuate given changes in the Cost for materials, or other Costs related to changes in Bills of Materials or Bills of Operations. The Actual Cost provides a current record of charges actually incurred by an Item. To update Actual Costs individually by Item, select the "Update Actual Costs by Item" option. The following screen will appear:
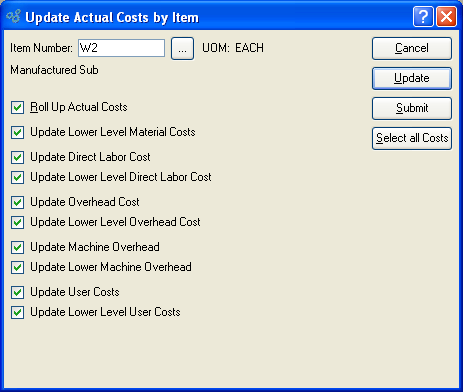
When updating Actual Costs by Item, you are presented with the following options:
- Item Number
Enter the Item Number of the Item whose Actual Costs you want to update. The browse button located to the right of the field leads to a searchable list of make and buy items.
- UOM
Inventory Unit of Measure.
Tip
For manufactured Items, rolling up Actual Costs ensures that lower level Costs are reflected in the Cost for the parent Item.
- Roll Up Actual Costs
Select to roll up Actual Costs. When this option is specified, all selected Costs will be added together to establish a revised total Actual Cost for the Item. This revised total goes into effect after the UPDATE button is selected. If all Costs are selected, all Costs will be rolled up. If a subset of all Costs is selected, only the subset will be rolled up. If the Roll Up Actual Costs option is not specified, the selected Cost updates will not be valid above their current level.
- Update Lower Level Material Costs
Select to update lower level material Costs. Not selecting means lower level material Costs will not be included in the Cost update.
- Update Direct Labor Cost
Select to update direct labor Cost. Not selecting means the direct labor Cost will not be included in the Cost update.
- Update Lower Level Direct Labor Cost
Select to update lower level direct labor Cost. Not selecting means the lower level direct labor Cost will not be included in the Cost update.
Note
You have the flexibility of updating all or only a subset of the listed Costs. Updating a subset might be desirable if only Material or User Costs have changed, for example.
- Update Overhead Cost
Select to update overhead Cost. Not selecting means the overhead Cost will not be included in the Cost update.
- Update Lower Level Overhead Cost
Select to update lower level overhead Cost. Not selecting means the lower level overhead Cost will not be included in the Cost update.
- Update Machine Overhead
Select to update machine overhead Cost. This option is selected by default.
- Update Lower Machine Overhead
Select to update lower level machine overhead Cost. This option is selected by default.
- Update User Costs
Select to update user Costs. Not selecting means user Costs will not be included in the Cost update.
- Update Lower Level User Costs
Select to update lower level user Costs. Not selecting means lower level user Costs will not be included in the Cost update.
To the far right of the screen, the following buttons are available:
- CANCEL
Closes the screen without updating selected Costs, returning you to the application desktop.
- UPDATE
Updates all selected Costs for the specified Item. If the option "Roll Up Actual Costs" has been selected, the total Actual Cost for the specified Item will be updated.
- SUBMIT
Select to submit requested action to the Batch Manager for processing.
- SELECT ALL COSTS
Selects all Costs for updating. Use this option to save time when selecting all Costs for updating. The option "Roll Up Actual Costs" must be selected separately if you want to include a rolled up total for the parent Item in the Cost update.
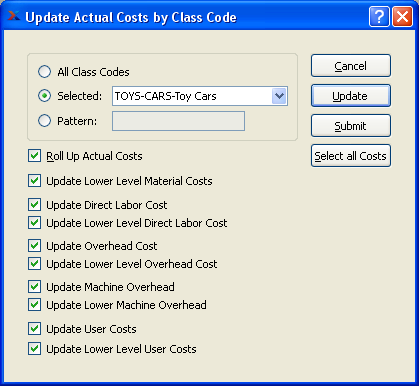
In addition to updating Actual Costs individually by Item, you may also update Actual Costs by Class Code. To update Actual Costs by Class Code, select the "Update Actual Costs by Class Code" option. The following screen will appear:
Tip
For best performance, you should run this utility by All Class Codes. This will also ensure your Costs are updated properly for any Items which cross Class Code lines.
When updating Actual Costs by Class Code, you are presented with the following options:
- All Class Codes
Select to update Actual Costs for all Class Codes. Running the utility by all Class Codes is the preferred method.
- Selected
Specify Class Code whose Actual Costs you want to update.
- Pattern
Enter a Class Code pattern to select a range of Class Codes. Refine your search using Regular Expressions.
Tip
For manufactured Items, rolling up Actual Costs ensures that lower level Costs are reflected in the Cost for the parent Item.
- Roll Up Actual Costs
Select to roll up Actual Costs. When this option is specified, all selected Costs will be added together to establish a revised total Actual Cost for the Item. This revised total goes into effect after the UPDATE button is selected. If all Costs are selected, all Costs will be rolled up. If a subset of all Costs is selected, only the subset will be rolled up. If the Roll Up Actual Costs option is not specified, the selected Cost updates will not be valid above their current level.
- Update Lower Level Material Costs
Select to update lower level material Costs. Not selecting means lower level material Costs will not be included in the Cost update.
- Update Direct Labor Cost
Select to update direct labor Cost. Not selecting means the direct labor Cost will not be included in the Cost update.
- Update Lower Level Direct Labor Cost
Select to update lower level direct labor Cost. Not selecting means the lower level direct labor Cost will not be included in the Cost update.
Note
You have the flexibility of updating all or only a subset of the listed Costs. Updating a subset might be desirable if only Material or User Costs have changed, for example.
- Update Overhead Cost
Select to update overhead Cost. Not selecting means the overhead Cost will not be included in the Cost update.
- Update Lower Level Overhead Cost
Select to update lower level overhead Cost. Not selecting means the lower level overhead Cost will not be included in the Cost update.
- Update Machine Overhead
Select to update machine overhead Cost. This option is selected by default.
- Update Lower Machine Overhead
Select to update lower level machine overhead Cost. This option is selected by default.
- Update User Costs
Select to update user Costs. Not selecting means user Costs will not be included in the Cost update.
- Update Lower Level User Costs
Select to update lower level user Costs. Not selecting means lower level user Costs will not be included in the Cost update.
To the far right of the screen, the following buttons are available:
- CANCEL
Closes the screen without updating selected Costs, returning you to the application desktop.
- UPDATE
Updates all selected Costs for the specified Item. If the option "Roll Up Actual Costs" has been selected, the total Actual Cost for the specified Item will be updated.
- SUBMIT
Select to submit requested action to the Batch Manager for processing.
- SELECT ALL COSTS
Selects all Costs for updating. Use this option to save time when selecting all Costs for updating. The option "Roll Up Actual Costs" must be selected separately if you want to include a rolled up total for the parent Item in the Cost update.
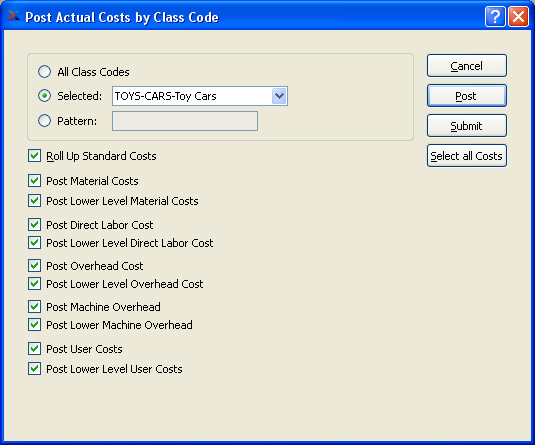
Post Actual Costs section.
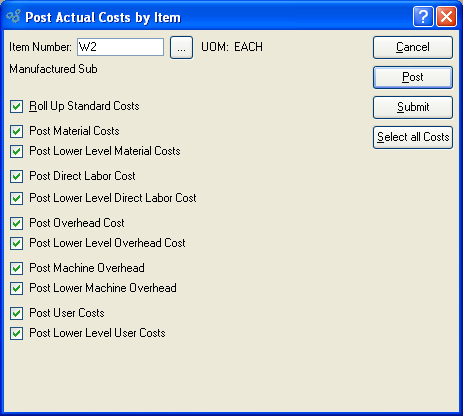
The Standard Cost for an Item is the Cost used for posting General Ledger transactions. Standard Cost is distinguished from Actual Cost in the sense that Standard Cost is fixed, whereas Actual Cost is subject to fluctuations arising from material or production changes. The two Costs may diverge. However, they can be brought back into alignment by posting Actual Cost to Standard. To post Actual Costs to Standard Cost individually by Item, select the "Post Actual Costs by Item" option. The following screen will appear:
Note
The Costing Elements that are selected for posting must correspond to the Costing Elements selected during the update process. If the elements don"t correspond, there may not be any associated Costs available for posting.
When posting Actual Costs by Item, you are presented with the following options:
Tip
For manufactured Items, rolling up Standard Costs ensures that lower level Costs are reflected in the Cost for the parent Item.
- Roll Up Standard Costs
Select to roll up Standard Costs. When this option is specified, all selected Costs will be added together to establish a revised total Standard Cost for the Item. This revised total goes into effect after the POST button is selected. If all Costs are selected, all Costs will be rolled up. If a subset of all Costs is selected, only the subset will be rolled up. If the Roll Up Standard Costs option is not specified, the selected Cost postings will not be valid above their current level.
- Post Material Costs
Select to post material Costs. Not selecting means material Costs will not be posted to the Standard Cost for the Item.
- Post Lower Level Material Costs
Select to post lower level material Costs. Not selecting means lower level material Costs will not be posted to the Standard Cost for the Item.
- Post Direct Labor Cost
Select to post direct labor Cost. Not selecting means the direct labor Cost will not be posted to the Standard Cost for the Item.
- Post Lower Level Direct Labor Cost
Select to post lower level direct labor Cost. Not selecting means the lower level direct labor Cost will not be posted to the Standard Cost for the Item.
Note
You have the flexibility of updating all or only a subset of the listed Costs. Updating a subset might be desirable if only Material or User Costs have changed, for example.
- Post Overhead Cost
Select to post overhead Cost. Not selecting means the overhead Cost will not be posted to the Standard Cost for the Item.
- Post Lower Level Overhead Cost
Select to post lower level overhead Cost. Not selecting means the lower level overhead Cost will not be posted to the Standard Cost for the Item.
- Post Machine Overhead
Select to post machine overhead Cost. This option is selected by default.
- Post Lower Machine Overhead
Select to post lower level machine overhead Cost. This option is selected by default.
- Post User Costs
Select to post user Costs. Not selecting means user Costs will not be posted to the Standard Cost for the Item.
- Post Lower Level User Costs
Select to post lower level user Costs. Not selecting means lower level user Costs will not be posted to the Standard Cost for the Item.
To the far right of the screen, the following buttons are available:
Tip
Actual Costs may also be posted to Standard Cost on an Item-by-Item basis using the right-click menu found on the Maintain Item Costs screen.
- SUBMIT
Select to submit requested action to the Batch Manager for processing.
- SELECT ALL COSTS
Selects all Costs for updating. Use this option to save time when selecting all Costs for updating. The option "Roll Up Standard Costs" must be selected separately if you want to include a rolled up total for the parent Item in the Cost update.
In addition to posting Actual Costs to Standard Cost individually by Item, you may also post Actual Costs by Class Code. To post Actual Costs by Class Code, select the "Post Actual Costs by Item" option. The following screen will appear:
Tip
For best performance, you should run this utility by All Class Codes. This will also ensure your Costs are updated properly for any Items which cross Class Code lines.
Note
The Costing Elements that are selected for posting must correspond to the Costing Elements selected during the update process. If the elements don"t correspond, there may not be any associated Costs available for posting.
When posting Actual Costs by Class Code, you are presented with the following options:
- All Class Codes
Select to post Actual Costs for all Class Codes. Running the utility by all Class Codes is the preferred method.
- Selected
Specify Class Code whose Actual Costs you want to post.
- Pattern
Enter a Class Code pattern to select a range of Class Codes. Refine your search using Regular Expressions.
Tip
For manufactured Items, rolling up Standard Costs ensures that lower level Costs are reflected in the Cost for the parent Item.
- Roll Up Standard Costs
Select to roll up Standard Costs. When this option is specified, all selected Costs will be added together to establish a revised total Standard Cost for the Item. This revised total goes into effect after the POST button is selected. If all Costs are selected, all Costs will be rolled up. If a subset of all Costs is selected, only the subset will be rolled up. If the Roll Up Standard Costs option is not specified, the selected Cost postings will not be valid above their current level.
- Post Material Costs
Select to post material Costs. Not selecting means material Costs will not be posted to the Standard Cost for the Item.
- Post Lower Level Material Costs
Select to post lower level material Costs. Not selecting means lower level material Costs will not be posted to the Standard Cost for the Item.
- Post Direct Labor Cost
Select to post direct labor Cost. Not selecting means the direct labor Cost will not be posted to the Standard Cost for the Item.
- Post Lower Level Direct Labor Cost
Select to post lower level direct labor Cost. Not selecting means the lower level direct labor Cost will not be posted to the Standard Cost for the Item.
Note
You have the flexibility of updating all or only a subset of the listed Costs. Updating a subset might be desirable if only Material or User Costs have changed, for example.
- Post Overhead Cost
Select to post overhead Cost. Not selecting means the overhead Cost will not be posted to the Standard Cost for the Item.
- Post Lower Level Overhead Cost
Select to post lower level overhead Cost. Not selecting means the lower level overhead Cost will not be posted to the Standard Cost for the Item.
- Post Machine Overhead
Select to post machine overhead Cost. This option is selected by default.
- Post Lower Machine Overhead
Select to post lower level machine overhead Cost. This option is selected by default.
- Post User Costs
Select to post user Costs. Not selecting means user Costs will not be posted to the Standard Cost for the Item.
- Post Lower Level User Costs
Select to post lower level user Costs. Not selecting means lower level user Costs will not be posted to the Standard Cost for the Item.
To the far right of the screen, the following buttons are available:
- CANCEL
Closes the screen without posting selected Costs, returning you to the application desktop.
- POST
Posts all selected Actual Costs by Item to Standard Cost. If the option "Roll Up Standard Costs" has been selected, the total Standard Cost for the specified Item will be updated.
- SUBMIT
Select to submit requested action to the Batch Manager for processing.
Post Standard Costs section.
Standard Costs are the Costs which are recorded in the General Ledger (G/L) whenever transactions are posted. As such, they are the Costs of record. Typically, a company will update its Standard Costs on a periodic basis—for example, annually or quarterly.
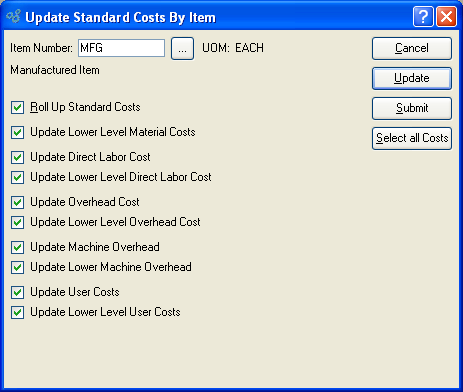
If you introduce new products into production between Standard Cost updates, you may want to roll up existing Standard Costs into the cost of your new manufactured Items. To update Standard Costs individually by Item, select the "Update Standard Costs by Item" option. The following screen will appear:
Note
Updating Standard Costs has absolutely no impact on an Item's Actual Costs. The only Costs affected will be Standard Costs.
When updating Standard Costs by Item, you are presented with the following options:
- Item Number
Enter the Item Number of the Item whose Standard Costs you want to update.
- UOM
Inventory Unit of Measure.
Tip
For manufactured Items, rolling up Standard Costs ensures that lower level Costs are reflected in the Cost for the parent Item.
- Roll Up Standard Costs
Select to roll up Standard Costs. When this option is specified, all selected Costs will be added together to establish a revised total Standard Cost for the Item. This revised total goes into effect after the UPDATE button is selected. If all Costs are selected, all Costs will be rolled up. If a subset of all Costs is selected, only the subset will be rolled up. If the Roll Up Standard Costs option is not specified, the selected Cost updates will not be valid above their current level.
- Update Lower Level Material Costs
Select to update lower level material Costs. Not selecting means lower level material Costs will not be included in the Cost update.
- Update Direct Labor Cost
Select to update direct labor Cost. Not selecting means the direct labor Cost will not be included in the Cost update.
- Update Lower Level Direct Labor Cost
Select to update lower level direct labor Cost. Not selecting means the lower level direct labor Cost will not be included in the Cost update.
Note
You have the flexibility of updating all or only a subset of the listed Costs. Updating a subset might be desirable if only Material or User Costs have changed, for example.
- Update Overhead Cost
Select to update overhead Cost. Not selecting means the overhead Cost will not be included in the Cost update.
- Update Lower Level Overhead Cost
Select to update lower level overhead Cost. Not selecting means the lower level overhead Cost will not be included in the Cost update.
- Update Machine Overhead
Select to update machine overhead Cost. This option is selected by default.
- Update Lower Machine Overhead
Select to update lower level machine overhead Cost. This option is selected by default.
- Update User Costs
Select to update user Costs. Not selecting means user Costs will not be included in the Cost update.
- Update Lower Level User Costs
Select to update lower level user Costs. Not selecting means lower level user Costs will not be included in the Cost update.
To the far right of the screen, the following buttons are available:
- CANCEL
Closes the screen without updating selected Costs, returning you to the application desktop.
- UPDATE
Updates all selected Costs for the specified Item. If the option "Roll Up Standard Costs" has been selected, the total Standard Cost for the specified Item will be updated.
- SUBMIT
Select to submit requested action to the Batch Manager for processing.
- SELECT ALL COSTS
Selects all Costs for updating. Use this option to save time when selecting all Costs for updating. The option "Roll Up Standard Costs" must be selected separately if you want to include a rolled up total for the parent Item in the Cost update.
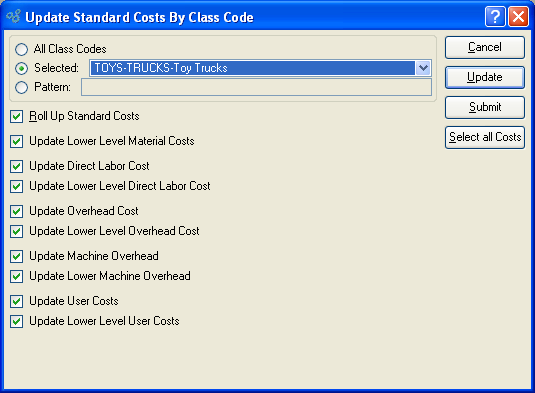
In addition to updating Standard Costs individually by Item, you may also update Standard Costs by Class Code. Updating Standard Costs has absolutely no impact on an Item's Actual Costs. The only Costs affected will be Standard Costs. To update Standard Costs by Class Code, select the "Update Standard Costs by Class Code" option. The following screen will appear:
Tip
For best performance, you should run this utility by All Class Codes. This will also ensure your Costs are updated properly for any Items which cross Class Code lines.
When updating Standard Costs by Class Code, you are presented with the following options:
- All Class Codes
Select to update Standard Costs for all Class Codes. Running the utility by all Class Codes is the preferred method.
- Selected
Specify Class Code whose Standard Costs you want to update.
- Pattern
Enter a Class Code pattern to select a range of Class Codes. Refine your search using Regular Expressions.
Tip
For manufactured Items, rolling up Standard Costs ensures that lower level Costs are reflected in the Cost for the parent Item.
- Roll Up Standard Costs
Select to roll up Standard Costs. When this option is specified, all selected Costs will be added together to establish a revised total Standard Cost for the Item. This revised total goes into effect after the UPDATE button is selected. If all Costs are selected, all Costs will be rolled up. If a subset of all Costs is selected, only the subset will be rolled up. If the Roll Up Standard Costs option is not specified, the selected Cost updates will not be valid above their current level.
- Update Lower Level Material Costs
Select to update lower level material Costs. Not selecting means lower level material Costs will not be included in the Cost update.
- Update Direct Labor Cost
Select to update direct labor Cost. Not selecting means the direct labor Cost will not be included in the Cost update.
- Update Lower Level Direct Labor Cost
Select to update lower level direct labor Cost. Not selecting means the lower level direct labor Cost will not be included in the Cost update.
Note
You have the flexibility of updating all or only a subset of the listed Costs. Updating a subset might be desirable if only Material or User Costs have changed, for example.
- Update Overhead Cost
Select to update overhead Cost. Not selecting means the overhead Cost will not be included in the Cost update.
- Update Lower Level Overhead Cost
Select to update lower level overhead Cost. Not selecting means the lower level overhead Cost will not be included in the Cost update.
- Update Machine Overhead
Select to update machine overhead Cost. This option is selected by default.
- Update Lower Machine Overhead
Select to update lower level machine overhead Cost. This option is selected by default.
- Update User Costs
Select to update user Costs. Not selecting means user Costs will not be included in the Cost update.
- Update Lower Level User Costs
Select to update lower level user Costs. Not selecting means lower level user Costs will not be included in the Cost update.
To the far right of the screen, the following buttons are available:
- CANCEL
Closes the screen without updating selected Costs, returning you to the application desktop.
- UPDATE
Updates all selected Costs for the specified Item. If the option "Roll Up Standard Costs" has been selected, the total Standard Cost for the specified Item will be updated.
- SUBMIT
Select to submit requested action to the Batch Manager for processing.
- SELECT ALL COSTS
Selects all Costs for updating. Use this option to save time when selecting all Costs for updating. The option "Roll Up Standard Costs" must be selected separately if you want to include a rolled up total for the parent Item in the Cost update.
Costing reports are found in this section.
Costed BOM Reports.
To view Costs for a single level Bill of Materials, select the "Costed Single Level BOM" option. The following screen will appear:
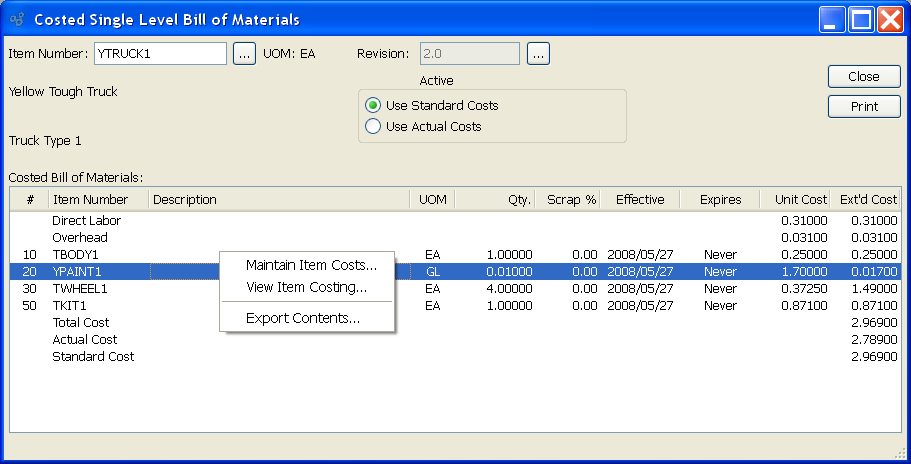
When displaying Costs for a single level Bill of Materials, you are presented with the following options:
- Item Number
Enter the Item Number of the manufactured Item whose associated Costs you would like to view using a single level Bill of Materials.
- UOM
Inventory Unit of Measure.
- Revision
If Revision Control is enabled at your site, specify the Bill of Materials Revision Number you want to view. If none exists, simply enter a value to create one. The status of the Revision will also be displayed. The following statuses apply to Revisions:
- Active
This is the current, default Revision used for costing and Material Requirements Planning (MRP). Only one Revision can be active at the same time. Active Revisions may be modified. However, once a Revision becomes inactive, it may no longer be changed.
- Use Standard Costs
Select to display Standard Costs for the specified Item. Both the Unit Cost and Extended Cost for each component Item, expressed in terms of Standard Cost, will display—assuming Standard Costs have been defined for each component Item.
Tip
When Labor and Overhead are posted to the General Ledger, they are posted using their Actual Cost. This is a departure from the rule which governs materials—namely, that materials are always posted using their Standard Cost. Differences between Actual and Standard Labor and Overhead Costs will be reflected in Inventory Cost Variances when Work Order Production or Operations are posted. You can address these variances if and when they occur by posting your Actual Costs to Standard.
- Use Actual Costs
Select to display Actual Costs for the specified Item. Both the Unit Cost and Extended Cost for each component Item, expressed in terms of Actual Cost, will display—assuming Actual Costs have been defined for each component Item.
Note
The totals displayed on the screen are derived as follows:
- Total Cost
This total is pulled from the Extended Cost column. The total may vary, depending on whether "Use Standard Costs" or "Use Actual Costs" is selected.
- Actual Cost
This value represents the Actual Cost for the parent Item whose Costed Indented BOM is being displayed.
- Standard Cost
This value represents the Standard Cost for the parent Item whose Costed Indented BOM is being displayed.
- Costed Bill of Materials
Display lists Costed Bill of Materials components, using the specified parameters. The Total Cost, Actual Cost, and Standard Cost will be calculated automatically at the bottom of the display.
To the far right of the screen, the following buttons are available:
- CLOSE
Closes the screen, returning you to the application desktop.
Runs the report associated with this screen.
The difference between the indented view and the single level view is that the indented view displays Costs for all subcomponents if there is a manufactured component listed on the Bill of Materials list. To view associated Item Costs using an indented Bill of Materials, select the "Costed Indented BOM" option. The following screen will appear:
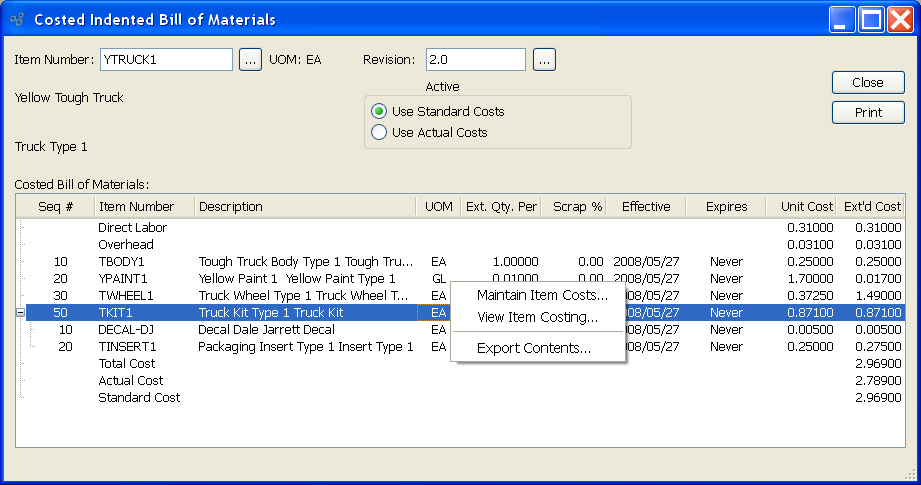
When displaying Costs for an indented Bill of Materials, you are presented with the following options:
- Item Number
Enter the Item Number of the manufactured Item whose associated Costs you would like to view using an indented Bill of Materials.
- UOM
Inventory Unit of Measure.
- Revision
If Revision Control is enabled at your site, specify the Bill of Materials Revision Number you want to view. If none exists, simply enter a value to create one. The status of the Revision will also be displayed. The following statuses apply to Revisions:
- Active
This is the current, default Revision used for costing and Material Requirements Planning (MRP). Only one Revision can be active at the same time. Active Revisions may be modified. However, once a Revision becomes inactive, it may no longer be changed.
- Use Standard Costs
Select to display Standard Costs for component Items in the specified Item's Bill of Materials. Both the Unit Cost and Extended Cost for each component Item, expressed in terms of Standard Cost, will display—assuming Standard Costs have been defined for each component Item.
Tip
When Labor and Overhead are posted to the General Ledger, they are posted using their Actual Cost. This is a departure from the rule which governs materials—namely, that materials are always posted using their Standard Cost. Differences between Actual and Standard Labor and Overhead Costs will be reflected in Inventory Cost Variances when Work Order Production or Operations are posted. You can address these variances if and when they occur by posting your Actual Costs to Standard.
- Use Actual Costs
Select to display Actual Costs for component Items in the specified Item's Bill of Materials. Both the Unit Cost and Extended Cost for each component Item, expressed in terms of Actual Cost, will display—assuming Actual Costs have been defined for each component Item.
Note
The totals displayed on the screen are derived as follows:
- Total Cost
This total is pulled from the Extended Cost column. The total may vary, depending on whether "Use Standard Costs" or "Use Actual Costs" is selected.
- Actual Cost
This value represents the Actual Cost for the parent Item whose Costed Indented BOM is being displayed.
- Standard Cost
: This value represents the Standard Cost for the parent Item whose Costed Indented BOM is being displayed.
- Costed Bill of Materials
Display lists Costed Indented Bill of Materials components, using the specified parameters. The difference between the indented view and the single level view is that the indented view displays all subcomponents if there is a manufactured component listed on the Bill of Materials. The Total Cost, Actual Cost, and Standard Cost will be calculated automatically at the bottom of the display.
To the far right of the display are the following buttons and display fields:
- CLOSE
Closes the screen, returning you to the application desktop.
Runs the report associated with this screen.
A summarized Bill of Materials shows all the material requirements for an Item. The components for subassemblies are included in this view; however, the top-level subassemblies themselves are excluded. To view a Costed summarized Bill of Materials, select the "Costed Summarized BOM" option. The following screen will appear:
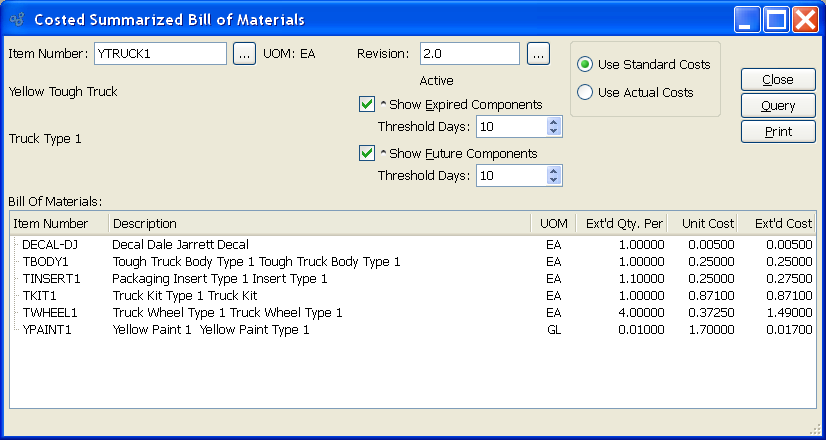
When displaying a Costed summarized Bill of Materials, you are presented with the following options:
- Item Number
Enter the Item Number of the manufactured Item you would like to view a Costed summarized Bill of Materials for.
- UOM
Inventory Unit of Measure.
- Revision
If Revision Control is enabled at your site, specify the Bill of Materials Revision Number you want to view. If none exists, simply enter a value to create one. The status of the Revision will also be displayed. The following statuses apply to Revisions:
- Active
This is the current, default Revision used for costing and Material Requirements Planning (MRP). Only one Revision can be active at the same time. Active Revisions may be modified. However, once a Revision becomes inactive, it may no longer be changed.
- Show Expired Components
Select to cause expired components to be listed in the "Bill of Materials" display.
- Threshold Days
Select a number using the arrow buttons, or manually enter a value up to a maximum of 999. Components that have been expired from the Bill of Materials within the specified number of days will be included in the display.
- Show Future Components
Select to cause future components to be listed in the "Bill of Materials" display.
- Threshold Days
Select a number using the arrow buttons, or manually enter a value up to a maximum of 999. Components that will be added in future to the Bill of Materials within the specified number of days will be included in the display.
- Use Standard Costs
Select to display Standard Costs for the specified Item.
Tip
When Labor and Overhead are posted to the General Ledger, they are posted using their Actual Cost. This is a departure from the rule which governs materials—namely, that materials are always posted using their Standard Cost. Differences between Actual and Standard Labor and Overhead Costs will be reflected in Inventory Cost Variances when Work Order Production or Operations are posted. You can address these variances if and when they occur by posting your Actual Costs to Standard.
- Use Actual Costs
Select to display Actual Costs for the specified Item.
- Bill of Materials
Display lists summarized Bill of Materials components, using the specified parameters.
To the far right of the screen, the following buttons are available:
- CLOSE
Closes the screen, returning you to the application desktop.
- QUERY
Select to generate the display, using the specified parameters.
Runs the report associated with this screen.
Item Cost Reports.
To view Item Costs by Class Code, select the "Item Costs by Class Code" option. The following screen will appear:

When displaying Item Costs by Class Code, you are presented with the following options:
- All Class Codes
Select to display Item Costs for all Class Codes.
- Selected
Specify Class Code whose Item Costs you want to display.
- Pattern
Enter a Class Code pattern to select a range of Class Codes. Refine your search using Regular Expressions.
- Only Show Zero Cost Items
Select to include only Items with zero Cost in the display. Use this option to identify Items having no Costs associated with them. The zero Costs view can be helpful when trying to determine why no General Ledger (G/L) transactions are being generated when certain Items are involved. Items must have Standard Costs associated with them if transactions involving them are to be recorded in the G/L. If an Item has no Standard Cost, no G/L records for that Item will be created.
- Only Show Items where Actual and Standard are different
Select to include in the report only those Items whose Actual and Standard Costs are not the same. In some cases, Items whose Actual and Standard Costs appear to be the same may be included when this option is selected. This is caused by rounding discrepancies in the case where the Locale being used allows for greater cost precision than this screen supports. If this occurs, the Item record will appear in a different color to indicate the difference occurs at a greater level of precision than can be viewed on the screen.
- Items
Display lists Item Costs by Class Code, using the specified parameters.
To the far right of the screen, the following buttons are available:
- CLOSE
Closes the screen, returning you to the application desktop.
- QUERY
Select to generate the display, using the specified parameters.
Runs the report associated with this screen.
To view a summary of Item Costs, select the "Item Costs Summary" option. The following screen will appear:
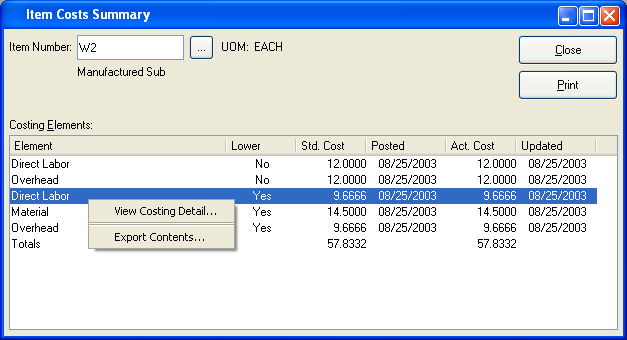
When displaying a summary of Item Costs, you are presented with the following options:
- Item Number
Enter the Item Number of the Item you would like to view summarized Costs for.
- UOM
Inventory Unit of Measure.
- Costing Elements
Display lists an Item Costs Summary, using the specified parameters.
To the far right of the screen, the following buttons are available:
- CLOSE
Closes the screen, returning you to the application desktop.
Runs the report associated with this screen.
Note
If the Costing Element does not contain lower level Costs, you will not be given the option to view Costing detail.
The "Item Costs History" display features an historical record of Costs per Item, sorted by Costing Elements. To view the history of Costs associated with an individual Item, select the "Item Costs History" option. The following screen will appear:
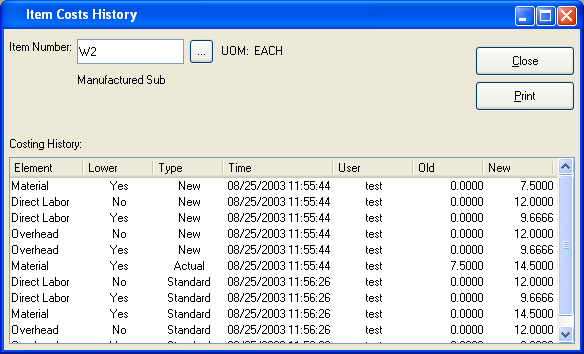
When displaying the history of Costs associated with an Item, you are presented with the following options:
- Item Number
Enter the Item Number of the Item whose Cost history you would like to view.
- UOM
Inventory Unit of Measure.
- Costing History
Display lists an Item's Cost History, using the specified parameters.
To the far right of the screen, the following buttons are available:
- CLOSE
Closes the screen, returning you to the application desktop.
Runs the report associated with this screen.
If you need to establish Costing Elements above and beyond the default Costing Elements defined by the system, you have the ability to do so in this section. Costing Elements you add here will be available to you when you define Costs for Items, as described in Section 6.1, “ Maintain Item Costs”. To create user-defined Costing Elements, select the "User-Defined Costing Elements" option. The following screen will appear:
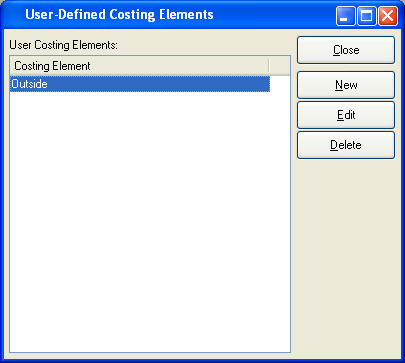
The user-defined Costing Elements master list displays an alphabetical list of all user-defined Costing Elements.
To the far right of the screen, the following buttons are available:
- CLOSE
Closes the screen, returning you to the application desktop.
- NEW
Opens screen for creating a new Costing Element.
- EDIT
Enables you to edit highlighted Costing Elements. The edit screen is the same as that for creating a new Costing Element—except that when editing, the fields will contain Costing Element information. Double-clicking on a Costing Element will also bring you to the editing screen.
- DELETE
Highlight a Costing Element and then select this button to remove the Costing Element from the list.
Note
By default, the system provides the following Costing Elements for manufactured Items:
Direct Labor
Machine Overhead
Overhead
For purchased Items, this default Costing Elements is provided:
Material
To create a new user-defined Costing Element, select the NEW button. The following screen will appear:
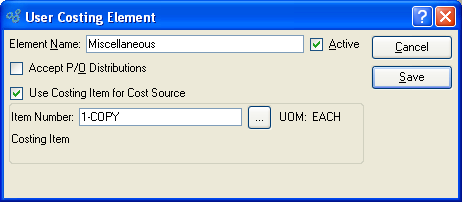
When creating a new user-defined Costing Element, you are presented with the following options:
- Element Name
Specify a name to describe the Costing Element.
- Active
Select to make the user-defined Costing Element active.
- Accept P/O Distributions
Select if you want the Costing Element to be used for distributing Costs related to Purchase Order Vouchers. If selected, the Costing Element will be included as one of the available Costing Elements when Voucher Item Costs are distributed.
- Use Costing Item for Cost Source
Select if you want to associate the Costing Element with a Costing Item, for the purpose of tracking Item Costs. A Costing Item kind of pseudo-Item used solely to provide a costed value for a Costing Element. When a user-defined Costing Element is linked to a Costing Item, the Costing Element assumes the Costs associated with the Costing Item.
- Item Number
Enter the Item Number of the Costing Item you would like to assign to the Costing Element.
- UOM
Inventory Unit of Measure.
To the far right of the screen, the following buttons are available:
- CANCEL
Closes the screen without creating the user-defined Costing Element, returning you to the previous screen.
- SAVE
Creates the Costing Element and adds it to the master list of user-defined Costing Elements.