Item Sources identify the relationship between Items and the Vendors who supply them. In this section we describe the features of Item Sources.
To enter a new Item Source, select the "Enter New Item Source" option. The following screen will appear:
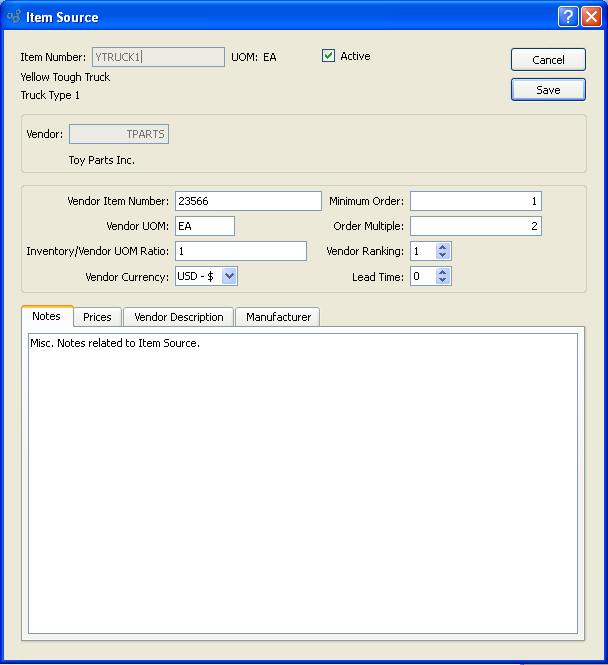
When entering a new Item Source, you are presented with the following options:
- Item Number
Enter the Item Number of the manufactured Item you want to create a Work Order for.
- UOM
Inventory Unit of Measure.
- Active
Identifies whether the Item is currently active.
- Vendor
Enter the Vendor Number of the Vendor who is the source for the specified Item.
- Vendor Item Number
Enter the Item Number the Vendor uses to identify the Item.
- Vendor UOM
Enter the Unit of Measure the Vendor uses for the specified Item.
- Inventory/Vendor UOM Ratio
/Vendor UOM Ratio: Specify the ratio between Inventory and Vendor Units of Measure (UOM). For example, if you store an Item in single units, but a Vendor sells you the Item in cases of 12, then you would enter "12" here to represent the 12:1 Inv./Vend. ratio. If the ratio is 1:1, then enter "1" here. When an Inv./Vend. ratio is specified, the system allows you to purchase Items using the Vendor's UOM; however, when the Items are received, the system will automatically convert the Inventory to your Inventory UOM. This same conversion logic flows throughout the system—whether you are viewing Inventory availability or running Material Requirements Planning (MRP). Your Inventory will always be represented in your Inventory UOM, regardless of the Vendor UOMs specified on any open Purchase Orders.
- Vendor Currency
Currency used by the Vendor.
- Minimum Order
Indicate the minimum Order allowed for the specified Item. A warning message will be shown if a Purchase Order Line Item falls below the minimum Order value entered here.
- Order Multiple
Value entered indicates the quantity multiple that Orders for this Item must use. A warning message will be shown if a Purchase Order Line Item does not conform to the Order multiple entered here.
- Vendor Ranking
Specify the Vendor's rank using the arrow buttons, or manually enter a value up to a maximum of 9. The ranking of a Vendor is used to identify the relative merits of Item Sources when releasing Purchase Requests. If a purchased Item has multiple Item Sources, you may select from a list of available Item Sources when releasing a Purchase Request. The Item Sources will be listed in descending order by Vendor ranking.
- Lead Time
Specify the lead time for the Vendor Item using the arrow buttons, or manually enter a value up to a maximum of 99. Specifies the Lead Time the Vendor requires to supply the specified Item, measured in days.
- Notes
This is a scrolling text field with word-wrapping for entering Notes related to the Item Source.
To the far right of the screen, the following buttons are available:
- CANCEL
Closes the screen without creating an Item Source, returning you to the application desktop.
- SAVE
Saves the Item Source and adds it to the master list of Item Sources.
To add or modify Item Source Prices, select the "Prices" tab at the bottom of the "Item Source" screen. The following screen will appear:
When adding or modifying Item Source Prices, you are presented with the following options:
- Prices
Display lists Item Source Prices for the specified Item Source.
To the far right of the screen, the following buttons are available:
- ADD
Opens screen for creating a new Item Source Price, as shown below.
- EDIT
Enables you to edit highlighted Item Source Price. The edit screen is the same as that for creating a new Item Source Price—except that when editing, the fields will contain Item Source Price information. Double-clicking on an Item Source Price will also bring you to the editing screen.
- DELETE
Highlight an Item Source Price and then select this button to remove the Item Source Price from the list.
To add or modify a description of the Vendor, select the "Vendor Description" tab at the bottom of the "Item Source" screen. The following screen will appear:
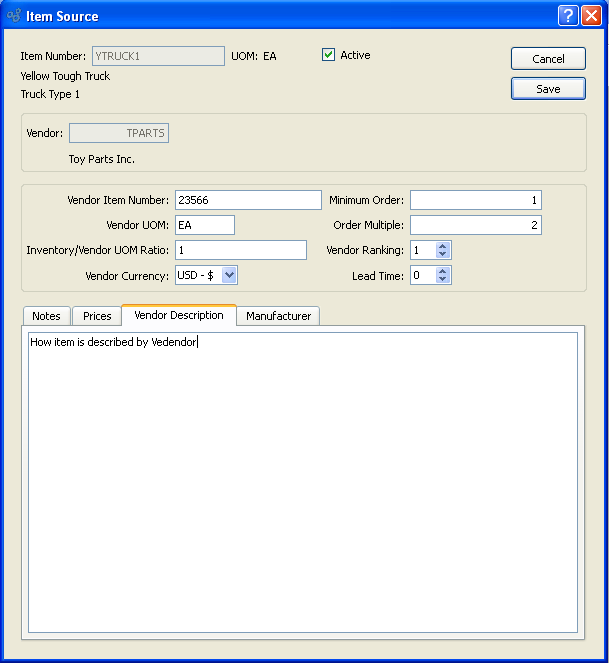
When adding or modifying a Vendor description, you are presented with the following options:
- Vendor Description
This is a scrolling text field with word-wrapping for entering Comments related to the Vendor.
To the far right of the screen, the following buttons are available:
- CANCEL
Closes the screen without creating an Item Source, returning you to the application desktop.
- SAVE
Saves the Vendor description and associates it with the Item Source.
To add or modify a Manufacturer information, select the "Manufacturer" tab at the bottom of the "Item Source" screen. The following screen will appear:
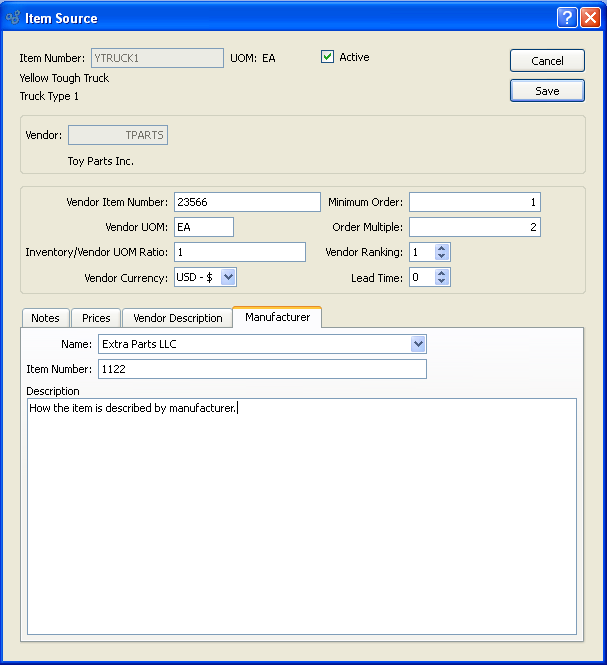
When adding or modifying manufacturing information, you are presented with the following options:
- Name
Name of the Manufacturer who creates the Item.
- Item Number
Item Number used by Manufacturer who creates the Item.
- Description
Description used by the Manufacturer who creates the Item.
To add an Item Source Price to the list of Prices, select the ADD button. The following screen will appear:
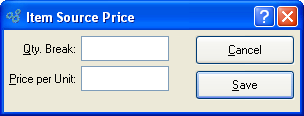
When creating a new Item Source Price, you are presented with the following options:
- Qty. Break
Specify the minimum quantity of the Item you must order to receive a Price Break.
- Price per Unit
Specify the Price per unit if the Quantity Break requirements are met.
To the far right of the screen, the following buttons are available:
- CANCEL
Closes the screen without creating an Item Source Price, returning you to the previous screen.
- SAVE
Saves the Item Source Price and adds it to the list of Item Source Prices.
To access the master list of Item Sources, select the "List Item Sources" option. The following screen will appear:
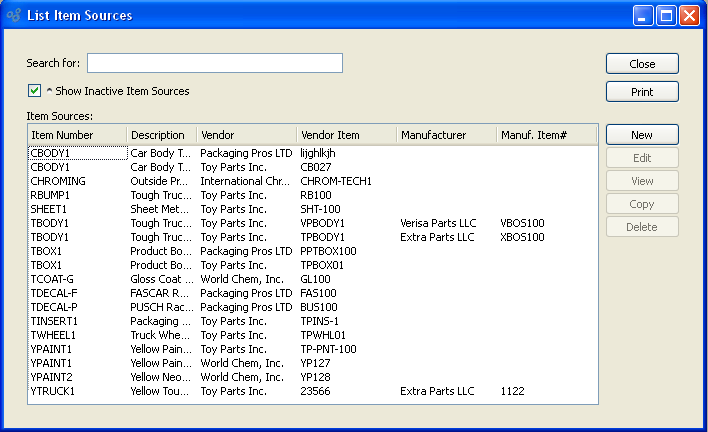
At the top of the screen is a "Search for" field. To search for an Item Source, begin typing in the search field. As you type, the Item Source list will automatically scroll toward the Item Source you are typing. You can also search for Item Sources manually by scrolling through the list. You have the option of applying the following filter when searching for Item Sources:
- Show Inactive Item Sources
Select to include inactive Item Sources in the list.
To the far right of the screen, the following buttons are available:
- CLOSE
Closes the screen, returning you to the application desktop.
Runs the report associated with this screen.
- NEW
Opens screen for creating a new Item Source.
- EDIT
Enables you to edit highlighted Item Sources. The edit screen is the same as that for creating a new Item Source—except that when editing, the fields will contain Item Source information. Double-clicking on an Item Source will also bring you to the editing screen.
- VIEW
Highlight an Item Source and then select this button to reach a read-only view of the "Edit" screen.
- COPY
Enables you to copy highlighted Item Sources.
- DELETE
Highlight an Item Source and then select this button to remove the Item Source from the list.