Purchase Master Information section.
Planner Codes are used to identify Items that fall under the jurisdiction of planners—that is, employees responsible for planning, scheduling, or procurement. To access the master list of Planner Codes, select the "Planner Codes" option. The following screen will appear:
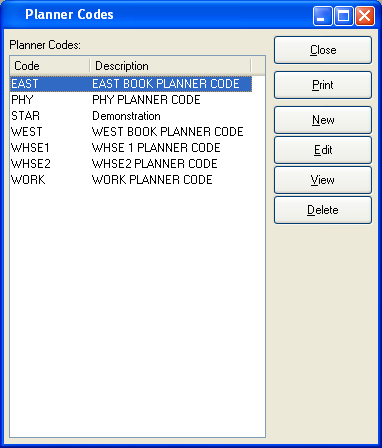
Planner Codes Master List
The "Planner Codes" screen displays information on all existing Planner Codes, including Planner Code and Planner Code description.
To the far right of the screen, the following buttons are available:
- CLOSE
Closes the screen, returning you to the application desktop.
Runs the report associated with this screen.
- NEW
Opens screen for creating a new Planner Code.
- EDIT
Enables you to edit highlighted Planner Codes. The edit screen is the same as that for creating a new Planner Code—except that when editing, the fields will contain Planner Code information. Double-clicking on a Planner Code will also bring you to the editing screen.
- VIEW
Highlight a Planner Code and then select this button to reach a read-only view of the "Edit" screen.
- DELETE
Highlight a Planner Code and then select this button to remove it from the list.
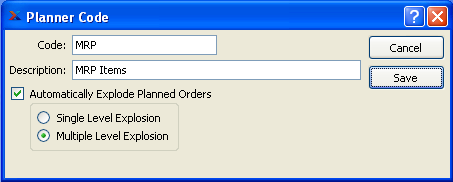
To create a new Planner Code, select the NEW button. The following screen will appear:
Tip
Create your Planner Codes using a logical, hierarchical structure. This will make it easier to retrieve Planner Code information in the future.
When creating a new Planner Code, you are presented with the following options:
- Code
Enter a code to identify the Planner Code.
- Description
Enter a brief description of the Planner Code.
Note
If you want requirements to be created for Planned Work Orders, the option "Automatically Explode Planned Orders" must be selected. If not selected, Planned Work Orders will not be exploded. This means that Planned Orders for lower level material requirements will not be generated when MRP is run.
- Automatically Explode Planned Orders
Select one of the following if you want Planned Work Orders to be exploded automatically:
- Single Level Explosion
This option specifies that when Planned Work Orders are exploded, requirements should be created for the parent Planned Work Order only.
- Multiple Level Explosion
This option specifies that requirements should be created for both parent and child Planned Work Orders.
Note
If you"re running MRP by Planner Code, the explosion level setting may not make a difference—depending on how your Planner Codes are assigned. For example, if all your Items fall within the same Planner Code, Planned Orders will be generated for all levels of requirements—regardless of whether single or multiple level explosion is set. The same does not hold true when running MRP by Item.
To the far right of the screen, the following buttons are available:
- CANCEL
Closes the screen without creating a Planner Code, returning you to the previous screen.
- SAVE
Creates the Planner Code and adds it to the master list of Planner Codes.
Reject Codes provide a means for labeling purchased Items when and if they are returned to the Vendor who supplied them. A Reject Code explains why an Item is being returned. To access the master list of Reject Codes, select the "Reject Codes" option. The following screen will appear:
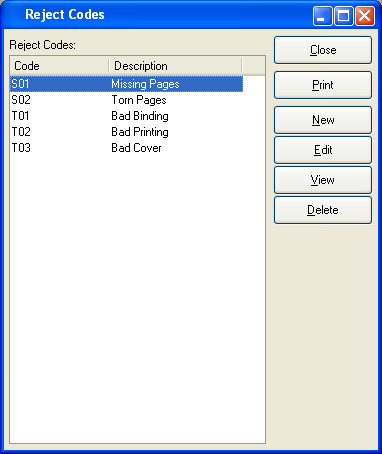
The "Reject Codes" screen displays information on all existing Reject Codes, including Reject Code and Reject Code description.
To the far right of the screen, the following buttons are available:
- CLOSE
Closes the screen, returning you to the application desktop.
Runs the report associated with this screen.
- NEW
Opens screen for creating a new Reject Code.
- EDIT
Enables you to edit highlighted Reject Code. The edit screen is the same as that for creating a new Reject Code—except that when editing, the fields will contain Reject Code information. Double-clicking on a Reject Code will also bring you to the editing screen.
- VIEW
Highlight a Reject Code and then select this button to reach a read-only view of the "Edit" screen.
- DELETE
Highlight a Reject Code and then select this button to remove the Reject Code from the list.
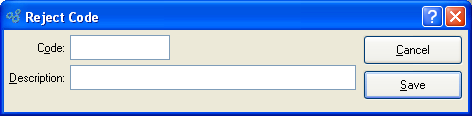
To create a new Reject Code, select the NEW button. The following screen will appear:
Tip
Reject Codes are abbreviations used to quickly and easily identify rejected Items. Keep these Codes short and meaningful so employees will have an easy time identifying them.
When creating a new Reject Code, you are presented with the following options:
- Code
Enter a code to identify the Reject Code.
- Description
Enter a brief description of the Reject Code.
To the far right of the screen, the following buttons are available:
- CANCEL
Closes the screen without creating a Reject Code, returning you to the previous screen.
- SAVE
Creates the Reject Code and adds it to the master list of Reject Codes.
Terms are used to determine the billing Terms for Accounts Payable and Accounts Receivable. To access the master list of Terms, select the "Terms" option. The following screen will appear:
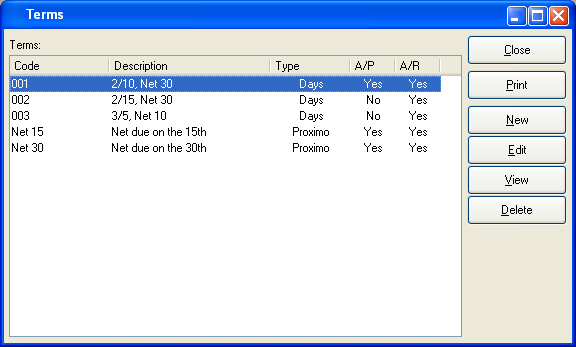
The "Terms" screen displays information on all existing Terms, including Term Code, Term description, Terms type, and Accounts Payable or Accounts Receivable status.
To the far right of the screen, the following buttons are available:
- CLOSE
Closes the screen, returning you to the application desktop.
Runs the report associated with this screen.
- NEW
Opens screen for creating new billing Terms.
- EDIT
Enables you to edit highlighted billing Terms. The edit screen is the same as that for creating new billing Terms—except that when editing, the fields will contain billing Terms information. Double-clicking on a billing Terms line will also bring you to the editing screen.
- VIEW
Highlight a billing Term and then select this button to reach a read-only view of the "Edit" screen.
- DELETE
Highlight a billing Terms line and then select this button to remove the billing Terms from the master list.
To create new billing Terms, select the NEW button. The following screen will appear:
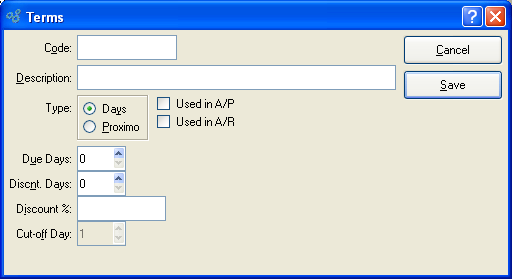
When creating new billing Term, you are presented with the following options:
Note
A/P billing Terms may be applied and Discounts taken when selecting a posted Voucher for payment.
- Used in A/R
Select if billing Terms are used for Accounts Receivable.
- Due Days
Select a number using the arrow buttons, or manually enter a value up to a maximum of 999. If the Terms type is "Days," then this refers to the number of days after the document (Invoice, Voucher, etc.) date which a payment is considered overdue. If the Terms type is "Proximo," then the setting refers to the day of the month of the document (Invoice, Voucher, etc.) date on which payment is due.
- Discnt. Days
Days: Select a number using the arrow buttons, or manually enter a value up to a maximum of 999. Specifies the number of days within which a payment must be made or received to take advantage of any Terms discount.
- Discount %
Specify the amount of any early payment discount.
- Cut-off Day
Specify the day of the month on or after which the due date will advance to the next month.
To the far right of the screen, the following buttons are available:
Expense Categories are used to identify the General Ledger (G/L) Accounts to be used when processing the following:
Non-Inventory Purchase Order Items
Miscellaneous Vouchers
Miscellaneous A/P Checks
Expense Transactions
For example, when entering a Purchase Order for a non-Inventory Item, you must select an Expense Category—thereby identifying the G/L Accounts the purchasing transaction will be distributed to. To access the master list of Expense Categories, select the "Expense Categories" option. The following screen will appear:

The "Expense Categories" screen displays information on all existing Expense Categories, including Expense Category code and Expense Category description.
To the far right of the screen, the following buttons are available:
- CLOSE
Closes the screen, returning you to the application desktop.
Runs the report associated with this screen.
- NEW
Opens screen for creating a new Expense Category.
- EDIT
Enables you to edit highlighted Expense Categories. The edit screen is the same as that for creating a new Expense Category—except that when editing, the fields will contain Expense Category information. Double-clicking on an Expense Category will also bring you to the editing screen.
- VIEW
Highlight an Expense Category and then select this button to reach a read-only view of the "Edit" screen.
- COPY
Highlight an Expense Category and then select this button to reach a screen for copying the Expense Category master.
- DELETE
Highlight an Expense Category and then select this button to remove the category from the list.
To create a new Expense Category, select the NEW button. The following screen will appear:
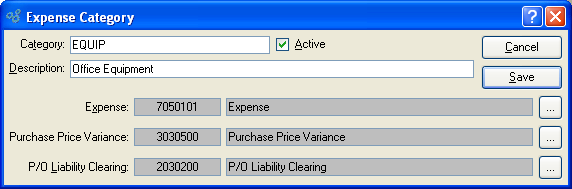
When creating a new Expense Category, you are presented with the following options:
- Category
Enter the Expense Category name.
- Description
Enter a brief description of the Expense Category.
- Active
Select to show the Expense Category as active. Not selecting means the Expense Category will be considered inactive. To re-activate an Expense Category, simply select this option.
- Expense
Identify a General Ledger (G/L) Account to distribute Purchasing Expenses to. This is an Expense Account. It will be debited when transactions using Expense Categories are posted.
- Purchase Price Variance
Identify a General Ledger (G/L) Account to distribute purchase Price variances to. This is an Asset Account. It will be credited or debited with the value of any variance that may arise when a Voucher is posted for non-Inventory Items.
- P/O Liability Clearing
Identify a General Ledger (G/L) Account to distribute Purchase Order liability clearing to. This is a Liability Account. It will be credited when non-Inventory Items are received, and debited when a Voucher for these Items is posted.
To the far right of the screen, the following buttons are available:
- CANCEL
Closes the screen without creating an Expense Category, returning you to the previous screen.
- SAVE
Creates the Expense Category and adds it to the master list of Expense Categories.
Accounts Payable (A/P) Account assignments represent the default General Ledger (G/L) Accounts used by the system when processing the following:
Vouchers
Payment Discounts
Miscellaneous A/P Credit Memos
Miscellaneous A/P Debit Memos
The Account assignments are made by Vendor Type. This means that transactions involving a Vendor will follow the assignments established for the Vendor Type—unless otherwise specified. To access the A/P Account assignments master list, select the "A/P Account Assignments" option. The following screen will appear:
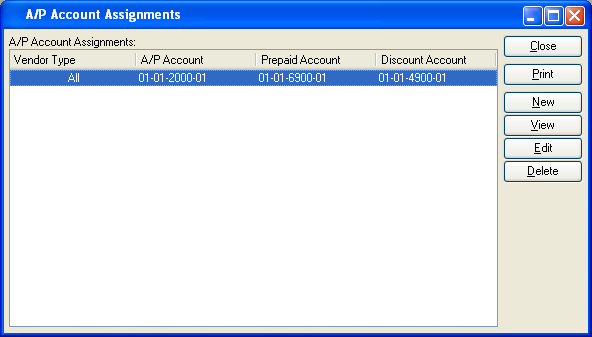
The "A/P Account Assignments" screen displays information on all existing A/P Account assignments.
To the far right of the screen, the following buttons are available:
- CLOSE
Closes the screen, returning you to the application desktop.
Runs the report associated with this screen.
- NEW
Opens screen for creating a new Account assignment.
- VIEW
Highlight an Account assignment and then select this button to reach a read-only view of the "Edit" screen.
- EDIT
Enables you to edit highlighted Account Assignment. The edit screen is the same as that for creating a new Account assignment —except that when editing, the fields will contain Account assignment information. Double-clicking on an Account assignment will also bring you to the editing screen.
- DELETE
Highlight an Account assignment and then select this button to remove the Account Assignment from the list.
To create a new A/P Account assignment, select the NEW button. The following screen will appear:
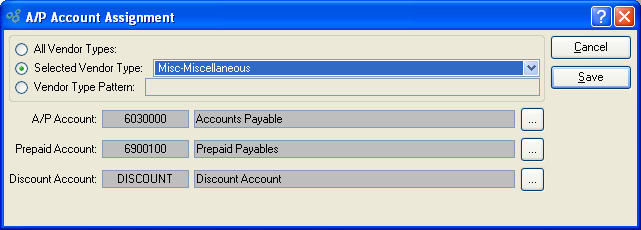
When creating a new A/P Account assignment, you are presented with the following options:
- All Vendor Types
Select to assign the A/P Accounts to all Vendor Types.
- Selected Vendor Type
Specify Vendor Type you want to associate with the A/P Account assignment.
- Vendor Type Pattern
Enter a Vendor Type pattern to select a range of Vendor Types. Refine your search using Regular Expressions.
- A/P Account
Identify a General Ledger (G/L) Account to assign as the default A/P Account. This is a Liability Account. It will be credited when Vouchers are posted and debited when Checks are posted.
- Prepaid Account
Identify a General Ledger (G/L) Account to assign as the default A/P Prepaid Account. This is an Asset Account. It should not be confused with or used interchangeably with the default A/P Account. The Prepaid Account will be credited when Miscellaneous A/P Credit Memos are posted and debited when Miscellaneous A/P Debit Memos are posted.
- Discount Account
Identify a General Ledger (G/L) Account to distribute purchasing Discounts to. This is a Revenue Account. It will be credited when purchasing Discounts are applied to selected Payments.
To the far right of the screen, the following buttons are available:
- CANCEL
Closes the screen without creating an Account assignment, returning you to the previous screen.
- SAVE
Creates the Account assignment and adds it to the master list of Account Assignments.