Return Authorization section.
Many users of xTuple ERP have a company policy to accept returned goods. To adequately handle this situation they need a mechanism to keep a record of what goods have been authorized for a return, credit, or other disposition. A Return Authorization is an internal approval system to resolve a problem resulting from dissatisfaction with products or services shipped. Depending on the business model, users may handle the return in a number of ways. The xTuple ERP return system is flexible enough to handle the needs of most business scenarios.
To access the Return Authorization window, Return Authorizations must be enabled in Sales Configuration. A Return Authorization appears as follows:
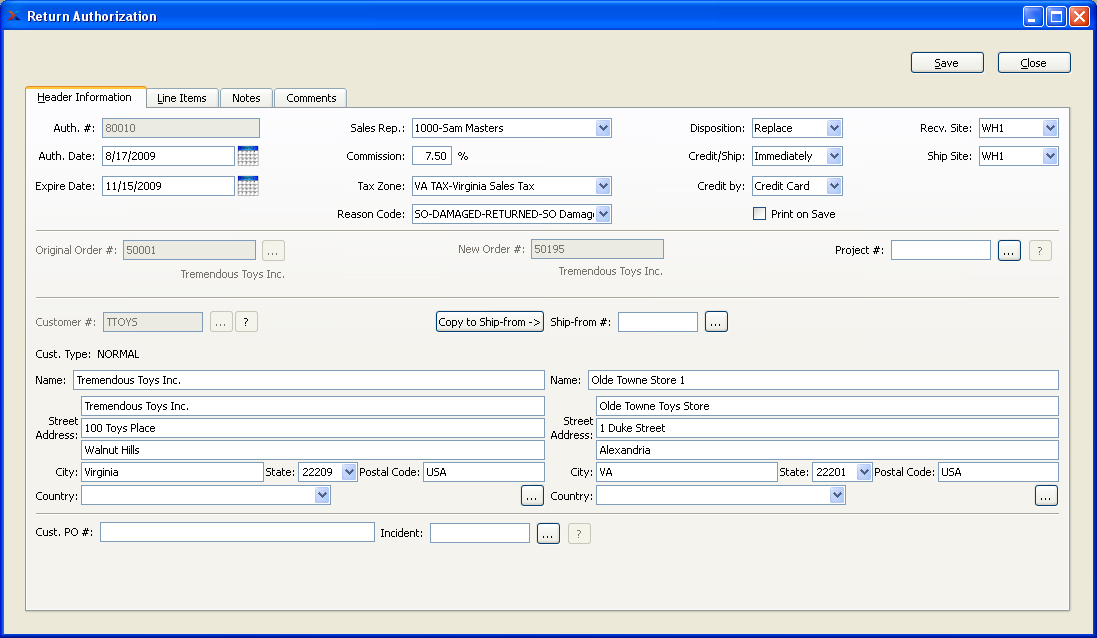
When creating a new Return Authorization, you are presented with the following options:
- Auth #
Next available Return Authorization Number will automatically display, unless your system requires you to enter Return Authorization Numbers manually. Default values and input parameters for Return Authorization Numbers are configurable at the system level.
- Auth. Date
Displays current day's date.
- Expire Date
Specify the date when the Return Authorization will expire. This is an optional setting used to determine the amount of time that should pass before the transactions on the Return Authorization are considered past due
- Sales Rep.
Specify the Sales Representative associated with the Return Authorization. Sales Representatives are linked to a Customer on the Customer master—either by a default setting or through the assignment of Ship-To Addresses. Each Ship-To Address may have a different Sales Representative associated with it. Consequently, the name of the Sales Representative appearing on the Return Authorization header will be the same as specified for the Ship-To Address being used.
- Commission
By default, the commission percentage recorded on the Customer master will be automatically entered in this field. If for some reason you select a non-default Sales Representative, the commission rate will not change. To adjust the commission rate, you must make the change manually.
- Tax Zone
Specify the Tax Zone associated with the Return Authorization. The Tax Zone for the specified Ship-To Address will be entered here by default. Otherwise, the primary Tax Zone for the Customer will be entered.
- Reason Code
Specify the reason for the Return Authorization. Reason Codes are used to explain why a Customer return is being authorized.
- Disposition
Specify the method to be used for handling the Return Authorization. If your system is configured to use a default disposition, then that value will be shown.
Note
The disposition of individual Line Items will be determined conditionally based on the settings made at the Return Authorization header level.
- Credit
Select to authorize the issuing of credit to the specified Customer. No return is required or expected; as a result, the Credit/Ship timetable option will be disabled for this disposition method. Return Authorization Line Items will close when an associated Credit Memo is posted.
- Return
Select to authorize returns from the specified Customer. Return Authorization Items will close when an associated Credit Memo is posted, or when all Items on a line have been returned, whichever comes last.
- Replace
Select to authorize the replacement of Items returned by the specified Customer. Authorized quantities will be added as additional order quantity to a new associated Sales Order. Return Authorization Items will close when all Items on the line have been returned or all authorized Items on the line have been shipped, whichever comes last. Any money to be credited to the customer is set on the Return Authorization line; any money to be billed to the customer is set at the new sales order line.
- Service
Select to authorize the repair or service of Items returned by the specified Customer. To isolate costing implications, only Items of type Job may be selected. Service or repair items will first be received by the Return Authorization. A new Sales Order with linked Work Order(s) will be created to track work and shipping on the repair or service. Money to be billed for service or repair should be set at the New Sales Order.
- Substitute
Select to authorize the substitution of Items returned by the specified Customer. Under this option, when an original Sales Order is imported into the Return Authorization, the Return Authorization Line Items will default to the Return disposition. Any new Line Items added beyond the original ones will have a default disposition of Ship.
- Credit/Ship
Specify the timing for the Return Authorization:
- Immediately
Select to issue credit or send returns to the specified Customer immediately.
- Upon Receipt
Select to issue credit or ship new associated Sales Order items only after you have received the returned goods.
- Credit by
Specify the method to be used for crediting the Customer:
- None
Select if you will not be issuing credit to the Customer. If you select this option, you will be unable to add pricing information at the Return Authorization Line Item level.
- Credit Memo
Select to credit the return with a Credit Memo to the Customer's account. If selected, a sales Credit Memo will be automatically queued up for processing on the Return Authorizations Workbench.
- Check
Select to credit the return by sending the Customer a Check. If selected, a Customer Check will be queued up for processing on the Return Authorizations Workbench. When the Check is processed, a sales Credit Memo will be created automatically—and the Check will be applied to it.
- Credit Card
Select to credit the return with a refund to the Customer's Credit Card. If selected, the payment will be queued up for processing on the Return Authorizations Workbench. A Credit Memo will be posted when the refund is processed—and the refund charges will be applied to it. If the timing of the credit is immediately, then you may issue the refund directly from the Line Items tab of the Return Authorization.
Note
The Credit Card functionality must be enabled at your site for the Credit Card method to function properly.
- Print on Save
Select to print a copy of the Return Authorization when you select the SAVE button. You must have a Form "keyed on" Return Authorizations for this option to work. The keyed on process is described here: Section 13.3.1, “Form”.
- Original Order #
You have the option to select an original Sales Order for all disposition types. When an original Sales Order is selected, all Line Items from the original Order will be imported into the Return Authorization automatically. For dispositions Credit and Return this feature imports the original pricing and billing information. When a Sales Order number is selected, the Customer Number and address information will be populated and disabled. If the Customer is selected first, only Sales Orders for that customer will appear on the search list.
Note
A Sales Order may be linked to only one open Return Authorization at a time.
- New Order #
For Return Authorizations having either Replace, Service, or Substitute dispositions, the system will automatically generate a new Sales Order for shipping purposes once any Line Item quantity has been authorized. Authorized Line Item quantities are added automatically to the new Sales Order, enabling you to ship the quantity at the appropriate time.
- Project #
You have the option to select a Project Number to associate with the Return Authorization. This enables you to link the Return Authorization with other Orders linked to the same project. The browse button located to the right of the field enables you to select from a list of available Projects.
- Customer #
Enter the Customer Number of the Customer whose return you are authorizing. The browse button located to the right of the field leads to a searchable Customers list. You may also access this list using the keyboard shortcut "CTRL + L".
Tip
A valid Customer Number must be entered in the "Customer #" field before Line Items can be added to a Return Authorization for all disposition types except Return. If no valid Customer Number is entered, you will not be able to add Line Items to the Return Authorization. Additionally, Return Authorizations may only be entered for active Customers.
- Cust. Type
Displays the Customer Type for the specified Customer.
- Bill-To Name
Displays the Customer's Bill-To name.
- Bill-To Phone
Displays the Customer's Bill-To phone number.
- Address
Displays the Customer's Bill-To Address. You may manually override the displayed Address information in the fields below—or use the browse button to select another Address. If a new Address is manually entered here, that Address will be added automatically to the master list of Addresses. For additional documentation related to creating Addresses, see Section 8.1, “ New Address”.
- Copy to Ship-to -\>
Select to copy contents of billing address into Ship-To address field. This option is enabled if the Customer master for the specified Customer indicates that free-form Ship-To's are allowed.
- Ship-To #
Enter the number of the preferred Ship-To Address. Customers may maintain multiple Ship-To Addresses. If the Customer master for the specified Customer indicates that free-form Ship-To's are allowed, then any address may be entered. If free-form Ship-To's are not allowed, then the Ship-To Address must be entered using the browse button located to the right of the field.
- Ship-To Name
Displays the name for the specified Ship-To.
- Ship-To Phone
Displays the phone number for the specified Ship-To.
- Address
Displays the specified Ship-To Address. You may manually override the displayed Address information in the fields below—or use the browse button to select another Address. If a new Address is manually entered here, that Address will be added automatically to the master list of Addresses. For additional documentation related to creating Addresses, see Section 8.1, “ New Address”.
- Cust. PO #
Enter a Customer Purchase Order Number, as needed.
- Incident
You have the option to associate an Incident Number with the Return Authorization. The browse button located to the right of the field enables you to select from a list of available Projects.
At the top of the screen, the following buttons are available:
- SAVE
Creates the Return Authorization and saves the Return Authorization information. The SAVE button must be selected in order to save the Return Authorization record. It is not enough to save Return Authorization Line Item information. The Return Authorization header must also be saved.
- CANCEL
Closes the screen without creating a new Return Authorization, returning you to the application desktop.
To create or modify Return Authorization Line Items, select the "Line Items" tab at the top of the "Return Authorization" screen. The following screen will appear:
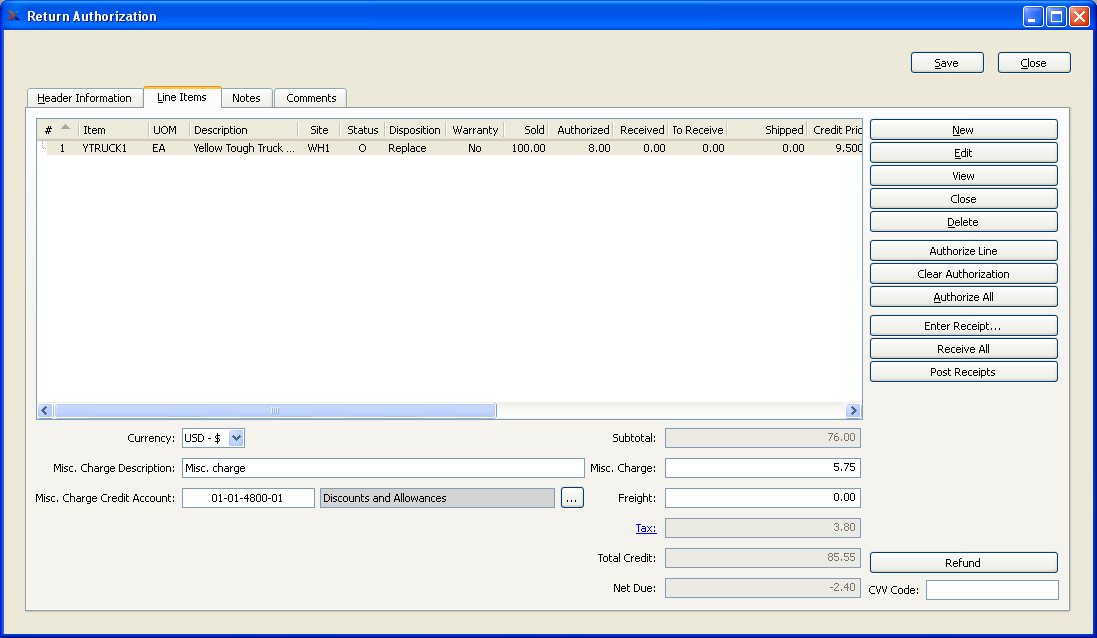
When creating or modifying Return Authorization Line Items, you are presented with the following options:
- Line Items
Display lists Line Items for this Return Authorization. A valid Customer Number must be entered in the "Customer #" field before Line Items can be added to the Return Authorization for all Dispositions except Return. For Kit Items, the Kit components will be given sub line numbers which will be displayed in an indented view.
- Currency
Select which currency will be used for this return.
- Misc. Charge Description
Enter a description to identify the miscellaneous charge.
- Misc. Charge Credit Account
Enter a Credit Account to assign the miscellaneous charge to.
- Subtotal
Displays the subtotal for the Return Authorization Line Items.
- Misc. Charge
Enter the amount of any miscellaneous charge. Before entering a miscellaneous charge amount, you must first assign the charge to a Sales Account and also enter a description of the charge.
Tip
You may only enter miscellaneous charges on a Return Authorization only when a valid credit method is selected and a credit amount has been specified for one or more line items. Once a credit memo has been created against the Return Authorization, the header amounts may not be subsequently modified.
- Freight
Enter the amount of freight charge to be credited on the specified Return Authorization.
- Tax
Displays the total amount of Tax to be charged on the Return Authorization. The Tax amount displayed here represents the total for all Line Item Tax amounts. To get a detailed view of the Tax calculation, click on the Tax link using your mouse.
- Total Credit
Displays the total amount of the Return Authorization credit.
- Net Due
Displays the total net due. The net is determined by adding the total credits with the total sales. If the amount is a negative number, this means the Customer owes you money.
- CVV CODE
Enter the Card Verification Value (CVV) Code found on the back of the specified Credit Card. This may be an optional feature at your site. Contact your Systems Administrator for details.
At the top of and to the far right of the screen, the following buttons are available:
- NEW
Opens screen for creating a new Return Authorization Line Item.
- EDIT
Enables you to edit highlighted Return Authorization Line Items. The edit screen is the same as that for creating a new Return Authorization Line Item—except that when editing, the fields will contain Return Authorization Line Item information. Double-clicking on a Return Authorization Line Item will also bring you to the editing screen.
- VIEW
Highlight a Return Authorization Line Item and then select this button to reach a read-only view of the "Edit" screen.
- CLOSE
Highlight a Return Authorization Line Item and then select this button to close the Return Authorization Line Item. If the highlighted Line Item is already closed, this button will revert to an OPEN button, which may be used to open the closed Line Item.
- DELETE
Highlight a Return Authorization Line Item and then select this button to remove the Return Authorization Line Item from the list.
- AUTHORIZE LINE
Highlight a Return Authorization Line Item and then select this button to authorize the Line Item quantity. This option is available only when an imported original Sales Order is being used—and then, the original Line Item quantity must be shipped before it may be authorized.
- CLEAR AUTHORIZATION
Highlight a Return Authorization Line Item and then select this button to change the authorization quantity to zero for the Line Item.
- AUTHORIZE ALL
Select to authorize the full quantity for all unauthorized Line Items. This option is available only when an imported original Sales Order is being used—and then, the original Line Item quantity must be shipped before it may be authorized.
- ENTER RECEIPT
Highlight an authorized Return Authorization Line Item and then select this button to receive the authorized quantity. The received quantity will be saved for subsequent posting.
- RECEIVE ALL
Select to automatically receive all authorized Line Item quantity. The received quantities will be saved for subsequent posting.
- POST RECEIPTS
Select to post all pending receipts for the Return Authorization.
- REFUND
Select to issue the specified Customer a refund on their Credit Card. This option is only available for credits issued by Credit Card. Your system must also be configured to use Credit Cards for this option to work.
- CVV Code
Enter the Card Verification Value (CVV) Code found on the back of the specified Credit Card. This may be an optional feature at your site. Contact your Systems Administrator for details.
Order Notes added to a Return Authorization are used for internal purposes only. To add Notes to a Return Authorization, select the "Order Notes" tab at the top of the "Return Authorization" screen. The following screen will appear:
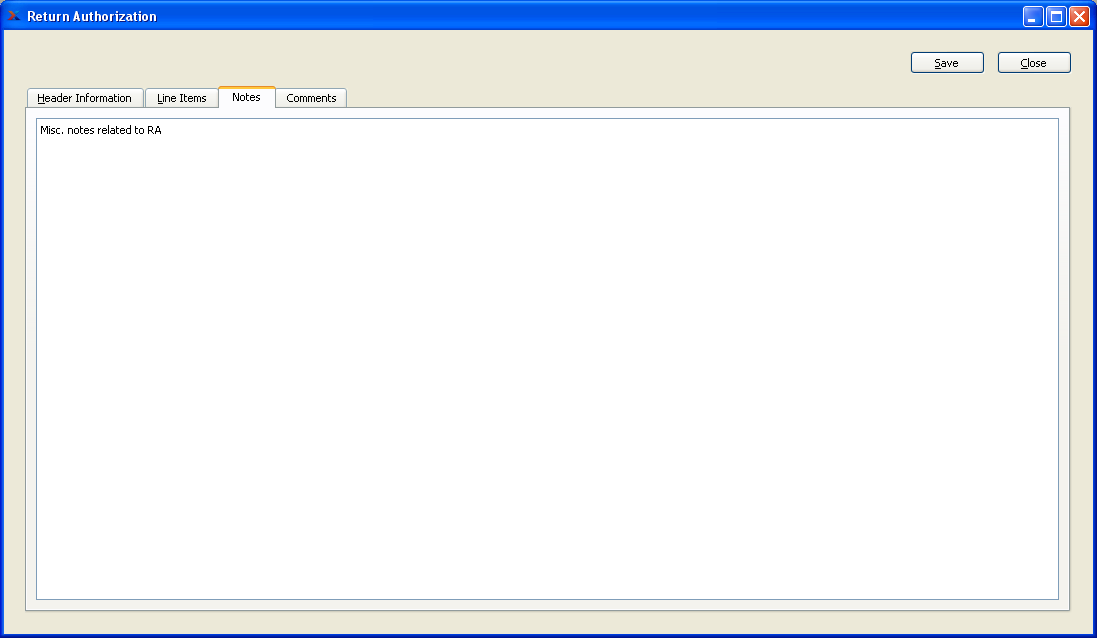
When adding Notes to a Return Authorization, you are presented with the following options:
- Order Notes
This is a scrolling text field with word-wrapping for entering general Notes related to the Return Authorization. These Notes are for internal use only.
To add Comments related to a Return Authorization, select the "Comments" tab. The following screen will appear:
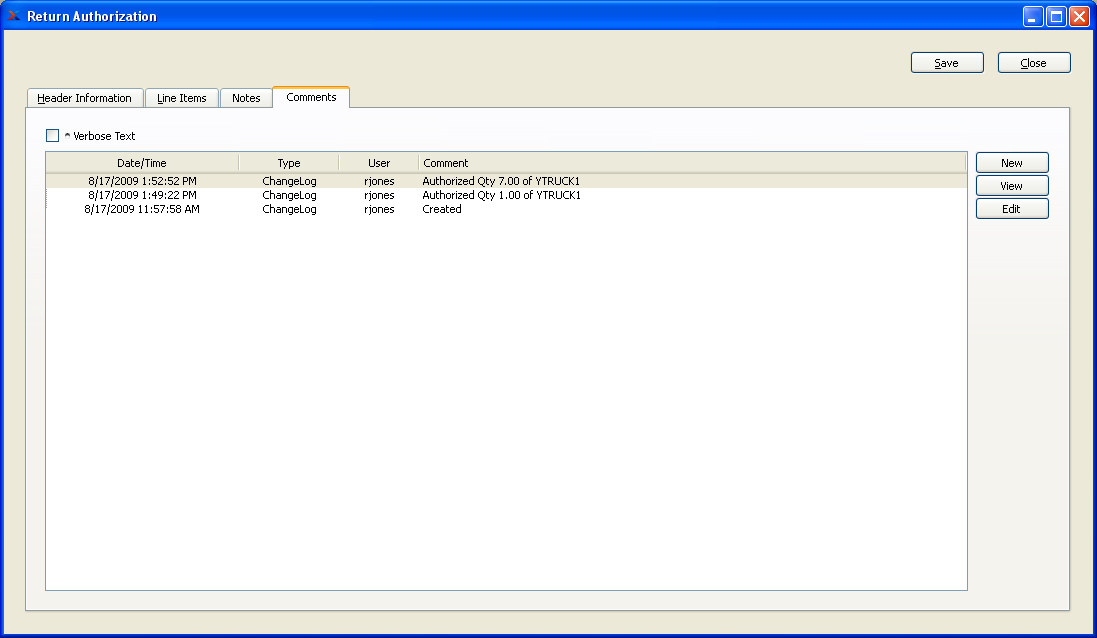
When adding or reviewing Comments, you are presented with the following options:
- Verbose Text
Select to display all Comments in the list in an expanded view which includes the entire text of each Comment. To edit a Comment, simply select the "Edit" link next to the Comment. That link will not be shown for Changelog Comments, which can't be edited. If the "Verbose Text" option is not selected, the Comment list will display only header level information for each Comment.
- Comments
Display lists Comments related to the record.
To the far right of the screen, the following buttons are available:
- NEW
Opens screen for creating a new Comment.
- VIEW
Highlight a Comment and then select this button to reach a read-only view of the "Edit" screen.
- EDIT
Enables you to edit highlighted Comments—as long as the Comments are not "ChangeLog" Comments. ChangeLog Comments are system-generated and may not be edited. The edit screen is the same as that for creating a new Comment—except that when editing, the fields will contain Comment information. Double-clicking on a Comment will also bring you to the editing screen.
To enter a new Comment, select the NEW button. The following screen will appear:
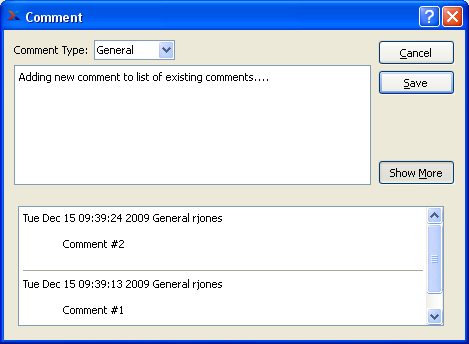
- Comment Type
Select a Comment Type from the drop-down list to classify the Comment. This is a required step. Comment Types may be system-defined (i.e., "ChangeLog" and "General") or user-defined, as described in Section 13.13, “Comment Types”. Once you have specified a Comment Type, begin typing your Comment in the main text area. The text area features word-wrapping and scroll-bar support for longer Comments.
To the far right of the screen, the following buttons are available:
- CANCEL
Closes the screen without creating the Comment, returning you to the previous screen.
- SAVE
Creates the Comment and adds it to the list of Comments.
- SHOW MORE
Select to show the complete list (i.e., "thread") of Comments associated with the record. To hide the list, simply select the SHOW MORE button again. The Comment thread will show the most recent Comment first.
To add a new Return Authorization Line Item, select the NEW button. The following screen will appear:
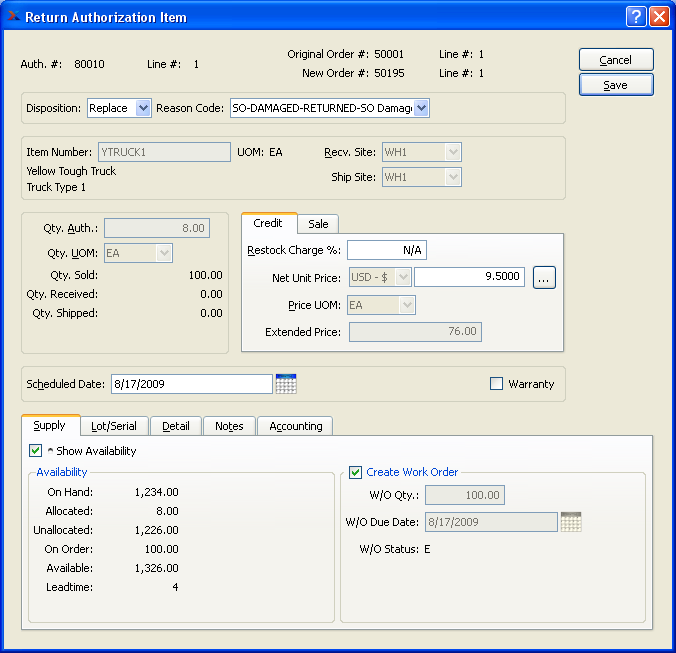
When creating a new Return Authorization Line Item, you are presented with the following options:
- Auth #
Displays the Return Authorization Number specified on the Return Authorization header.
- Line #
Displays the Line Item Number for the current Line Item.
- Original Order #
Displays the original Sales Order Number if the Line Item has been imported into the Return Authorization. Importing Return Authorization Line Items from an original Sales Order is optional only. When Line Items are imported, the original quantities and pricing information are imported also.
- Line #
Displays the original Sales Order Line Item Number.
- New Order #
Displays the Order Number for the new Sales Order created in support of the Return Authorization, if applicable. New Sales Orders will be automatically created for Return Authorizations having the following dispositions: Replace, Service, Ship.
- Line #
Displays the Line Item Number for the new Sales Order.
- Disposition
Line Item dispositions are defaulted conditionally based on the Return Authorization's header-level disposition setting. However, you may manually over-ride the line level disposition when creating or Return Authorization Line Items provided you do so before a quantity has been authorized. The following options are available:
- Credit
Select to authorize the issuing of credit for the specified Item quantity at the specified Price. No return is required or expected.
- Return
Select to authorize the return of the specified Item quantity at the specified Price.
- Replace
Select to authorize the replacement of the specified Item quantity.
- Service
Select to authorize the servicing of an Item for the specified quantity. This disposition is valid only for Items having the Job Item Type. The Price controls will be disabled for this disposition. A new corresponding Sales Order and line will be created if one does not already exist. If any money is to be billed for the service, this should be set at the new Sales Order line item.
- Ship
Select to authorize a shipment of a specified quantity on a new Sales Order. The Price controls will be disabled for this disposition. A new corresponding Sales Order and line will be created if one does not already exist. Any money to be billed should be set on the new Sales Order line item.
- Reason Code
Specify the reason for the Return Authorization. Reason codes are used to explain why a Customer return is being authorized. The Line Item inherits the Reason Code from the header, but may be overridden at the line level.
- Item Number
Enter the Item Number of the Item you want to authorize. The Items you may select will vary depending on the Line Item disposition. For example, only Job Items may be selected for Line Items having the Service disposition. Once an Item Number is entered, the Inventory Unit of Measure and Item description will automatically appear.
If a returned Item is an Average-Cost Item, is linked to a Sales Order, and will result in an Inventory receipt, the Average Cost for the Item on the Sales Order will be pulled into the return Line Item as the default value. If there is no Sales Order to reference, the cost on the receipt will default to the Standard Cost for the Item. If the Item Site is Average Cost, the Unit Cost will actually be editable on the return Line Item, so you can manually or programmatically change the value to whatever makes sense for your business practice.
- Recv. Site
Specify the Site where you want the returned Item quantity to be received.
- Ship Site
Specify the Site where you want authorized Return Authorization quantity to be shipped from. This option is only available for Line Items having a disposition which requires creation of a new Sales Order (i.e., Replace, Service, Ship).
- Qty. Auth.
Enter the quantity of the specified Item you want to authorize.
Note
The quantity authorized is based on the quantity Unit of Measure.
- Qty. UOM
Specify the Unit of Measure to be used when authorizing the Line Item. Sold Items may be assigned multiple Selling UOMs. These alternate UOMs may be defined on the Item master. If a Line Item has no Selling UOM defined, then the Inventory UOM will be used here by default.
- Qty. Sold
Displays the Line Item quantity sold on the original Sales Order line if the Line Item was imported from an original Sales Order.
- Qty. Received
Displays the quantity received against the Return Authorization Line Item to date, if any.
- Qty. Shipped
Displays the Return Authorization Line Item quantity shipped to date, if any. This value applies to Line Items having a corresponding line on a new Sales Order.
- Credit
If the Return Authorizations involves giving a Customer credit for the Line Item, then you may specify the following options:
- Restock Charge %
Enter the amount of any restock charge discount, if any.
- Net Unit Price
Displays the Net Unit Price for the Sales Order Item. This information will be imported automatically for Return Authorizations linked to an original Sales Order if header disposition was Credit or Return when the order was imported. If there is no linked Sales Order, then the system will choose the lower of the following two Prices: A) The most-specific Pricing Schedule Assignment or B) any Sale in effect at the time of Order entry. The specificity of Pricing Schedule Assignments is determined in the following descending order: By Customer Ship-To Address (most specific), by Customer, by Customer Type, by Customer Type pattern, by all Customers. The browse button located to the right of the field leads to a Price List screen.
If your Pricing Schedule has multiple Units of Measure (UOM) on it―or if several Pricing Schedules share the same level of Price specificity, but they have different UOMs―then the UOM which matches the selected UOM will be chosen―that is, as long as the quantity break does not exceed the quantity being priced. If no entry matches the UOM with a quantity break less than the quantity being priced, then the lowest value Price for any UOM will be chosen. To make sure a specific UOM is always chosen at the desired level of Price specificity, then your Pricing Schedules should include at least one UOM with a quantity break of 0.
Note
The Price controls will be automatically disabled for Line Items if a credit method has not been specified or for line items having the following dispositions: Service and Ship.
- Price UOM
The Price Unit of Measure is the same as the Selling UOM. If an Item has Selling UOMs defined, then you will be able to select from between the Inventory UOM and any defined Selling UOMs. If no Selling UOMs have been defined, then the Inventory UOM will be used here by default.
- Extended Price
Displays the Extended Price. The Extended Price for a Line Item is based on the quantity ordered multiplied by the Net Unit Price.
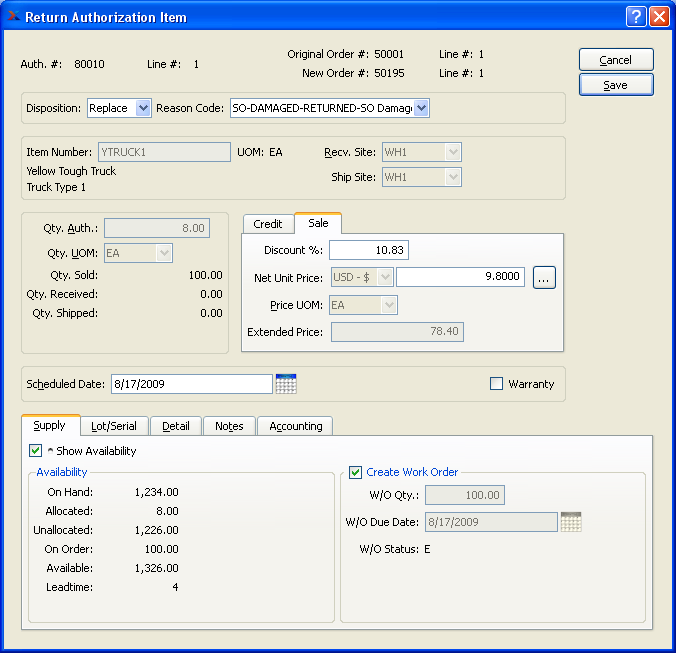
- Sale
If the Return Authorizations involves re-selling the Line Item to the Customer, then you may specify the following options:
- Discount %
Enter the amount of any discount, if any.
- Net Unit Price
Displays the Net Unit Price for the Sales Order Item. This information will be imported automatically for Return Authorizations linked to an original Sales Order if header disposition was Credit or Return when the order was imported. If there is no linked Sales Order, then the system will choose the lower of the following two Prices: A) The most-specific Pricing Schedule Assignment or B) any Sale in effect at the time of Order entry. The specificity of Pricing Schedule Assignments is determined in the following descending order: By Customer Ship-To Address (most specific), by Customer, by Customer Type, by Customer Type pattern, by all Customers. The browse button located to the right of the field leads to a Price List screen.
If your Pricing Schedule has multiple Units of Measure (UOM) on it―or if several Pricing Schedules share the same level of Price specificity, but they have different UOMs―then the UOM which matches the selected UOM will be chosen―that is, as long as the quantity break does not exceed the quantity being priced. If no entry matches the UOM with a quantity break less than the quantity being priced, then the lowest value Price for any UOM will be chosen. To make sure a specific UOM is always chosen at the desired level of Price specificity, then your Pricing Schedules should include at least one UOM with a quantity break of 0.
Note
The Price controls will be automatically disabled for Line Items if a credit method has not been specified or for line items having the following dispositions: Service and Ship.
- Price UOM
The Price Unit of Measure is the same as the Selling UOM. If an Item has Selling UOMs defined, then you will be able to select from between the Inventory UOM and any defined Selling UOMs. If no Selling UOMs have been defined, then the Inventory UOM will be used here by default.
- Extended Price
Displays the Extended Price. The Extended Price for a Line Item is based on the quantity ordered multiplied by the Net Unit Price.
- Scheduled Date
The scheduled date is the date when the Line Item quantity should be shipped. The user who enters the Line Item is responsible for determining the scheduled date. After entering the scheduled date, hit the TAB key on your keyboard to display values in the remaining display only fields.
- Warranty
Select if the Line Item is a warranty Item. If selected, the Cost of Warranty Account will be used when shipping the Line Item, instead of the Cost of Sales Account. It will also be used when receiving warranty Items through a Return Authorization, instead of the Cost of Returns Account.
When entering Return Authorizations you have the ability to view current availability for Line Items. You may also create replenishment Orders if they are needed.
- Show Availability
Select if you want to display Item availability information.
- Availability
If showing Item availability, the following information will be shown:
- On Hand
Displays the current Quantity on Hand value.
- Allocated
Displays the quantity allocated to current Sales Orders and/or Work Orders in the system. An Item is considered allocated to a Sales Order if a Sales Order Line Item exists for the Item—and that Line Item has not yet been issued to Shipping. An Item is considered allocated to a Work Order if the Item is a material requirement—and the material has not yet been issued to the Work Order. Once the current Line Item is saved, the "Allocated" value will increase by the quantity ordered.
- Unallocated
Displays the Quantity on Hand remaining after allocations have been accounted for, as in: QOH - Allocated Qty. = Unallocated Qty.
- On Order
If the Line Item is a manufactured Item, the quantity ordered by current Work Orders will be displayed. If the Line Item is a purchased Item, the quantity ordered by current Purchase Orders will be displayed.
- Available
Displays the available quantity. Available quantity is determined using the following formula: Unallocated Qty. + On Order Qty. = Available Qty.
- Lead Time
Displays the Item Site Lead Time for the specified Line Item.
Tip
The "Show Availability" feature can be turned on or off by default at the system level. If the feature is turned on, the Availability totals will display only after a Scheduled Date has been entered for the Line Item.
- Create Work Order
If the Line Item is a manufactured Item, select this option to automatically create a Work Order for the specified quantity. For make-to-order manufactured Items, this option will be selected automatically. A Work Order will be created to meet the Return Authorization demand once you save the Line Item to the Order. An Item is designated as make-to-order if the "Create W/Os to meet Sales Demand" flag on the Item Site master is selected. A Work Order created automatically from a Return Authorization Line Item will assume the same Order Number as the new Sales Order the Return Authorization Line Item is associated with—even if that Order Number has already been used by a previous Work Order.
- W/O Qty.
The quantity ordered by the Line Item will display here.
- W/O Due Date
By default, the scheduled date of the Line Item will display here.
- W/O Status
Displays the current status of the Work Order.
To the far right of the screen, the following buttons are available:
- CANCEL
Closes the screen without creating a new Return Authorization Line Item, returning you to the Return Authorization header.
- SAVE
Creates the new Return Authorization Line Item and adds it to the list of Return Authorization Line Items. If "Create Work Order" is specified, the associated Work Order will also be created.
For Lot/Serial Items, you have the option to authorize only specific Lot/Serial quantities. The "Lot/Serial" tab will only be enabled for Lot/Serial Items. To authorize specific Lot/Serial quantities, select the "Lot/Serial" tab. The following screen will appear:
When authorizing specific Lot/Serial quantities, you are presented with the following options:
- Lot/Serial
Displays any Lot/Serial quantities specifically authorized for the Return Authorization.
- Authorize only these Lot/Serial Numbers
Select to enable the Lot/Serial selection process. When this option is selected, you will be able to select specific Lot/Serial quantities for authorization.
To the far right of the screen, the following buttons are available:
- NEW
Opens screen for creating a new Lot/Serial authorization.
- EDIT
Enables you to edit highlighted Lot/Serial authorization. The edit screen is the same as that for creating a new Lot/Serial authorization—except that when editing, the fields will contain Lot/Serial authorization information. Double-clicking on a Lot/Serial authorization will also bring you to the editing screen.
- DELETE
Highlight a Lot/Serial authorization and then select this button to remove the Lot/Serial authorization from the list.
To view Costs or adjust Tax information for a Return Authorization Line Item, select the "Detail" tab at the bottom of the screen, as shown below:
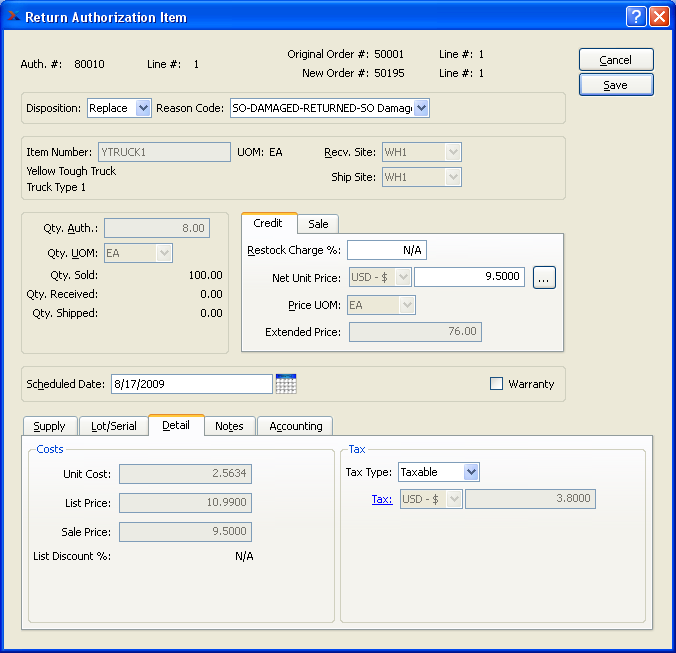
When viewing Costs or adjusting Tax information for a Return Authorization Line Item, you are presented with the following options:
- Unit Cost (Inv. UOM)
Displays the Standard Cost per unit based on the Inventory Unit of Measure.
- List Price
Displays the sales List Price per unit.
- Customer Price
Displays the Price given to the specified Customer. Special Customer Prices can be set for individual Customers or Customer Groups by using a Pricing Schedule.
- List Discount %
Displays the percentage discount off the List Price. Indicates the difference between the List Price for an Item and the Net Unit Price as a percentage. This is the margin between the Net Unit Price and the List Price.
- Tax
The following Tax options are available, should you need to override the Tax Selection settings for the Line Item:
- Tax Type
Specify the Tax Type for the Line Item. If the Item master does not have a Tax Type for the Return Authorization's Tax Authority, then no Tax will be charged.
- Tax
Displays the amount of Tax to be charged for the Line Item quantity. To get a detailed view of the Tax calculation, click on the Tax link using your mouse.
To enter Notes related to a Return Authorization Line Item, select the "Notes" tab at the bottom of the screen, as shown below:

When adding Notes related to a Return Authorization Line Item, you are presented with the following options:
- Notes
This is a scrolling text field with word-wrapping for entering general Notes related to the Return Authorization Line Item.
Tip
If a Return Authorization Item is marked to create a Work Order, the Production Notes for the created Work Order will contain the Sales Order Number, the Customer Name, and any additional Sales Order Line Item Notes.
To define an alternate Cost of Sales Account for a Return Authorization Line Item, select the "Accounting" tab at the bottom of the screen, as shown below:
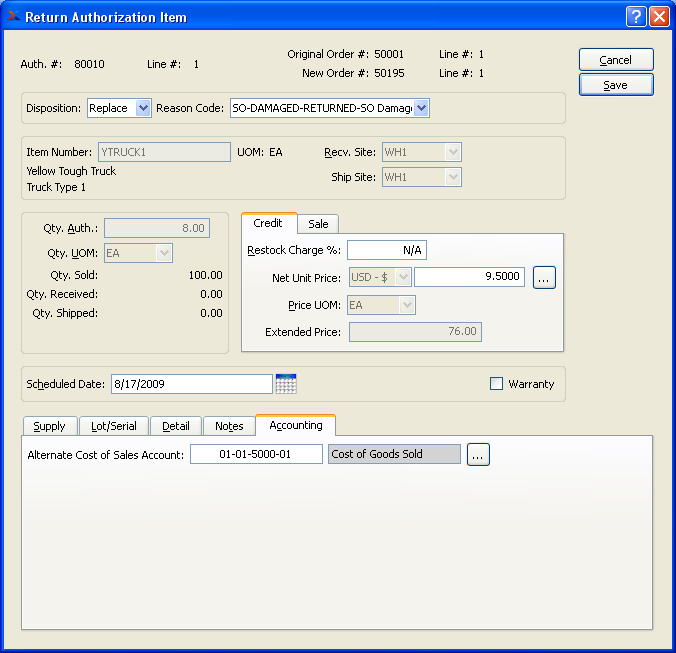
When defining an alternate Cost of Sales Account for a Return Authorization Line Item, you are presented with the following options:
- Alternate Cost of Sales Account
Specify an alternate Account to be used for the Cost of Sales. The Account you specify will be used instead of the typical Account pre-defined in the Sales Account Assignments.
To authorize specific Lot/Serial quantities, select the NEW button. The following screen will appear:

When authorizing specific Lot/Serial quantities, you are presented with the following options:
- Item Number
Displays the Item Number specified for the Return Authorization Item. The Inventory Unit of Measure and Item description will automatically appear.
- UOM
Inventory Unit of Measure.
- Lot/Serial #
Select a pre-existing Lot/Serial Number for the Item. Or create a new Lot/Serial Number manually.
- Qty. Auth.
Enter the quantity of the specified Lot/Serial quantity you want to authorize.
Note
The quantity authorized is based on the quantity Unit of Measure.
- Qty. Registered
Displays the Lot/Serial quantity already registered. To learn more about Lot/Serial registration, see Section 7.1, “Lot/Serial Registration”.
- Qty. Received
Displays the quantity received against the Return Authorization Line Item to date, if any.
To the far right of the screen, the following buttons are available:
- CANCEL
Closes the screen without authorizing specific Lot/Serial quantities, returning you to the previous screen.
- SAVE
Creates the new Lot/Serial quantity authorization and adds it to the list of Lot/Serial authorizations for the Return Authorization Item.
To display open Return Authorizations by Site, select the "List Open Return Authorizations" option. The following screen will appear:
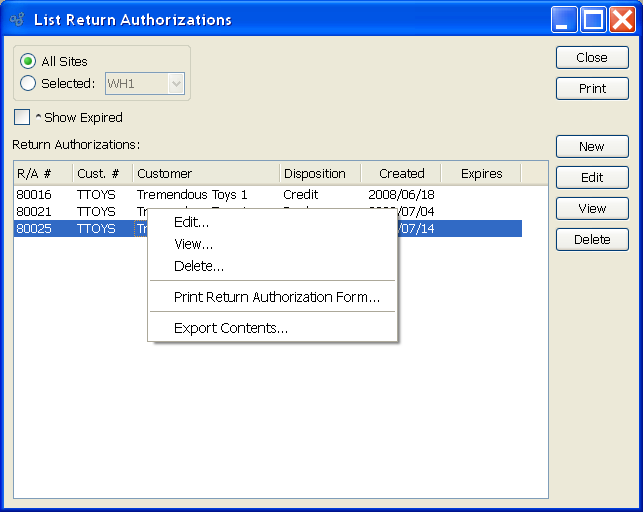
When displaying open Return Authorizations, you are presented with the following options:
- All Sites
Select to display a list of open Return Authorizations for all Sites.
- Selected
Specify Site whose open Return Authorizations you want to display.
- Show Expired
Select to include expired Return Authorizations in the display.
- Return Authorizations
Display lists open Return Authorizations.
- Automatically Update
Select to automatically update the display every five minutes.
To the far right of the screen, the following buttons are available:
- CLOSE
Closes the screen, returning you to the application desktop.
Runs the report associated with this screen.
- NEW
Opens screen for creating a new Return Authorization.
- EDIT
Enables you to edit highlighted Return Authorizations. The edit screen is the same as that for creating a new Return Authorization—except that when editing, the fields will contain Return Authorization information. Double-clicking on a Return Authorization will also bring you to the editing screen.
- VIEW
Highlight a Return Authorization and then select this button to reach a read-only view of the "Edit" screen.
- DELETE
Highlight a Return Authorization and then select this button to remove the Return Authorization from the master list
The Return Authorization Workbench is designed to help manage and process open Return Authorizations—and to process credits and refunds. The Return Authorization Workbench appears as follows:
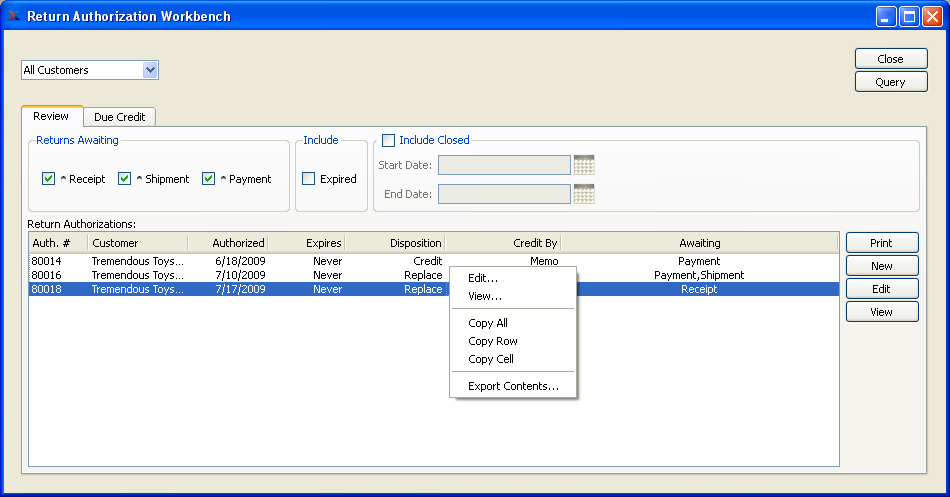
When processing open Return Authorizations, you are presented with the following options:
- Customer
Select to display Return Authorizations for one of the following Customer options:
- All Customer Types
Select to display Return Authorizations for all Customer Types.
- Select
Specify Customer whose Return Authorizations you want to display.
- Customer #
Enter the Customer Number of the Customer whose Return Authorizations you want to display. The browse button located to the right of the field leads to a searchable Customers list. You may also access this list using the keyboard shortcut "CTRL + L". Once a Customer Number is entered, the Customer name and billing address will display. Select the "?" symbol next to the browse button to view Customer information for the specified Customer.
- Customer Type
Specify the Customer Type whose Return Authorizations you want to display.
- Customer Type Pattern
Enter a Customer Type pattern to select a range of Customer Types. Refine your search using Regular Expressions.
- Returns Awaiting
Return Authorizations may exist in several stages of readiness. Choose which of the following stages you want to include in the display:
- Receipt
Select to include Return Authorizations waiting for Customer returns to be posted as received.
- Shipment
Select to include Return Authorizations waiting to be shipped to Customers.
- Payment
Select to include Return Authorizations waiting for Customer payment.
- Include
You may choose to include the following optional information:
- Expired
Select to include expired Return Authorizations in the display. If not selected, expired Return Authorizations will not be included.
- Include Closed
You may choose to include closed Return Authorizations within a specified date range:
- Start Date
Closed Return Authorizations entered on and after this date will be displayed.
- End Date
Closed Return Authorizations entered on and before this date will be displayed.
- Return Authorizations
Display lists Return Authorizations by Customer or Customer Type, using the specified parameters.
To the far right of the screen, the following buttons are available:
- CLOSE
Closes the screen, returning you to the application desktop.
- QUERY
Select to generate the display, using the specified parameters.
Runs the report associated with this screen.
- NEW
Select to create a new Return Authorization.
- EDIT
Enables you to edit highlighted Return Authorization. The edit screen is the same as that for creating a new Return Authorization—except that when editing, the fields will contain Return Authorization information. Double-clicking on a Return Authorization will also bring you to the editing screen.
Tip
Some of the processing required for a Return Authorization (e.g., posting Receipts) may be handled on the Return Authorization header, which you can reach by using the EDIT button.
- VIEW
Highlight a Return Authorization and then select this button to reach a read-only view of the "Edit" screen.
Using the Return Authorization Workbench you have the ability to process Customer returns where credit is due. To process Customer returns due credit, select the "Due Credit" tab. The following screen will appear:
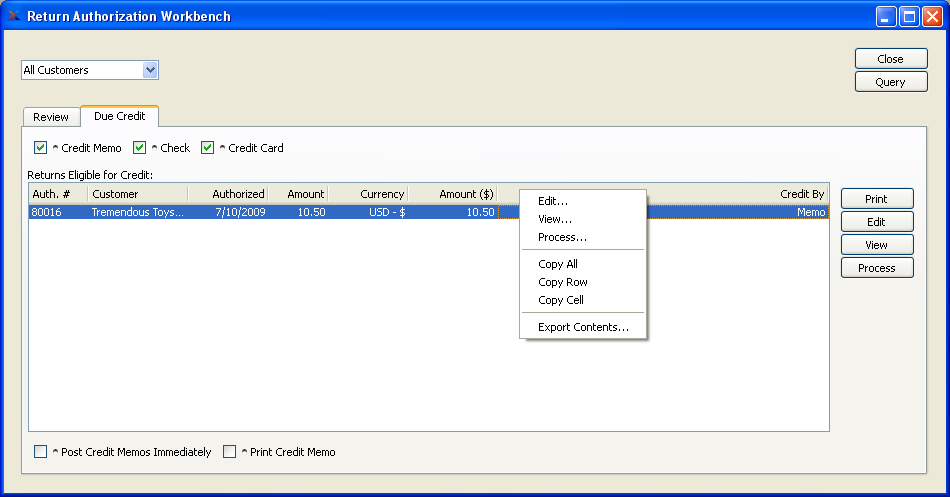
When processing Customer returns due credit, you are presented with the following options:
- Credit Memo
Select to include Customer returns eligible for a Credit Memo in the display.
Note
Customer returns handled by Return Authorizations are handled outside the normal sales Credit Memo Inventory handling process. By default, Credit Memo Line Items created from a Return Authorization will show a quantity returned value equal to zero.
- Check
Select to include Customer returns eligible for payment by Check in the display.
- Credit Card
Select to include Customer returns eligible for a Credit Card refund in the display.
- Returns Eligible for Credit
Display lists Customer returns eligible for credit, using the specified parameters.
- Post Credit Memos Immediately
Select if you want processed Credit Memos to be posted immediately after they are created. If processing a check or credit card, this option is not available as the credit memo must automatically post in order to process a check or credit card against it.
- Print Credit Memo
Select if you want Credit Memos to be printed when you select the PROCESS button.
To the far right of the screen, the following buttons are available:
- CLOSE
Closes the screen, returning you to the application desktop.
- QUERY
Select to generate the display, using the specified parameters.
Runs the report associated with this screen.
- EDIT
Enables you to edit highlighted Return Authorization. The edit screen is the same as that for creating a new Return Authorization—except that when editing, the fields will contain Return Authorization information. Double-clicking on a Return Authorization will also bring you to the editing screen.
Tip
Some of the processing required for a Return Authorization (e.g., posting Receipts) may be handled on the Return Authorization header, which you can reach by using the EDIT button.
- VIEW
Highlight a Return Authorization and then select this button to reach a read-only view of the "Edit" screen.
- PROCESS
Highlight a Return Authorization and then select this button to create a Sales Order Credit Memo for the selected item. The S/O Credit Memo will be added to the list of unposted Credit Memos in an unprinted state. However, you may print the Credit Memo as you process it by selecting the "Print Credit Memo" option. If you select the "Post Credit Memos Immediately" option, then the Credit Memo will be posted as soon as it is created.
If the Customer specified on the Credit Memo has an EDI Profile attached, you may encounter an EDI processing interface when printing it.