System Master Information section.
To enter information about your database, select the "Database Information" option. The following screen will appear:
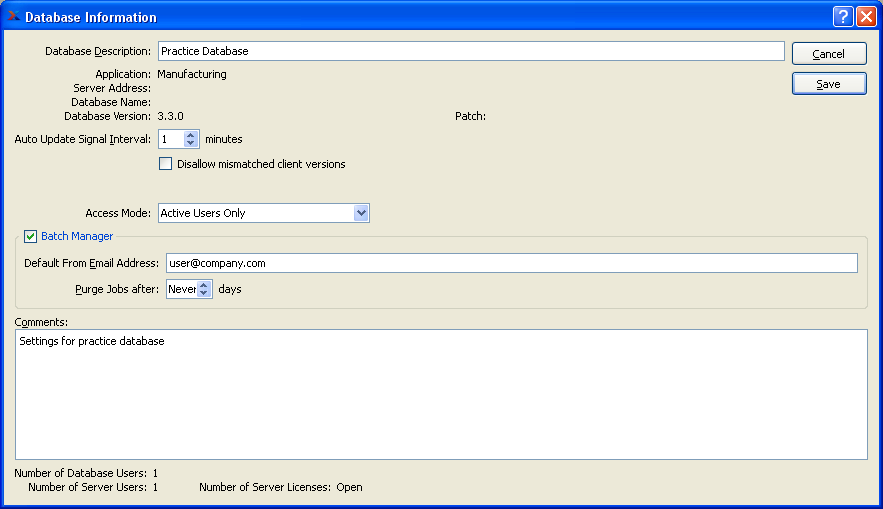
When entering Database information, you are presented with the following options:
- Database Description
The description entered here will be displayed in the Title Bar of the main window. This field is typically used to store company names and/or the particular name of the server where the server software is running (e.g., "ABC Manufacturing - Production Server").
- Application
Displays the xTuple ERP edition of the database running on your server.
- Server Address
Displays the unique network address assigned to the server. This will typically show a TCP/IP Address or Network Host Name.
Note
The network address for the server is set using the OPTIONS button found on the login screen you see when logging into the application. The server address initially assigned to a user will display in the "Server Address" field. If the server address is ever changed, you will need to notify all users to update their login options.
- Database Name
Displays the default name of the database running on your server.
Tip
If you ever change or rename your database, you will need to notify all users to update their login options.
- Database Version
Displays the version of the database running on your server.
- Patch
This field will show the contents, if any, of the metric field ServerPatchVersion so users can tell what if any patches have been applied to the database.
- Auto Update Signal Interval
Many screens in the application have an Auto Update option. Specify how frequently you want the auto update signal to be refreshed.
- Disallow Mismatched Client Versions
This flag prevents users from running client versions that are different than the version the database is running on.
- Access Mode
Specify one of the following options to determine which users should be able to access the database:
- Active Users Only
Select to allow any active database users to access the database.
- Admin Users Only (Maintenance Mode)
Select to allow only system admin users to access the database. This is a useful mode during periods when you are performing database maintenance and don't want end users accessing the system.
- Any Users not Inactive
Select to allow any users who are either active or undefined to access the database. This option differs from the "Active Users Only" option because it also allows PostgreSQL server users to access the database, even though they may not have a user account on the database. In other words, the user is defined on the server but not on the database. This option could be useful when loading new databases which haven't had all their users defined yet. Undefined users will be allowed to access the database. However, they will need a system admin to grant them privileges to fully use the system.
- Batch Manager
If you have the Batch Manager installed on your system and you want to enable/activate it, then select this option. Once selected, any jobs submitted to the Batch Manager will be processed. If the option is not selected, then jobs submitted to the Batch Manager will not be processed. The following options should also be specified:
- Default Batch Email Address
Enter an email address to be used as the default "From" address in situations when no other "From" address is specified. For example, this feature would apply if when scheduling an Invoice for email delivery no email address is entered in the "From" field.
- Purge Batch Jobs after
Specify how frequently (in days) you want to purge already-completed Batch Manager jobs.
- Comments
This is a scrolling text field with word-wrapping for entering Comments related to your database.
- Number of Database Users
Displays the number of concurrent Database users.
- Number of Server Users
Displays the number of concurrent server users.
- Number of Server Licenses
Displays the number of licenses available for your server.
Note
Only users with the appropriate privileges will be permitted to change Database information. For all other users, this screen will be view-only.
To the far right of the screen, the following buttons are available:
- CANCEL
Closes the screen, returning you to the application desktop.
- SAVE
Saves the specified Database information, returning you to the application desktop.
This button will not appear if you have not been assigned the appropriate privileges.
You can store various types of Images in an database for later reference. For example, you may want to store an Image of your company logo to display on printed Invoices. Users who have been granted the "MaintainImages" privilege will have the ability to load and maintain Images. The following list shows the supported Image formats:
To access the master list of stored Images, select the "Images" option. The following screen will appear:
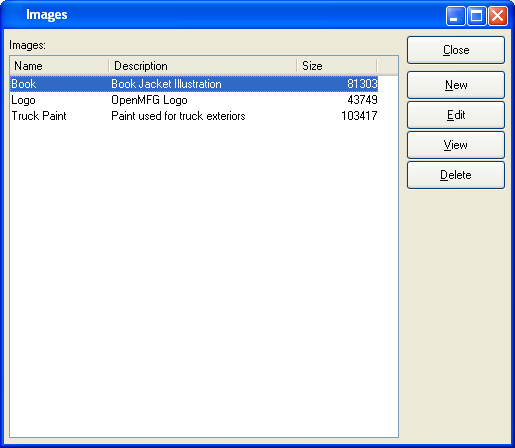
The Images master list displays information on all stored Images, including Image name, Image description, and Image file size.
To the far right of the list, the following buttons are available:
- CLOSE
Closes the screen, returning you to the application desktop.
- NEW
Opens screen for adding a new Image to the master list of stored Images.
- EDIT
Enables you to edit highlighted Image definitions. The edit screen is the same as that for creating a new Image definition—except that when editing, the fields will contain Image information. Double-clicking on an Image definition will also bring you to the editing screen.
- VIEW
Highlight an Image definition and then select this button to reach a read-only view of the "Edit" screen.
- DELETE
Highlight an Image definition and then select this button to remove the Image from the master list.
To add a new Image to the master list of stored Images, select the NEW button. The following screen will appear:
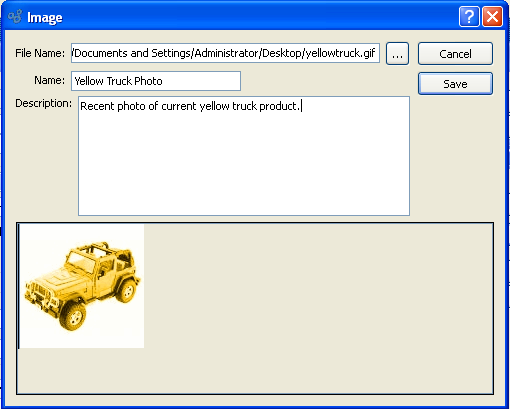
When adding a new Image to the master list of stored Images, you are presented with the following options:
- File Name
Enter the physical directory location of the Image. The browse button enables you to search your system for the physical directory location of the Image file. Once you locate the file, simply select it to have it entered into the "File Name" field.
- Name
Enter a unique Image name.
- Description
Enter a brief description of the Image.
To the far right of the screen, the following buttons are available:
- CANCEL
Closes the screen without adding a new Image to the master list of stored Images.
- SAVE
Creates the Image and adds it to the master list of stored Images.
To access the master list of available Form definitions, select the "Forms" option. The following screen will appear:
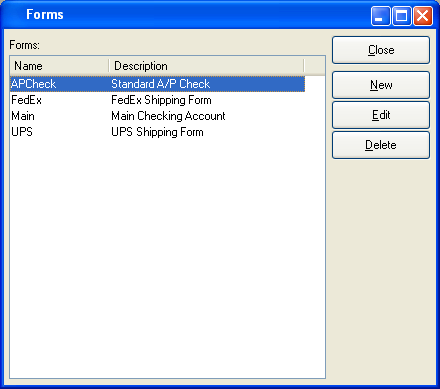
The Forms master list displays information on all available Form definitions, including Form name and Form description.
To the far right of the list, the following buttons are available:
- CLOSE
Closes the screen, returning you to the application desktop.
- NEW
Opens screen for adding a new Form definition to the Forms master list.
- EDIT
Enables you to edit highlighted Form definitions. The edit screen is the same as that for creating a new Form definition—except that when editing, the fields will contain Form information. Double-clicking on a Form will also bring you to the editing screen.
- DELETE
Highlight a Form and then select this button to remove the Form from the master list.
To create a new Form definition, select the NEW button. The following screen will appear:
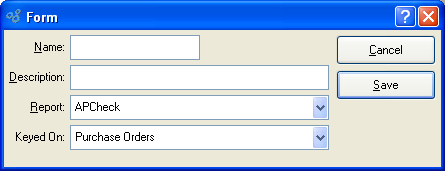
When creating a new Form definition, you are presented with the following options:
- Name
Enter a unique Form name.
- Description
Enter a brief description of the Form.
- Report
Specify the report definition you want to associate with the Form.
Tip
In the case where you have multiple versions (i.e., grades) of the same-named report definition, it doesn't matter which one you select when setting up a Form. The system will always use the report definition having the highest grade.
- Keyed On
Specify where in the application you want the report definition to be cross referenced. For example, selecting "Work Orders" will make the specified report definition available to the "Print Work Order Form" screen. The system supports the following keyed on cross-references:
Customers
Items
Item Sites
Purchase Orders
Sales Orders
Vendors
Work Orders
Sales Analysis - Special Calendar
Production Entry Sheets
Return Authorizations
To the far right of the screen, the following buttons are available:
- CANCEL
Closes the screen without adding a new Form to the master list.
- SAVE
Creates the Form and adds it to the Forms master list.
To access the master list of available Label Form definitions, select the "Label Forms" option. The following screen will appear:
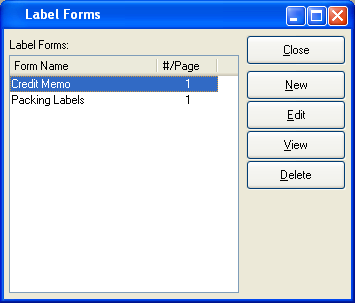
The Label Forms master list displays information on all available Label Form definitions, including Label Form name and number of labels per page.
To the far right of the list, the following buttons are available:
- CLOSE
Closes the screen, returning you to the application desktop.
- NEW
Opens screen for adding a new Label Form definition to the master list of Label Forms.
- EDIT
Enables you to edit highlighted Label Form definitions. The edit screen is the same as that for creating a new Label Form definition—except that when editing, the fields will contain Label Form information. Double-clicking on a Label Form will also bring you to the editing screen.
- DELETE
Highlight a Label Form and then select this button to remove the Label Form from the master list.
To create a new Label Form definition, select the NEW button. The following screen will appear:
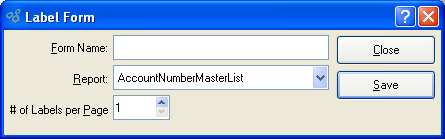
When creating a new Label Form definition, you are presented with the following options:
- Name
Enter a unique Label Form name.
- Report
Specify the report definition you want to associate with the Label Form.
Tip
In the case where you have multiple versions (i.e., grades) of the same-named report definition, it doesn't matter which one you select when setting up a Form. The system will always use the report definition having the highest grade.
- # of Labels per Page
Select a value between 1 and 99 using the arrow buttons located to the right of the field.
Value entered dictates the number of Label Forms to be printed per page.
To the far right of the screen, the following buttons are available:
- CLOSE
Closes the screen without adding a new Label Form to the master list.
- SAVE
Creates the Label Form and adds it to the Label Forms master list.
Throughout the application you have the ability to sort data and schedule activities according to specified time periods—or Calendars. Any users granted the "MaintainCalendars" privilege have the ability to define and maintain Calendars. To access the master list of Calendars, select the "Calendars" option. The following screen will appear:
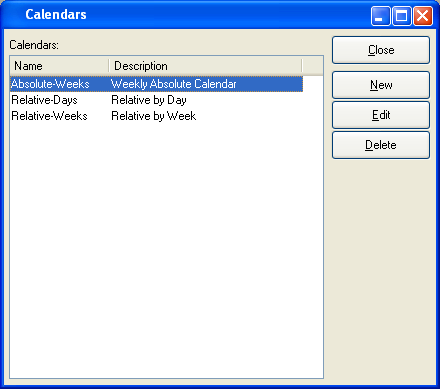
The "Calendar Master List" screen displays information on all existing Calendars, including Calendar name and Calendar description.
To the far right of the screen, the following buttons are available:
- CLOSE
Closes the screen, returning you to the application desktop.
- NEW
Opens screen for creating a new Calendar type.
- EDIT
Enables you to edit highlighted Calendar definitions. The edit screen is the same as that for creating a new Calendar definition—except that when editing, the fields will contain Calendar information. Double-clicking on a Calendar definition will also bring you to the editing screen.
- DELETE
Highlight a Calendar definition and then select this button to remove the Calendar from the list.
To create a new Calendar, select the NEW button. The following screen will appear:
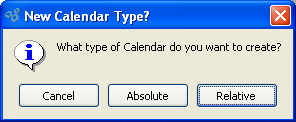
When determining the type of Calendar you want to create, you are presented with the following options:
- CANCEL
Closes the screen without creating a new Calendar, returning you to the previous screen.
- ABSOLUTE
Opens screen for creating a new absolute Calendar. Absolute Calendars consist of fixed time periods with specific dates defining the periods. The following example illustrates the kind of fixed time period to be found in an absolute Calendar: "01/01/2002 to 03/31/2002".
- RELATIVE
Opens screen for creating a new relative Calendar. Relative Calendars are more dynamic than absolute Calendars, allowing you to define time periods in relation to a point in time. Examples of points in time that relative Calendar periods might be defined in relation to include the following: "Current Day" or "Beginning of Current Month" or "Beginning of Next Quarter".
Regardless of which Calendar type you select, the following screen will appear:
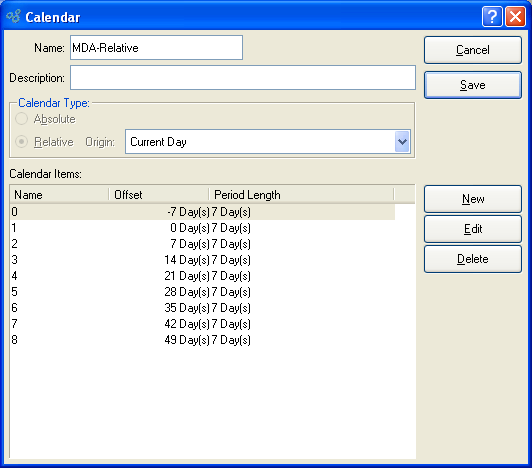
When creating a new Calendar, you are presented with the following options:
- Name
Enter a unique Calendar name.
- Description
Enter a brief description of the Calendar.
- Calendar Type
One of the following options will be selected:
- Absolute
Option will be selected if you specified absolute Calendar.
- Relative
Option will be selected if you specified relative Calendar.
- Origin
Specify the origin point for your relative Calendar.
- Calendar Items
Display lists Calendar Items for the specified Calendar. For relative Calendars, columns in the display include Calendar Item name, offset, and period length. For absolute Calendars, columns in the display include Calendar Item name, start date, and period.
To the far right of the screen, the following buttons are available:
- CANCEL
Closes the screen, returning you to the previous screen.
- SAVE
Creates the Calendar, returning you to the previous screen.
- NEW
Opens screen for creating a new Calendar Item.
- EDIT
Enables you to edit highlighted Calendar Items. The edit screen is the same as that for creating a new Calendar Item—except that when editing, the fields will contain Calendar Item information. Double-clicking on a Calendar Item will also bring you to the editing screen.
- DELETE
Highlight a Calendar Item and then select this button to remove the Calendar Item from the list.
To add a new Calendar Item to a Calendar, select the NEW button. The following screen will appear if the specified Calendar is an absolute Calendar:
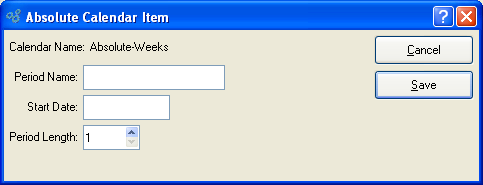
When creating a new Calendar Item for an absolute Calendar, you are presented with the following options:
- Calendar Name
Displays name of Calendar.
- Period Name
Enter a unique name to identify the absolute Calendar Item.
- Start Date
Date entered describes when Calendar Item period will begin.
- Period Length
Select a value between 1 and 999 using the arrow buttons located to the right of the field. Value entered dictates the length of the specified time period, measured in days.
To the far right of the screen, the following buttons are available:
- CANCEL
Closes the screen without creating a new absolute Calendar Item, returning you to the previous screen.
- SAVE
Creates the absolute Calendar Item and adds it to the list of Calendar Items.
The following screen will appear if the specified Calendar is a relative Calendar:
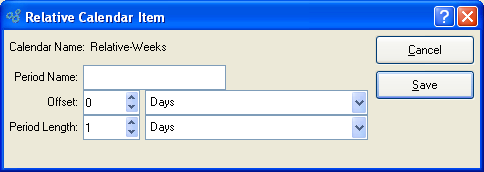
When creating a new Calendar Item for a relative Calendar, you are presented with the following options:
- Calendar Name
Displays name of Calendar.
- Period Name
Enter a unique name to identify the relative Calendar Item.
Note
Negative numbers may be used when defining an Offset period in a relative Calendar. This enables you to view data prior to the current period, for example.
- Offset
Select a value between -999 and 999 using the arrow buttons located to the right of the field. The offset is used to indicate the length of time a period is removed from a given starting point—for example, the current day, the current week, etc. Specify the type of interval to be used for the offset by selecting one from the list in the adjacent field. There are four different offset interval types to choose from: days, weeks, months, and years.
- Period Length
Select a value between 0 and 999 using the arrow buttons located to the right of the field. The period length dictates the length of the specified period. Specify the type of interval to be used for the period by selecting one from the list in the adjacent field. There are four different period interval types to choose from: days, weeks, months, and years.
To the far right of the screen, the following buttons are available:
- CANCEL
Closes the screen without creating a new relative Calendar Item, returning you to the previous screen.
- SAVE
Creates the relative Calendar Item and adds it to the list of Calendar Items.
The system support for multi-currency begins with the definition of multiple Currencies. In fact, the way to turn on multi-currency support is to define two or more Currencies on the master list of Currencies. Once two Currencies are defined, you will see multi-currency support integrated throughout the application. If you prefer not to use multi-currency at your site, then simply define a base Currency only—and no secondary Currencies.
Caution
You must define a base Currency, even if you do not plan to use multi-currency. System administrators must ensure that a base Currency is defined—and that it is defined accurately.
The base Currency is the Currency used for all General Ledger (G/L) transactions. Only one base Currency may be defined per each database. Any transactions conducted in a foreign Currency will be converted automatically to the base Currency (using the prevailing Exchange Rate) before they are posted to the G/L.
Warning
Once you post a transaction using multi-currency support, you cannot turn off multi-currency from that point forward. Either you implement multi-currency or you don"t. There is no middle ground. System-level privileges are available to prevent users from accessing Currency and Exchange Rate functionality.
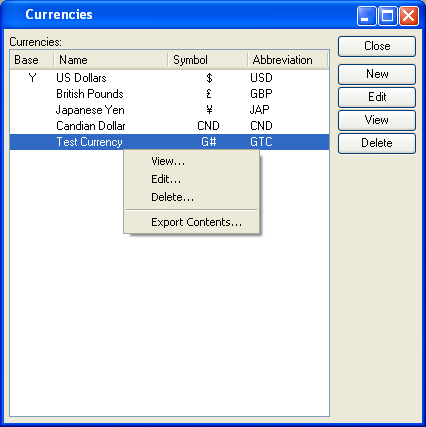
To access the master list of Currencies, select the "Currencies" option. The following screen will appear:
Tip
Standard Currency information for most Countries is provided by default as part of Section 13.10, “Countries”. Simply select this information by Country when setting up multiple Currencies.
The Currencies master list displays information on all Currencies, including base Currency indicator, Currency name, Currency symbol, and Currency abbreviation.
To the far right of the list, the following buttons are available:
- CLOSE
Closes the screen, returning you to the application desktop.
- NEW
Opens screen for adding a new Currency to the master list of Currencies.
- EDIT
Enables you to edit highlighted Currency definitions. The edit screen is the same as that for creating a new Currency definition—except that when editing, the fields will contain Currency information. Double-clicking on a Currency definition will also bring you to the editing screen.
- VIEW
Highlight a Currency definition and then select this button to reach a read-only view of the "Edit" screen.
- DELETE
Highlight a Currency definition and then select this button to remove the Currency from the master list.
To add a new Currency to the master list of Currencies, select the NEW button. The following screen will appear:
Tip
Standard Currency information for most Countries is provided by default as part of the standard Country list: Section 13.10, “Countries”. Simply select this information by Country when setting up multiple Currencies.
When adding a new Currency to the master list of Currencies, you are presented with the following options:
- Name
Enter a name to describe the Currency.
- Symbol
Enter a symbol to identify the Currency. Use special keyboard characters to enter special Currency symbols. For example, under Windows, you can create the symbol for Japanese Yen by using the following keys: ALT + 0165. If you change the symbol for your base Currency, you must restart the application to ensure the change is populated throughout the system.
- Abbreviation
Enter an abbreviation to identify the Currency.
- Base Currency
Specify whether the Currency is the base Currency. The base Currency is the Currency used for all General Ledger (G/L) transactions. Only one base Currency may be defined per each database. Any transactions conducted in a foreign Currency will be converted automatically to the base Currency (using the prevailing Exchange Rate) before they are posted to the G/L.
Tip
Choose your base Currency carefully. Once you indicate a given Currency is the base Currency, you will not be able to change that selection using the application. Consult your system administrator if this situation occurs.
To the far right of the screen, the following buttons are available:
- CANCEL
Closes the screen without adding a new Currency to the master list of Currencies.
- SAVE
Creates the Currency and adds it to the master list of Currencies.
- SELECT
Choose this button to select Currency information by Country from the Countries table.
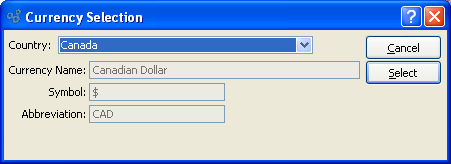
To select Currency information by Country, choose the SELECT button. The following screen will appear:
Tip
Make any changes to the Currency information for a Country on the Country master screen.
When selecting Currency information by Country, you are presented with the following options:
- Country
Specify the Country you want to assign the Currency to.
- Currency Name
Displays the name of the Currency for the specified Country.
- Symbol
Displays the symbol for the Currency of the specified Country.
- Abbreviation
Displays the abbreviation for the Currency of the specified Country.
To the far right of the screen, the following buttons are available:
- CANCEL
Closes the screen without selecting Currency information by Country.
- SELECT
Choose this button to select the Currency information for the specified Country.
Exchange Rates are used to determine the value of foreign Currency—in relation to the base Currency—on a given date. They are also used to convert the value of transactions involving foreign Currencies to the base Currency when the transactions are posted. This conversion to base Currency is required because all transactions posted to the General Ledger (G/L) are posted in base Currency.
Note
The system will post Exchange Rate variances whenever fluctuating Exchange Rates result in Currency gains or losses. The Currency gain/loss Account is defined on the Configure G/L screen.
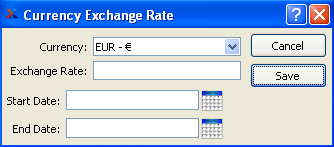
To access the master list of Exchange Rates, select the "Exchange Rates" option. The following screen will appear:
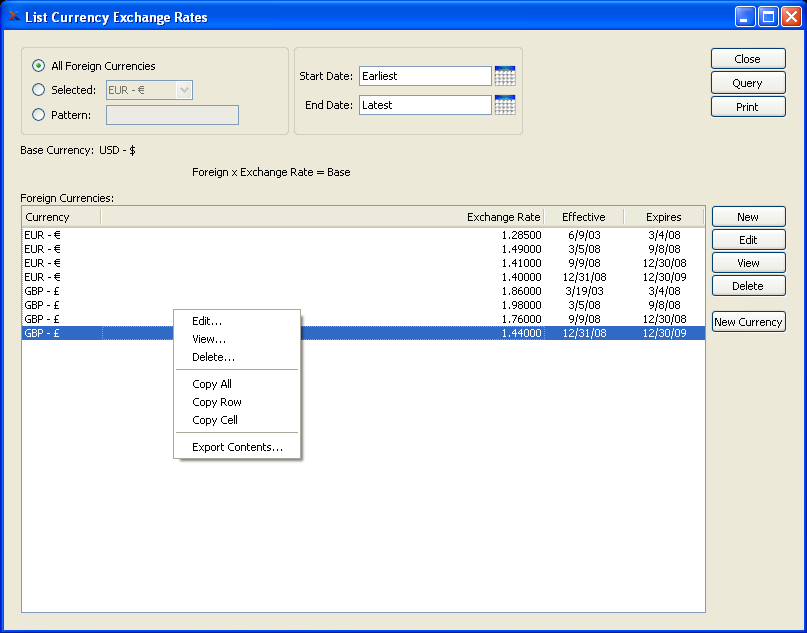
The Exchange Rates master list displays information on all Exchange Rates. The following options are available:
- All Foreign Currencies
Select to display Exchange Rates for all foreign Currencies.
- Selected
Specify the foreign Currency whose Exchange Rates you want to display.
- Pattern
Enter a foreign Currency pattern to select a range of foreign Currencies. Refine your search using Regular Expressions.
- Base Currency
Displays the base Currency defined for the database you are connected to.
- Start Date
Exchange Rates effective on and after this date will be displayed. This is a required field.
- End Date
Exchange Rates effective on and before this date will be displayed. This is a required field.
- Foreign Currencies
Display lists valid Exchange Rates for the specified foreign Currencies, using the specified parameters. You can configure the meaning of your Exchange Rate values using the Configure G/L screen in the System module. Exchange Rates may be configured in either of two ways: 1) Base x Exchange Rate = Foreign or 2) Foreign x Exchange Rate = Base.
Tip
Use the Accounting configuration screen to determine the meaning of your Exchange Rate values.
To the far right of the list, the following buttons are available:
- CLOSE
Closes the screen, returning you to the application desktop.
- QUERY
Select to generate the display, using the specified parameters. Start date and end date must be entered for request to proceed. Results will be displayed in the "Foreign Currencies" display.
Runs the report associated with this screen.
- NEW
Opens screen for adding a new Exchange Rate to the master list of Exchange Rates.
- EDIT
Enables you to edit highlighted Exchange Rate definitions. The edit screen is the same as that for creating a new Exchange Rate definition—except that when editing, the fields will contain Exchange Rate information. Double-clicking on an Exchange Rate definition will also bring you to the editing screen.
- VIEW
Highlight an Exchange Rate definition and then select this button to reach a read-only view of the "Edit" screen.
- DELETE
Highlight an Exchange Rate definition and then select this button to remove the Exchange Rate from the master list.
- NEW CURRENCY
Opens screen for adding a new Currency to the master list of Currencies.
To add a new Exchange Rate to the master list of Exchange Rates, select the NEW button. The following screen will appear:
When adding a new Exchange Rate to the master list of Exchange Rates, you are presented with the following options:
- Currency
Specify the Currency you want to apply the Exchange Rate to. You may enter multiple Exchange Rates for an individual Currency—as long as the effective dates do not overlap.
- Exchange Rate
Enter the Exchange Rate to be used for the specified Currency during specified date range. The meaning of the Exchange Rate value is configured on the Configure G/L screen in the System module. The value of Exchange Rates may be configured in either of two ways: 1) Base x Exchange Rate = Foreign or 2) Foreign x Exchange Rate = Base.
- Start Date
Enter the date on which the Exchange Rate becomes effective.
- End Date
Enter the date after which the Exchange Rate is no longer valid.
To the far right of the screen, the following buttons are available:
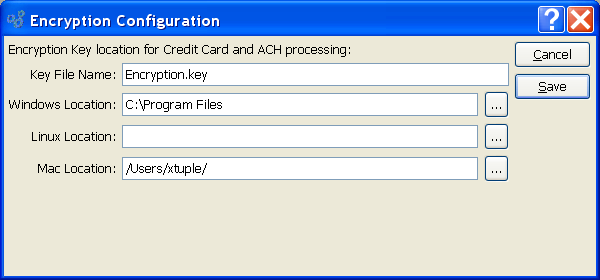
You must have an encryption key defined to successfully process Credit Cards and ACH transactions in xTuple ERP. To define the name of the encryption key and its location in your system, select the "Encryption" option. The following screen will appear:
Tip
All users on your system who need access to Credit Card and ACH information must use the same key file. The key file can be a simple text file with any contents whatsoever. It should be stored at the same level as the xTuple executable file. For Mac users, this would be within the MacOS directory inside the Package Contents for your xTuple executable. The key file is not stored in the database.
When establishing the encryption key settings for your Credit Card and ACH configuration, you are presented with the following options:
- Key File Name
Enter the name of your key file. The key file is an encryption seed file, which enables you to read encrypted Credit Card and ACH information. The key file is required regardless of the Verification Service used at your site. The contents of the key file should be at least 16 characters long and use a combination of upper and lower case letters and numbers. Special characters should not be used.
Note
If you change the contents of your key file after it has already been in production, steps must be taken to convert any data encrypted up to that point. The function "alterencrypt" must be used to handle the conversion. Please contact your Systems Administrator for more information.
- Windows Location
Specify the directory path any Windows machine on your system would use to access the key file. All users and machines on the system must use the same key file. To ensure consistency and security, the file should be stored in a central location.
Tip
If you name the key file "OpenMFG.key" and place it in the installation directory, then you do not need to enter the path.
- Linux Location
Specify the directory path any Linux machine on your system would use to access the key file. All users and machines on the system must use the same key file. To ensure consistency and security, the file should be stored in a central location.
- Mac Location
Specify the directory path any Mac machine on your system would use to access the key file. All users and machines on the system must use the same key file. To ensure consistency and security, the file should be stored in a central location.
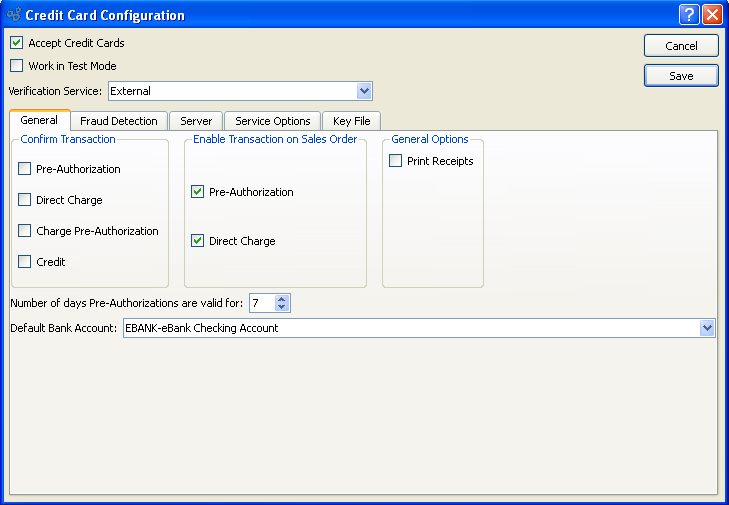
To configure your system to process Credit Cards, select the "Credit Cards" option. The following screen will appear:
Note
The system currently supports only the YourPay and Authorize.Net verification services.
When establishing the general settings for your Credit Card configuration, you are presented with the following options:
- Accept Credit Cards
Select to indicate the system is configured to accept Credit Card Payments. If selected, the Credit Card processing functionality will be enabled throughout the system. For example, users will be able to store Customer Credit Card information on the Customer master—and receive Credit Card payments when processing Sales Orders. If this option is not selected, Credit Card functionality will be disabled.
Tip
Check to verify you have the cURL tool installed with your xTuple ERP executable to ensure Credit Card processing operates smoothly.
- Work in Test Mode
Select if your site is testing the Credit Card configuration and functionality. If selected, the system will verify that the server specified under the "Server" tab is in fact the correct test server. If this option is not selected, the system will verify that the correct production server is specified.
Warning
Make sure that you uncheck this option as soon as you are ready to put the application into production. Most credit card transactions will appear to succeed whether running in test mode or live mode but there will be no actual charges made if in test mode.
If you are using Authorize.Net then you should also make sure that the Merchant Interface is configured to run in live mode instead of test mode. Both xTuple ERP and the Authorize.Net gateway allow sending test transactions to the live server but both applications must be set to run in live mode for real transactions to occur.
- Verification Service
Specify the Credit Card verification service you will be using:
- Authorize.Net
Select if you will be using the Authorize.Net payment gateway for handling Credit Card transactions. Specific Authorize.Net options will be enabled on the screen if you select this service.
- YourPay
Select if you will be using the YourPay payment gateway for handling Credit Card transactions. Specific YourPay options will be enabled on the screen if you select this service.
- External
Select if you will be using tools outside of xTuple ERP to communicate with your Credit Card company. If selected, you may still process Credit Card transactions in xTuple ERP—and this information will be stored in your xTuple database. However, no information will be sent to outside Credit Card processors. You can learn more about the interface used to collect external Credit Card transactions in Section 13.9.1, “External Credit Card Transaction”.
- Confirm Transaction
Specify when you want to application users to confirm transactions before they are processed:
- Pre-Authorization
Select if you want confirmation before pre-authorizing charges on a Credit Card.
- Direct Charge
Select if you want confirmation before directly charging a Credit Card.
- Charge Pre-Authorization
Select if you want confirmation before posting pre-authorized charges.
- Credit
Select if you want confirmation before crediting back charges on a Credit Card.
- Enable Transaction on Sales Order
Select which of the following options should be enabled under the Payments tab of the Sales Order header. This setting does not affect the A/R Workbench or any other window in the application.
- Pre-Authorization
If selected, only the AUTHORIZE button will be enabled.
- Direct Charge
If selected, only the CHARGE button will be enabled.
- Number of days Pre-Authorizations are valid for
Select a value between 1 and 30 using the arrow buttons located to the right of the field. Value entered specifies the number of days pre-authorizations will remain valid from the date they were entered. Once a pre-authorization expires, it will no longer be visible in the system and will be unavailable for post-authorization.
- Default Bank Account
Specify the default Bank Account to be used for receiving Cash whenever a Customer Credit Card is charged.
- General
- Print Receipts
Select if you want the ability to print credit card receipts.
To the far right of the screen, the following buttons are available:
- CANCEL
Cancels any configuration settings, returning you to the application desktop.
- SAVE
Saves the configuration settings, returning you to the application desktop.
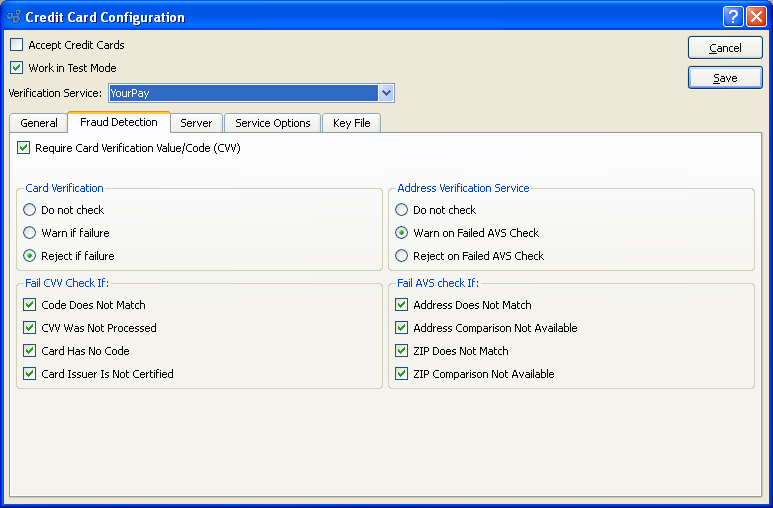
Fraud detection methods vary depending on the payment gateway used. Authorize.Net requires fraud settings to be configured on the gateway server. Other services, like YourPay, send fraud detection results back to the client software and require the client to decide whether to accept the transaction or void it. To configure client-side fraud detections settings, if required, select the "Fraud Detection" tab. The following screen will appear:
Tip
If YourPay is the service being used, the options on the "Fraud Detection" tab will be enabled and selections should be made. These options will be disabled if the Authorize.Net gateway is being used. Fraud detection settings for Authorize.Net must be configured through the Merchant Interface.
When configuring client-side fraud detection settings, if required, you are presented with the following options:
- Require Card Verification Value/Code (CVV)
Select if you want to require users to enter a CVV code when processing Credit Cards.
- Card Verification
Specify how you want to handle Credit Card verification processing:
- Do not check
Select if the xTuple application should ignore the CVV result sent by the payment gateway.
- Warn if failure
Select if the xTuple application should tell the user if the CVV result sent by the payment gateway fails based on the criteria checked in the "Fail CVV Check If" section.
- Reject if failure
Select if the xTuple application should void the transaction and tell the user if the CVV result sent by the payment gateway fails based on the criteria checked in the "Fail CVV Check If" section.
- Fail CVV Check If:
Specify how you want to handle Credit Card Verification Value (CVV) check failures:
- Code Does Not Match
Select if the transaction should be treated as fraudulent if the CVV does not match the credit card number.
- CVV Was Not Processed
Select if the transaction should be treated as fraudulent if the Credit Card company, such as Visa or American Express, could not process the CVV for the payment gateway.
- Card Had No Code
Select if the transaction should be treated as fraudulent if the Credit Card does not have a CVV but is expected to have one.
- Card Issuer Is Not Certified
Select if the transaction should be treated as fraudulent if the financial institution that issued the Credit Card is not certified.
- Address Verification Service
Specify how you want to handle address verification:
- Do not check
Select if the xTuple application should ignore the AVS result sent by the payment gateway.
- Warn on Failed AVS Check
Select if the xTuple application should tell the user if the AVS result sent by the payment gateway fails based on the criteria checked in the "Fail AVS Check If" section.
- Reject on Failed AVS Check
Select if the xTuple application should void the transaction and tell the user if the AVS result sent by the payment gateway fails based on the criteria checked in the "Fail AVS Check If" section.
- Fail AVS check if:
Specify how you want to handle address verification check failures:
- Address Does Not Match
Select if the transaction should be treated as fraudulent if the address stored by the xTuple application does not match the Credit Card company's recorded billing address for the Credit Card.
- Address Comparison Not Available
Select if the transaction should be treated as fraudulent if the Credit Card company could not process the street address information for the payment gateway.
- ZIP Does Not Match
Select if the transaction should be treated as fraudulent if the postal code stored by the xTuple application does not match the Credit Card company's recorded billing address for the Credit Card.
- ZIP Comparison Not Available
Select if the transaction should be treated as fraudulent if the Credit Card company could not process the postal code information for the payment gateway.
To establish the server settings for your Credit Card configuration, select the "Server" tab. The following screen will appear:
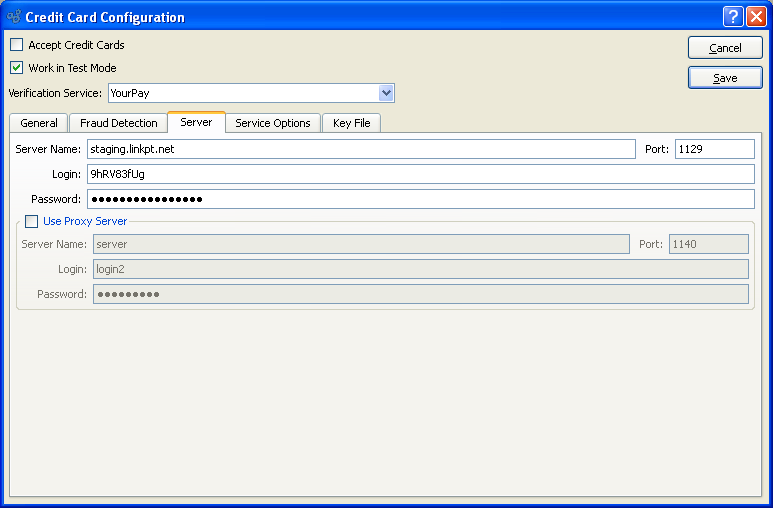
When establishing the server settings for your Credit Card configuration, you are presented with the following options:
- Server Name
Enter the URL for the specified Verification Service's server. The URL specified may vary, depending on whether you are working in test mode or production mode. If this is empty then the application will use the default URL for this Verification Service, which again may vary depending on whether you are working in test mode or production mode.
- Port
Enter the port number for the specified Verification Service's server. If this is left empty then the application will use the default Port for this Verification Service.
- Login
YourPay does not require login information to be entered in this field. For Authorize.Net, use your API Login here, not your Merchant Interface Login, which may differ.
- Password
YourPay does not require login information to be entered in this field. Type your Transaction Key here for Authorize.Net. The label for this field may change if you select Authorize.Net.
- Use Proxy Server
Select if your site uses a proxy server.
- Server Name
Specify the IP Address for your proxy server.
- Port
Specify the port used by your proxy server.
- Login
Specify the login name for your proxy server.
- Password
Specify the password for your proxy server.
Tip
You can leave the Server Name and Port fields blank if you desire. This is the easiest way to switch between test mode and production mode, as you won't have to change these values every time you switch modes.
Some payment gateways, such as Authorize.Net, allow testing against the live, production server. If you want to run test transactions against the live payment gateway then you must set the Server Name explicitly to the live payment gateway's URL. You will get a warning from the application when you click the Save button if you do this.
To establish the service option settings for your Credit Card configuration, select the "Service Options" tab. The options will vary depending on the payment gateway being used. If YourPay is being used, the following screen will appear:
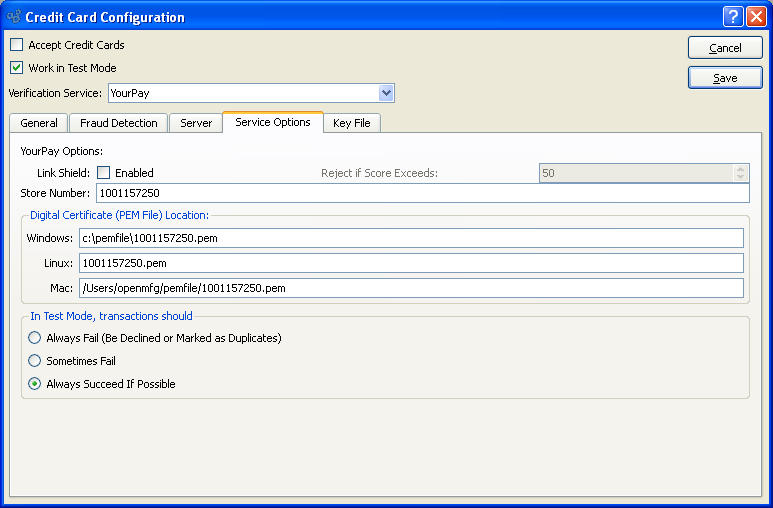
When establishing the service option settings for your YourPay configuration, you are presented with the following options:
- Link Shield
LinkShield is a risk-scoring service provided by YourPay at an additional fee. If you have purchased this service then check the Enabled box and set the desired cut-off score.
- Reject if Score Exceeds
Set your risk tolerance by selecting a value between 0 and 100 using the arrow buttons located to the right of the field or by typing a number in this field. A Link Shield score of 0 indicates that this transaction has an extremely low risk, while a score of 100 indicates a high risk transaction.
- Store Number
Enter the number of your YourPay store. Store numbers are assigned when you register with the YourPay Verification Service.
- Digital Certificate (PEM File) Location:
Specify the physical location of the digital certificate (i.e., PEM file) according to your operating system:
- Windows
Specify the directory path any Windows machine on your system would use to access the YourPay PEM file. The PEM file may be stored locally for use by individual machines, or on a network drive for wider distribution.
- Linux
Specify the directory path any Linux machine on your system would use to access the YourPay PEM file. The PEM file may be stored locally for use by individual machines, or on a network drive for wider distribution.
- Mac
Specify the directory path any Mac machine on your system would use to access the YourPay PEM file. The PEM file may be stored locally for use by individual machines, or on a network drive for wider distribution.
- In Test Mode, transactions should
The YourPay test gateway allows testing the client application's ability to handle failed transactions. The client application can build transaction messages and then indicate whether the test gateway should return an error or not.
- Always Fail (Be Declined or Marked as Duplicates)
If this is selected then the test gateway will always return a message indicating that the transaction failed. Sometimes it will send a message saying the transaction was declined and sometimes it will send a message saying the transaction failed because it is a duplicate of a prior transaction.
- Sometimes Fail
This is similar to "Always Fail" but about 80% of the transactions attempted by the application will be sent unaltered and should be expected to succeed. Approximately 10% of the transactions sent to the test server should be marked as declined and approximately 10% should be marked as duplicates.
- Always Succeed If Possible
This option does not inject failure requests in the transaction stream. This allows testing normal flow of all credit card transactions in the application.
If Authorize.Net is being used, the following screen will appear:
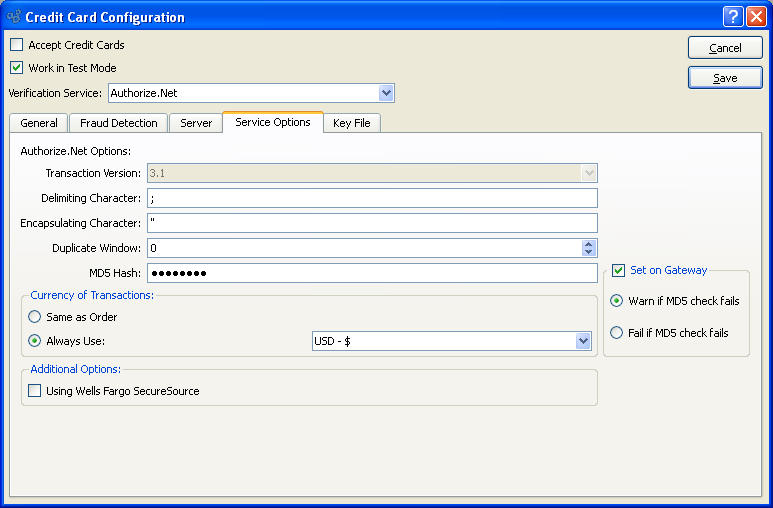
When establishing the service option settings for your Authorize.Net configuration, you are presented with the following options:
- Transaction Version
Authorize.Net supports three different versions of the communications protocol at this time, with the potential for more to be added in the future. The xTuple application builds transaction requests which conform to version 3.1 of the Authorize.Net protocol. This field is a placeholder to allow for future expansion by both xTuple and Authorize.Net.
- Delimiting Character
This field allows overriding the default character used by Authorize.Net to separate parts of the messages sent by the gateway to the client application. If this field is blank then Authorize.Net will use the comma (,) to separate message fields. If you expect your data to contain commas as part of their content, such as street addresses, then you should change the Delimiting Character.
- Encapsulating Character
This field allows setting the character used by Authorize.Net to enclose individual parts of the messages sent by the gateway to the client application. If this field is blank then Authorize.Net will not use any character for this purpose.
- Duplicate Window
Use this field to indicate a time window to Authorize.Net for checking for duplicate transactions. If similar transactions are sent to Authorize.Net within this window then it may reject them as duplicates. This is a value in seconds.
- MD5 Hash
If you want an additional sense of security, set the MD5 Hash field to a short string and set the same value on the Merchant Interface. This shared secret can be used to assure that the payment gateway is actually Authorize.Net's server and not an imposter. The value of the MD5 Hash field and a few other fields in the transaction request are processed with the MD5 algorithm by the payment gateway and the resulting string is returned to the xTuple application. The xTuple application performs the same processing and compares the result with the value sent by the payment gateway.
- Set on Gateway
Specify how you want the gateway to respond if the MD5 hash fails:
- Warn if MD5 check fails
If the comparison of the MD5 value fails then warn the user.
- Fail if MD5 check fails
If the comparison of the MD5 values fails then treat the transaction as failed, regardless of apparent success or failure, and tell the user. This transaction is not voided.
- Currency of Transactions
Specify how you want to handle foreign Currency transactions:
- Same as Order
Always process credit card transactions using the same currency as the Sales Order, Cash Deposit, or Credit Memo.
- Always Use
Select to always use the Currency specified here for all Credit Card transactions.
- Additional Options
You have the option to specify the following additional options:
- Using Wells Fargo SecureSource
Check this box if you are using Authorize.Net with Wells Fargo SecureSource. Wells Fargo SecureSource requires that transaction requests be built slightly differently than pure Authorize.Net transactions and this configuration option tells the xTuple application to construct the transactions to work with this service.
Warning
You should set the Encapsulating Character to a value. Otherwise some transactions may fail with an error reporting that the response from the payment gateway has the wrong number of fields.
Several of these configuration options may be set through the Authorize.Net Merchant Interface. If you set any of these options there, you must use exactly the same values here in the Service Options tab. If you do not then most or all of your credit card transactions will fail, often with mysterious errors.
If you want to use the MD5 Hash feature, you must set it to exactly the same value here and on the Merchant Interface, including spaces and capitalization.
You may set the Delimiting Character, Encapsulating Character, Duplicate Window, and Currency of Transactions in the xTuple application without setting them through the Authorize.Net Merchant Interface.
To establish the key file settings for your Credit Card configuration, select the "Key File" tab. The following screen will appear:

Tip
All users on your system who need access to Credit Card information must use the same key file. The key file can be a simple text file with any contents whatsoever. It should be stored at the same level as the xTuple executable file. For Mac users, this would be within the MacOS directory inside the Package Contents for your xTuple executable. The key file is not stored in the database.
Note
The encryption key information may be entered on this screen, or on the Encryption screen—and vice versa.
When establishing the key file settings for your Credit Card configuration, you are presented with the following options:
- Key File Name
Enter the name of your key file. The key file is an encryption seed file, which enables you to read encrypted Credit Card information. The key file is required regardless of the Verification Service used at your site. The contents of the key file should be at least 16 characters long and use a combination of upper and lower case letters and numbers. Special characters should not be used.
Note
If you change the contents of your key file after it has already been in production, steps must be taken to convert any data encrypted up to that point. The function "alterencrypt" must be used to handle the conversion. Please contact your Systems Administrator for more information.
- Windows Location
Specify the directory path any Windows machine on your system would use to access the key file. All users and machines on the system must use the same key file. To ensure consistency and security, the file should be stored in a central location.
Tip
If you name the key file "OpenMFG.key" and place it in the installation directory, then you do not need to enter the path.
- Linux Location
Specify the directory path any Linux machine on your system would use to access the key file. All users and machines on the system must use the same key file. To ensure consistency and security, the file should be stored in a central location.
- Mac Location
Specify the directory path any Mac machine on your system would use to access the key file. All users and machines on the system must use the same key file. To ensure consistency and security, the file should be stored in a central location.
If you are using an external Credit Card processing mechanism to record information about xTuple ERP Credit Card transactions, the following screen will be used when these transactions are recorded:
When entering details related to an external Credit Card transaction, you are presented with the following options:
- Customer
Displays the name of the Customer you are entering a Credit Card transaction for.
- Credit Card Number
Displays the selected Credit Card for the specified Customer.
- Transaction Type
Displays the transaction type (i.e., Charge).
- Amount
Displays the amount of the transaction.
- Order
Displays the number of the Order (e.g., Sales Order, Cash Receipt, etc.) which the selected Credit Card is being charged for.
- Approval Status
Specify the status of the external Credit Card transaction. The following options are available: Approved, Declined, Error, and Held for Review.
- Approval Code
Enter the approval code you received from the external Credit Card processor.
- Transaction ID
Enter the transaction identifier you received from the external Credit Card processor. By default, this value will be the same as the Order Number.
- Passed Address Verification
Select if the external transaction passed the address verification.
- Passed Card Verification
Select if the external transaction passed the card verification.
To the far right of the screen, the following buttons are available:
- CANCEL
Closes the screen without processing details of the external Credit Card transaction, returning you to the previous screen.
- SAVE
Creates the record of the external Credit Card transaction and stores this information in the database.
A comprehensive list of Country definitions is provided with the system for use in Address and Currency masters. To access the master list of Country definitions, select the "Countries" option. The following screen will appear:
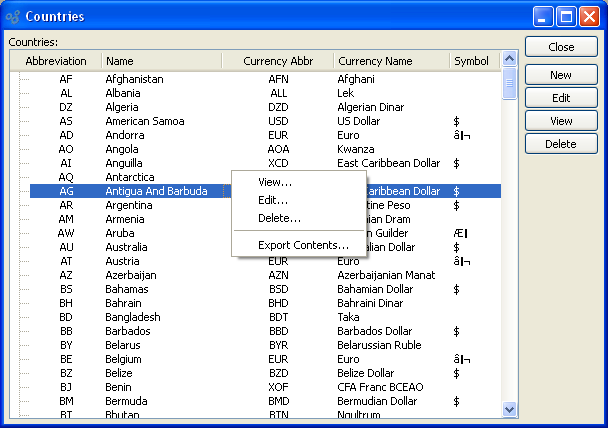
Tip
While Country definitions may be added or edited, you should carefully consider before making any changes to the existing definitions. In general, changing Country definitions should be discouraged.
The "Countries" screen displays information on all existing Countries, including Country abbreviation, Country name, Country Currency abbreviation, Country Currency name, and Country Currency symbol.
To the far right of the screen, the following buttons are available:
- CLOSE
Closes the screen, returning you to the application desktop.
- NEW
Opens screen for creating a new Country definition.
- EDIT
Enables you to edit highlighted Country definitions. The edit screen is the same as that for creating a new Country definition—except that when editing, the fields will contain Country information. Double-clicking on a Country definition will also bring you to the editing screen.
- VIEW
Highlight a Country definition and then select this button to reach a read-only view of the "Edit" screen.
- DELETE
Highlight a Country definition and then select this button to remove the Country from the list.
To create a new Country definition, select the NEW button. The following screen will appear:
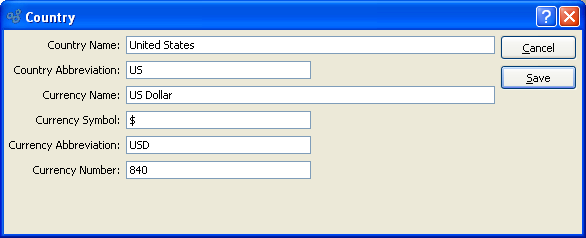
When creating a new Country definition, you are presented with the following options:
- Country Name
Enter a unique Country name.
- Country Abbreviation
Enter a short abbreviation for the Country.
Tip
Defining Currency information for Countries helps standardize the process of defining Currencies.
- Currency Name
Enter a name to identify the Country's Currency.
- Currency Symbol
Enter a symbol to identify the Country's Currency. Use special keyboard characters to enter special Currency symbols. For example, under Windows, you can create the symbol for Japanese Yen by using the following keys: ALT + 0165.
- Currency Abbreviation
Enter a short abbreviation for the Country's Currency.
- Currency Number
Enter a number to uniquely identify the Currency. For example, in the standard Currencies defined in the default Countries table, the Currency Number used is the ISO-assigned Currency Number.
To the far right of the screen, the following buttons are available:
- CANCEL
Closes the screen without adding a new Country definition to the master list of Countries.
- SAVE
Creates the Country definition and adds it to the master list of Countries.
A simple list of State and Province definitions is provided with the system for use in Address records. To access or edit the master list of States and Provinces, select System > Master Information > States and Provinces... The following screen will appear:
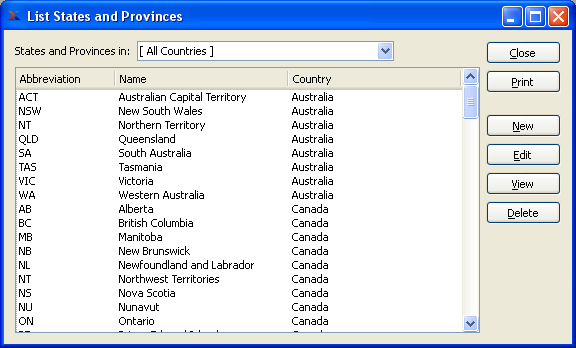
States and Provinces Master List
The "List States and Provinces" screen displays information on all defined States or Provinces, including the Abbreviation, full Name, and parent Country.
When viewing the list of States and Provinces, you are presented with the following option:
- States and Provinces in
Select a Country from the list of available options to show only those states and provinces already defined for that Country.
To the far right of the screen, the following buttons are available:
- CLOSE
Closes the screen, returning you to the application desktop.
Runs the report associated with this screen.
- NEW
Opens screen for creating a new State or Province definition.
- EDIT
Enables you to edit highlighted State or Province definitions. The edit screen is the same as that for creating a new State or Province definition—except that when editing, the fields will contain State or Province information. Double-clicking on a State or Province definition will also bring you to the editing screen.
- VIEW
Highlight a State or Province definition and then select this button to reach a read-only view of the "Edit" screen.
- DELETE
Highlight a State or Province definition and then select this button to remove the State or Province from the list.
To create a new State or Province definition, select the NEW button. The following screen will appear:
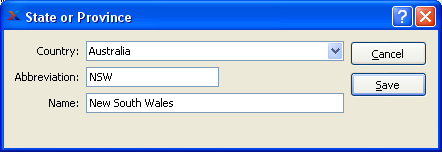
Create a New State or Province
When creating a new State or Province definition, you are presented with the following options:
- Country
Select a Country from the list.
- Abbreviation
Enter a short abbreviation for the State or Province. This should be the standard postal abbreviation if there is one or may be left blank.
- Name
Enter a State or Province name that is unique for this Country.
To the far right of the screen, the following buttons are available:
- CANCEL
Closes the screen without adding a new State or Province definition to the master list of States and Provinces.
- SAVE
Creates the State or Province definition and adds it to the master list of States and Provinces.
Locales are associated with users and define the format for date, time, and numbers. Locales are also used to search for translation files and to specify decimal precision and some of the colors that the user sees on the screen. This is a powerful feature that allows each user to interact with the application in their native language and formats.
Part of defining a Locale is setting the language and, optionally, the Country. It is the combination of language and Country that determines date and numeric formats and which translation file will be used. For example, a Locale that references English and the United States will display as follows:
- Date
M/D/YY
- Time
12 hour format
- Numbers
1,999.00
A Locale that refers to German and Germany will display like this:
- Date
DD.MM.YY
- Time
12 hour format
- Numbers
1.999,00
Translation information is stored in .qm files, which xTuple uses to display the user interface in a different language. When a Language is selected in a Locale and the Country is left as "Default," the xTuple client expects to find the file xTuple.xx.qm (where xx is the ISO two letter language code) located in the directory where the xTuple client is located. The U.S. Library of Congress is the ISO registration authority for language codes and makes the list of languages available on its language codes website. Please contact xTuple for more information about the availability of .qm files for various languages.
When both a Language and a Country are selected, the xTuple client looks for the file xTuple.xx_yy.qm located in the directory where the xTuple client is installed. The xx is the ISO two letter language code and yy is the two letter country code. You can find country codes in xTuple by navigating to System > Master Information > Countries and observing the abbreviation column. If the xTuple client does not find a file that matches both Language and Country (xTuple.xx_yy.qm) it next looks for a file that contains the Language only (e.g., xTuple.xx.qm).
If no .qm translation file is found, the xTuple client will report the error and continue the logon. The user will be presented the screens in the default language, which is English. The conventions established for the Locale that define date, time, decimal precision, and color will be presented based on the Locale associated with the User. If you don't want to see this error message again, go to the Preferences window and check the Ignore Missing Translations check box.
Numbers are generally formatted by the application in accordance with the conventions associated with the selected language and Country. These conventions mostly concern the character used to distinguish the fractional part of a number from the integer part, commonly called the "decimal point" or decimal separator, and the character used as the "group separator" or, at least in the U.S., the "thousands separator." In addition to the core numeric format, the xTuple application lets you choose the precision of numeric display and data entry for different kinds of number.
To access the master list of Locales, select the "Locales" option. The following screen will appear:
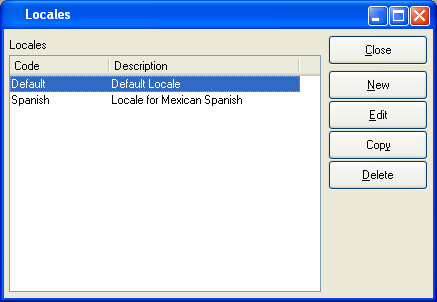
The "Locales" screen displays information on all existing Locales, including Locale name and Locale description.
To the far right of the screen, the following buttons are available:
- CLOSE
Closes the screen, returning you to the application desktop.
- NEW
Opens screen for creating a new Locale.
- EDIT
Enables you to edit highlighted Locale definitions. The edit screen is the same as that for creating a new Locale definition—except that when editing, the fields will contain Locale information. Double-clicking on a Locale master will also bring you to the editing screen.
- COPY
Highlight a Locale and then select this button to reach a screen for copying the Locale's definition.
- DELETE
Highlight a Locale definition and then select this button to remove the Locale from the list.
Locales are used to present information to users in the formats and language appropriate for their site. For example, the formatting of dates, times, and Currency are controlled by Locales. Translation of the application into a user's local language is also controlled by Locales.
Tip
Make the link between users and their Locales on the Maintain Users screen.
The xTuple Locale functionality is designed to coordinate with the settings in your local operating system. Because of this, it should only be necessary to specify the "Default" language and country value—and xTuple ERP will follow your operating system settings. For example, let's say you are located in China, running an operating system configured for China. In that scenario, using the default xTuple Locale values should result in xTuple ERP being formatted appropriately for China.
While in most cases using the default values will work, you may have the need to modify your Locale settings for specific cases. To create a new Locale, select the NEW button. The following screen will appear:
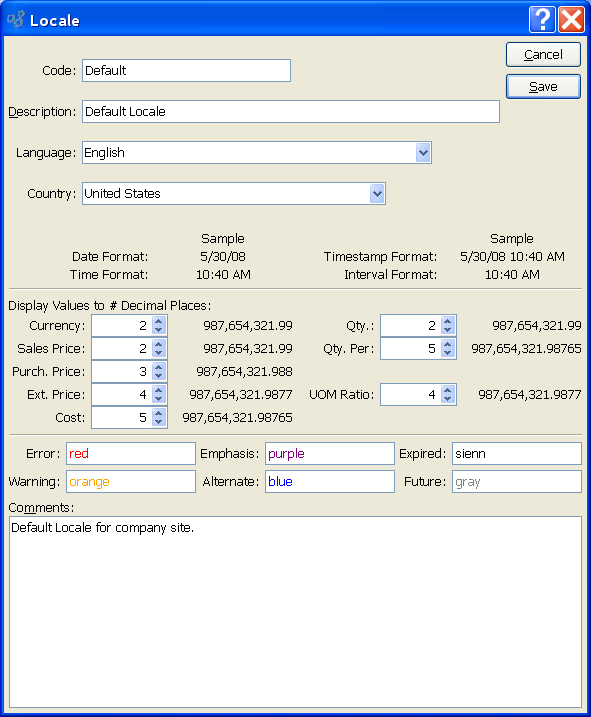
When creating a new Locale, you are presented with the following options:
- Code
Enter a code to uniquely identify the specified Locale setting. This code is referenced in the Maintain Users section, where Locales are associated with individual users.
Note
If you plan to use the Default Locale, then it may not be necessary to define any additional Locales. By using the Default Locale you allow your operating system settings to govern the presentation of xTuple ERP.
- Description
Enter a brief description to further define the specified Locale.
- Language
Select a language from the list of languages—or specify "Default" to indicate you want your operating system to define language option for you. The language selection impacts date and time formatting. It also tells the system which language translation file to load (if any). xTuple ERP supports multi-language translations of the product interface through the use of .qm files. If a .qm translation file is installed next to your xTuple ERP executable file, then the system will load the translation file at run time—automatically translating the application into your desired language. As long as your .qm file follows the standard ISO-derived naming convention (e.g.,
xTuple.cn.qm= Chinese andxTuple.es.qm= Spanish), then the system will successfully find it based on your Locale language selection.- Country
Select a country from the list of countries—or specify "Any" to indicate you want your operating system to define country option for you. The available countries will vary depending on the language selection. The country selection combined with the language selection impacts date and time formatting.
The following date and time formatting will be used, based on your language and country selections. If you are using the "Default" language and country selections, then the formatting will be inherited from your operating system.
- Date Format
Displays the format used for dates within the application.
- Time Format
Displays the format used for times within the application.
- Timestamp Format
Displays the timestamp format used to display any "timestamp" data within the application. Timestamps are typically used in transaction logs that record the specific date and time when an activity occurs within the system.
- Interval Format
Displays the format used for intervals within the application. The interval format is used to define how Work Order clock-in/clock-out times and effort are displayed.
While date and time formatting and the general format of numeric values are governed by the language and country selections, you do have the ability to manually determine the number of decimal places displayed for various types of numeric value. The following formatting options are available:
- Currency
The Currency format is used to display most monetary data within the application.
- Sales Price
The Sales Price format is used to display any Sales Price data within the application.
- Purch. Price
The Purchase Price format is used to display any Purchase Price data within the application.
- Ext. Price
The Extended Price format is used to display any Extended Price data within the application.
- Cost
The Cost format is used to display costing data within the application.
- Qty.
The Quantity format is used to display quantity data within the application.
- Qty. Per
The Quantity Per format is used to display quantity ratios within the application.
- UOM Ratio
The Unit of Measure Ratio format is used to display Unit of Measure Ratios within the application.
- Color Coding
Specify RGB values, or use any of the color names found in the
You have the ability to define the colors used by the application to emphasize special cases in the data. When entering color choices, you can either use standard RGB (Red, Green, Blue) values or any of the color names found on the available colors list. If you choose to enter RGB values then the format is either #RGB, #RRGGBB, or #RRRGGGBBB. Colors may be defined for any of the following cases:
- Error
Specify the color-coding for errors.
- Warning
Specify the color-coding for warnings.
- Emphasis
Specify the color-coding for emphasis.
- Alternate
Specify the color-coding for alternate text.
- Expired
Specify the color-coding to indicate the expired condition.
- Future
Specify the color-coding to indicate the future condition.
To enter Comments related to the Locale, use the Comments field:
- Comments
This is a scrolling text field with word-wrapping for entering Comments related to the Locale.
To the far right of the screen, the following buttons are available:
- CANCEL
Closes the screen, returning you to the previous screen.
- SAVE
Creates the Locale setting and adds it to the master list of Locales.
To access the master list of Comment Types, select the "Comment Types" option. The following screen will appear:
The "Comment Types" screen displays information on all existing Comment Types, including Comment Type name and Comment Type description.
To the far right of the screen, the following buttons are available:
- CLOSE
Closes the screen, returning you to the application desktop.
- NEW
Opens screen for creating a new Comment Type.
Note
System-defined Comment Types cannot be edited or deleted. Only user-defined Comment Types may be edited or deleted.
- EDIT
Enables you to edit highlighted Comment Type definitions. The edit screen is the same as that for creating a new Comment Type definition—except that when editing, the fields will contain Comment Type information. Double-clicking on a Comment Type definition will also bring you to the editing screen.
- DELETE
Highlight a Comment Type definition and then select this button to remove the Comment Type from the list.
To create a new Comment Type, select the NEW button. The following screen will appear:
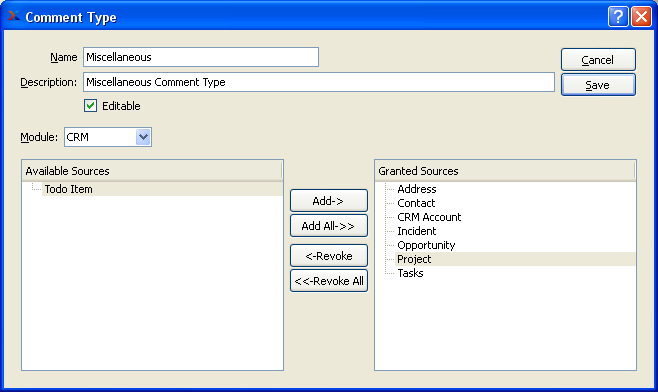
When creating a new Comment Type, you are presented with the following options:
- Name
Enter a unique Comment Type name.
- Description
Enter a brief description of the Comment Type.
- Editable
Select if you want to allow users to edit the content of Comments entered using the Comment Type. If not selected, users will not be able to edit Comments created under the Comment Type—in other words, Comments will be read-only.
- Module
Specify the module(s) where you want the Comment Type to be available for use. For example, if you only want Comments using this Comment Type to appear in the Manufacture module, then select the "Manufacture" option from the drop-down list. You can then further limit visibility to the Comment Type by selecting one or more sources available for each module. Users will only be able to use a Comment Type if the Comment Type has been explicitly assigned to a module and source.
- Available Sources
For each of the available modules, there are corresponding places (i.e., sources) where Comments may be entered. In the Sales module, for example, you can add Comments to Customers, Sales Orders, Quotes, etc. The available sources list indicates all the places in a module where Comments can be used.
- Granted Sources
The granted sources list indicates all the places in a module where the Comment Type has been made available for use. If a source does not appear in the granted list, then the Comment Type won't be available for use in that source.
The following buttons are located between the Available Sources and Granted Sources columns:
- ADD->
Highlight a specific source in the available sources column, then select this button to transfer the source to the granted sources column. Double-clicking on an available source will also transfer it to the granted sources column.
- ADD ALL->>
Select this button to automatically transfer all available sources to the granted sources column.
- <-REVOKE
Highlight a specific source in the granted sources column, then select this button to remove the source from the granted sources column. Double-clicking on a granted v will also remove it from the granted sources column.
- <<-REVOKE ALL
Select this button to automatically remove all granted sources from the granted sources column.
To the far right of the screen, the following buttons are available:
- CANCEL
Closes the screen without adding a new Comment Type to the master list of Comment Types.
- SAVE
Creates the Comment Type and adds it to the master list of Comment Types.
To access the master list of Departments, select the "Departments" option. The following screen will appear:

The Departments master list displays information on all Departments, including Department number and Department name.
To the far right of the list, the following buttons are available:
- CLOSE
Closes the screen, returning you to the application desktop.
Runs the report associated with this screen.
- NEW
Opens screen for adding a new Department to the master list of Departments.
- EDIT
Enables you to edit highlighted Department definitions. The edit screen is the same as that for creating a new Department definition—except that when editing, the fields will contain Department information. Double-clicking on a Department definition will also bring you to the editing screen.
- VIEW
Highlight a Department definition and then select this button to reach a read-only view of the "Edit" screen.
- DELETE
Highlight a Department definition and then select this button to remove the Department from the master list. You may only delete Departments if they are not being used.
To add a new Department to the master list of Departments, select the NEW button. The following screen will appear:
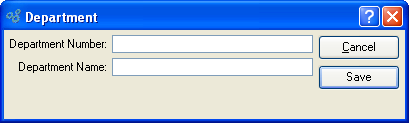
When adding a new Department to the master list of Departments, you are presented with the following options:
- Department Number
Enter a unique code to identify the Department.
- Department Name
Enter a brief name to describe the Department.
To the far right of the screen, the following buttons are available:
- CANCEL
Closes the screen without adding a new Department to the master list of Departments.
- SAVE
Creates the Department and adds it to the master list of Departments.
To access the master list of Shifts, select the "Shifts" option. The following screen will appear:
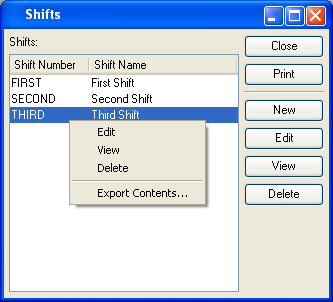
The Shifts master list displays information on all Shifts, including Shift number and Shift name.
To the far right of the list, the following buttons are available:
- CLOSE
Closes the screen, returning you to the application desktop.
Runs the report associated with this screen.
- NEW
Opens screen for adding a new Shift to the master list of Shifts.
- EDIT
Enables you to edit highlighted Shift definitions. The edit screen is the same as that for creating a new Shift definition—except that when editing, the fields will contain Shift information. Double-clicking on a Shift definition will also bring you to the editing screen.
- VIEW
Highlight a Shift definition and then select this button to reach a read-only view of the "Edit" screen.
- DELETE
Highlight a Shift definition and then select this button to remove the Shift from the master list.
To add a new Shift to the master list of Shifts, select the NEW button. The following screen will appear:
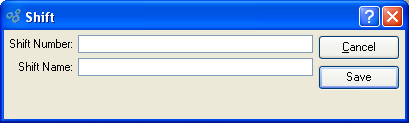
When adding a new Shift to the master list of Shifts, you are presented with the following options:
- Shift Number
Enter a unique code to identify the Shift.
- Shift Name
Enter a brief name to describe the Shift.
To the far right of the screen, the following buttons are available:
- CANCEL
Closes the screen without adding a new Shift to the master list of Shifts.
- SAVE
Creates the Shift and adds it to the master list of Shifts.
The Import and Export configuration allows you to set options for importing data from XML files as an alternative to the CSV Import tool. These data might be generated manually or by other database or e-commerce systems. For example xTuple supports importing orders from Yahoo! stores.
Importing data from XML files is a multi-step process:
The files have to be received from the originator and placed on a computer file system where the xTuple application can find them.
Any wrapper information has to be stripped off, such as mail headers for files received by electronic mail.
The XML has to be converted from its original format to one understood by the xTuple application.
The converted file has to be read by the xTuple application and its contents inserted into the database.
xTuple currently does not automate the first two steps in this process.
xTuple uses XSLT to convert XML files from one format to another. XML file formats are described in DTDs. The xtupleimport DTD defines an XML file format which can be directly imported by the xTuple application. This DTD defines XML tags with names that correspond exactly with the names of views and columns in the xTuple import API.
An XSLT file for transforming Yahoo! OrderList files for import into an xTuple database is available from xTuple. If you need to import data files in other XML formats you must write your own XSLT to convert the data to conform to xTuple's DTD.
To configure which transformations to use for XML files in various formats, click the XSLT Mapping tab on the Configure Import and Export window.

Configure XSLT Mapping
When configuring XSLT Mapping, you are presented with the following options:
- Default XSLT File Directories
The XSLT files used to perform the translation between XML data formats must be present on the file system of the computer which is running the xTuple application. This set of options lets you define one directory for each operating system platform where the application should look for XSLT files.
- Map of XSLT import and export filters
This is a list of document transformations recognized by the xTuple application. These transformations are called filters.
To the far right of the list of import and export filters, the following buttons are available:
- NEW
Opens the screen for entering new XSLT import and export filters.
- EDIT
Opens the screen for editing existing XSLT import and export filters.
- DELETE
Delete existing XSLT import and export filters.
To create a new XSLT Map, select the NEW button. The following screen will appear:
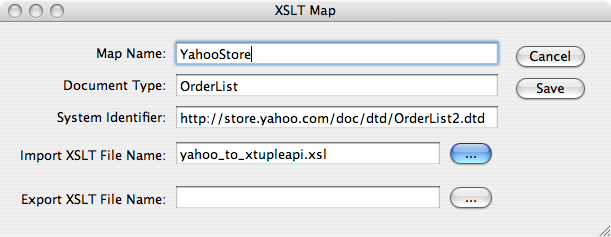
XSLT Map
When creating a new XSLT Map, you are presented with the following options:
- Map Name
This is a name you choose to describe this map.
- Document Type
This is the XML document type that the application will use to find the correct filter to use when importing an XML document. When the application starts to import an XML document, it looks for the
DOCTYPEprocessing directive at the top of the file. If theDOCTYPEisxtupleimportthen no transformation is required. Otherwise it searches for a match in the Document Type and System Identifier columns to find the correct filter to use when importing the file.The Document Type of an XML file is the name of its root element.
- System Identifier
This is the System Identifier that the application will use to find the correct filter to use when importing an XML document.
The System Identifier is a URI that describes how to get the DTD for the XML document.
- Import XSLT File Name
This is the name of the XSLT file that will be used to transform XML files with this Document Type and System Identifier to xTuple's format for XML files. If the name of the file is a full path, starting with a drive letter on Windows or a / on Macintosh or Linux, then the application will look for this file using this full path specification. If the name is a simple filename (like
myTransform.xsl) or a relative pathname (likeoasis/from_ubl.xsl) then the application will look for it in the default XSLT directory defined on the Configure Import and Export window.- Export XSLT File Name
This is the name of the XSLT file that will be used to transform XML files generated by xTuple to a file of the given Document Type and System Identifier.
Note
Exporting XML is not currently supported by xTuple. At this time the Export XSLT File Name on the XSLT Map window and the XML Export tab on the Configure Import and Export window are placeholders for future development.
To the far right of the screen, the following buttons are available:
- CANCEL
Cancels any changes to the XSLT Map and returns to the Configure Import and Export window.
- SAVE
Saves the changes to the XSLT Map and returns to the Configure Import and Export window.
The XML Import tab on the Configure Import and Export window lets you define how the transformations are to be performed.
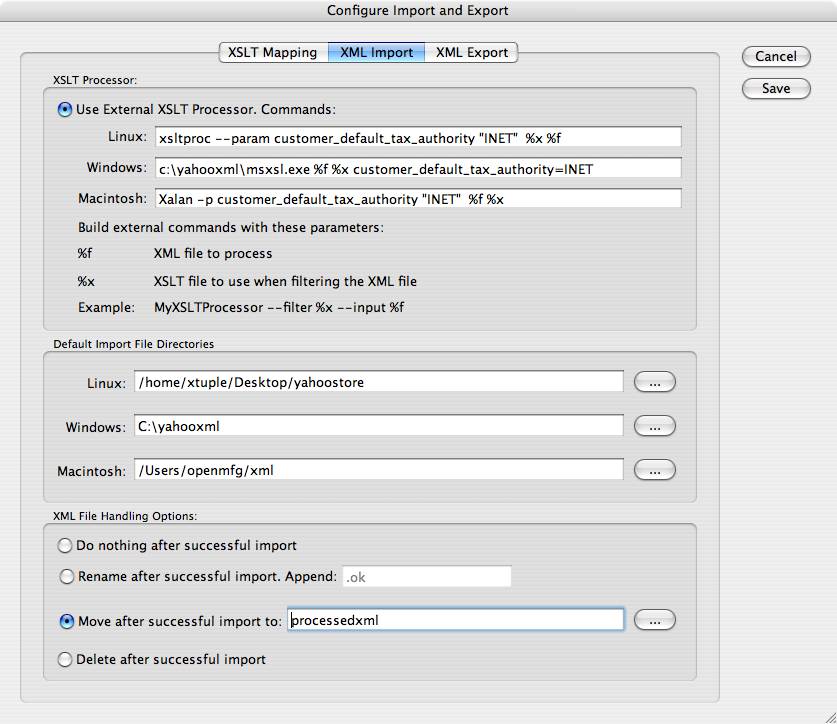
XML Import
When configuring XML Import processing you are presented with the following options:
- XSLT Processor
XSLT is a language for transforming XML documents. To apply an XSLT stylesheet to a given XML document you need an XSLT processor. This is a program that interprets or compiles the XSLT and then performs the transformation on the XML file.
Note
Each XSLT processor has its own command-line syntax.
- Use External XSLT Processor. Commands
Lets you define the command line that the xTuple application should execute to perform the transformation. Two arguments that will always be required are the name of the XSLT file which describes the transformation and the XML file to be transformed. When typing the command line that should be run to call the XSLT processor, put %f where the XSLT processor expects to find the name of the XML file and %x where the XSLT processor expects to find the name of the XSLT file.
In the figure you see three different XSLT processors defined. Each has its own syntax, which is reflected by the differences in the sequence of options and the way run-time parameters are passed to the stylesheets. Note that msxsl.exe takes the XML and XSLT files in a different order than the other two processors.
XSLT run-time parameters let you write a stylesheet with default values that can be changed when you run a transformation without editing the stylesheet itself. In this example, written to use xTuple's stylesheet for importing Yahoo! orders, the customer_default_tax_authority parameter is set to INET; when Customer records are created they will all be assigned the tax authority INET.
- Default Import File Directories
This names the directory on each platform that the xTuple application will search when the user wants to import XML files. It is used to populate the Import XML window.
- XML File Handling Options
This set of options lets you choose what the application should do with XML files after they have been imported successfully. Files which lead to errors during import will be left in place.
- Do nothing after successful import
If you choose this option then the application will leave imported files unchanged in the import directory.
- Rename after successful import. Append
If you choose this option then the application will leave the files in the import directory but will add a suffix to the file. You must give a suffix in the adjacent text field if you select this option.
- Move after successful import to
If you choose this option then the application will move the files to the directory you name after the import is complete. If the directory name is a simple or relative path then the application assumes this is a subdirectory of or is relative to the Default Import Directory.
- Delete after successful import
This will remove the files from the import directory after they have been imported.
Note
The XML Export tab is currently empty. It is a placeholder for future development.
The Electronic Data Interchange (EDI) system supports the export of documents and files using either of the following two delivery methods:
Email
FTP
EDI Profiles are the master records which describe what information to send and how to send that information to EDI recipients—whether those recipients are Customers, Suppliers, or intermediaries such as VANs (Value-Added Networks). When creating an EDI Profile, you specify delivery method, recipient details (or how to retrieve these from the database), and output format. The following output formats are available:
xTuple Report (.PDF)
Comma Delimited (.CSV)
Tab Delimited (.TSV)
Using different combinations of delivery methods, output formats, and database queries, you have the flexibility to create a wide range of unique EDI Profiles.
Tip
The EDI system exports files using the Batch Manager. The Batch Manager must be installed and running at your site for EDI exports to be successful.
To access the master list of EDI Profiles, select the "EDI Profiles" option. The following screen will appear:
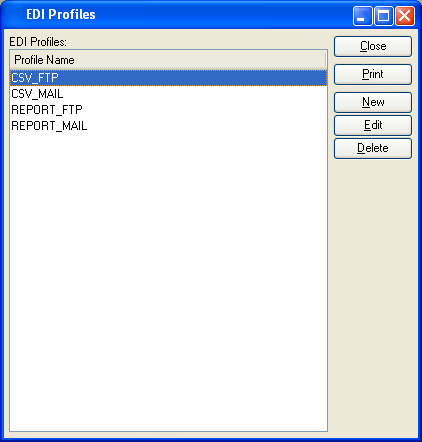
The "EDI Profiles" screen displays information on all existing EDI Profiles. To the far right of the screen, the following buttons are available:
- CLOSE
Closes the screen, returning you to the application desktop.
Runs the report associated with this screen.
- NEW
Opens screen for creating a new EDI Profile.
- EDIT
Enables you to edit the highlighted EDI Profile definition. The edit screen is the same as that for creating a new EDI Profile definition—except that when editing, the fields will contain EDI Profile information. Double-clicking on an EDI Profile definition will also bring you to the editing screen.
- DELETE
Highlight an EDI Profile definition and then select this button to remove the EDI Profile from the list.
To create a new EDI Profile, select the NEW button. For this example, we have chosen the Email delivery method, as shown in the following screenshot:
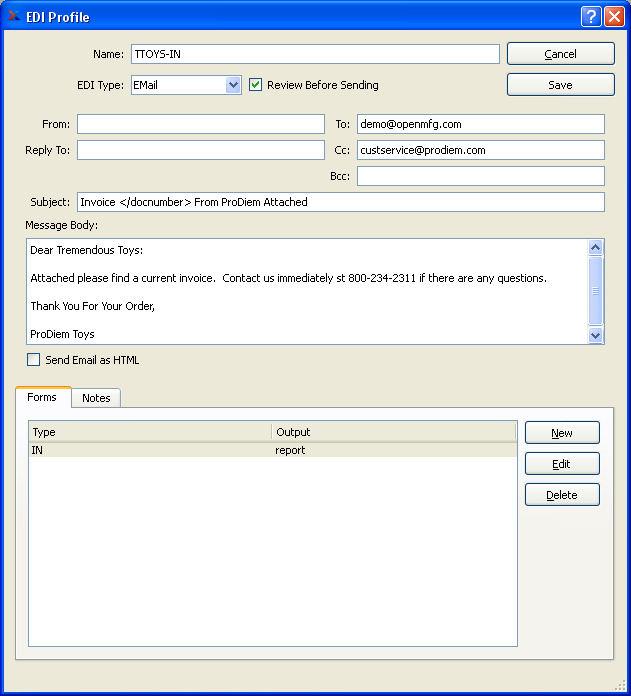
Create New EDI Profile for Email Delivery
Note
The screen options will vary depending on which EDI delivery method you select—Email or FTP.
When creating an EDI Profile using the Email delivery type, you are presented with the following options:
- Name
Enter a brief name to identify the EDI Profile. This is the name which will appear when the Profile is cross-referenced throughout the application—in the Customer master, for example.
- EDI Type
For this example, we have selected the "Email" delivery method. Selecting the "Email" option indicates that recipients will receive EDI documents via electronic mail. Most documents will be attached to the email after the Message Body.
- From
This is the email address of the person sending the email. It can be set to a particular person's email address or to a generic address (e.g. "[email protected]"). If it is left blank on this screen, the Batch Manager will fill in the email address of the user running the application when an EDI message gets prepared.
- Reply To
This is the reply-to address that will be set on the outgoing email message. This controls the email address used when someone replies to an email sent by xTuple ERP. If the "From" address is left blank or is set to the application user's email address, it's a good idea to set the "Reply To" address to a generic address. This is especially useful if there is an email address shared by an entire department. If this is left blank, replies will normally be sent to the "From" address.
- To
Enter the email address to be used as the default recipient address whenever documents are emailed using this Profile.
Tip
Send documents to multiple recipients by separating email addresses with a comma. Be sure to omit any spaces between addresses when using commas to send copies to multiple recipients.
- Cc
Enter the email address to be used as the default carbon copy address whenever documents are emailed using this Profile.
- Bcc
Enter the email address to which copies of the email will be sent using this Profile. Bcc differs from Cc in that none of the recipients will see the bcc addresses. It is a good idea to set this to an address that will have its Inbox archived or to an email address shared by a department. This way there is a history of the transmission or the entire department knows what has happened.
- Subject
Enter a default email subject line to be used whenever documents are emailed using this Profile.
- Message Body
Use this text field to enter the default message that will accompany any documents emailed using this Profile.
- Send Email as HTML
Select if you want the body of the Email to be sent as HTML. If not selected, the Email will be sent as plain text.
- Forms
Displays the EDI Form(s) associated with the Profile. Forms control which types of document can be sent using this EDI Profile—if the EDI Profile does not have a form for a document type, that document type cannot be sent using this EDI Profile. Forms also control the names and values of replacement tokens (see Section 13.17.1.1, “EDI Form”).
- Notes
This is a scrolling text field with word-wrapping for entering Notes related to the Profile.
To the far right of the screen, the following buttons are available:
- CANCEL
Closes the screen without adding a new Profile to the master list of EDI Profiles.
- OK
Creates the EDI Profile and adds it to the master list of EDI Profiles.
- NEW
Opens screen for creating a new EDI Form definition.
- EDIT
Enables you to edit highlighted EDI Form definitions. The edit screen is the same as that for creating a new EDI Form definition—except that when editing, the fields will contain EDI Form information. Double-clicking on an EDI Form definition will also bring you to the editing screen.
- DELETE
Highlight an EDI Form definition and then select this button to remove the EDI Form from the list.
Certain special character sequences exist that you can use to build your EDI Profile. You can enter these EDI tokens in any of the text input fields on the EDI Profile window (except the Name, of course). You can also define your own tokens by writing database queries (see Section 13.17.1.1, “EDI Form”). The system defines the following tokens:
- </docid>
This is the internal document ID of the document being sent.
- </docnumber>
This is the document number of the document being sent.
- </doctype>
This is the internal version of the type of document being sent.
- </doctypefull>
This is a human readable version of the </doctype>.
- a document-type-specific token
The primary key id for the document, named for the primary key field of that document (e.g., </invchead_id>).
Table 9.1. Values of EDI replacement tokens for different document types
| </doctype> | </doctypefull> | document-type-specific token |
|---|---|---|
| AR | A/R Statement | cust_id |
| CM | Credit Memo | cmhead_id or aropen_id, depending on context |
| IC | Incident | incdt_id |
| IN | Invoice | invchead_id |
| PO | Purchase Order | pohead_id |
| QT | Quote | quhead_id |
| SO | Sales Order | cohead_id and sohead_id |
To create a new EDI Profile using the FTP delivery method, select the NEW button from the EDI Profiles master list. Once the new Profile screen opens, choose the "FTP" option. As the following screenshot shows, the screen options change when "FTP" is selected:
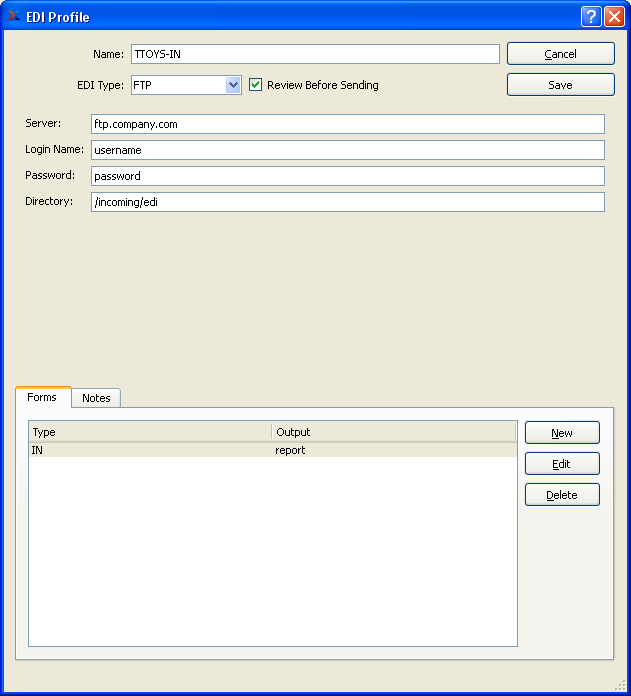
When creating a new EDI Profile using the FTP delivery method, you are presented with the following options:
- Name
Enter a brief name to identify the EDI Profile. This is the name which will appear when the Profile is cross-referenced throughout the application—in the Customer master, for example.
- Type
For this example, we have selected the "FTP" delivery method. Selecting the "FTP" option indicates that recipients will receive EDI documents as files transferred by FTP to the server address specified in the Profile.
- Server
Enter the host name or IP Address of the FTP server where EDI documents should be transferred.
- Login Name
Enter the login name required to access the specified server.
- Password
Enter the password required to access the specified server (this value is not encrypted in the database).
- Directory
Specify the directory location (if any) where EDI documents transferred by FTP should be placed. By default, EDI documents will be placed in the top level directory.
- Forms
Displays the EDI Form(s) associated with the Profile.
- Notes
This is a scrolling text field with word-wrapping for entering Notes related to the Profile.
To the far right of the screen, the following buttons are available:
- CANCEL
Closes the screen without adding a new Profile to the master list of EDI Profiles.
- OK
Creates the EDI Profile and adds it to the master list of EDI Profiles.
- NEW
Opens screen for creating a new EDI Form definition.
- EDIT
Enables you to edit highlighted EDI Form definitions. The edit screen is the same as that for creating a new EDI Form definition—except that when editing, the fields will contain EDI Form information. Double-clicking on an EDI Form definition will also bring you to the editing screen.
- DELETE
Highlight an EDI Form definition and then select this button to remove the EDI Form from the list.
EDI Forms specify the file format an EDI Profile will use. To associate an EDI Form with a Profile, select the NEW button. For this example, we will choose the "Report" format, as shown in the following screenshot:
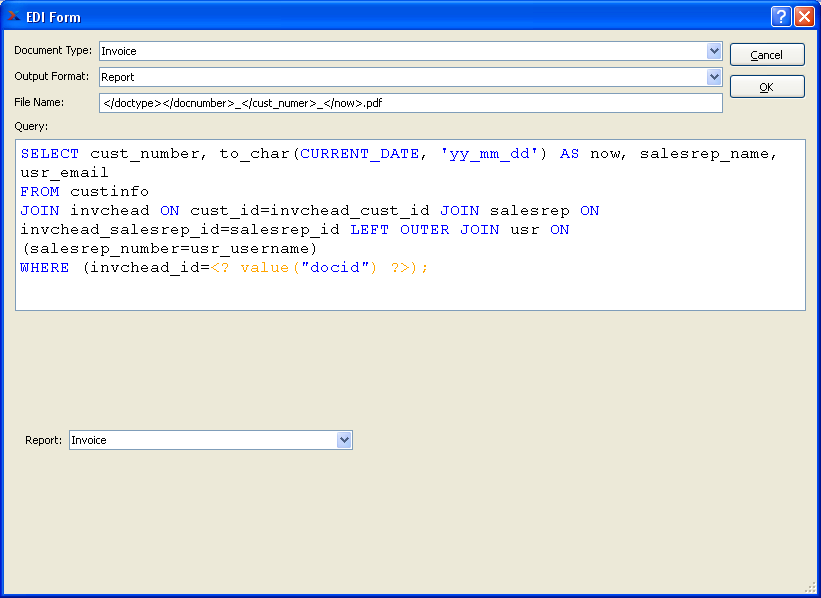
Create New EDI Form Using Report Format
When creating a new EDI Form using the Report format, you are presented with the following options:
- Document Type
Select the type of document the Form will be used for.
- Output Format
For this example, we have selected the "Report" output format. Selecting the "Report" option indicates that document information will be written using the report definition specified below. Documents will be forwarded to EDI recipients in .PDF format.
- File Name
Enter a standard file name to be used when documents are forwarded to EDI recipients using this EDI Form. You may enter tags to generate dynamic file names using information stored in your database. In the example shown, the file name will include the specific Invoice Number of each Invoice being forwarded to EDI recipients, the Customer Number, and the date the EDI is generated.
- Query
This is an optional field to be used if you want to define your own replacement tokens. The example uses a SQL statement to select the Customer Number for this Invoice and the current date as year, month, and date separated by underscores ("_"). You will note in the WHERE clause that MetaSQL is used to dynamically capture the specific Customer Number using the system-defined
docidtoken (the"</>"wrapper is replaced by the MetaSQL<? value("") ?>). For more information on writing queries using MetaSQL, please see the Report Writer User Guide.Tokens defined in this Query can also be used on the EDI Profile screen. For example, the query in the example above also retrieves the Sales Rep's name and email address. The Message Body on the EDI Profile window could be changed to end with the token "</salesrep_name>" and the From address could be set to "</usr_email>". If you do this, Invoice emails will always be signed with the name of the Sales Rep and sent from the Sales Rep's email address if s/he is also defined as a User and Employee.
- Report
Specify the report definition you want to associate with the EDI Form.
To create a new EDI Form using Comma Separated Value (CSV) format, select the NEW button from the EDI Profiles master list. Once the new Profile screen opens, choose the "CSV" option. As the following screenshot shows, the screen options change when "CSV" is selected:
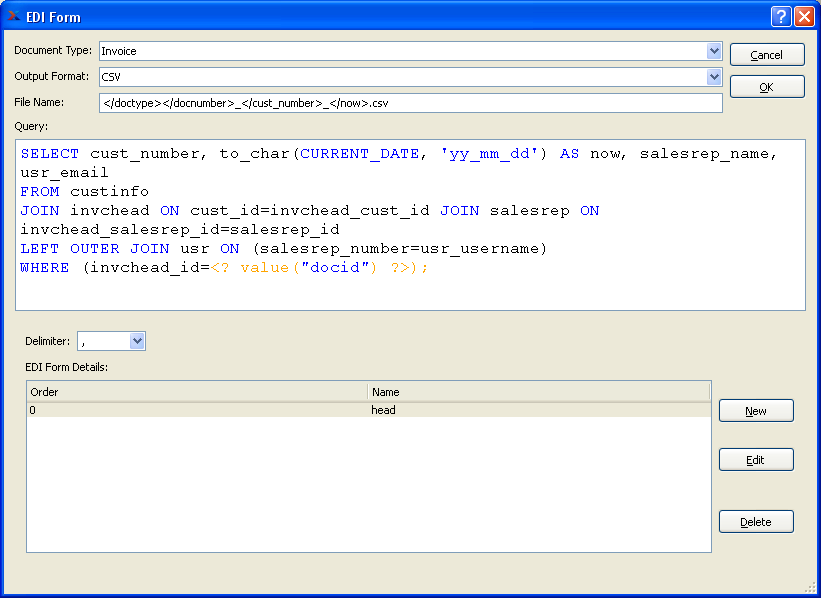
Create New EDI Form Using CSV Format
When creating a new EDI Form using the CSV format, you are presented with the many of the same options as for reports. However, the Report option is replaced with the following:
- Delimiter
Select one of the following delimiter options:
- Comma
Select to generated comma-delimited CSV files.
- Tab
Select to generated tab-delimited CSV files.
You may also define your own delimiter. It must be a single, non-space, printing character (e.g. "*" or ":").
- EDI Form Details
Displays a list of all the SQL queries to be used when generating the CSV file output.
To the far right of the screen, the following buttons are available:
- NEW
Opens screen for creating a new Form Detail query.
- EDIT
Enables you to edit highlighted Form Detail definitions. The edit screen is the same as that for creating a new Form Detail definition—except that when editing, the fields will contain Form Detail information. Double-clicking on a Form Detail definition will also bring you to the editing screen.
- DELETE
Highlight a Form Detail definition and then select this button to remove the Form Detail from the list.
To create a new Form Detail query to be used when generating CSV file output, select the NEW button. The following screen will appear:
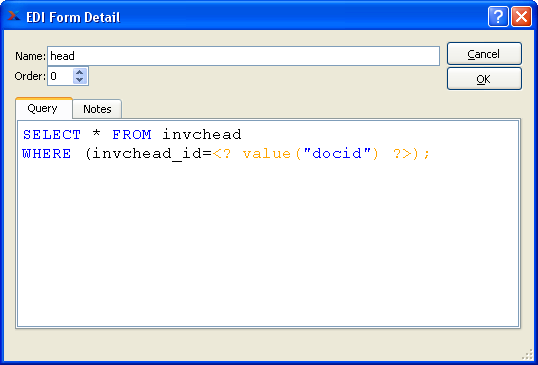
Create New EDI Form Detail Query
When creating a new Form Detail query, you are presented with the following options:
- Name
Enter a name to identify the Form Detail query. In the example shown, the name indicates the query will return information to be used in the header of the CSV file output.
- Order
Select a value between 1 and 99 using the arrow buttons located to the right of the field. The value entered specifies the order in which a query will be executed.
- Query
Enter a SQL query to identify the information you want to populate your CSV file with. As you can see in the example, the query selects invoice header information from the "invchead" table. You will note in the WHERE clause that MetaSQL is used to dynamically capture the specific Invoice number using the system-defined
docidtoken (the"</>"wrapper is replaced by the MetaSQL<? value("") ?>). You may also use any tokens defined in the EDI Form query to build the EDI Form Detail query. For more information on writing queries using MetaSQL, please see the Report Writer User Guide.- Notes
This is a scrolling text field with word-wrapping for entering Notes related to the EDI Detail query.
To the far right of the screen, the following buttons are available:
- CANCEL
Closes the screen without adding a new query to the Form Details list.
- OK
Creates the query and adds it to the master list of Form Details.