Configure Modules section.
To configure the Products module, select the "Configure Products" option. The following screen will appear:
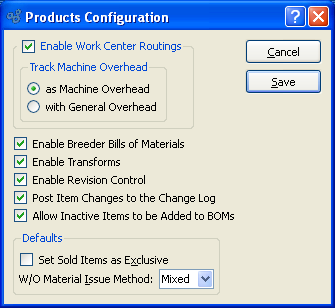
When configuring the Products module, you are presented with the following options:
- Enable Work Center Routings
Select to enable the system's Work Center Routings capability. If not selected, users will be prevented from creating Work Centers, entering Bills of Operations (BOOs), or performing any tasks related to Operations posting, etc. If your system has Work Center Routings defined, this option will be hidden.
- Track Machine Overhead
Machine Overhead: If Work Center Routings are enabled, select one of the following methods for tracking machine overhead:
- as Machine Overhead
Select to track machine overhead separately from other overhead Costs, using the machine overhead rate specified in a Work Center master. Any associated Costs will display in the system-defined "Machine Overhead" Costing Element.
- with General Overhead
Select to track machine overhead in the same category as other overhead Costs. Any associated Costs will display in the system-defined "Overhead" Costing Element. (This is the default setting.)
- Enable Breeder Bills of Materials
Select to enable the system's Breeder Bill of Materials capability. If not selected, users will be prevented from entering Breeder Bills of Materials (BOMs) or performing any tasks related to posting production for Breeder BOMs, etc.
- Enable Transforms
Select to enable the system's Item Transformation capability. If not selected, users will be prevented from performing tasks related to Item Transformations.
- Enable Revision Control
Select to enable the Revision Control system. If selected, privileged users will be able to maintain Revisions for Bills of Material and Operations. Revisions may also be used in manufacturing and purchasing processes.
- Post Item Changes to the Change Log
Select to post to the Change Log any changes made to Item masters.
- Allow Inactive Items to be Added to BOMs
Select to allow inactive Items to be added to Bills of Materials.
- Defaults
Specify preferences for the following defaults:
- Set Sold Items as Exclusive
Select to mark all sold Items as "Exclusive" by default whenever a new Item is created.
- W/O Material Issue Method
Select one of the available default issue methods.
- Push
Select to issue materials to a Work Order by a specific material issue transaction.
- Pull
Select to issue materials to a Work Order by a material backflush.
- Mixed
Select to issue materials to a Work Order based on the issue method applied to the materials initially—that is, either pull or push.
Tip
The default settings "Set Sold Items as Exclusive" and "W/O Material Issue Method" only apply to newly-created Items. They cannot be used to retroactively update already existing Items.
To the far right of the screen, the following buttons are available:
- CANCEL
Cancels any configuration settings, returning you to the application desktop.
- SAVE
Saves the configuration settings, returning you to the application desktop.
To configure the Inventory module, select the "Configure Inventory" option. The following screen will appear
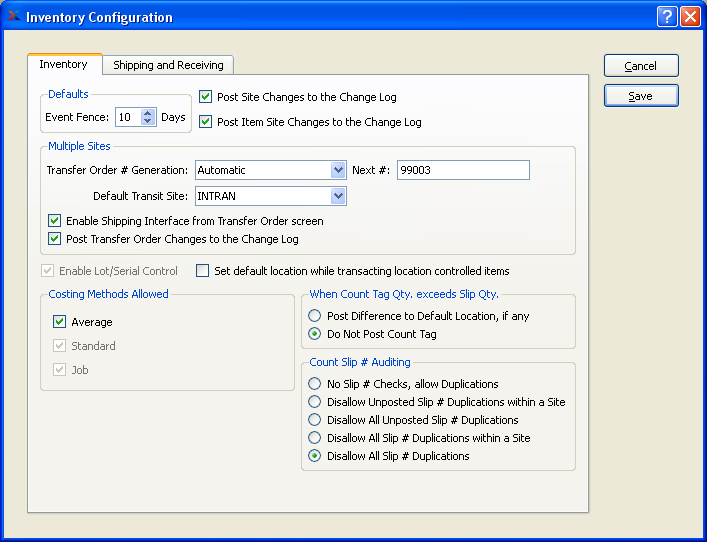
When configuring the Inventory module, you are presented with the following options:
- Defaults
Specify a default Event Fence:
- Event Fence
Select a value between 0 and 999 using the arrow buttons located to the right of the field. Indicates the Event Fence value that will appear by default whenever a new Item Site is created. The value is measured in days.
- Post Item Site Changes to the Change Log
Select to post to the Change Log any changes made to Item Site masters.
- Post Site Changes to the Change Log
Select to post to the Change Log any changes made to Site masters.
- Enable Multiple Sites
Select to allow more than one Site to be entered in the system. If multiple Sites are not enabled, your system will be single Site only. Users will be prevented from creating more than one Site. If your system has multiple Sites defined, this option will be hidden.
- Transfer Order # Generation
If multiple Sites are enabled, select one of the available Transfer Order Number generation methods:
- Automatic
Transfer Order Numbers will be automatically incremented by 1 each time a new Transfer Order is created. These automatically-generated numbers may not be edited. They are read-only.
- Manual
Transfer Order Numbers must be entered manually whenever you create a new Transfer Order.
- Automatic, Allow Override
Transfer Order Numbers will be automatically generated and incremented, as under the "Automatic" option described above. However, this option also allows you to manually override the Transfer Order Number at the time of Transfer Order creation.
- Next #
The next sequentially available Transfer Order Number will display here. You may change the number—creating a new basis for the next Transfer Order Number—by typing the new number into this field. Any changes you make here will be reflected the next time a new Transfer Order is created.
- Default Transit Site
If multiple Sites are enabled, specify the default Transit Site. The specified Site will be pre-selected by default whenever Transfer Orders are entered.
- Enable Lot/Serial Control
Select to enable Lot/Serial tracking capability in the system. If not selected, users will be prevented from creating Item Sites having either the Lot or Serial control method. Without the ability to create Lot/Serial Item Sites, the Lot/Serial tracking capability is disabled. If your system has Lot/Serial Item Sites defined, this option will be hidden.
- Set default Location while transacting Location-controlled Items
Select if you want to allow users to set or change the default Location for Multiple Location Control (MLC) Items while in the process of conducting transactions involving MLC Items. If not selected, the default Location will have to be set or changed on the Item Site record for each Item.
- Costing Methods Allowed
Select any or all of the available methods to value inventory transactions for an Item Site. If any Item Sites exist for a particular Cost Method, that Cost Method is disabled to prevent unselecting.
- Average
Cost distributions for an Item Site is based on an average of all costs accumulated for the Item Site. The Quantity on Hand of Item Sites defined with this Cost Method will not be allowed to go negative.
- Standard
Cost distributions for an Item Site is based on the Standard Cost posted for the Item.
- Job
Cost distributions for an Item Site is based on actual accumulation of costs on a Work Order. This Cost Method is used exclusively by Items with Type of "Job".
- When Count Tag Qty. exceeds Slip Qty
Select one of the following options for handling discrepancies in count quantities:
- Post Difference to Default Location, if any
Select to post excess Count Tag quantity to an Item's default location if the Item's Count Tag quantity exceeds its Count Slip quantity. Applies only if a default location has been defined for the Item. Default locations are defined for an Item in the Item Site record.
- Do Not Post Count Tag
Select to prevent Count Tag quantity from being posted if it exceeds the Item's Count Slip quantity.
Note
By default, the system allows only one unposted Count Tag per Item Site. If an unposted Count Tag already exists for an Item Site, then an additional duplicate Count Tag may not be added.
- Count Slip # Auditing
Select one of the following Count Slip number auditing methods:
- No Slip # Checks, allow Duplications
Allows any Count Slip numbers to be used. Duplicate Count Slip numbers will also be allowed.
- Disallow Unposted Slip # Duplications within a Site
Prevents duplicate "Unposted" Count Slip numbers from existing within a given Site. However, duplicate "Unposted" Count Slip numbers may exist within multiple Sites.
- Disallow All Unposted Slip # Duplications
Prevents duplicate "Unposted" Count Slip numbers from existing within multiple Sites.
- Disallow All Slip # Duplications within a Site
Prevents duplicate Count Slip numbers from existing within a given Site. However, duplicate Count Slip numbers may exist within multiple Sites.
- Disallow All Slip # Duplications
Prevents duplicate Count Slip Numbers from existing within multiple Sites.
To configure the Inventory Shipping and Receiving options, select the "Shipping and Receiving" tab. The following screen will appear:
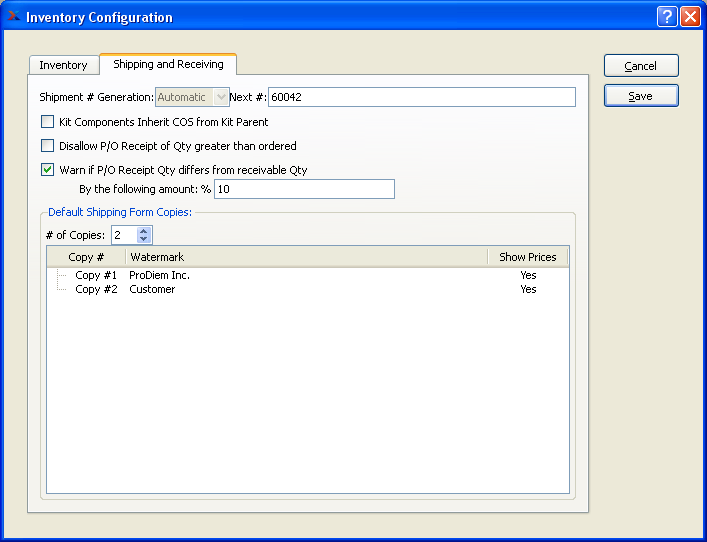
When configuring Shipping and Receiving, you are presented with the following options:
- Shipment # Generation
By default, Shipment Numbers are generated automatically.
- Next #
Enter the next Shipment Number to be used. The system assigns Shipment Numbers to Sales Order Line Item quantities when stock is issued to Shipping. All stock at Shipping for an individual Sales Order is assigned the same Shipment Number. If no stock is already at Shipping, then a new Shipment Number will be used.
- Kit Components Inherit COS from Kit Parent
Select if you want the components of Kit Items to inherit the same Cost of Sales (COS) Account used by the parent Kit Item. If not selected, the Kit components will use the COS Accounts defined in their respective Sales Account Assignments.
- Disallow P/O Receipt of Qty greater than ordered
Select to ensure the maximum receiving quantity does not exceed the quantity ordered. If selected, the system will prevent users from receiving more Purchase Order Line Item quantity than the quantity ordered. Not selecting this option means users will be allowed to receive quantity in excess of the quantity ordered.
- Warn if P/O Receipt Qty differs from receivable Qty
Select to generate a warning message if the entered quantity to receive does not match the quantity remaining to be received. The warning message will alert users that a difference exists. However, it will not prevent users from continuing.
- By the following amount:
Specify the percentage difference between Receipt quantity and receivable quantity which when reached should trigger a warning message.
- Default Shipping Form Copies
Indicate the number of Shipping Form copies you want to print by default:
- # of Copies
Specify the number of miscellaneous copies you want to print. Information about the specified copies will display below. To add a Watermark, double-click on a copy line.
To the far right of the screen, the following buttons are available:
- CANCEL
Cancels any configuration settings, returning you to the application desktop.
- SAVE
Saves the configuration settings, returning you to the application desktop.
To configure the Purchase module, select the "Configure Purchase" option. The following screen will appear:
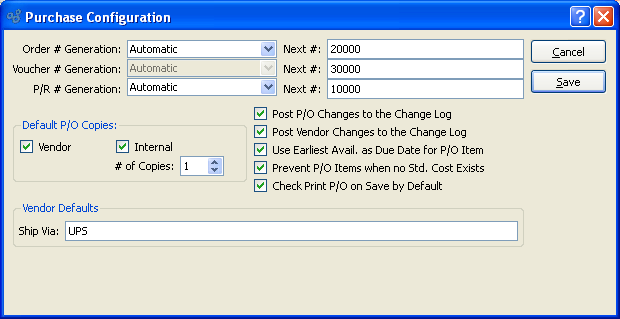
When configuring the Purchase module, you are presented with the following options:
- Order # Generation
Specify one of the available Purchase Order Number generation methods:
- Automatic
Purchase Order Numbers will be automatically incremented by 1 each time a new Purchase Order is created. These automatically-generated numbers may not be edited. They are read-only.
- Manual
Purchase Order Numbers must be entered manually whenever you create a new Purchase Order.
- Automatic, Allow Override
Purchase Order Numbers will be automatically generated and incremented, as under the "Automatic" option described above. However, this option also allows you to manually override the Purchase Order Number at the time of Purchase Order creation.
- Next #
The next sequentially available Purchase Order Number will display here. You may change the number—creating a new basis for the next Purchase Order Number—by typing the new number into this field. Any changes you make here will be reflected the next time a new Purchase Order is created in the P/O module.
- Voucher # Generation
By default, Voucher Numbers are automatically generated. This system setting cannot be changed.
- Next #
The next sequentially available Voucher Number will display here. You may change the number—creating a new basis for the next Voucher Number—by typing the new number into this field. Any changes you make here will be reflected the next time a new Voucher is created in the P/O module.
- P/R # Generation
Select one of the available Purchase Request Number generation methods:
- Automatic
Purchase Request Numbers will be automatically incremented by 1 each time a new Purchase Request is created. These automatically-generated numbers may not be edited. They are read-only.
- Manual
Purchase Request Numbers must be entered manually whenever you create a new Purchase Order.
- Automatic, Allow Override
Purchase Request Numbers will be automatically generated and incremented, as under the "Automatic" option described above. However, this option also allows you to manually override the Purchase Request Number at the time of Purchase Request creation.
- Next #
The next sequentially available Purchase Request Number will display here. You may change the number—creating a new basis for the next Purchase Request Number—by typing the new number into this field. Any changes you make here will be reflected the next time you issue a new Purchase Request within the P/O module.
- Default P/O Copies
Indicate the copies you want to print.
- Vendor
Select to print one Vendor copy.
- Internal
Select to print a specified number of internal copies. When you select this option, the "# of Copies" field will be enabled.
- # of Copies
Specify the number of copies you want to print.
- Post P/O Changes to the Change Log
Select to post to the Change Log any changes made to Purchase Orders.
- Post Vendor Changes to the Change Log
Select to post to the Change Log any changes made to Vendor masters.
- Use Earliest Avail. as Due Date for P/O Item
Select to use Item Source Earliest Available dates as the default due date when entering manual Purchase Order Line Items. If not selected, the due date field will be left blank when entering Purchase Order Line Items—requiring users to enter the date manually. Earliest Available dates are determined by adding Item Source Lead Times to the current date.
Note
The "Use Earliest Avail." option applies only to Purchase Orders entered manually. This option does not impact the scheduling of POs generated from MRP Planned Orders.
- Prevent P/O Items when no Std. Cost Exists
Select if you want to prevent users from entering Purchase Order Line Items for Items which have no Standard Cost. If selected, users will be shown a message stating the problem. The solution is to add Standard Cost to the Item(s) in question.
- Check Print P/O on Save by Default
Select to prompt users to print Purchase Orders whenever Purchase Orders are saved. If selected, users will be presented with a Purchase Order print screen whenever a Purchase Order is saved. To bypass this feature, do not select this option.
- Vendor Defaults
Specify the following Vendor defaults:
- Ship Via
Specify the default Ship Via to be used for Purchase Orders.
To the far right of the screen, the following buttons are available:
- CANCEL
Cancels any configuration settings, returning you to the application desktop.
- SAVE
Saves the configuration settings, returning you to the application desktop.
To configure the Schedule module, select the "Configure Schedule" option. The following screen will appear:
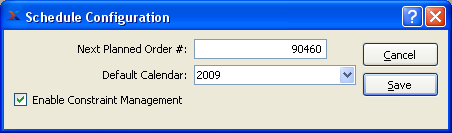
When configuring the Schedule module, you are presented with the following options:
- Next Planned Order #
Enter a number to establish the basis for the next Planned Order Number. Any changes made here will be reflected the next time a new Planned Order is created.
- Default Calendar
Specify a default Calendar to be used when running the "MPS Detail" report.
- Enable Constraint Management
Select to enable the Constraint Management system. If not selected, the system will be hidden from view.
To the far right of the screen, the following buttons are available:
- CANCEL
Cancels any configuration settings, returning you to the application desktop.
- SAVE
Saves the configuration settings, returning you to the application desktop.
To configure the Manufacture module, select the "Configure Manufacture" option. The following screen will appear:
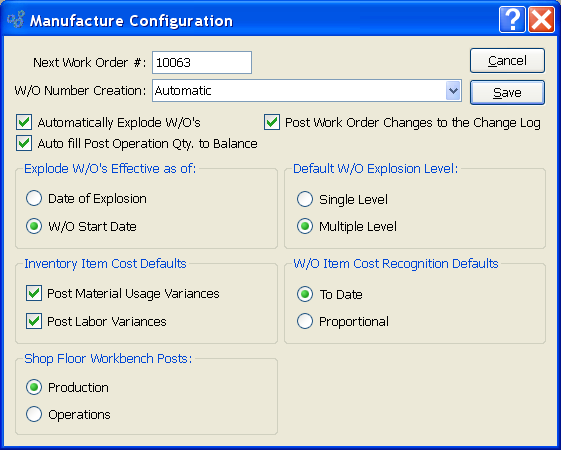
When configuring the Manufacture module, you are presented with the following options:
- Next Work Order #
The next sequentially available Work Order Number will display here. You may change the number—creating a new basis for the next Work Order Number—by typing the new number into this field. Any changes you make here will be reflected the next time a new Work Order is created.
- W/O Number Creation
Select one of the available Work Order Number creation methods:
- Automatic
Work Order Numbers will be automatically incremented by 1 each time a new Work Order is created. These automatically-generated numbers may not be edited. They are read-only.
- Manual
Work Order Numbers must be entered manually whenever you create a new Work Order.
- Automatic, Allow Override
Work Order Numbers will be automatically generated and incremented, as under the "Automatic" option described above. However, this option also allows you to manually override the Work Order Number at the time of Work Order creation.
- Automatically Explode W/O's
Select if you want Work Orders to be exploded automatically. Work Order explosion is the process whereby Work Order Material Requirements and Work Order Operations are created for a Work Order. If this option is selected, all parent Work Order Items will be exploded by default. Child Work Orders will also be exploded by default, if the Bill of Materials for the parent Item specifies that child Work Orders should be created when the parent Work Order is exploded. If this option is not selected, Work Orders will need to be exploded manually.
- Auto fill Post Operation Qty. to Balance
Check this option if you want quantities to be automatically be populated with the quantity balance due when posting Operations.
- Post Work Order Changes to the Change Log
Select to post to the Change Log any changes made to Work Orders.
- Explode W/O's Effective as of
Select one of the following Work Order explosion effectivity dates:
- Date of Explosion
Explode Work Orders effective on the date of explosion, incorporating Bills of Materials and Bills of Operations effective on that date.
- W/O Start Date
Explode Work Orders effective on the scheduled start date, incorporating Bills of Materials and Bills of Operations effective on that date.
Tip
Pick a default explosion level if you have not configured the W/O module to automatically explode Work Orders. If Work Orders are exploded by default, the selection of an explosion level is not relevant.
- Inventory Item Cost Defaults
Specify preferences for the following defaults:
- Post Material Usage Variances
Select to post material usage variances whenever Work Order production is posted.
- Post Labor Variances
Select to post labor variances whenever Work Order Operations are posted.
- Shop Floor Workbench Posts
Select the Work Order processing method to be used by the Shop Floor Workbench:
- Production
Select to require a Production-posting approach on the Shop Floor Workbench.
- Operations
Select to require an Operations-posting approach on the Shop Floor Workbench.
Note
The Shop Floor Workbench cannot be used in a dual mode. The Workbench must be configured to use either a Production-posting or an Operations-posting approach.
- Default W/O Explosion Level
Select one of the following default explosion levels, if Work Orders will not be exploded automatically by default:
- Single Level
This option specifies that when Work Orders are exploded, requirements should be created for the parent Work Order Items only.
- Multiple Level
This option specifies that requirements should be created for both parent and child Work Orders.
Note
Performing a multiple level explosion does not create child Work Orders. Child Work Orders must first be created before they can be exploded. The easiest way to ensure that child Work Orders are created for manufactured components is to select the "Create Child W/O at Parent W/O Explosion" option found on the Bill of Materials.
- W/O Item Cost Recognition Defaults
Select one of the following Cost of Sales recognition defaults for Job Items:
Note
The default method will be used when creating Work Orders for Job Items. The method may be changed manually at the Work Order header level.
- To Date
When Work Orders for Job items are shipped, all of the WIP costs accumulated to date will be charged to Cost of Sales.
- Proportional
When Work Orders for Job items are shipped, a value up to the proportional value of the total quantity shipped will be charged to Cost of Sales. For example, if 3 Items are to be shipped on a Job Work Order and all the material has been issued—and if only 1 of the 3 is shipped—then 1/3 of the value charged to WIP at that point will be charged to Cost of Sales.
Tip
The appropriate reporting selections must be made in the Bill of Operations to ensure that labor and overhead Costs associated with setup and run time Operations are reported.
To the far right of the screen, the following buttons are available:
- CANCEL
Cancels any configuration settings, returning you to the application desktop.
- SAVE
Saves the configuration settings, returning you to the application desktop.
To configure the CRM module, select the "Configure CRM" option. The following screen will appear:
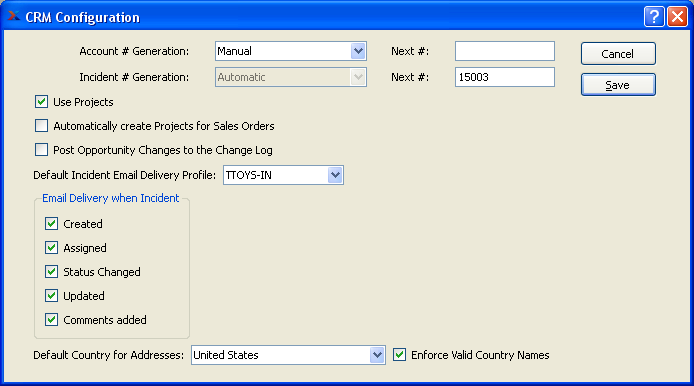
When configuring the CRM module, you are presented with the following options:
- Account # Generation
Select one of the available CRM Account Number generation methods:
- Manual
CRM Account Numbers must be entered manually whenever you create a new CRM Account.
- Automatic
CRM Account Numbers will be automatically incremented by 1 each time a new CRM Account is created. These automatically-generated numbers may not be edited. They are read-only.
- Automatic, Allow Override
CRM Account Numbers will be automatically generated and incremented, as under the "Automatic" option described above. However, this option also allows you to manually override the CRM Account Number at the time of CRM Account creation.
- Next #
Specify the next available CRM Account number. The next CRM Account created will use the number specified here. Leave this field blank if you will be creating CRM Account numbers manually.
- Incident # Generation
By default, Incident numbers are generated automatically. However, you have the ability to specify the next available number.
- Next #
Specify the next available Incident number. The next Incident created will use the number specified here.
- Use Project
Select to provide the ability to create Projects.
- Automatically create Projects for Sales Orders
Select to allow the creation of Projects for Sales Orders.
- Post Opportunity Changes to the Change Log
Select to have the system automatically log changes made to Opportunity records under the "Comments" tab for each Opportunity where the changes are made. If not selected, Opportunity changes will not be tracked automatically.
- Email Delivery when Incident
Select the options below to trigger Email notifications when Incident Events occur.
- Created
When Incident is created, Email notification is sent.
- Assigned
When user is assigned to Incident, Email notification is sent.
- Status Changed
When status of an Incident is changed, Email notification is sent.
- Updated
When Incident is updated, Email notification is sent.
- Comments Added
When Comments are added to an Incident, Email notification is sent.
Note
The following tokens are supported in EDI profile for CRM Incidents:
</email1> = Incident owner email address
</email2> = Incident assignee email address
</email3> = Incident contact email address
</description> = Incident description
</docnumber> = Incident number
</doctype> = "INCDT"
</docid> = Incident primary key id
</docbody> = Builds text of fields, notes and history of incident record
</comments> = Incident comments
- Default Country for Addresses
When new addresses are created, set the Country in those new addresses to the value selected here unless the user overrides the selection when creating the address.
- Enforce Valid Country Names
If this option is not checked, users can select from a list of Countries or type Country names that are not in the list. When this box is checked, users must select from a list of valid Countries when creating or editing addresses; the application will warn you to fix the Country before it will save an Address with an invalid Country.
Warning
When you click in this box to turn on the Enforce Valid Country Names feature, the application warns you if you have any addresses with invalid Country names. This includes Addresses, Sales Orders, Invoices, and other data. The warning message refers to a fixCountry.gz extension package. You can download this free package from the xTuple xChange.
Warning
Once this box is checked and you save the configuration, it will be disabled and you cannot uncheck it.
Note
You can edit the list of Countries by navigating to System > Master Information > Countries. To learn more, see Section 13.10, “Countries”.

To the far right of the screen, the following buttons are available:
- CANCEL
Cancels any configuration settings, returning you to the application desktop.
- SAVE
Saves the configuration settings, returning you to the application desktop.
To configure the Sales module, select the "Configure Sales" option. The following screen will appear:
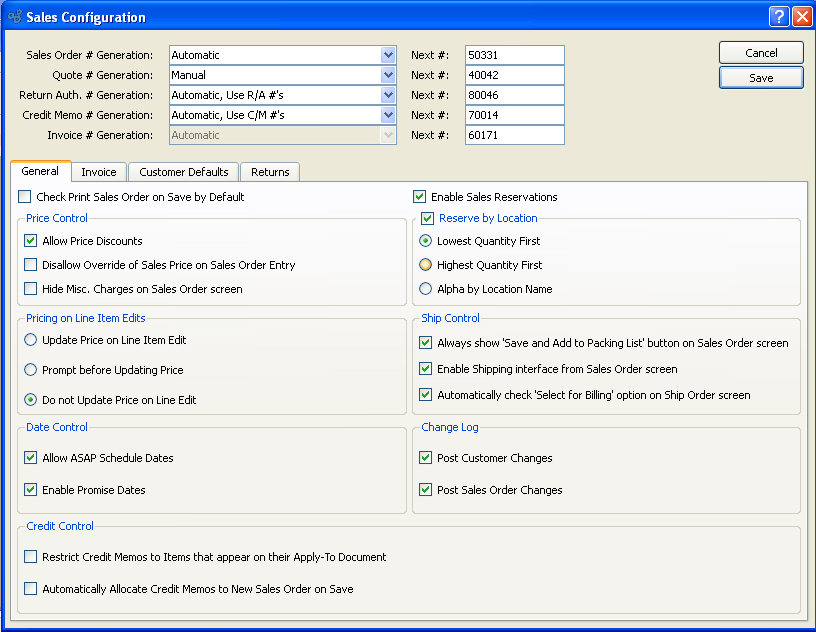
When configuring the S/O module, you are presented with the following options:
- Sales Order # Generation
Select one of the available Sales Order Number generation methods:
- Manual
Sales Order Numbers must be entered manually whenever you create a new Sales Order.
- Automatic
Sales Order Numbers will be automatically incremented by 1 each time a new Sales Order is created. These automatically-generated numbers may not be edited. They are read-only.
- Automatic, Allow Override
Sales Order Numbers will be automatically generated and incremented, as under the "Automatic" option described above. However, this option also allows you to manually override the Sales Order Number at the time of Sales Order creation.
- Next #
The next sequentially available Sales Order Number will display here. You may change the number—creating a new basis for the next Sales Order Number—by typing the new number into this field. Any changes you make here will be reflected the next time a new Sales Order is created in the S/O module.
- Quote # Generation
Select one of the available Quote Number generation methods:
- Manual
Quote Numbers must be entered manually whenever you create a new Quote.
- Automatic, Use Quote #'s
Quote Numbers will be automatically incremented by 1 each time a new Quote is created. These automatically-generated numbers may not be edited. They are read-only.
- Automatic, Use Quote #'s, Allow Override
Quote Numbers will be automatically generated and incremented, as under the "Automatic" option described above. However, this option also allows you to manually override the Quote Number at the time of Quote creation.
- Automatic, Use S/O #'s
Quote Numbers will be automatically incremented by 1 each time a new Quote is created, using the same number generation method specified for the creation of Sales Order Numbers. These automatically-generated numbers may not be edited. They are read-only.
- Next #
The next sequentially available Quote Number will display here. You may change the number—creating a new basis for the next Quote Number—by typing the new number into this field. Any changes you make here will be reflected the next time a new Quote is created in the S/O module.
- Return Auth. # Generation
Select one of the available Return Authorization Number generation methods:
- Manual
Return Authorization Numbers must be entered manually whenever you create a new Return Authorization.
- Automatic, Use R/A #'s
Return Authorization Numbers will be automatically incremented by 1 each time a new Return Authorization is created. These automatically-generated numbers may not be edited. They are read-only.
- Automatic, Use R/A #s, Allow Override
Return Authorization Numbers will be automatically generated and incremented, as under the "Automatic" option described above. However, this option also allows you to manually override the Return Authorization Number at the time of Return Authorization creation.
- Credit Memo # Generation
Select one of the available Credit Memo Number generation methods:
- Manual
Credit Memo Numbers must be entered manually whenever you create a new Credit Memo.
- Automatic, Use C/M #'s
Credit Memo Numbers will be automatically incremented by 1 each time you issue a new Credit Memo. These automatically-generated numbers may not be edited. They are read-only.
- Automatic, Use C/M #"s, Allow Override
Credit Memo Numbers will be automatically generated and incremented, as under the "Automatic" option described above. However, this option also allows you to manually override the Credit Memo Number at the time of Credit Memo creation.
- Automatic, Use S/O #'s
Credit Memo Numbers will be automatically incremented by 1 each time a new Credit Memo is created, using the same number generation method specified for the creation of Sales Order Numbers. These automatically-generated numbers may not be edited. They are read-only.
- Next #
The next sequentially available Credit Memo Number will display here. You may change the number—creating a new basis for the next Credit Memo Number—by typing the new number into this field. Any changes you make here will be reflected the next time you issue a new Credit Memo within the S/O module.
- Invoice # Generation
By default, Invoice Numbers are automatically generated. This system setting cannot be changed.
- Next #
The next sequentially available Invoice Number will display here. You may change the number—creating a new basis for the next Invoice Number—by typing the new number into this field. Any changes you make here will be reflected the next time you create a new Invoice within the S/O module.
To establish general settings for the S/O module, select the "General" tab. The following options will appear:
- Check Print Sales Order on Save by Default
Select to prompt users to print Sales Orders whenever Sales Orders are saved. If selected, users will be presented with a Sales Order print screen whenever a Sales Order is saved. To bypass this feature, do not select this option.
- Price Control
Select from the following price control options:
- Allow Price Discounts
Check this option to allow pricing discounts for select customers. This option instructs the system to verify whether any Pricing Discounts have been established for a Customer, prior to calculating the Line Item Price for of an Item within a Sales Order. If this option is unchecked, then the system will apply the full List Price for an Item within a Sales Order.
- Disallow Override of Sales Price on Sales Order Entry
Select to prevent all users from overriding the Sales Price when entering Sales Order Line Items. This is a system-wide setting, affecting all users. Do not select this option if you want to selectively prevent users from overriding Sales Prices. Individual users may be granted the ability to override Sales Prices, use the S/O module's OverridePrice privilege.
- Hide Misc. Charges on Sales Order screen
Select to hide all fields related to Miscellaneous Charges on the Sales Order Line Item tab. If your site does not use Misc. Charges when entering Sales Orders, it may make sense to hide this functionality to avoid confusion.
- Pricing on Editing Line Items
Select one of the following as your preferred response when users change Sales Order Line Item quantities:
- Update Price on Line Item Edit
If selected, the system will automatically update the Net Unit Price for the Line Item, adjusting to accommodate the newly-entered quantity.
- Prompt before Updating Price
If selected, the system will ask users if they want to update the Net Unit Price (YES/NO). If they answer "YES" because they do want to update the Price, then they will have to manually make the Price adjustment.
- Do not Update Price on Line Edit
If selected, the Net Unit Price will not be changed when Line Item quantity is changed on EDIT—and users will not be prompted to consider changing the Price.
Note
The Sales Order Line Item pricing options apply only when editing Line Item quantity.
- Date Control
Select from the following date control options:
- Allow ASAP Schedule Dates
Selecting this option will cause Sales Order Line Items to default to the current date if no schedule date is entered.
Note
The allocation of available Credit Memos occurs only once—when a Sales Order is saved for the first time. Subsequent saves will not result in additional allocations.
- Enable Promise Dates
Select to display a Promised Date field on the Sales Order Line Item screen, by default. If not selected, there will be no Promised Date field shown on that screen.
- Enable S/O Reservations
Select to enable the Sales Order Reservations functionality system-wide. This feature allows for the hard allocation of quantity to Sales Orders. If not selected, the Sales Order reservation options will be hidden from view.
- Reserve by Location
Select to set S/O Reservations for discrete locations and lots. The hard allocation of quantity will be for particular locations and will prevent other orders from issuing reserved inventory. The S/O Pick List will print the reserved location to expedite inventory picking. You may choose the order of precedence for selecting locations; Lowest Quantity First, Highest Quantity First, or Alpha by Location Name.
- Lowest Quantity First
Locations for the Item will be sorted ascending by quantity. Reservations will start with the Location with the lowest quantity and continue until the quantity required is fully reserved or there is insufficient quantity on hand.
- Highest Quantity First
Locations for the Item will be sorted descending by quantity. Reservations will start with the Location with the highest quantity and continue until the quantity required is fully reserved or there is insufficient quantity on hand.
- Alpha by Location Name
Locations for the Item will be sorted ascending alphabetically by the Location Name. Reservations will start with the first Location and continue until the quantity required is fully reserved or there is insufficient quantity on hand.
Note
The change of Reserve by Location from a state of enabled to disabled will remove all location reservations.
- Ship Control
Select from the following ship control options:
- Always show "Save and Add to Packing List" button on Sales Order screen
Select if you want the SAVE AND ADD TO PACKING LIST button to always be displayed on the Sales Order header screen. If this option is not selected, the SAVE AND ADD TO PACKING LIST button will only be displayed for newly-entered Sales Orders which have not yet been saved.
- Enable Shipping interface from Sales Order screen
Select to enable the performance of limited Shipping functionality from the Sales Order header. If selected, users will be able to issue Stock to Shipping and also return Stock from Shipping directly from the Sales Order header. If not selected, these Shipping options will not be available on the Sales Order header.
- Automatically check "Select for Billing" option on Ship Order screen
Select if you want the "Select for Billing" option to be selected by default whenever you ship Sales Order Line Items. Selecting this option reduces steps in the billing process. Specifically, if an Order is selected for billing when it is shipped, you do not then have to take the extra step of independently selecting the Order for billing. This can save time and also ensure your shipped Orders are selected for billing at the time of shipment.
- Change Log
Select from the following change log options
- Post Customer Changes to the Change Log
Select to post to the Change Log any changes made to Customer masters.
- Post Sales Order Changes to the Change Log
Select to post to the Change Log any changes made to Sales Orders.
- Credit Control
Select from the following credit control options:
- Restrict Credit Memos to Items that appear on their Apply-To Document
Select if you want to restrict Credit Memo Items to their Apply-To Document. Selecting this option narrows the Credit Memo Item selection process to only those Items which appeared on the Invoice the Credit Memo is being applied to. If not selected, a sold Item master list will appear instead when selecting Credit Memo Items for Credit Memos applied to a specific Invoice. This setting has no bearing on unapplied Credit Memos.
- Automatically Allocate Credit Memos to New Sales Order on Save
Select to have open Credit Memos for a Customer automatically allocated to any new Sales Orders entered for that Customer. This functionality helps reduce Customer credit balances by ensuring that Customer credits are consumed when new Sales Orders are entered. Any available, open Credit Memos are eligible for allocation. The allocation of available Credit Memos occurs only once—when a Sales Order is saved for the first time. Subsequent saves will not result in additional allocations. Credit Memos which have been allocated to a Sales Order are applied at the point when the Invoice resulting from the Sales Order is posted. Once the full balance of a Credit Memo has been applied, the Credit Memo is then closed. The printed Invoice the Customer receives will indicate whether Credit Memos have been applied. In addition, the total due from the Customer will be automatically adjusted to reflect any applied credits.
To the far right of the screen, the following buttons are available:
- CANCEL
Cancels any configuration settings, returning you to the application desktop.
- SAVE
Saves the configuration settings, returning you to the application desktop.
To establish Invoice and Credit Memo settings, select the "Invoice" tab. The following screen will appear:
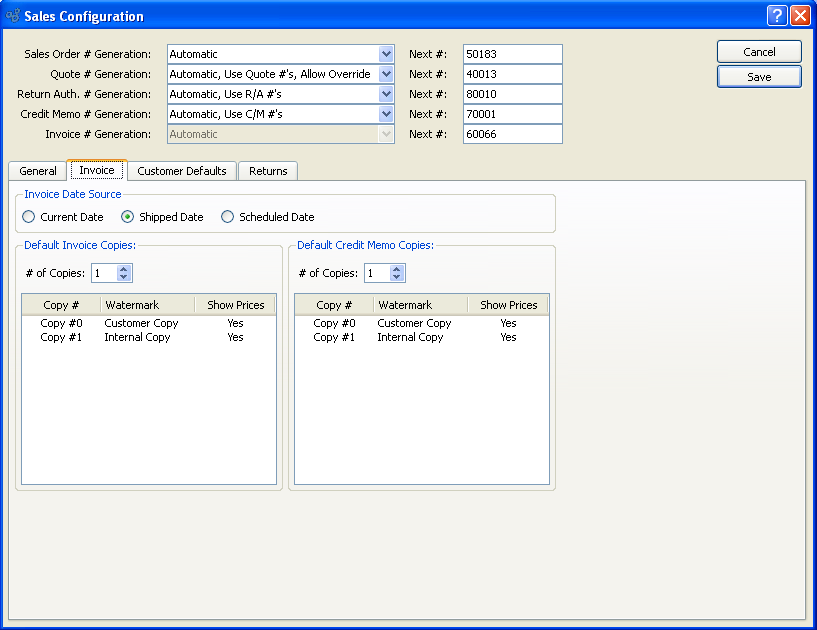
When establishing Invoice and Credit Memo settings, you are presented with the following options:
- Invoice Date Source
Select one of the following Invoice date options:
- Current Date
If selected, the Invoice date on the Invoice header will be the same date as the Sales order date.
- Shipped Date
If selected, the Invoice date on the Invoice header will be the same date as the Sales Order ship date.
- Scheduled Date
If selected, the Invoice date on the Invoice header will be the same date as the Sales Order scheduled date.
- Default Invoice Copies
Indicate how you want invoice copies to print.
- # of Copies
Indicate the number of copies you want to print. Information about the specified copies will display below.
- Default Credit Memo Copies
Indicate how you want credit memo copies to print.
- # of Copies
Indicate the number of copies you want to print. Information about the specified copies will display below.
To establish default settings to be used whenever new Customers are entered, select the "Customer Defaults" tab. The following screen will appear:
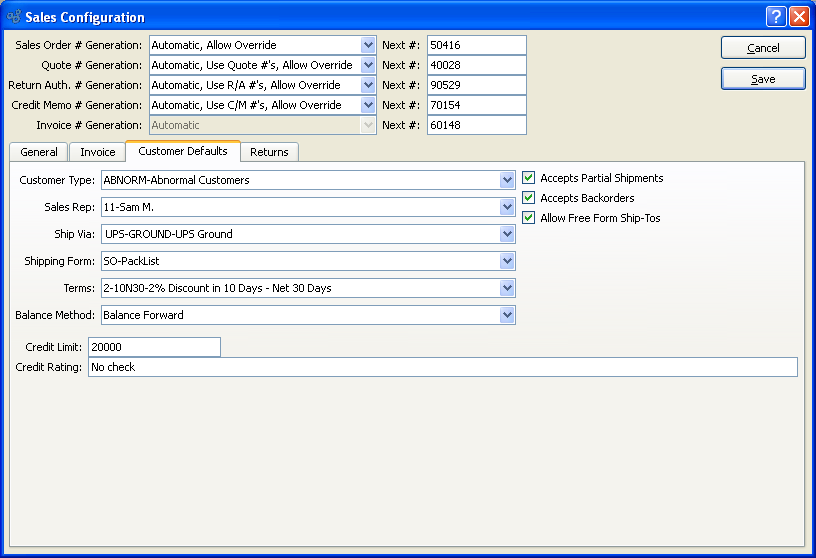
When establishing Customer master default settings, you are presented with the following options:
- Customer Type
Specify a default Customer Type to be used whenever new Customers are created. The default Customer Type may be changed when entering or editing new Customers.
- Sales Rep
Specify a default Sales Representative to be used whenever new Customers are created. The Sales Rep may be changed when entering or editing new Customers.
- Ship Via
Specify a default Ship Via.
- Shipping Form
Specify a default Shipping Form.
- Terms
Specify the default billing Terms to be used whenever new Customers are created. The default Terms may be changed when entering or editing new Customers.
- Balance Method
Specify a default procedure for handling cash receipts from Customers. This notation is informational only. Balance Forward: Select to apply cash receipts to the Customer's current balance due.
- Credit Limit
Specify the default credit limit to be used for all Customers.
- Credit Rating
Specify the default credit rating to be used for all Customers.
- Accepts Partial Shipments
Select to indicate Customers accept partial shipments by default.
- Accepts Backorders
Select to indicate Customers accept backorders by default.
- Allow Free Form Ship-Tos
Select to indicate Customers allow free-form Ship-To's by default. This default appears on the Customer master.
To define your system's Return Authorization configuration, select the "Return" tab. The following screen will appear:
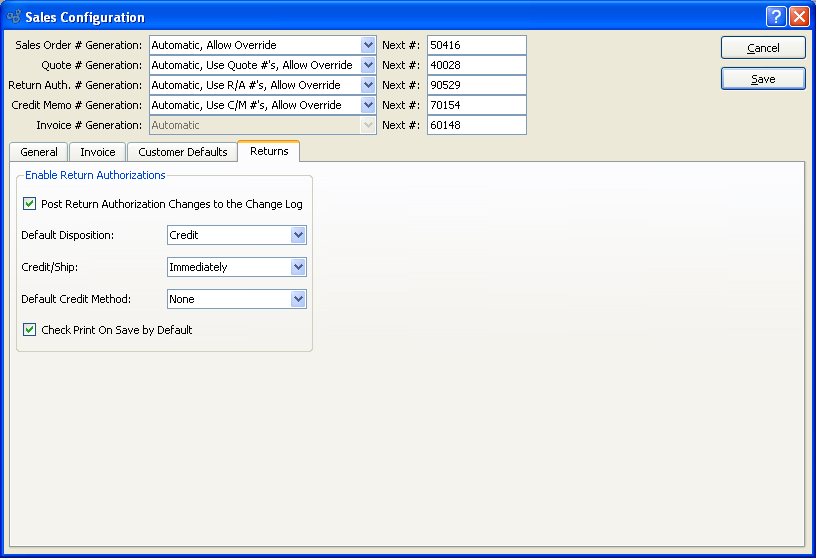
Returns Configuration Options
When configuring Return Authorization settings, you are presented with the following options:
- Enable Return Authorizations
Select to enable the system's Return Authorizations capability. If not selected, users will be prevented from performing any tasks related to Return Authorizations—and related functionality will be hidden from view. For systems where Return Authorizations are enabled, this option will be hidden.
- Post Return Authorization Changes to the Change Log
Select to record changes made to Return Authorizations in the Return Authorization change log. If not selected, the Return Authorization changelog will not contain change information.
- Default Disposition
Specify one of the following default methods for handling Return Authorizations:
- Credit
Select if, by default, you want to issue credit to Customers for authorized Line Items and quantities. No return is required or expected. Return Authorization Line Items will close when an associated Credit Memo is posted.
- Return
Select if, by default, you want to authorize returns from Customers. Return Authorization Items will close when an associated Credit Memo is posted, or when all Items on a line have been returned, whichever comes last.
- Replace
Select if, by default, you want to replace Items returned by Customers. Authorized quantities will be added as additional order quantity to an associated Sales Order line, which in turn should be reopened if closed. Return Authorization Items will close when all Items on the line have been returned or all authorized Items on the line have been shipped, whichever comes last. No money should be involved when invoicing replacement Items.
- Service
Select if, by default, you want to repair or service Items returned by Customers. Service or repair items will first be received by a Return Authorization. Then a new Sales Order with linked Work Order(s) will be created to track work and shipping on the repair or service. The new Sales Order will be on RMA Hold until Items have been received by the Return Authorization.
- Substitute
Select if, by default, you want to authorize the substitution of Items returned by Customers. Under this option, when an original Sales Order is imported into the Return Authorization, the Return Authorization Line Items will default to the Return disposition. Any new Line Items added beyond the original ones will have a default disposition of Ship.
- Credit/Ship
Specify the default timetable for Customer credits and/or returns:
- Immediately
Select to issue credit or send returns to Customers immediately by default.
- Upon Receipt
Select to issue credit or send returns to Customers only after you have received returned goods from them by default.
- Default Credit Method
Specify one of the following default credit method options:
- None
Select if, by default, you do not issue credit for Customer returns.
- Credit Memo
Select if, by default, you credit Customer returns with a Credit Memo to the Customer's account. This option will result in the automatic creation of a sales Credit Memo.
- Check
Select if, by default, you credit Customer returns by sending them a Check. This option will create a Credit Memo, then a Misc. Check that applies to the Credit Memo.
- Credit Card
Select if, by default, you credit Customer returns with a refund on their Credit Card.
Setting up the default Account Number structure is one of the primary purposes of the General Ledger Configuration. The system uses a multi-segment approach to defining General Ledger accounts. The various segments include the following:
Base Account Segment
Company Segment
Profit Center
Subaccount
Depending on the parameters selected, the system will display General Ledger Account Numbers in the Profit Center-Account Number-Subaccount sequence. An example of this sequence would be 001-11111-001.
Tip
It is important to realize that the system does not utilize sub-Accounts in the same manner that some other packaged software does. It does not roll-up into the base account, but allows you to define "related" Accounts.
To configure the General Ledger, select the "General Ledger" tab. The following screen will appear:
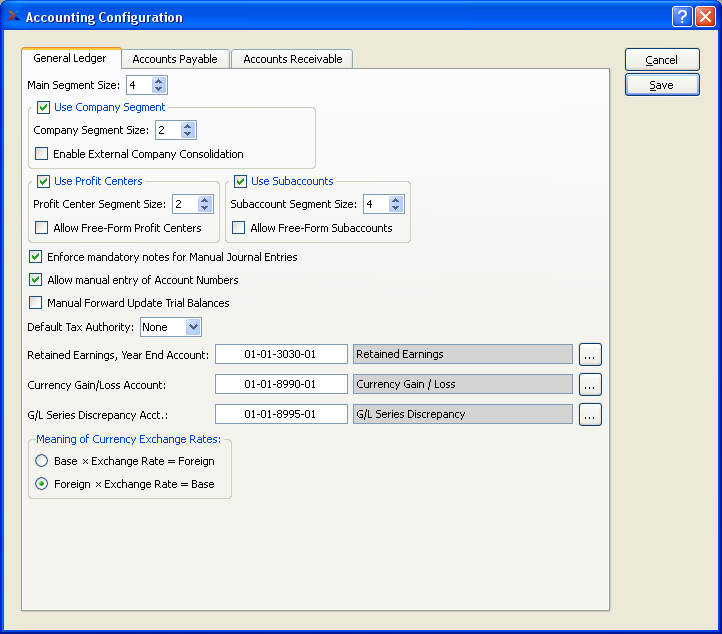
When configuring the General Ledger, you are presented with the following options:
- Main Segment Size
Specify a main Segment size value between 3 and 10. This setting defines how large the base Account Number portion should be. For example, if you specify "4" here, then your Account Numbers would probably range from 1000 through 9999. Similarly, if you specify "5" then your Account Number range would be from 10000 though 99999.
- Use Company Segment
Select to utilize a Company Segment by default. This is an optional setting.
- Company Segment Size
If a Company Segment is being utilized, specify a Company Segment size value between 1 and 10.
- Enable External Company Consolidation
Check this setting to enable the ability associate a Company to another database that can be used to synchronize trial balance information.
- Use Profit Centers
Select to utilize Profit Centers by default. This is an optional setting.
- Profit Center Segment Size
If Profit Centers are being utilized, specify a Profit Center Segment size value between 1 and 10. This segment is placed at the front end of the Account Number. Profit Centers are typically used to identify activity for different Sites.
- Allow Free-Form Profit Centers
Select to allow free-form Profit Centers. Free-form means the values may be edited on the Account Number master. In other words, you will not be required to select a predetermined Profit Center value from the list. Using free-form Profit Centers can lead to inconsistent Account Numbers if not handled correctly.
- Use Subaccounts
Select to utilize Subaccounts by default. This is an optional setting.
- Subaccount Segment Size
If Subaccounts are being utilized, specify a Subaccount Segment size value between 1 and 10. This segment is placed at the back end of the Account Number. Subaccounts are typically used to identify activity for similar types of accounts where detail is important.
- Allow Free-Form Subaccounts
Select to allow free-form Subaccounts. Free-form means the values may be edited on the Account Number master. In other words, you will not be required to select a predetermined Subaccount value from the list. Using free-form Subaccounts can lead to inconsistent Account Numbers if not handled correctly.
- Enforce mandatory notes for Manual G/L Entries
Select if you want to require users to be required to enter Notes when posting simple or series manual Journal entries. If this option is not selected, users will not be required to enter Notes when posting simple or series manual Journal entries.
Tip
Try to avoid changing your Year End Equity Account if you have already used it to close a Fiscal Year. If you do change this Account after a fiscal year has been closed, be sure to consult your system administrator. The trial balance for the new Account will need to be manually updated.
- Allow manual entry of Account Numbers
Select to enable users to manually enter G/L Account Numbers wherever G/L Account Numbers may be entered. If not selected, users will be required to use a browse button to select G/L Account Numbers from a list.
Note
If Account Numbers have multiple segments separated by dashes, the dashes must be included when manually entering G/L Account Numbers. If the dashes are not included, the manual entry will not work.
- Manual Forward Update Trial Balances
Select if you want to manually configure Trial Balance forward-updating on an Account-by-Account basis. If you prefer automatic forward-updating, then do not select this option. Not selecting this option means forward-updating will be automatic across all Accounts and financial reports. In automatic mode, the forward-update check box will be hidden on the Account master records. The forward-update utility in the Accounting Module menu will also be hidden from view in automatic mode.
- Default Tax Authority
Specify the default Tax Authority to be used when setting up Sites.
- Retained Earnings, Year End Account
Select a valid General Ledger Account. This is an Equity Account. It will be credited if retained earnings are positive—and debited if retained earnings are negative. The retained earnings calculation occurs when a Fiscal Year is closed. Total Expenses for the year are subtracted from total Revenues, and the balance is transferred to the Year End Equity Account. The system then automatically resets the beginning balances for Revenue and Expense Accounts to $0 for the start of the new Fiscal Year.
Note
The Currency Gain/Loss Account is needed only for databases where multiple Currencies are used.
- Currency Gain/Loss Account
Select a valid General Ledger Account. This is an Expense Account. It will debited for Currency gains and credited for Currency losses arising from fluctuating Exchange Rates. Currency gains/losses may be recognized at the following points: 1) When posting a Cash Receipt applied to an Invoice; 2) when posting an A/P Check applied to a Voucher; 3) when applying an A/R Misc. Credit Memo to an Invoice; and 4) when applying an A/P Misc. Credit Memo to a Voucher. In each case, the gain or loss arises when the Exchange Rate used for the Apply-To document differs from the Exchange Rate used for the application.
- G/L Series Discrepancy Account
Select a valid General Ledger Account. This is an Expense Account. It will be debited or credited if rounding errors cause discrepancies when multiple line item (i.e., series) transactions are posted to the General Ledger. If used, the amounts posted to this Account will be minuscule, as rounding errors are fractional by nature.
- Meaning of Currency Exchange Rates
Specify how you want Exchange Rates to be implemented and also displayed on the Exchange Rates master list:
- Base x Exchange Rate = Foreign
If selected, this equation will be used.
- Foreign x Exchange Rate = Base
If selected, this equation will be used.
To the far right of the screen, the following buttons are available:
- CANCEL
Cancels any configuration settings, returning you to the application desktop.
- SAVE
Saves the configuration settings, returning you to the application desktop.
To configure Accounts Payable options, select the "Accounts Payable" tab. The following screen will appear:
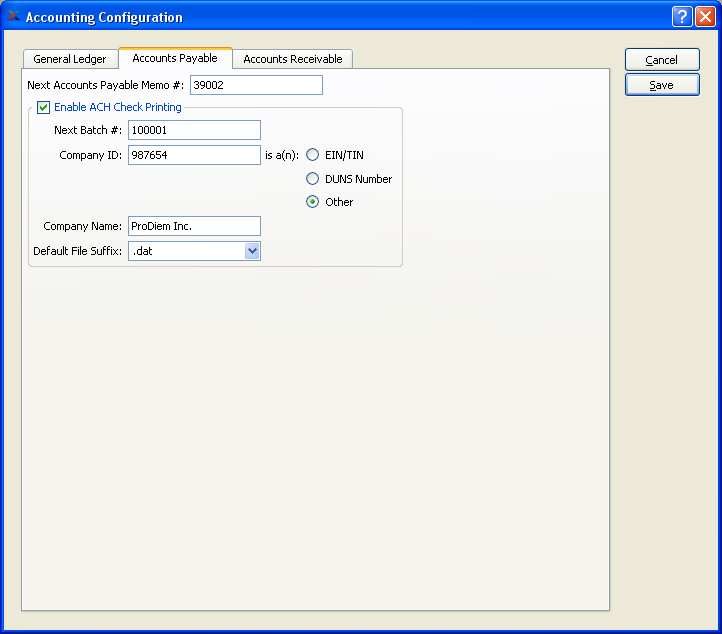
Configure Accounts Payable
When configuring the A/P module, you are presented with the following options:
- Next A/P Memo #
The next sequentially available Accounts Payable Memo Number will display here. You may change the number—creating a new basis for the next A/P Memo Number—by typing the new number into this field.
- Enable ACH Check Printing
Select to enable Automated Check Clearinghouse (ACH), which is automated electronic funds transfer and clearing.
- Next Batch #
Start number for the next batch of Checks issued.
- Company ID
Unique company number used to identify legal business entity. Select a radio button to specify what type of number is used.
- EIN/TIN
Employer Identification Number (EIN) or Federal Tax Identification Number (TIN)
- DUNS Number
Dun & Bradstreet nine digit unique business ID number.
- Other
Any other unique Identifier.
- Company Name
Legal Name of organization.
- Default File Suffix
Specifies file format used for check printing based on items in drop down list.
To configure Accounts Receivable options, select the "Accounts Receivable" tab. The following screen will appear:
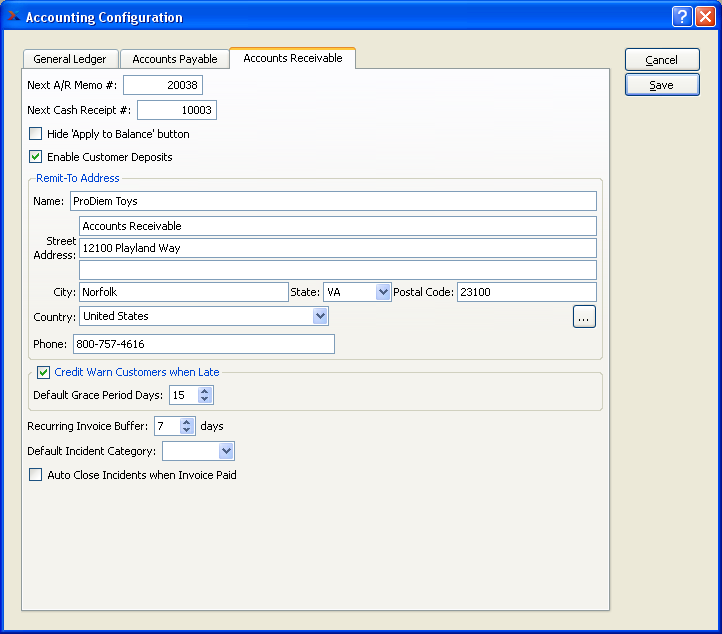
Configure Accounts Receivable
When configuring Accounts Receivable options, you are presented with the following options:
- Next A/R Memo #
The next sequentially available Accounts Receivable Memo Number will display here. You may change the number—creating a new basis for the next A/R Memo Number—by typing the new number into this field.
- Hide "Apply to Balance" button
Select if you want to hide the APPLY TO BALANCE button on the "Enter Cash Receipt" screen. If this option is selected, users will be required to apply Cash Receipts manually to individual open A/R items.
- Enable Customer Deposits
Select if you want unapplied Cash Receipts from Customers to be handled by a Deferred Revenue Account. If selected, the A/R Account Assignments screen will include a Deferred Revenue Account option. Not selecting this option will hide the Deferred Revenue Account option on the A/R Account assignments screen. Also hidden will be Customer Deposit options on the Cash Receipts screen. If the Deferred Revenue approach is not being used, then unapplied Cash Receipts will be handled by the Asset Account for the specified Bank Account.
- Remit-To Address
The Remit-To Address is used in multiple report definitions. Specify details to be used for your site's default Remit-To Address. If a new Address is manually entered here, that Address will be added automatically to the master list of Addresses. For additional documentation related to creating Addresses, see Section 8.1, “ New Address”.
- Credit Warn Customers when Late
Select to globally enable the ability to place Customers on credit warning when the due dates on their A/R open items become late past the specified grace period. If this option is selected, you will have the ability to run a utility called "Update Late Customer Credit Status" described here: Section 11.4, “Update Late Customer Credit Status”. When run, this utility will review all late A/R open items for all Customers. Any Customers found to have late items falling outside the grace period will be placed on credit warning. These Customers will automatically be taken off credit warning once their late items are paid.
- Default Grace Period Days
Specify the standard number of days beyond the A/R open due date which will serve as a grace period. As long as A/R open item due dates are within the grace period, Customers will not be put on credit warning when the late status utility is run. Once outside the grace period, they will be placed on credit warning.
- Recurring Invoice Buffer
Specify the number of buffer days you want to allow for when automatically processing recurring Invoices. This setting is used by the recurring Invoices utility, which is described in more detail here Section 11.5, “ Create Recurring Invoices”. Essentially, the buffer days setting tells the utility how far to look ahead. When it runs, the utility will create new Invoices for any recurring Invoices having Invoice dates within the look-ahead (i.e., buffer) days. If an Invoice date falls outside the buffer period, then no new Invoice will be created.
- Default Incident Category
Specifies the default Incident category used for Incidents associated with Accounts Receivable.
- Auto Close Incidents when Invoice Paid
Select to automatically close Incidents tied to open Invoices when those Invoices are themselves paid in full and closed.