Introduction
In this demo, we will show you how to build a Tinder-style web application (named "Tapster") recommending comics to users based on their likes/dislikes of episodes interactively.
The demo will use Similar Product Template. Similar Product Template is a great choice if you want to make recommendations based on immediate user activities or for new users with limited history. It uses MLLib Alternating Least Squares (ALS) recommendation algorithm, a Collaborative filtering (CF) algorithm commonly used for recommender systems. These techniques aim to fill in the missing entries of a user-item association matrix. Users and products are described by a small set of latent factors that can be used to predict missing entries. A layman's interpretation of Collaborative Filtering is "People who like this comic, also like these comics."
All the code and data is on GitHub at: github.com/PredictionIO/Demo-Tapster.
Data
The source of the data is from Tapastic. You can find the data files here.
The data structure looks like this:
Episode List data/episode_list.csv
Fields: episodeId | episodeTitle | episodeCategories | episodeUrl | episodeImageUrls
1,000 rows. Each row represents one episode.
User Like Event List data/user_list.csv
Fields: userId | episodeId | likedTimestamp
192,587 rows. Each row represents one user like for the given episode.
The tutorial has four major steps: - Demo application setup - PredictionIO installation and setup - Import data into database and PredictionIO - Integrate demo application with PredictionIO
Tapster Demo Application
The demo application is built using Rails.
You can clone the existing application with:
1 2 3 | $ git clone https://github.com/PredictionIO/Demo-Tapster.git $ cd Demo-Tapster $ bundle install |
You will need to edit config/database.yml to match your local database settings. We have provided some sensible defaults for PostgreSQL, MySQL, and SQLite.
Setup the database with:
1 2 | $ rake db:create $ rake db:migrate |
At this point, you should have the demo application ready but with an empty database. Lets import the episodes data into our database. We will do this with: $ rake import:episodes. An "Episode" is a single comic strip.
This script is pretty simple. It loops through the CSV file and creates a new episode for each line in the file in our local database.
You can start the app and point your browser to http://localhost:3000
1 | $rails server
|

PredictionIO Setup
Install PredictionIO
Follow the installation instructions here or simply run:
1 | $ bash -c "$(curl -s https://install.prediction.io/install.sh)" |

Create a New App
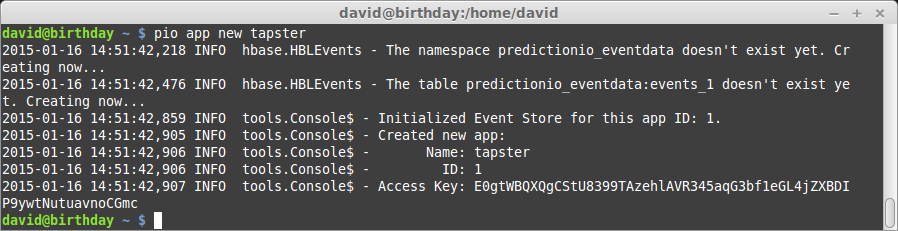
You will need to create a new app on PredictionIO to house the Tapster demo. You can do this with:
1 | $ pio app new tapster
|
Take note of the App ID and Access Key.
Setup Engine
We are going to copy the Similar Product Template into the PIO directory.
1 2 | $ cd PredictionIO $ pio template get PredictionIO/template-scala-parallel-similarproduct tapster-episode-similar |
Next we are going to update the App ID in the ‘engine.json’ file to match the App ID we just created.
1 2 3 | $ cd tapster-episode-similar $ nano engine.json $ cd .. |

Modify Engine Template
By the default, the engine template reads the “view” events. We can easily to change it to read “like” events.
Modify readTraining() in DataSource.scala:
1 2 3 4 5 6 7 8 9 10 11 12 13 14 15 16 17 18 19 20 21 22 23 24 25 26 27 28 29 30 31 32 33 34 35 36 | override def readTraining(sc: SparkContext): TrainingData = { ... val viewEventsRDD: RDD[ViewEvent] = eventsDb.find( appId = dsp.appId, entityType = Some("user"), eventNames = Some(List("like")), // MODIFIED // targetEntityType is optional field of an event. targetEntityType = Some(Some("item")))(sc) // eventsDb.find() returns RDD[Event] .map { event => val viewEvent = try { event.event match { case "like" => ViewEvent( // MODIFIED user = event.entityId, item = event.targetEntityId.get, t = event.eventTime.getMillis) case _ => throw new Exception(s"Unexpected event ${event} is read.") } } catch { case e: Exception => { logger.error(s"Cannot convert ${event} to ViewEvent." + s" Exception: ${e}.") throw e } } viewEvent } ... } } |
Finally to build the engine we will run:
1 2 3 | $ cd tapster-episode-similar $ pio build $ cd .. |

Import Data
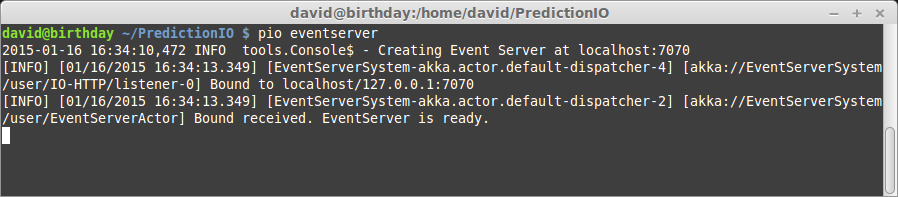
Once everything is installed, start the event server by running: $ pio eventserver
ALERT: If your laptop goes to sleep you might manually need to restart HBase with:
1 2 3 | $ cd PredictionIO/venders/hbase-0.98.6/bin $ ./stop-hbase.sh $ ./start-hbase.sh |
The key event we are importing into PredictionIO event server is the "Like" event (for example, user X likes episode Y).
We will send this data to PredictionIO by executing $ rake import:predictionio command.
This script is a little more complex. First we need to connect to the Event Server.
1 | client = PredictionIO::EventClient.new(ENV['PIO_ACCESS_KEY'], ENV['PIO_EVENT_SERVER_URL'], THREADS) |
You will need to create the environmental variables PIO_ACCESS_KEY and PIO_EVENT_SERVER_URL. The default Event Server URL is: http://localhost:7070.
You can set these values in the .env file located in the application root directory and it will be automatically loaded into your environment each time Rails is run.
The next part of the script loops through each line of the data/user_list.csv file and returns an array of unique user and episode IDs. Once we have those we can send the data to PredictionIO like this.
First the users:
1 2 3 4 5 | user_ids.each_with_index do |id, i| # Send unique user IDs to PredictionIO. client.aset_user(id) puts "Sent user ID #{id} to PredictionIO. Action #{i + 1} of #{user_count}" end |
And now the episodes:
1 2 3 4 5 6 7 8 9 10 11 12 13 14 15 16 17 | episode_ids.each_with_index do |id, i| # Load episode from database - we will need this to include the categories! episode = Episode.where(episode_id: id).take if episode # Send unique episode IDs to PredictionIO. client.acreate_event( '$set', 'item', id, properties: { categories: episode.categories } ) puts "Sent episode ID #{id} to PredictionIO. Action #{i + 1} of #{episode_count}" else puts "Episode ID #{id} not found in database! Skipping!".color(:red) end end |
Finally we loop through the data/user_list.csv file a final time to send the like events:
1 2 3 4 5 6 7 8 9 10 11 12 13 14 | CSV.foreach(USER_LIST, headers: true) do |row| user_id = row[0] # userId episode_id = row[1] # episodeId # Send like to PredictionIO. client.acreate_event( 'like', 'user', user_id, { 'targetEntityType' => 'item', 'targetEntityId' => episode_id } ) puts "Sent user ID #{user_id} liked episode ID #{episode_id} to PredictionIO. Action #{$INPUT_LINE_NUMBER} of #{line_count}." end |
In total the script takes about 4 minutes to run on a basic laptop. At this point all the data is now imported to PredictionIO.

Engine Training
We train the engine with the following command:
1 2 | $ cd tapster-episode-similar $ pio train -- --driver-memory 4g |

Using the --driver-memory option to limit the memory used by PredictionIO. Without this PredictionIO can consume too much memory leading to a crash. You can adjust the 4g up or down depending on your system specs.
You can set up a job to periodically retrain the engine so the model is updated with the latest dataset.
Deploy Model
You can deploy the model with: $ pio deploy from the tapster-episode-similar directory.
At this point, you have an demo app with data and a PredictionIO server with a trained model all setup. Next, we will connect the two so you can log the live interaction (likes) events into PredictionIO event server and query the engine server for recommendation.
Connect Demo app with PredictionIO
Overview
On a high level the application keeps a record of each like and dislike. It uses jQuery to send an array of both likes and dislikes to the server on each click. The server then queries PredictionIO for a similar episode which is relayed to jQuery and displayed to the user.
Data flow:
- The user likes an episode.
- Tapster sends the "Like" event to PredictionIO event server.
- Tapster queries PredictionIO engine with all the episodes the user has rated (likes and dislikes) in this session.
- PredictionIO returns 1 recommended episode.
JavaScript
All the important code lives in app/assets/javascripts/application.js View on GitHub
Most of this file is just handlers for click things, displaying the loading dialog and other such things.
The most important function is to query the Rails server for results from PredictionIO.
1 2 3 4 5 6 7 8 9 10 11 12 13 14 | // Query the server for a comic based on previous likes. See episodes#query. queryPIO: function() { var _this = this; // For closure. $.ajax({ url: '/episodes/query', type: 'POST', data: { likes: JSON.stringify(_this.likes), dislikes: JSON.stringify(_this.dislikes), } }).done(function(data) { _this.setComic(data); }); } |
Rails
On the Rails side all the fun things happen in the episodes controller locates at: app/controllers/episodes_controller View on GitHub.
1 2 3 4 5 6 7 8 9 10 11 12 13 14 15 16 17 18 19 20 21 22 23 24 25 26 27 28 29 30 31 32 | def query # Create PredictionIO client. client = PredictionIO::EngineClient.new(ENV['PIO_ENGINE_URL']) # Get posted likes and dislikes. likes = ActiveSupport::JSON.decode(params[:likes]) dislikes = ActiveSupport::JSON.decode(params[:dislikes]) if likes.empty? # We can't query PredictionIO with no likes so # we will return a random comic instead. @episode = random_episode render json: @episode return end # Query PredictionIO. # Here we black list the disliked items so they are not shown again! response = client.send_query(items: likes, blackList: dislikes, num: 1) # With a real application you would want to do some # better sanity checking of the response here! # Get ID of response. id = response['itemScores'][0]['item'] # Find episode in database. @episode = Episode.where(episode_id: id).take render json: @episode end |
On the first line we make a connection to PredictionIO. You will need to set the PIO_ENGINE_URL. This can be done in the .env file. The default URL is: http://localhost:8000.
Next we decode the JSON sent from the browser.
After that we check to see if the user has liked anything yet. If not we just return a random episode.
If the user has likes then we can send that data to PredictionIO event server.
We also blacklist the dislikes so that they are not returned.
With our response from PredictionIO it’s just a matter of looking it up in the database and rendering that object as JSON.
Once the response is sent to the browser JavaScript is used to replace the existing comic and hide the loading message.
Thats it. You’re done! If Ruby is not your language of choice check out our other SDKs and remember you can always interact with the Event Server though it’s native JSON API.
Links
Source code is on GitHub at: github.com/PredictionIO/Demo-Tapster
Conclusion
Love this tutorial and PredictionIO? Both are open source (Apache 2 License). Fork this demo and build upon it. If you produce something cool shoot us an email and we will link to it from here.
Found a typo? Think something should be explained better? This tutorial (and all our other documenation) live in the main repo here. Our documentation is in the livedoc branch. Find out how to contribute documentation at docs.prediction.io/community/contribute-documentation/.
We ♥ pull requests!