Overview
You can scale PredictionIO on AWS with CloudFormation. Here we have defined a PredictionIO CloudFormation stack that you can deploy a functional, fully distributed PredictionIO cluster in minutes.
Instances
The PredictionIO CloudFormation stack creates two types of instance: compute and storage. By default, the stack will launch 1 compute Instance and 3 Storage instances.
The compute instance (ComputeInstance) acts as Spark master. You can launch extra compute instances (ComputeInstanceExtra) by updating the stack. The storage instances (StorageInstance) form the core of the HDFS, ZooKeeper quorum, and HBase storage. Extra storage instances (StorageInstanceExtra) can be added to the cluster by updating the stack. They cannot be removed once they are spinned up.
PredictionIO Event Server will be launched on all storage instances.
Networking
The stack will automatically create a VPC and a subnet with an Internet gateway. All cluster instances will be launched inside this subnet using a single security group that enables all TCP communications among all instances within the same group. All compute instances (including those that are launched after stack creation) will receive public IPs. All core storage instances will receive public Elastic IPs.
Step-by-Step
First, you need to have an active Amazon Web Services account with permissions to use the following services:
- Auto Scaling
- CloudFormation
- EC2
- VPC
Subscribe to PredictionIO Cluster
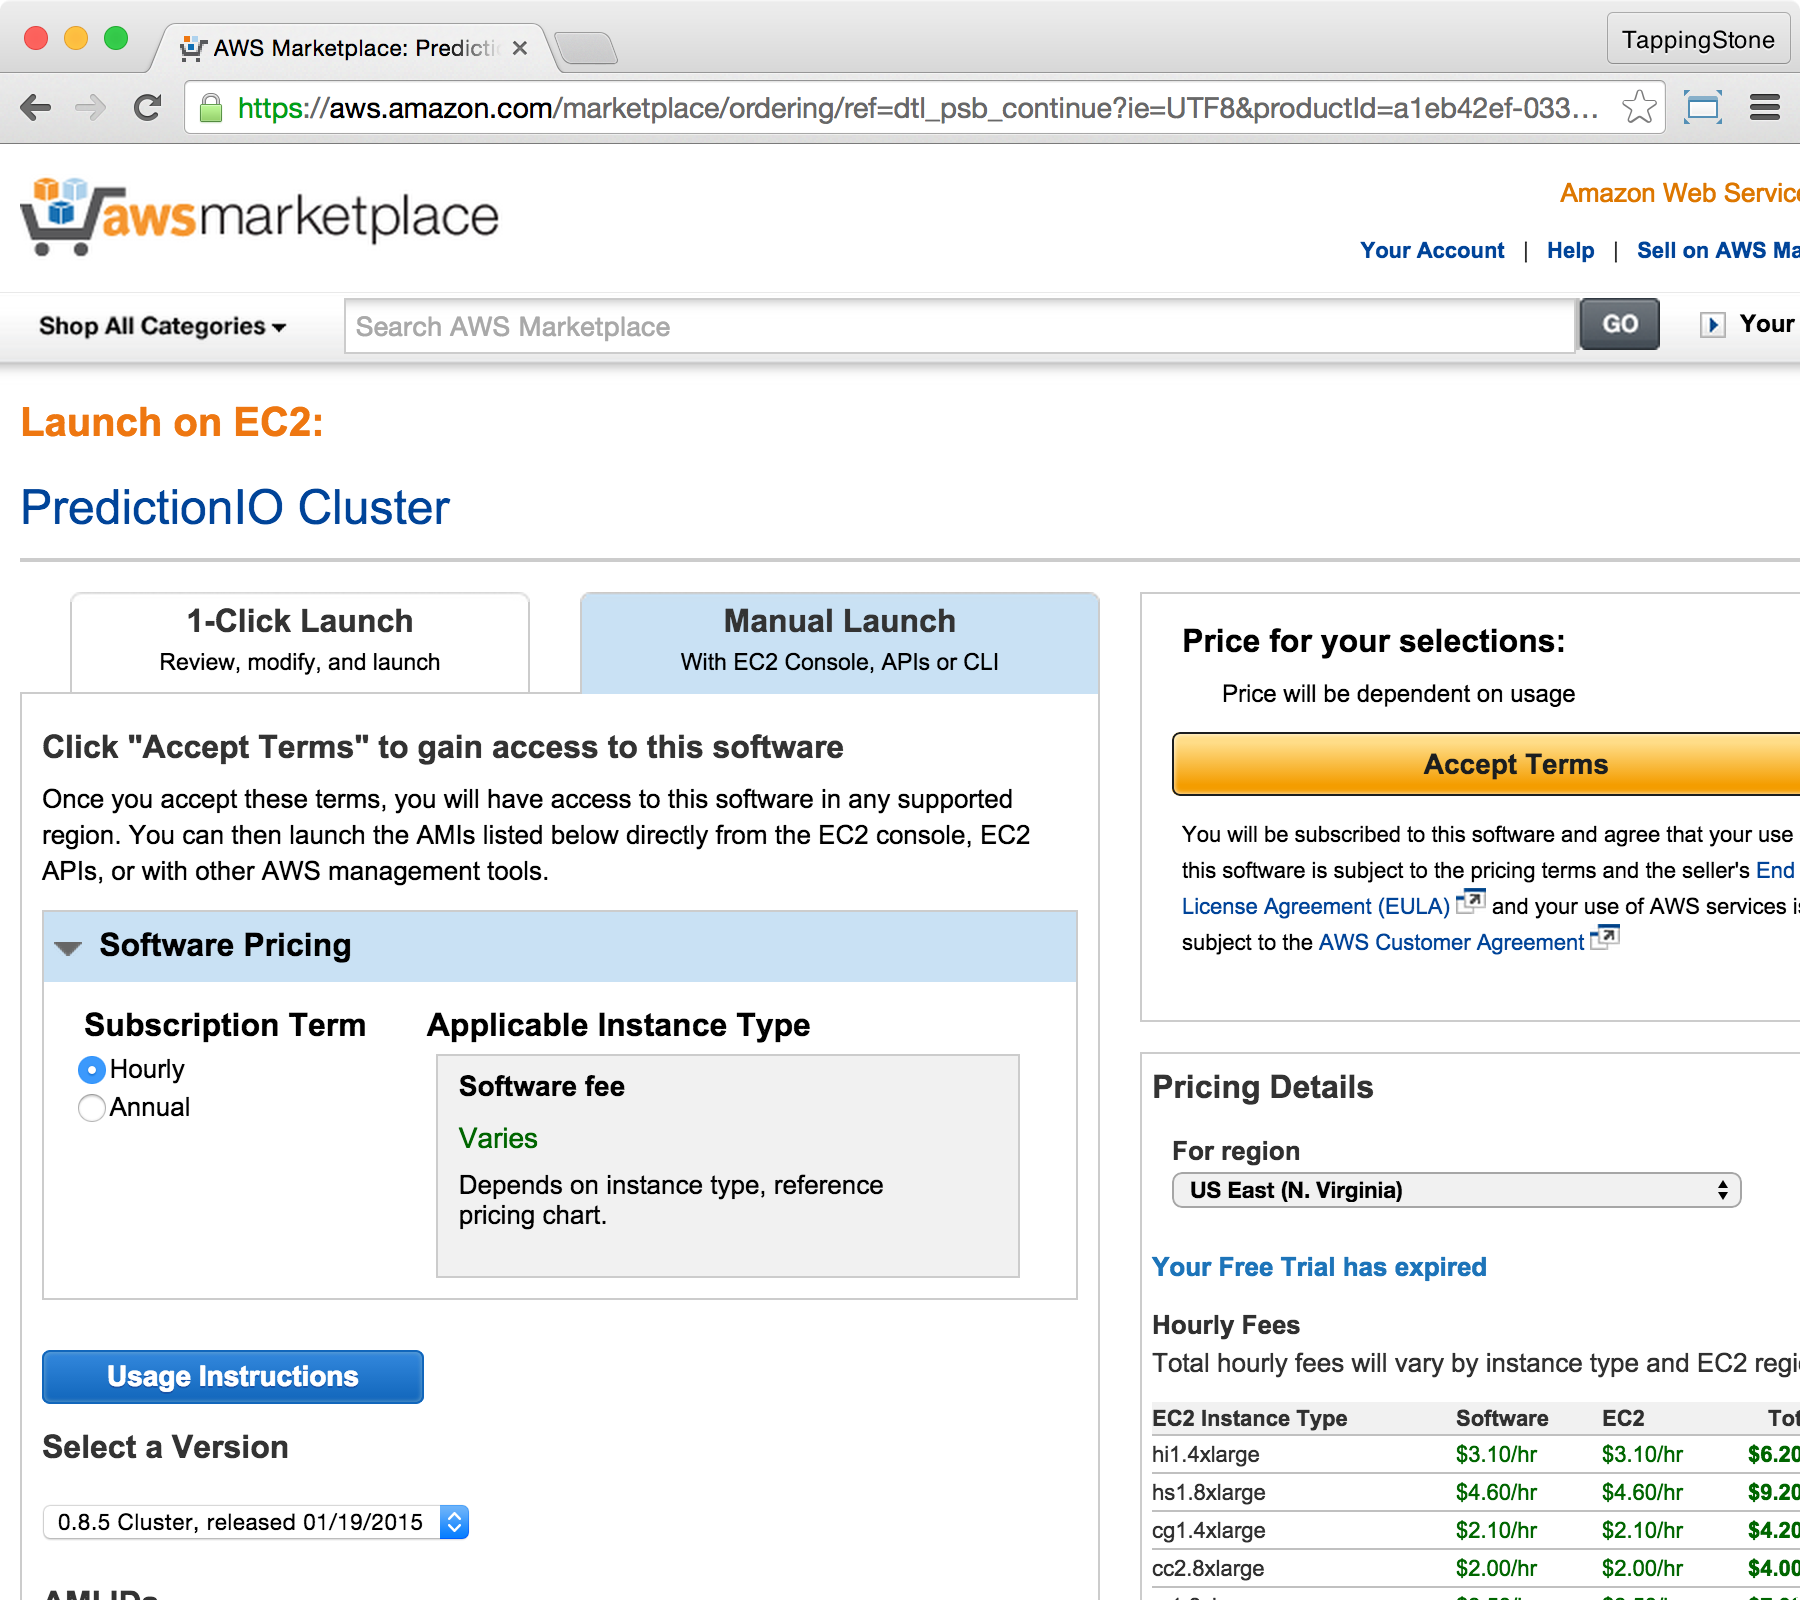
Before you can start using PredictionIO CloudFormation template, you will need to subscribe to PredictionIO Cluster AMI through AWS Marketplace. To subscribe, go to this link. Click the yellow "Continue" button on the next screen.

In the next screen, click the "Manual Launch" tab, then select your preferred pricing model. Pick your desired version, then click "Accept Terms".
Once your subscription is in place, you may proceed to the next section.
Start Using CloudFormation
From your main AWS console, locate CloudFormation and click on it.
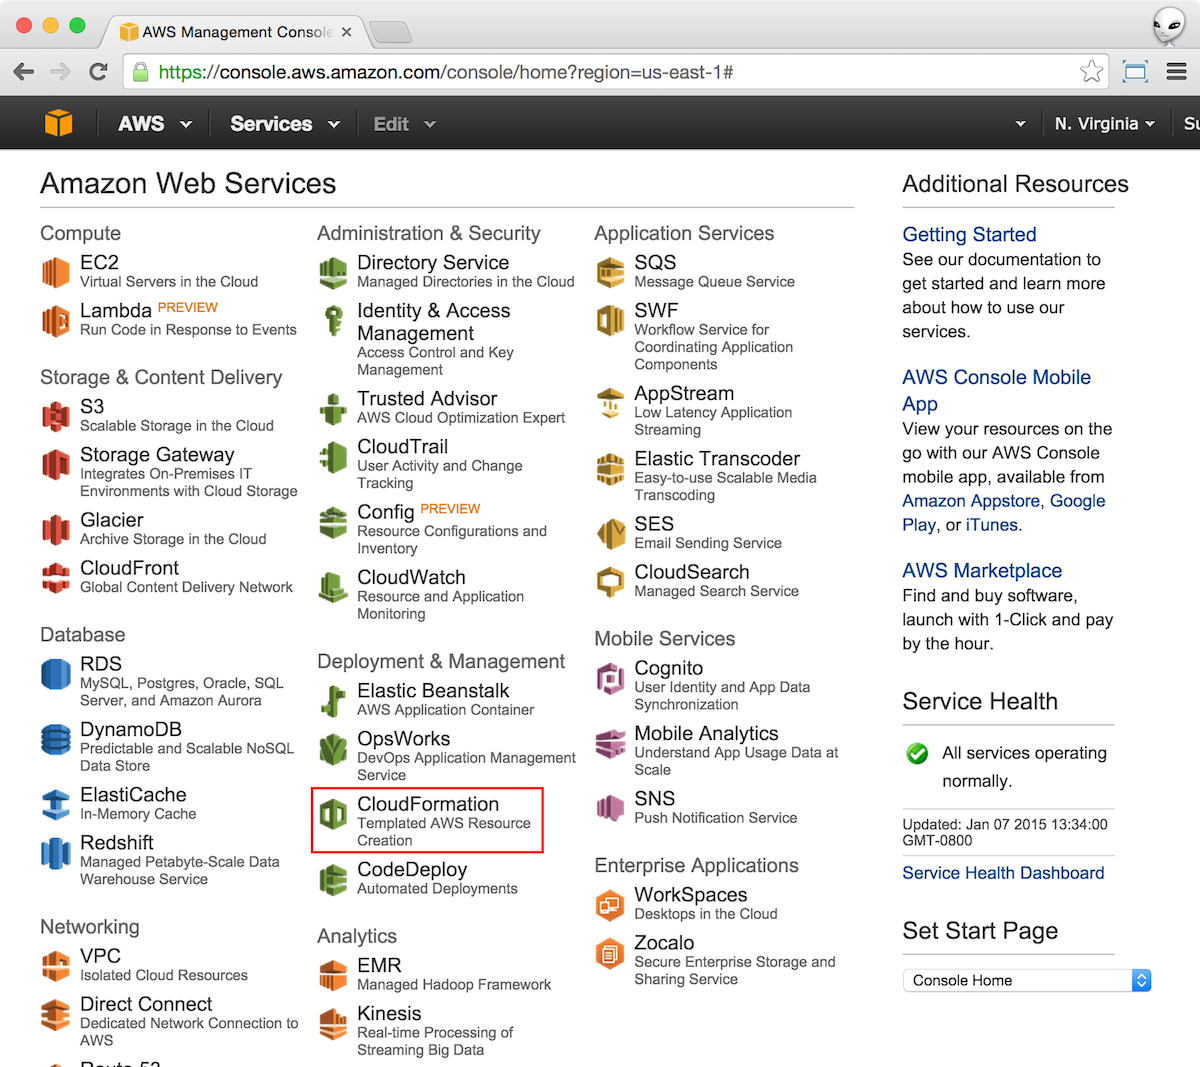
This will bring you to the CloudFormation console below.

Select the PredictionIO CloudFormation Stack Template
From the CloudFormation console, click on the Create New Stack blue button as shown above. This will bring up the Select Template screen. Name your stack as you like. Within the Template section, choose Specify an Amazon S3 template URL, and put https://s3.amazonaws.com/cloudformation.prediction.io/0.9.6/pio.json as the value.

Click Next when you are done.
Specify Stack Parameters
The next screen shows the stack parameters. You must enter your AWS SSH key pair. For the other parameters, you can change them to meet your needs or simply use the default values.
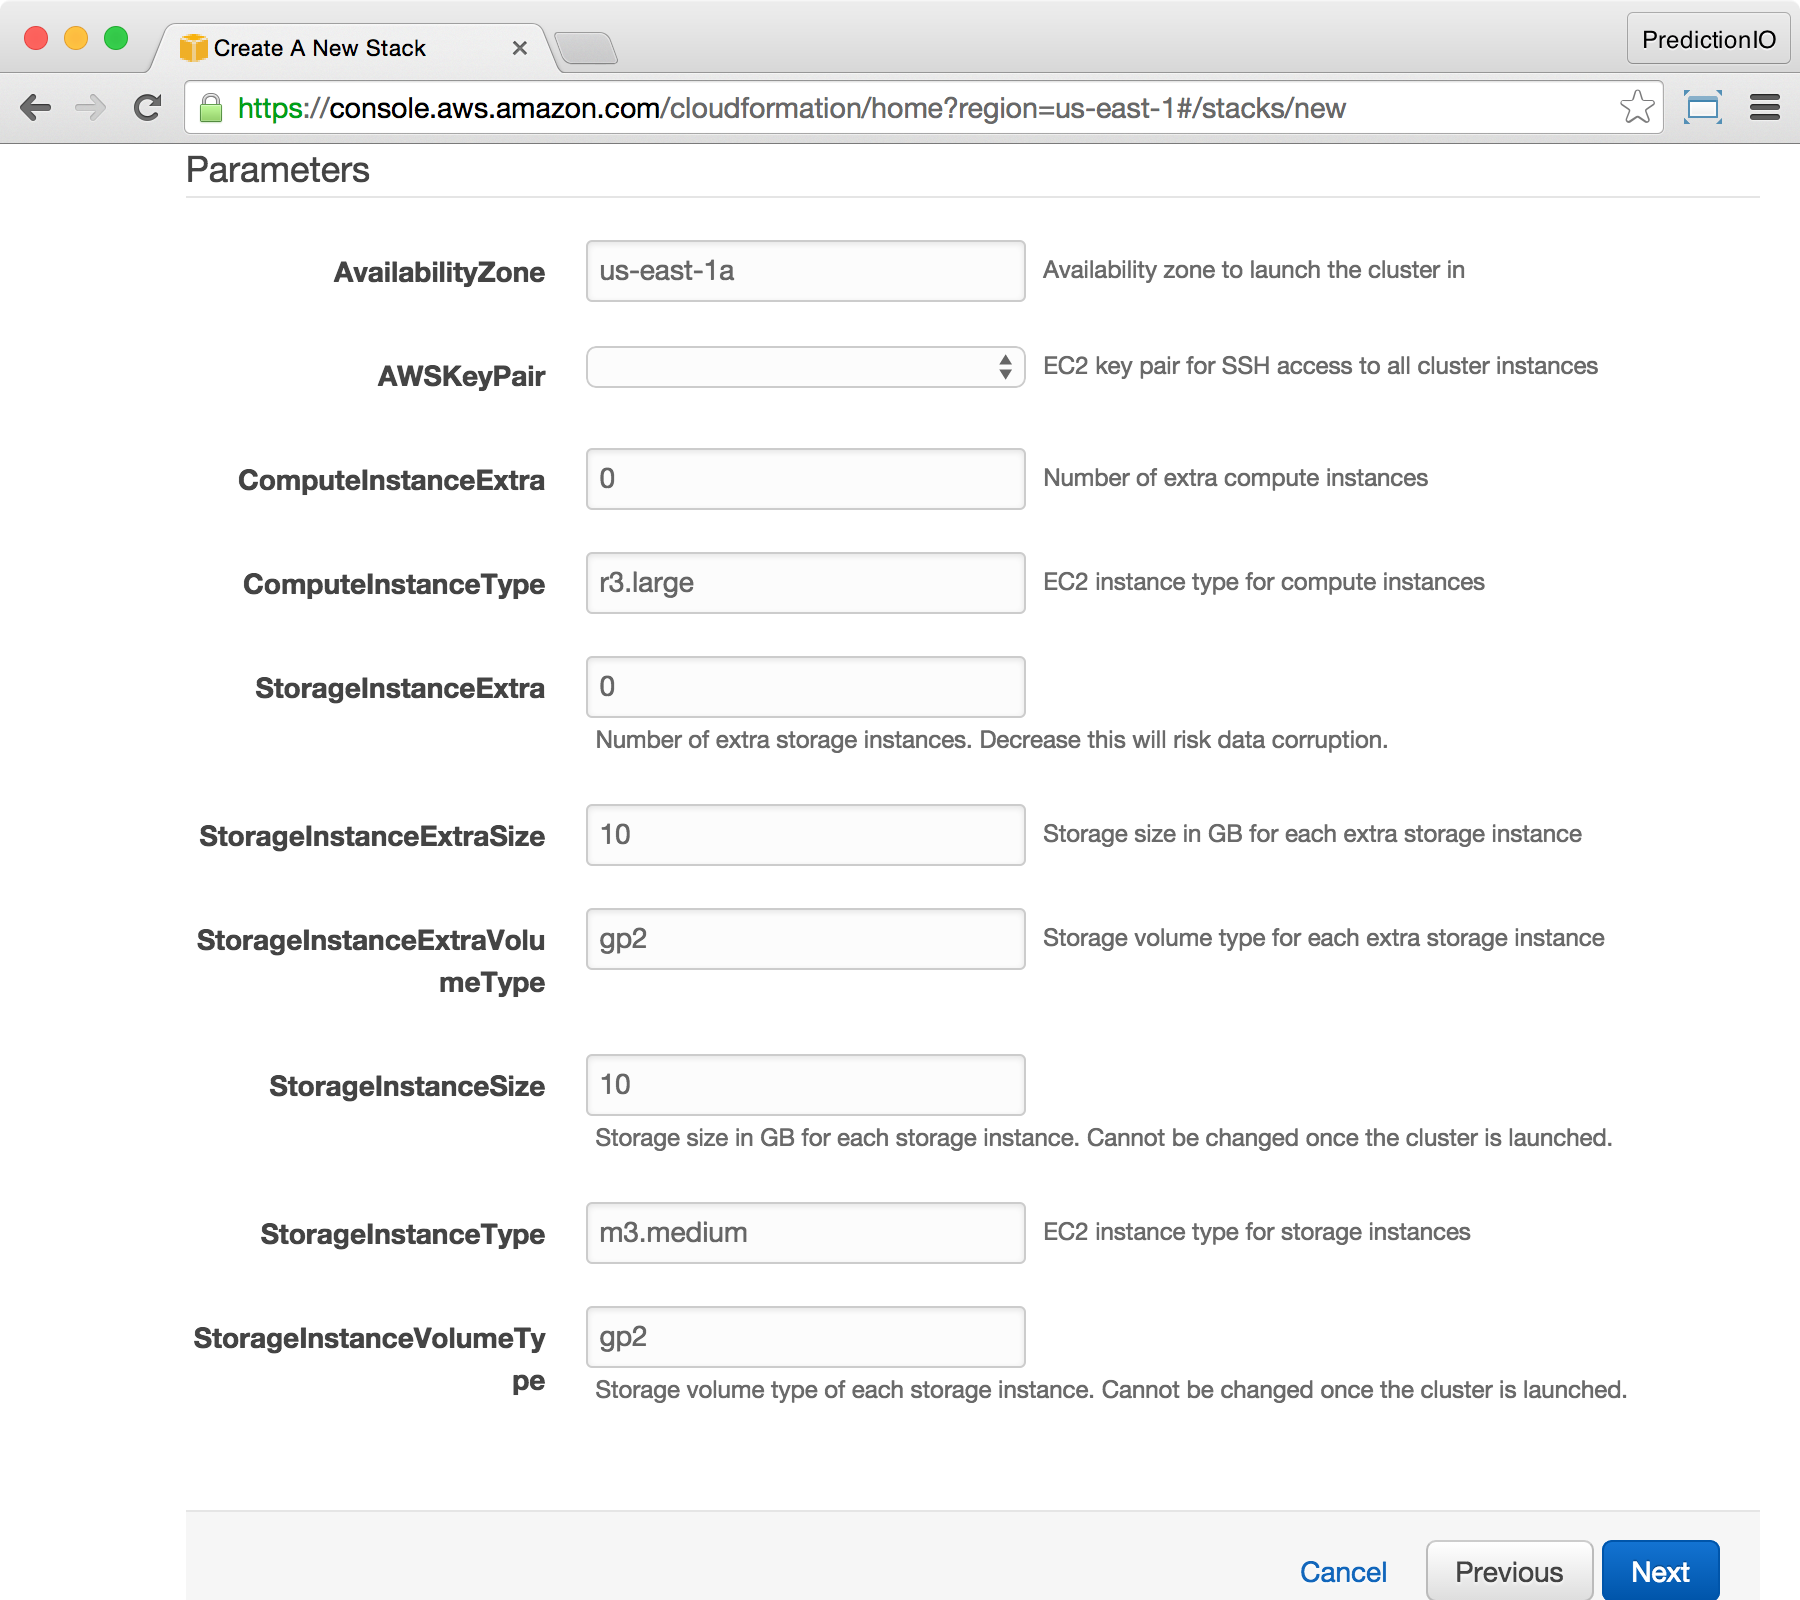
| Parameter | Description |
|---|---|
| AWS-KeyPair | The AWS SSH key pair name that can be used to access all instances in the cluster. |
| AvailabilityZone | Specify the availability zone that the PredictionIO cluster will be launched in. All instances of the cluster will be launched into the same zone for optimal network performance between one another. |
| ComputeInstanceType | The EC2 instance type of all compute instances. Memory-optimized EC2 instances are recommended. |
| ComputeInstanceExtra | Number of extra compute instances besides the core compute instance. This can be increased and decreased. |
| StorageInstanceExtra | Number of extra storage instances besides core storage instances. Never decrease this value or you will risk data corruption. |
| StorageInstanceExtraSize | Size in GB of each extra storage instance. This can be changed when you add an extra storage instance. |
| StorageInstanceExtraVolumeType | The EBS volume type of each extra storage instance. Valid values are standard and gp2. This can be changed when you add an extra storage instance. |
| StorageInstanceType | The EC2 instance type of all storage instances. General purpose EC2 instances are recommended. |
| StorageInstanceSize | Size in GB of each core storage instance. This cannot be changed once the cluster is launched. |
| StorageInstanceVolumeType | The EBS volume type of each core storage instance. Valid values are standard and gp2. This cannot be changed once the cluster is launched. |
Click Next when you are done. You will arrive at the Options screen. You can skip this step if you do not have other options to specify.
At the Review screen, click Create to finish.
Using the Cluster
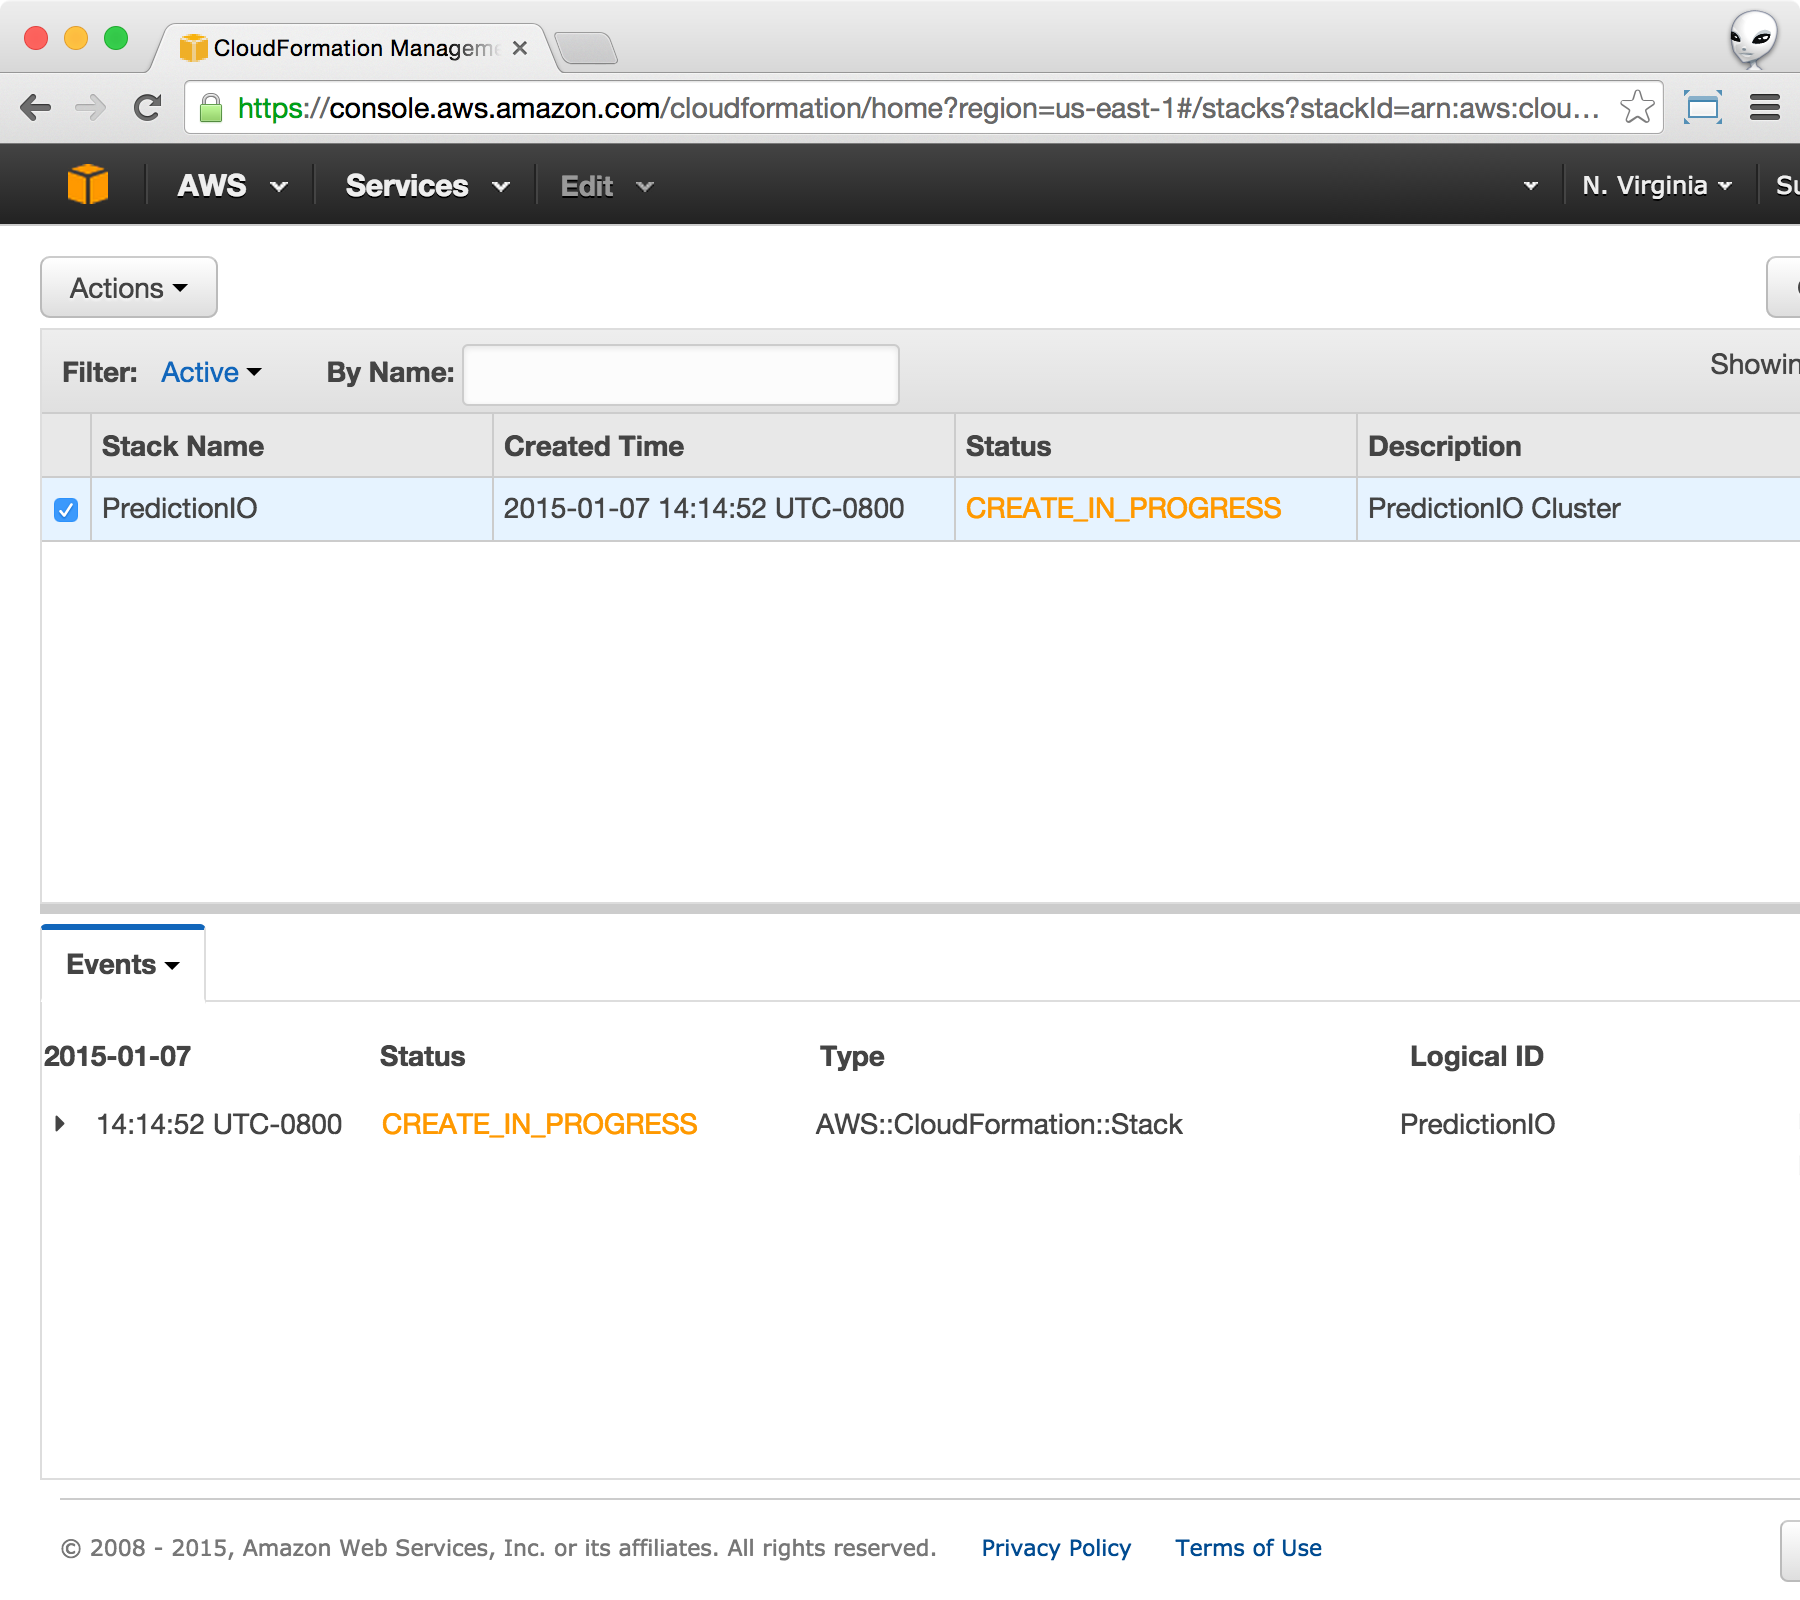
You should see the following when the cluster is being created after the previous step.
Once the stack creation has finished, you can click on Events and select Outputs to arrive to the following screen.
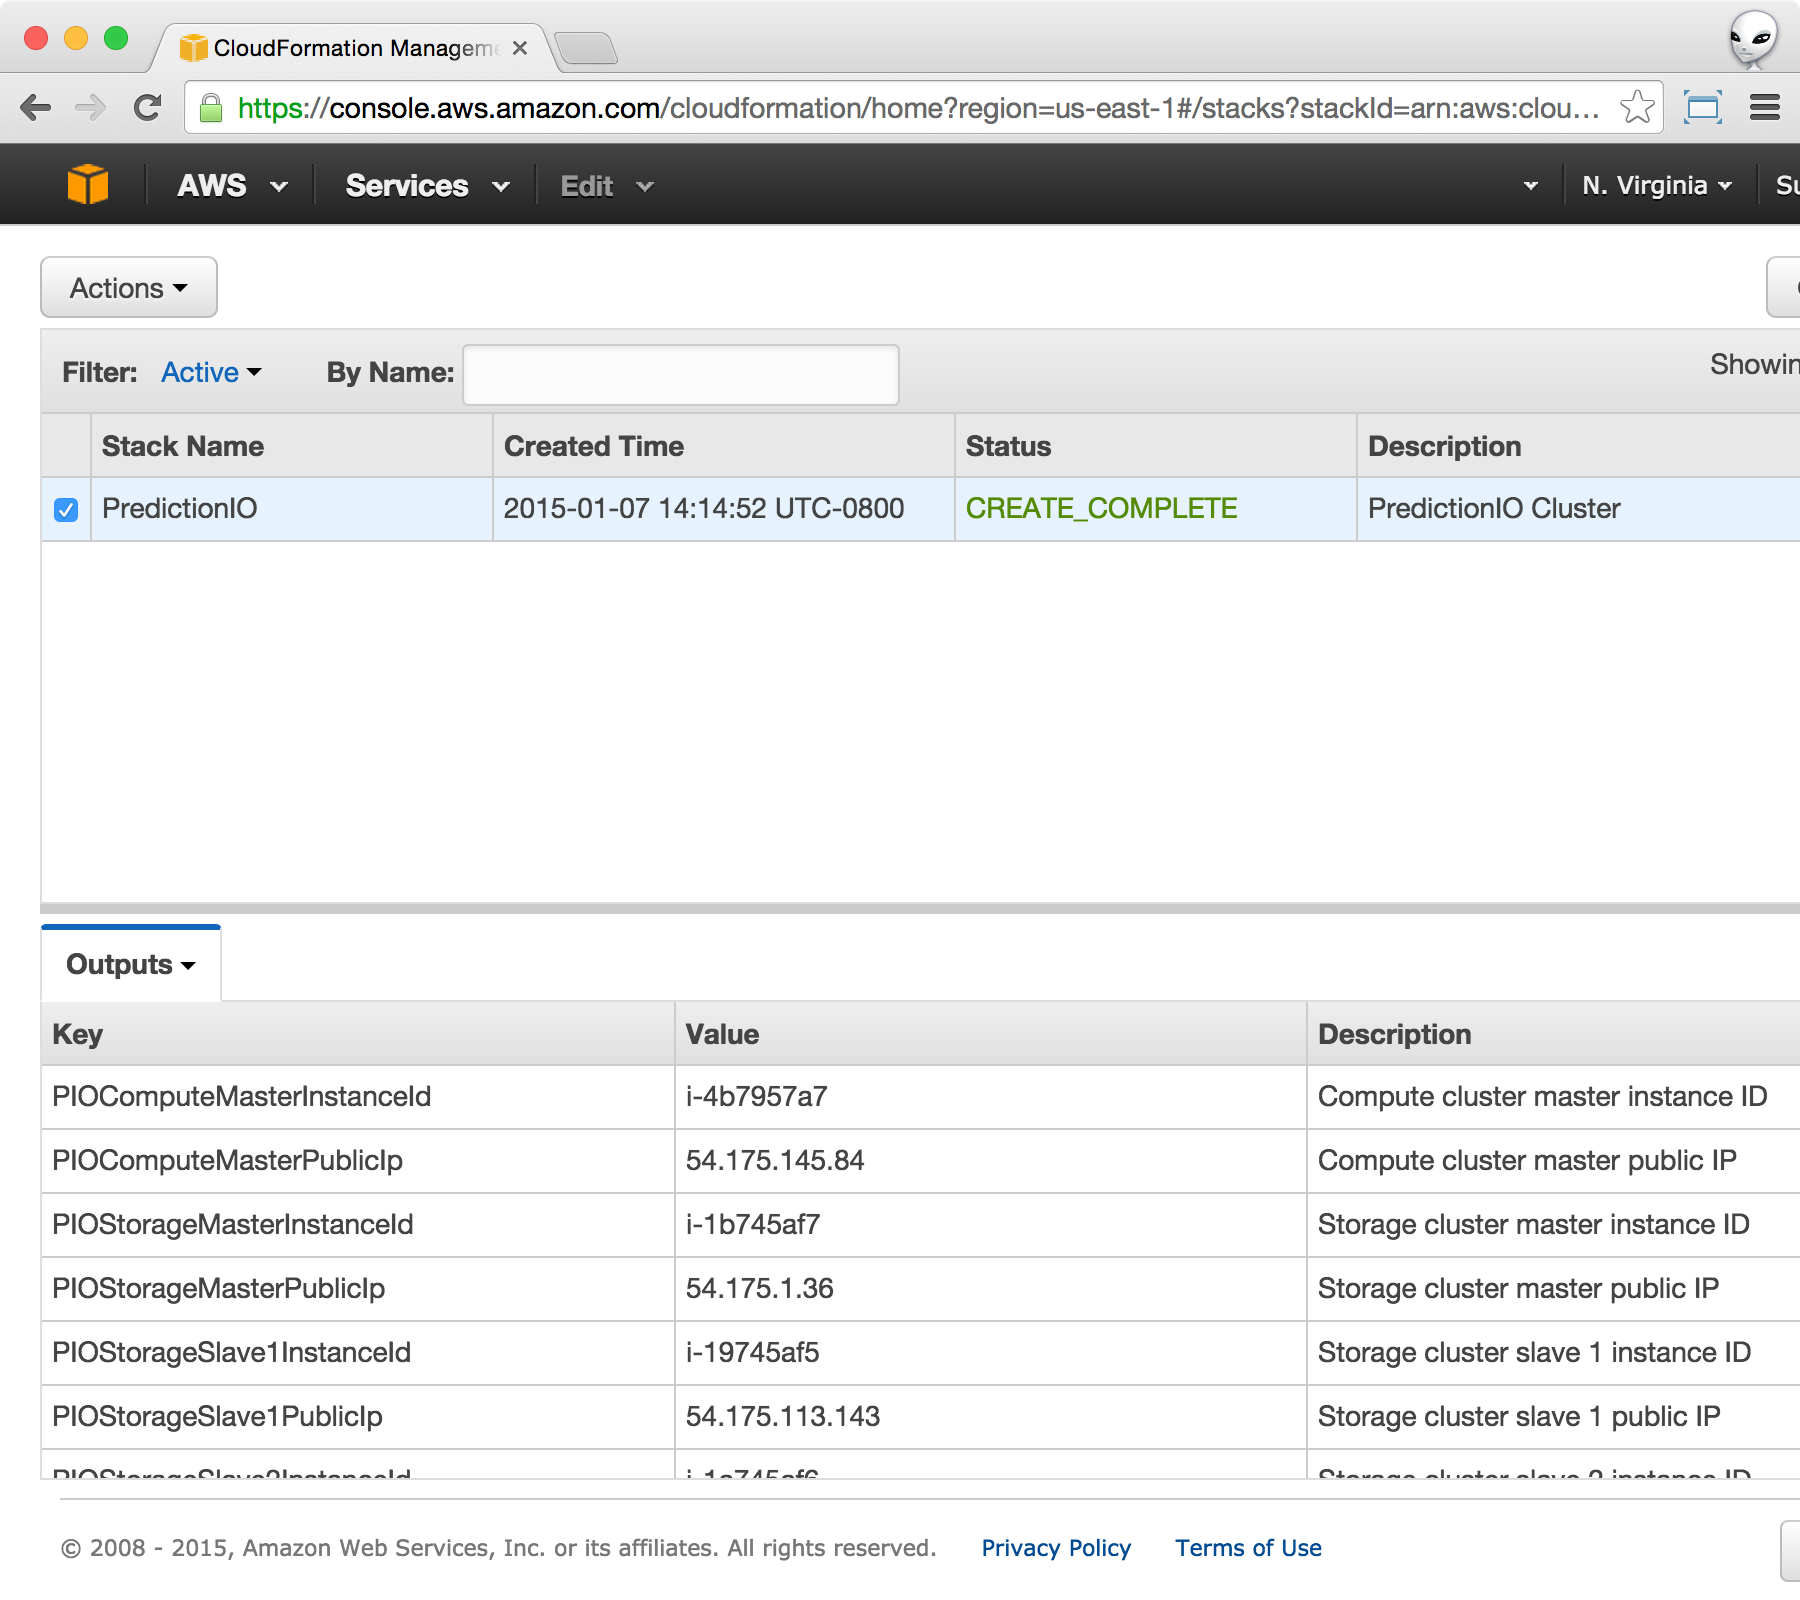
Take note of PIOComputeMasterPublicIp and PIOStorageMasterPublicIp. We will now access the cluster and make sure everything is in place.
Verify Compute Instances
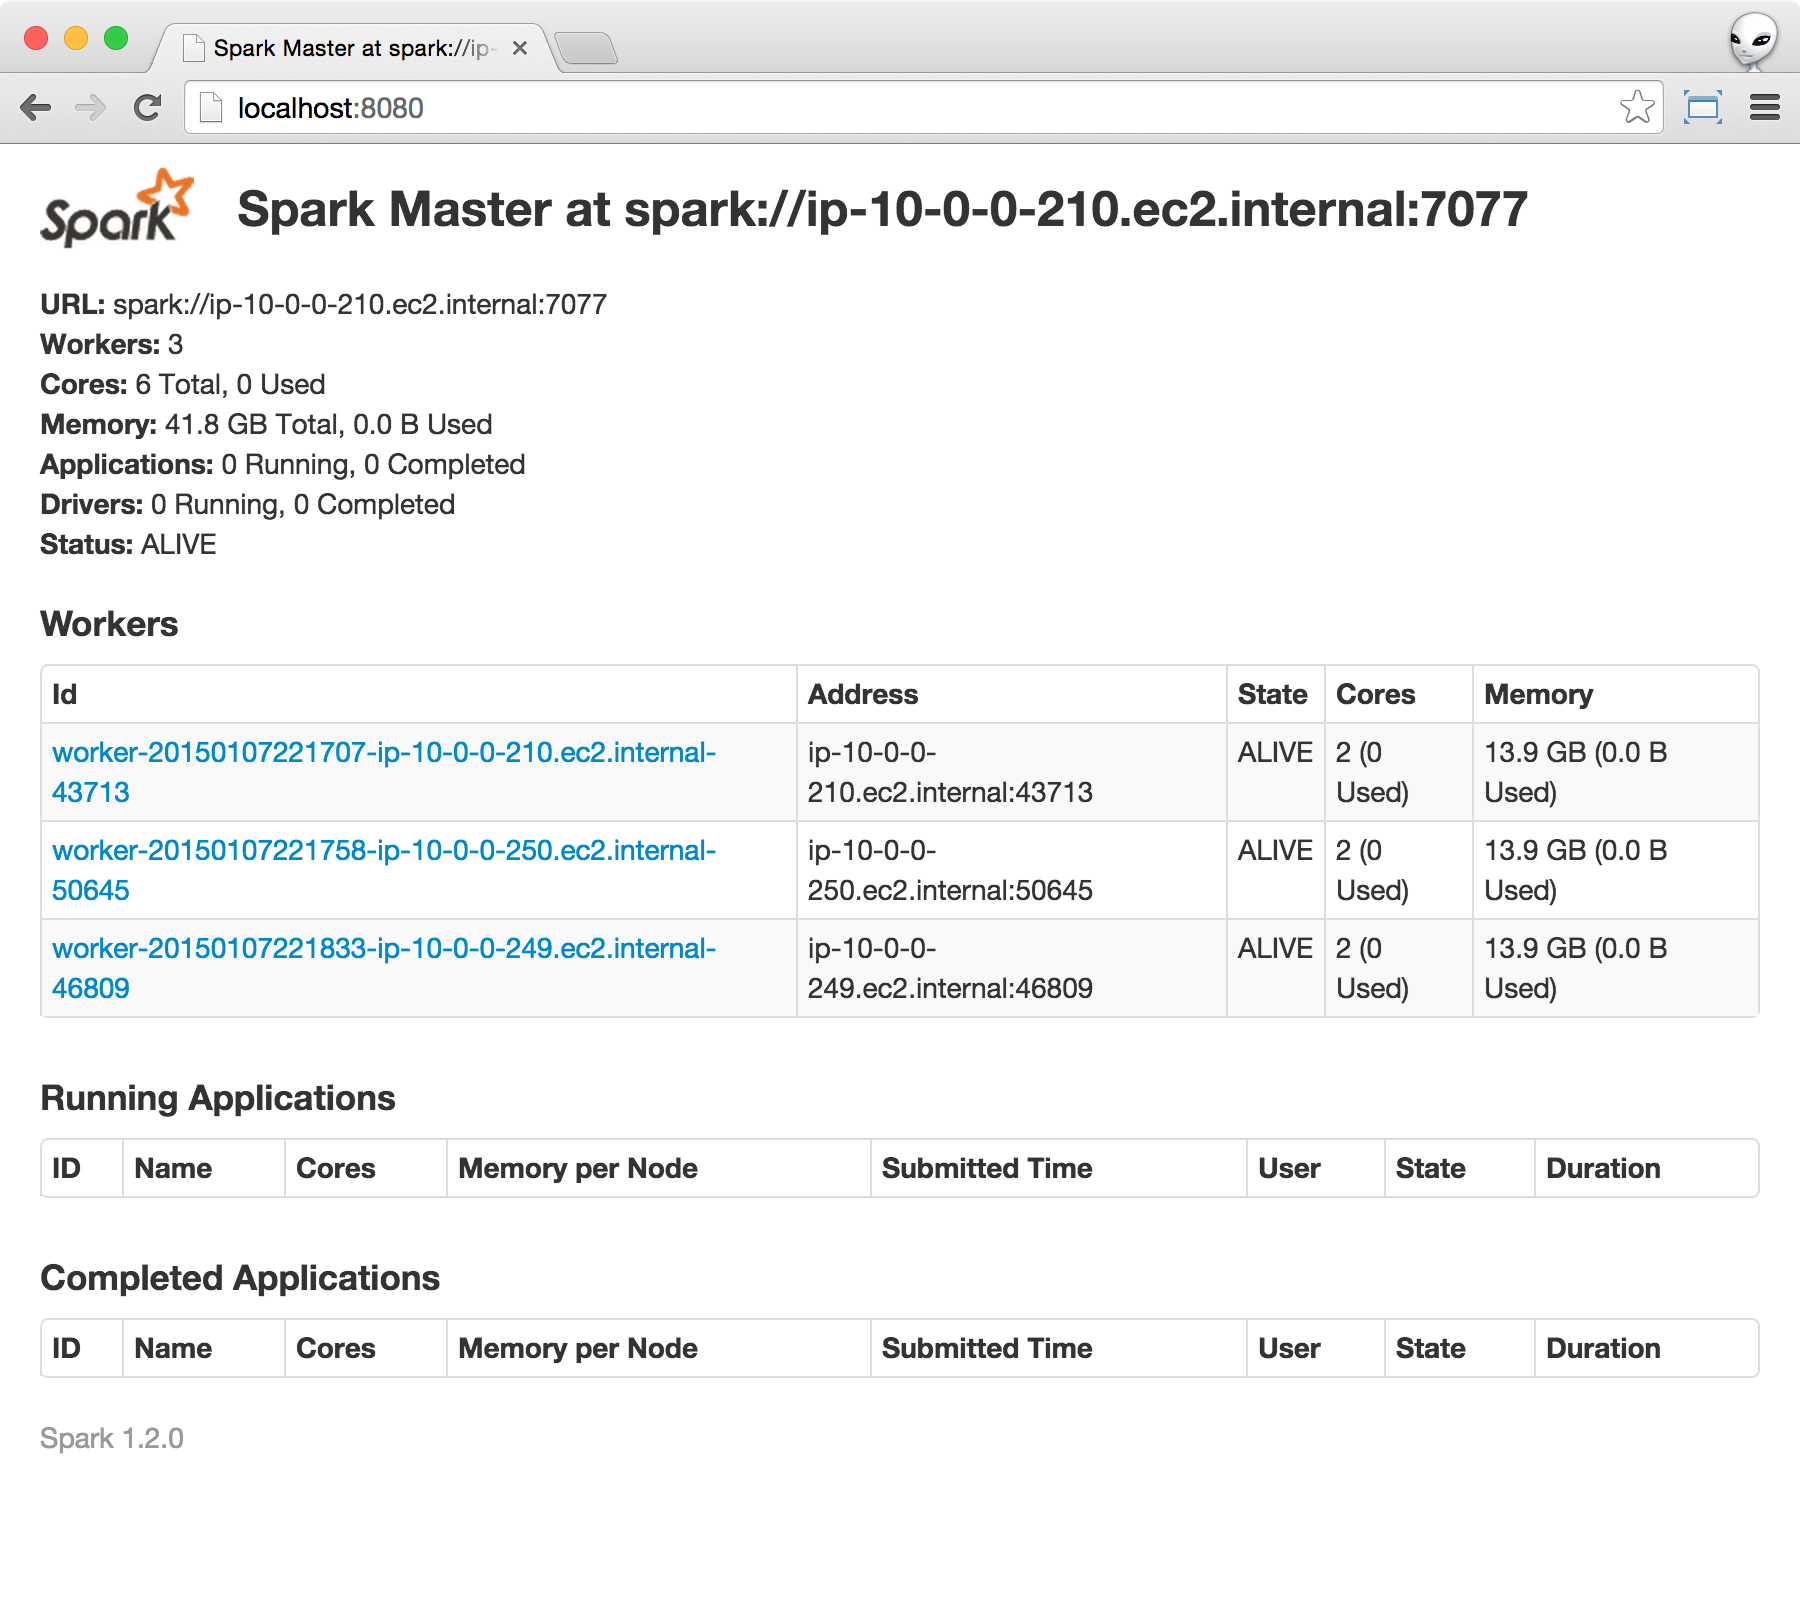
SSH to the master compute instance using the PIOComputeMasterPublicIp. In this example, let us assume the IP address be 54.175.145.84, and your private key file be yourkey.pem.
1 | $ ssh -i yourkey.pem -A -L 8080:localhost:8080 [email protected] |
Once you are in, point your web browser to http://localhost:8080. You should see something similar to the following.
Verify Storage Instances
SSH to the storage instance using the PIOStorageMasterPublicIp. In this example, let us assume the IP address be 54.175.1.36, and your private key file be yourkey.pem.
1 | $ ssh -i yourkey.pem -A -L 50070:localhost:50070 -L 16010:localhost:16010 -L 16030:localhost:16030 [email protected] |
Once you are in, point your web browser to http://localhost:50070 and click on Datainstances at the top menu. You should see the following page.

If all 3 storage instances are working properly, you can then verify HBase by pointing your web browser to http://localhost:16010. You should see something similar to the following.
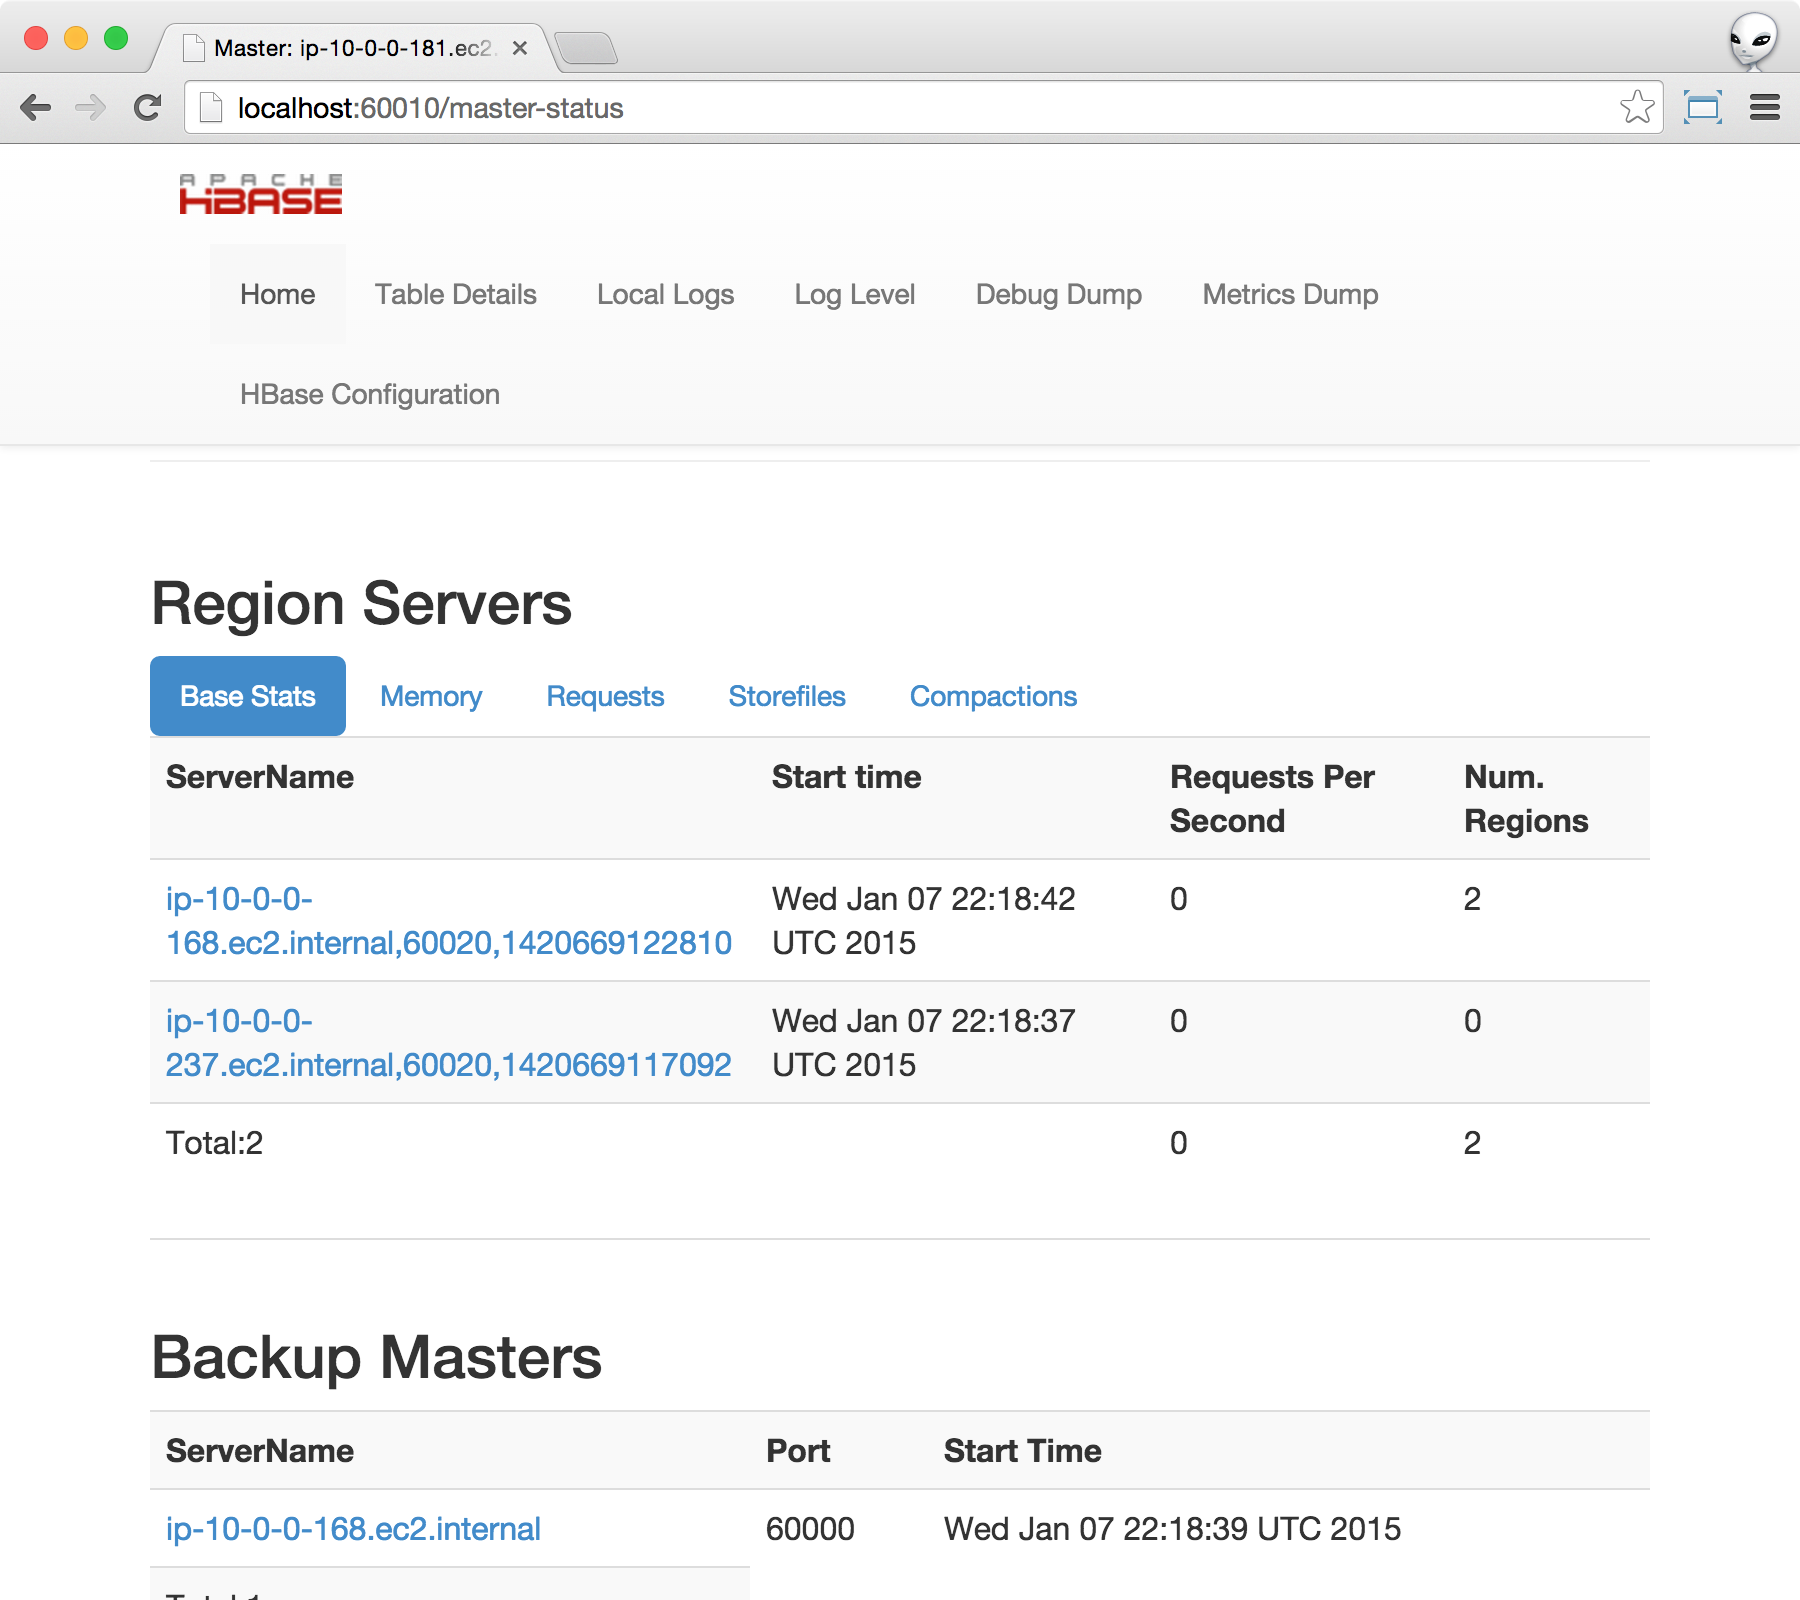
If you do not specify any extra storage instances, you should see 2 region servers. There should also be 1 backup master.
Running Quick Start
You can now start with the fully-distributed PredictionIO cluster. Let's start with the recommendation quick start with a few twists.
Skip the installation steps and run
pio status. You should see everything functional.Run through the section Create a Sample App as described. The installation directory of PredictionIO is
/opt/PredictionIO.Run through the section Collecting Data as described, except that you will be connecting to the Event Server at the master core storage instance. Assuming the private IP of the master core storage instance is
10.0.0.123, add--url http://10.0.0.123:7070to theimport_eventserver.pycommand.Copy HBase configuration to the engine template directory. The full path of the configuration file is
/opt/hbase-0.98.9-hadoop2/conf/hbase-site.xml. (This step will not be required in future releases.)Run through the section Deploy the Engine as a Service up to the subsection Training. Assuming the private DNS name of the master compute instance is
ip-10-0-0-234.ec2.internal, add-- --master spark://ip-10-0-0-234.ec2.internal:7077after thepio traincommand. This will send the training to the compute cluster instead of the local machine. The Spark master URL must match exactly the one shown on its web UI. Repeat the same steps for subsection Deploying, which will create an Engine Server backed by the compute cluster.
Scaling the Cluster
As your data size and/or audience grow, you can scale your cluster to handle more workload or decrease turnaround time. In this section, we will provide some general guidelines about when and how to scale your cluster with CloudFormation.
Scaling Compute Instances
You can increase compute instances to reduce training time ($pio train) and the time to query an engine server. You can also check the [Spark Master Web UI] to see if you need additional compute power.
Notice that for compute instances, you can increase or decrease the number of extra compute instances (ComputeInstanceExtra) as much as you like. The extra compute instances will join the master and become slave compute instances as Spark workers.
Let us begin by adding 2 extra compute instances. At the CloudFormation console, right click on the cluster stack and click on Update Stack.
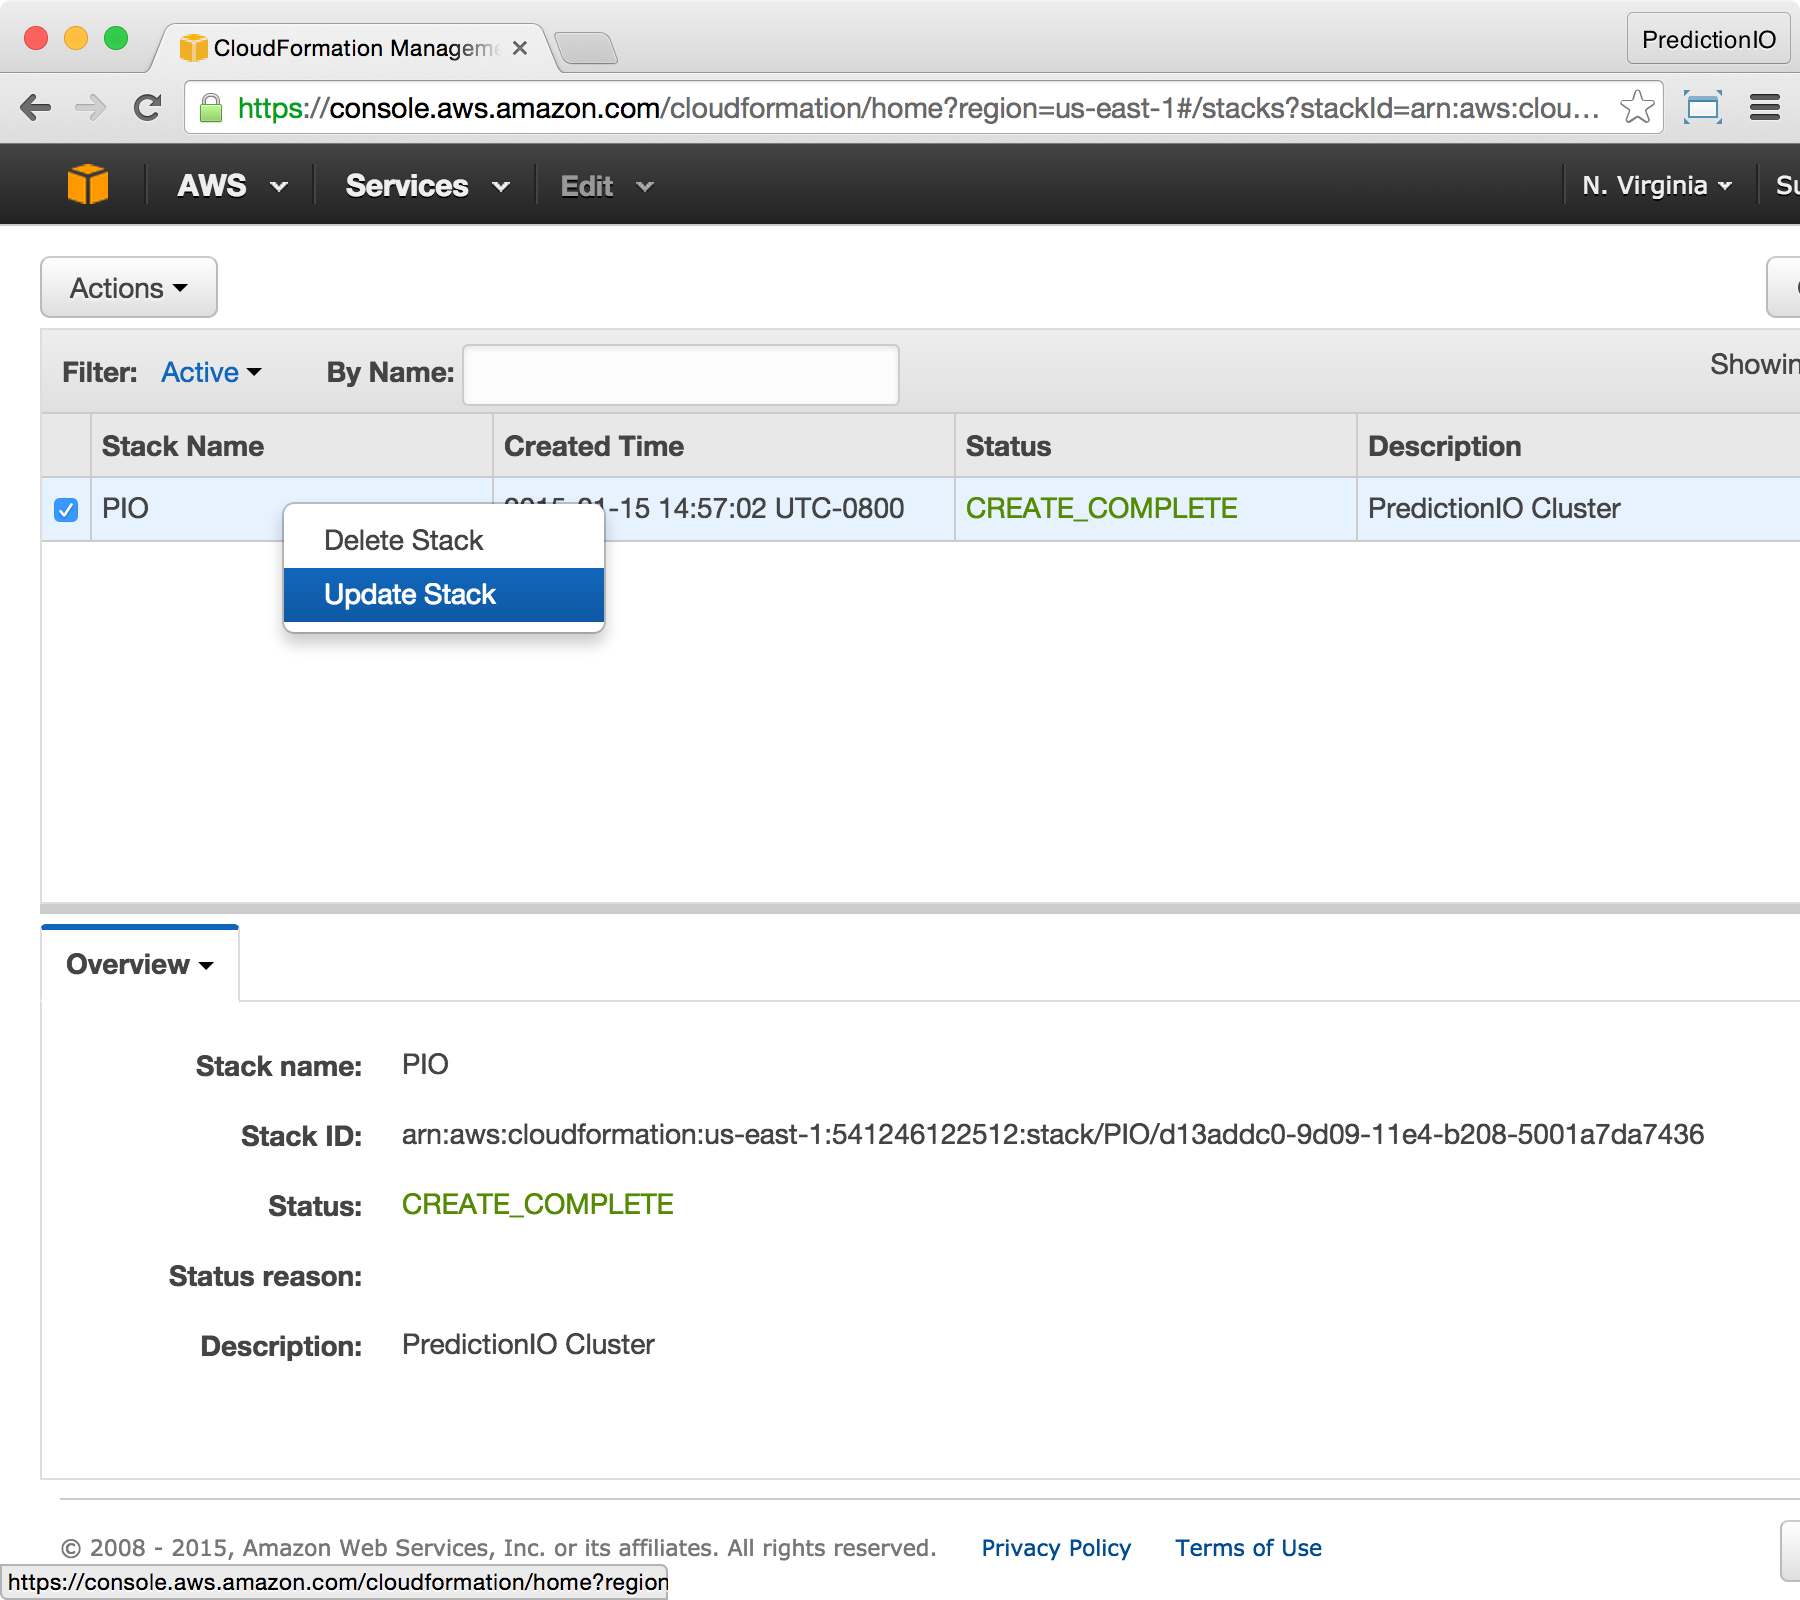
At the Select Template screen, make sure Use existing template is picked, then click Next.
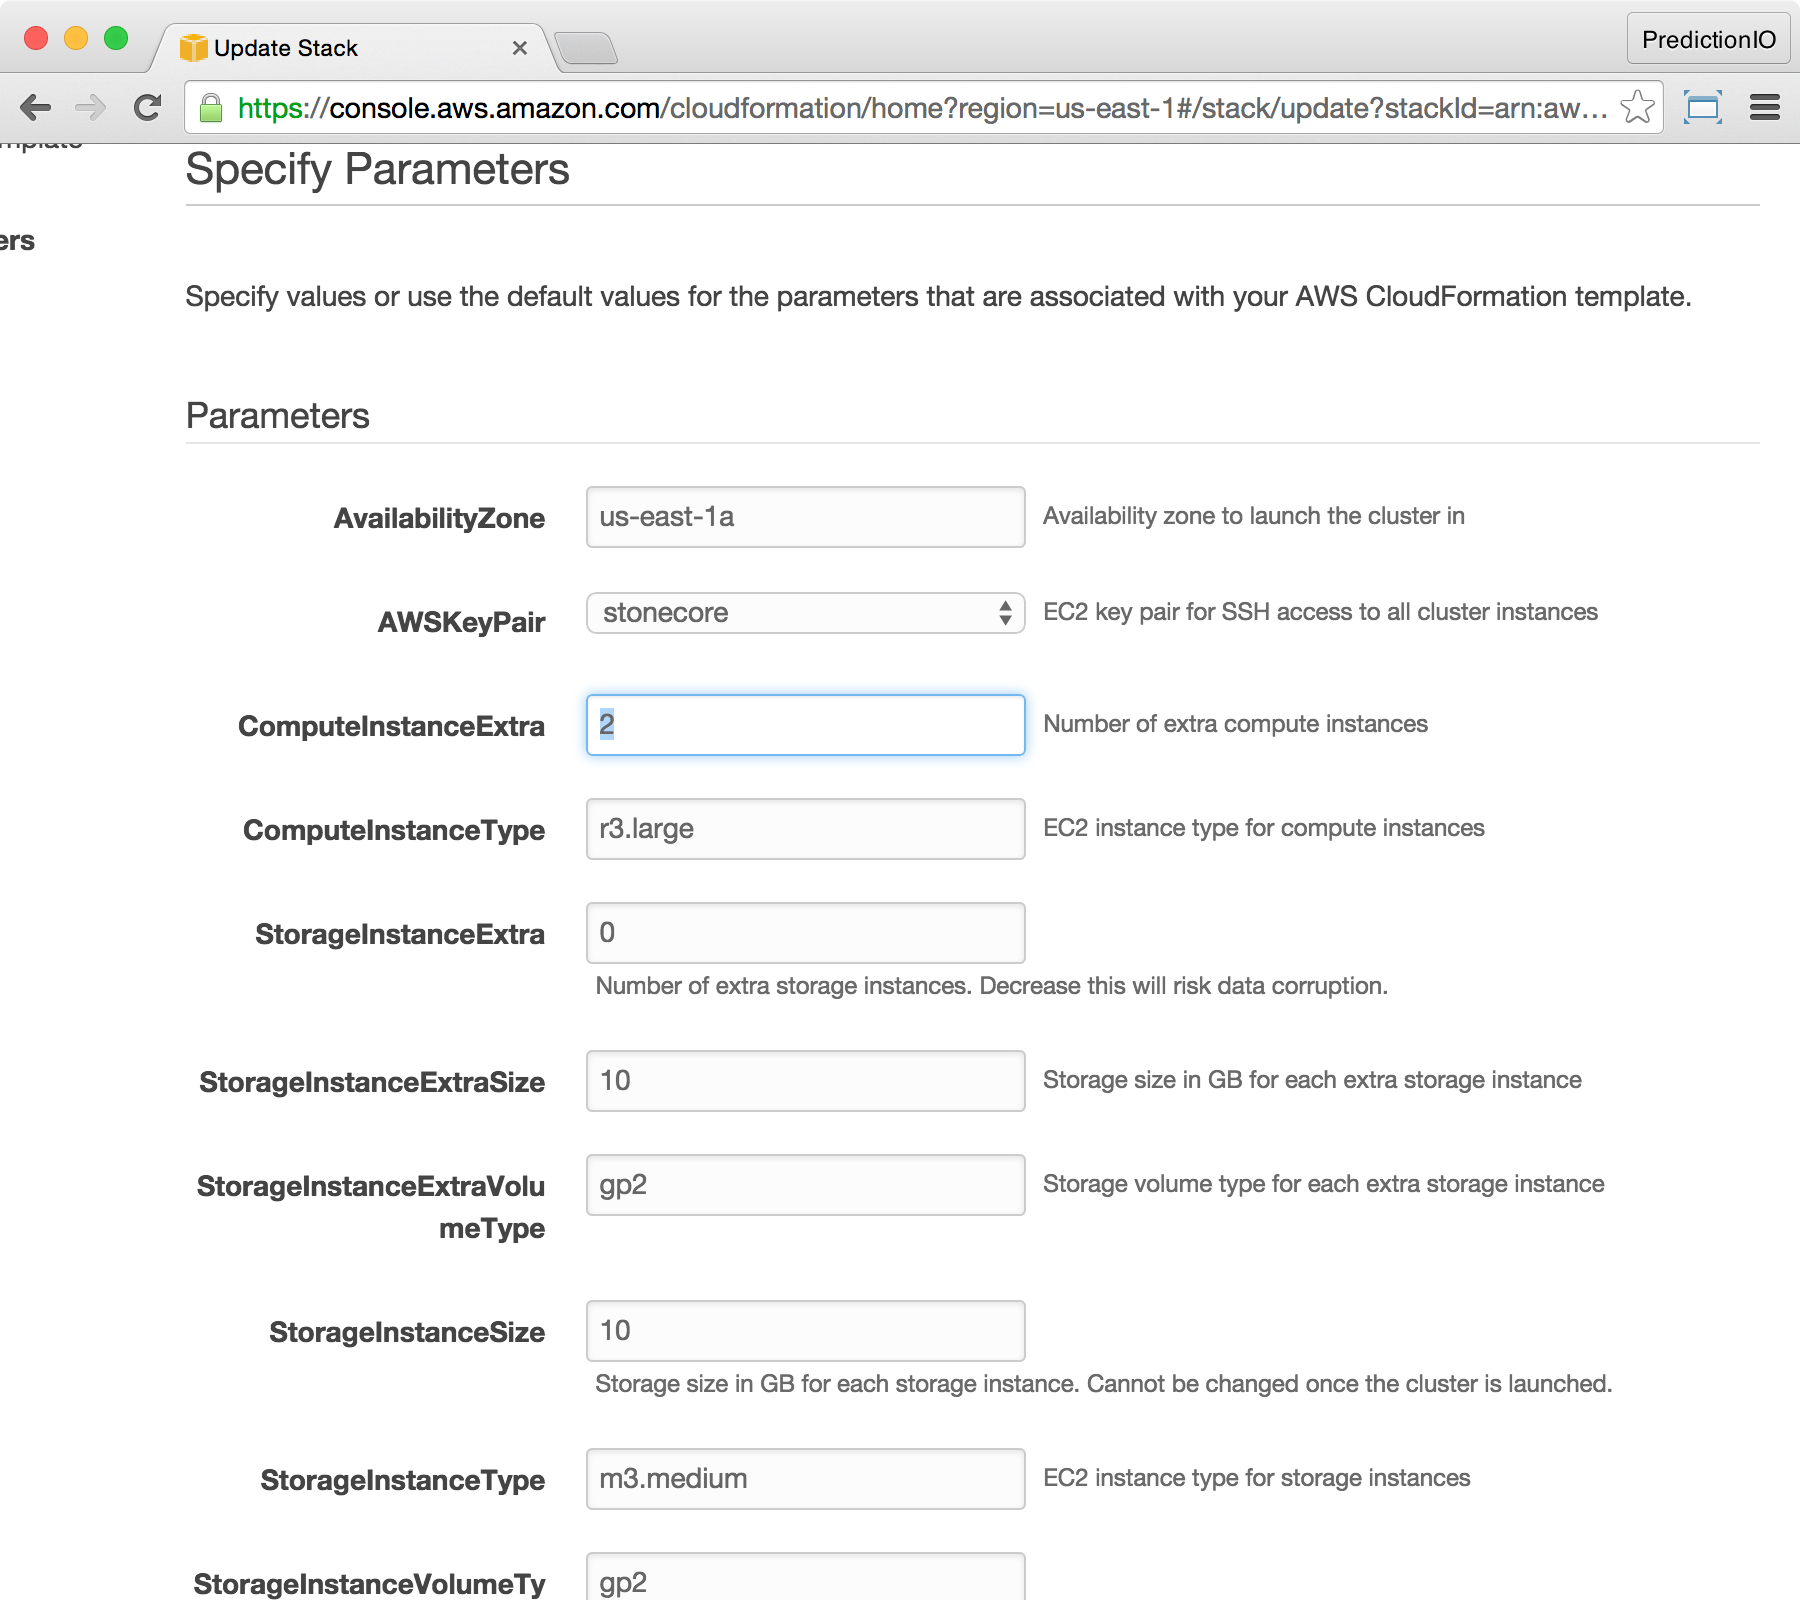
At the Specify Parameters screen, increase the value of ComputeInstanceExtra to 2, then click Next.
At the Options screen, leave everything unchanged, and click Next.
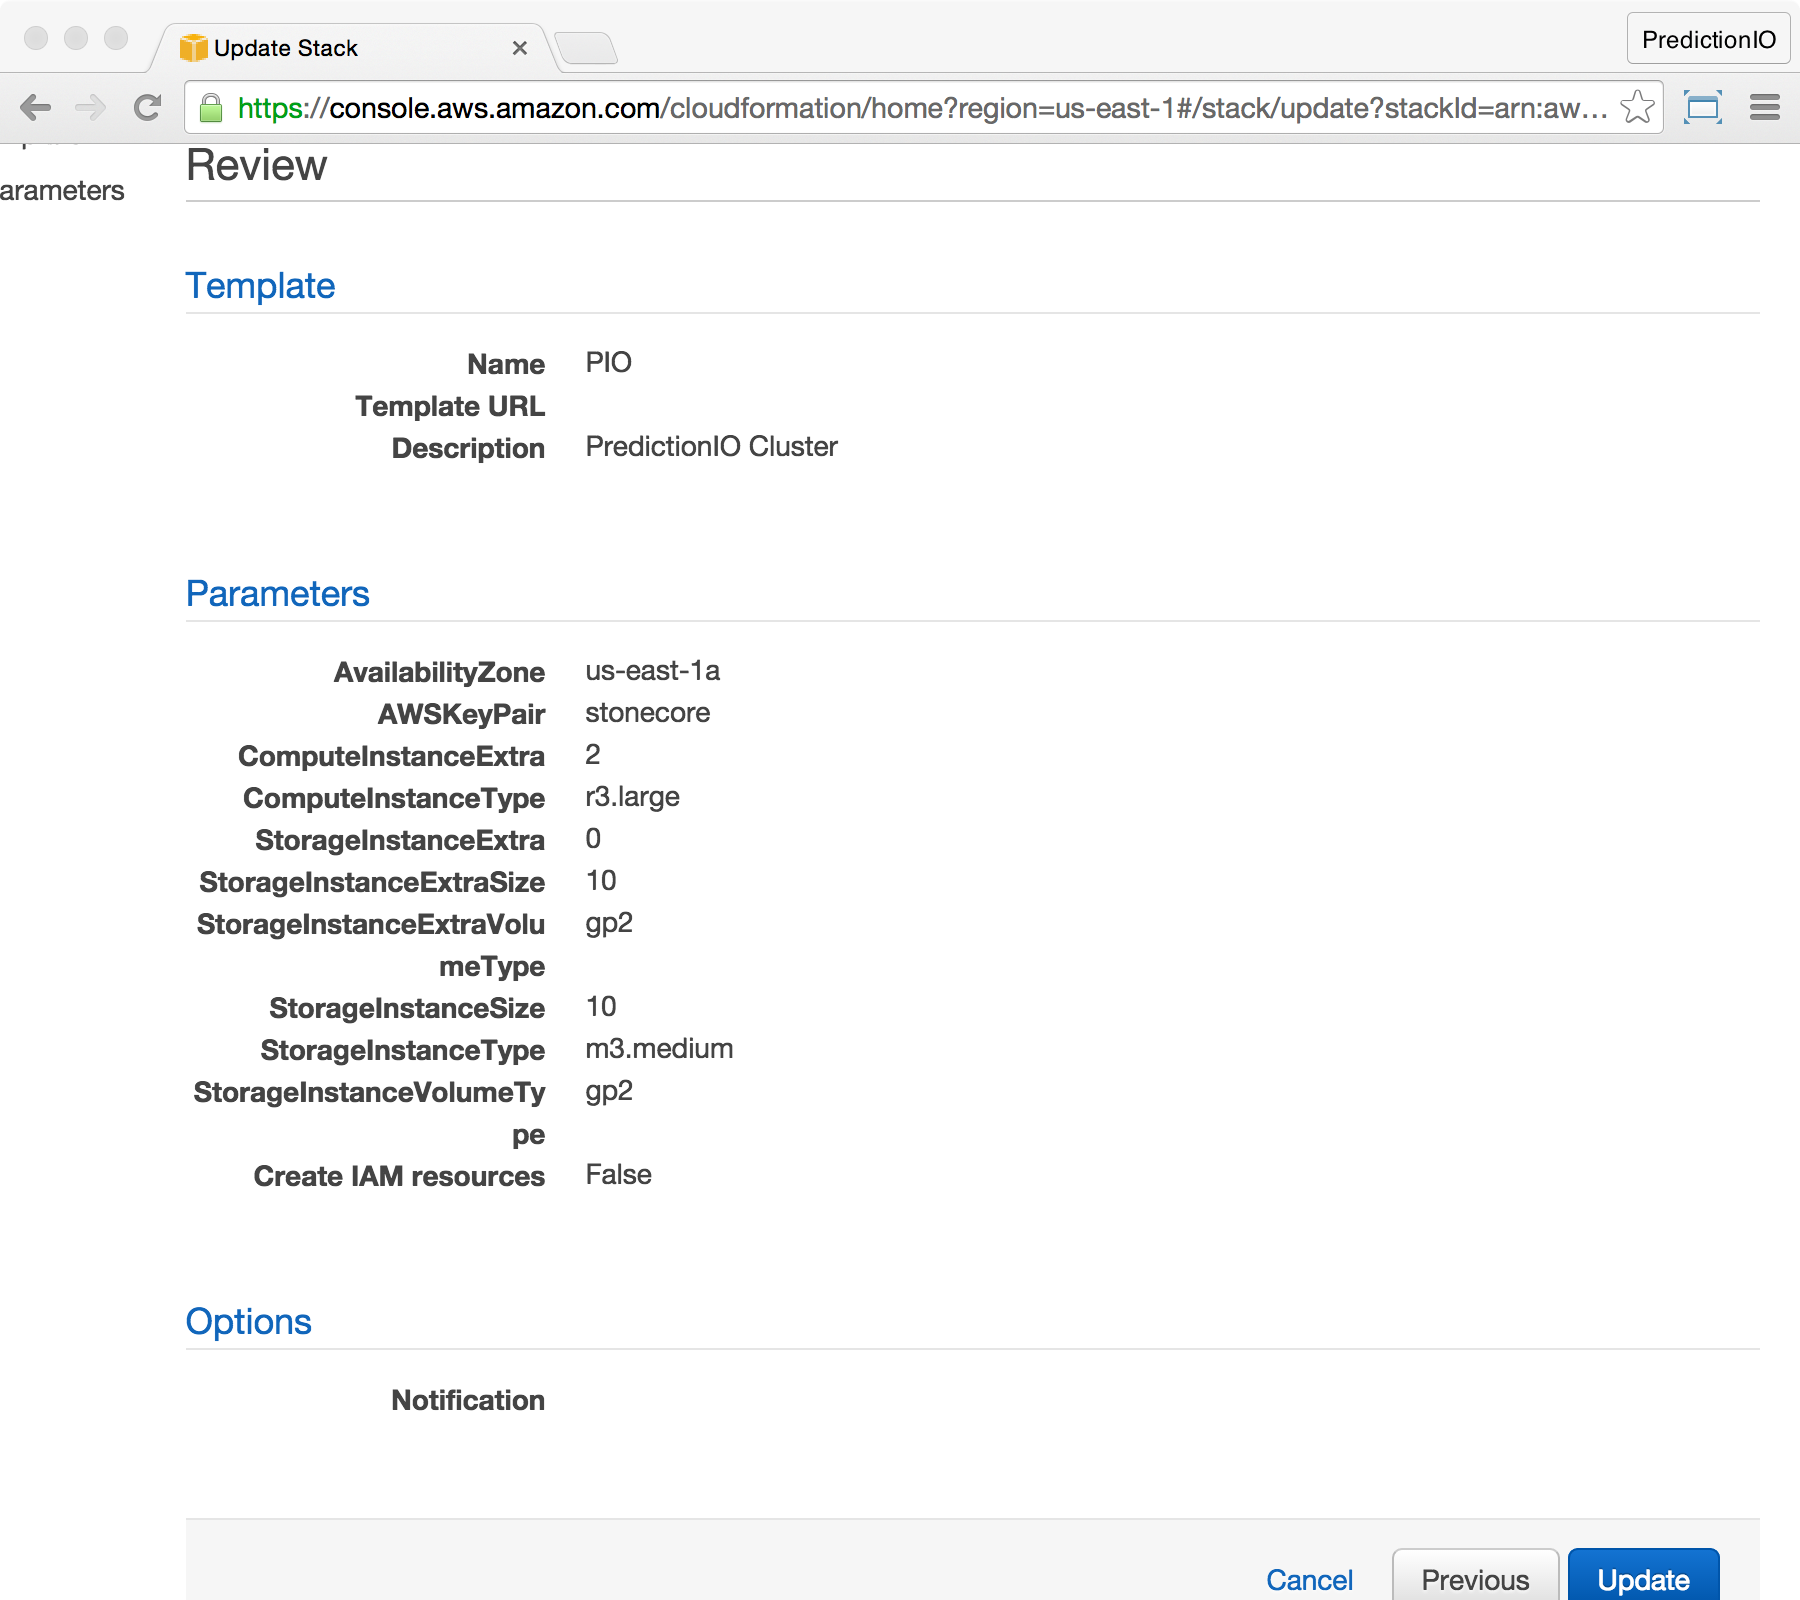
At the Review screen, make sure ComputeInstanceExtra is now updated to 2. Finish by clicking Update.
You will be brought back to the CloudFormation console. You should see the stack status changed to UPDATE_IN_PROGRESS.

Once the status become UPDATE_COMPLETED, you will have 2 extra compute instances. Notice that during the update, your cluster is still functional and any existing work will not be affected. If you are downscaling, existing work might be affected during the update process.
Scaling Storage Instances
You can scale your storage instances when you are about to run out of space. You can check your storage usage at the [Hadoop NameNode web UI].
Let us begin by adding 2 extra storage instances. At the CloudFormation console, right click on the cluster stack and click on Update Stack.
At the Select Template screen, make sure Use existing template is picked, then click Next.
At the Specify Parameters screen, increase the value of StorageInstanceExtra to 2, and set the value of StorageInstanceExtraSize to 100, then click Next. Notice that whenever you add an extra storage instance, you can change its size to a new value. The new size will not affect existing storage instances and your data will be safe.

At the Options screen, leave everything unchanged, and click Next.
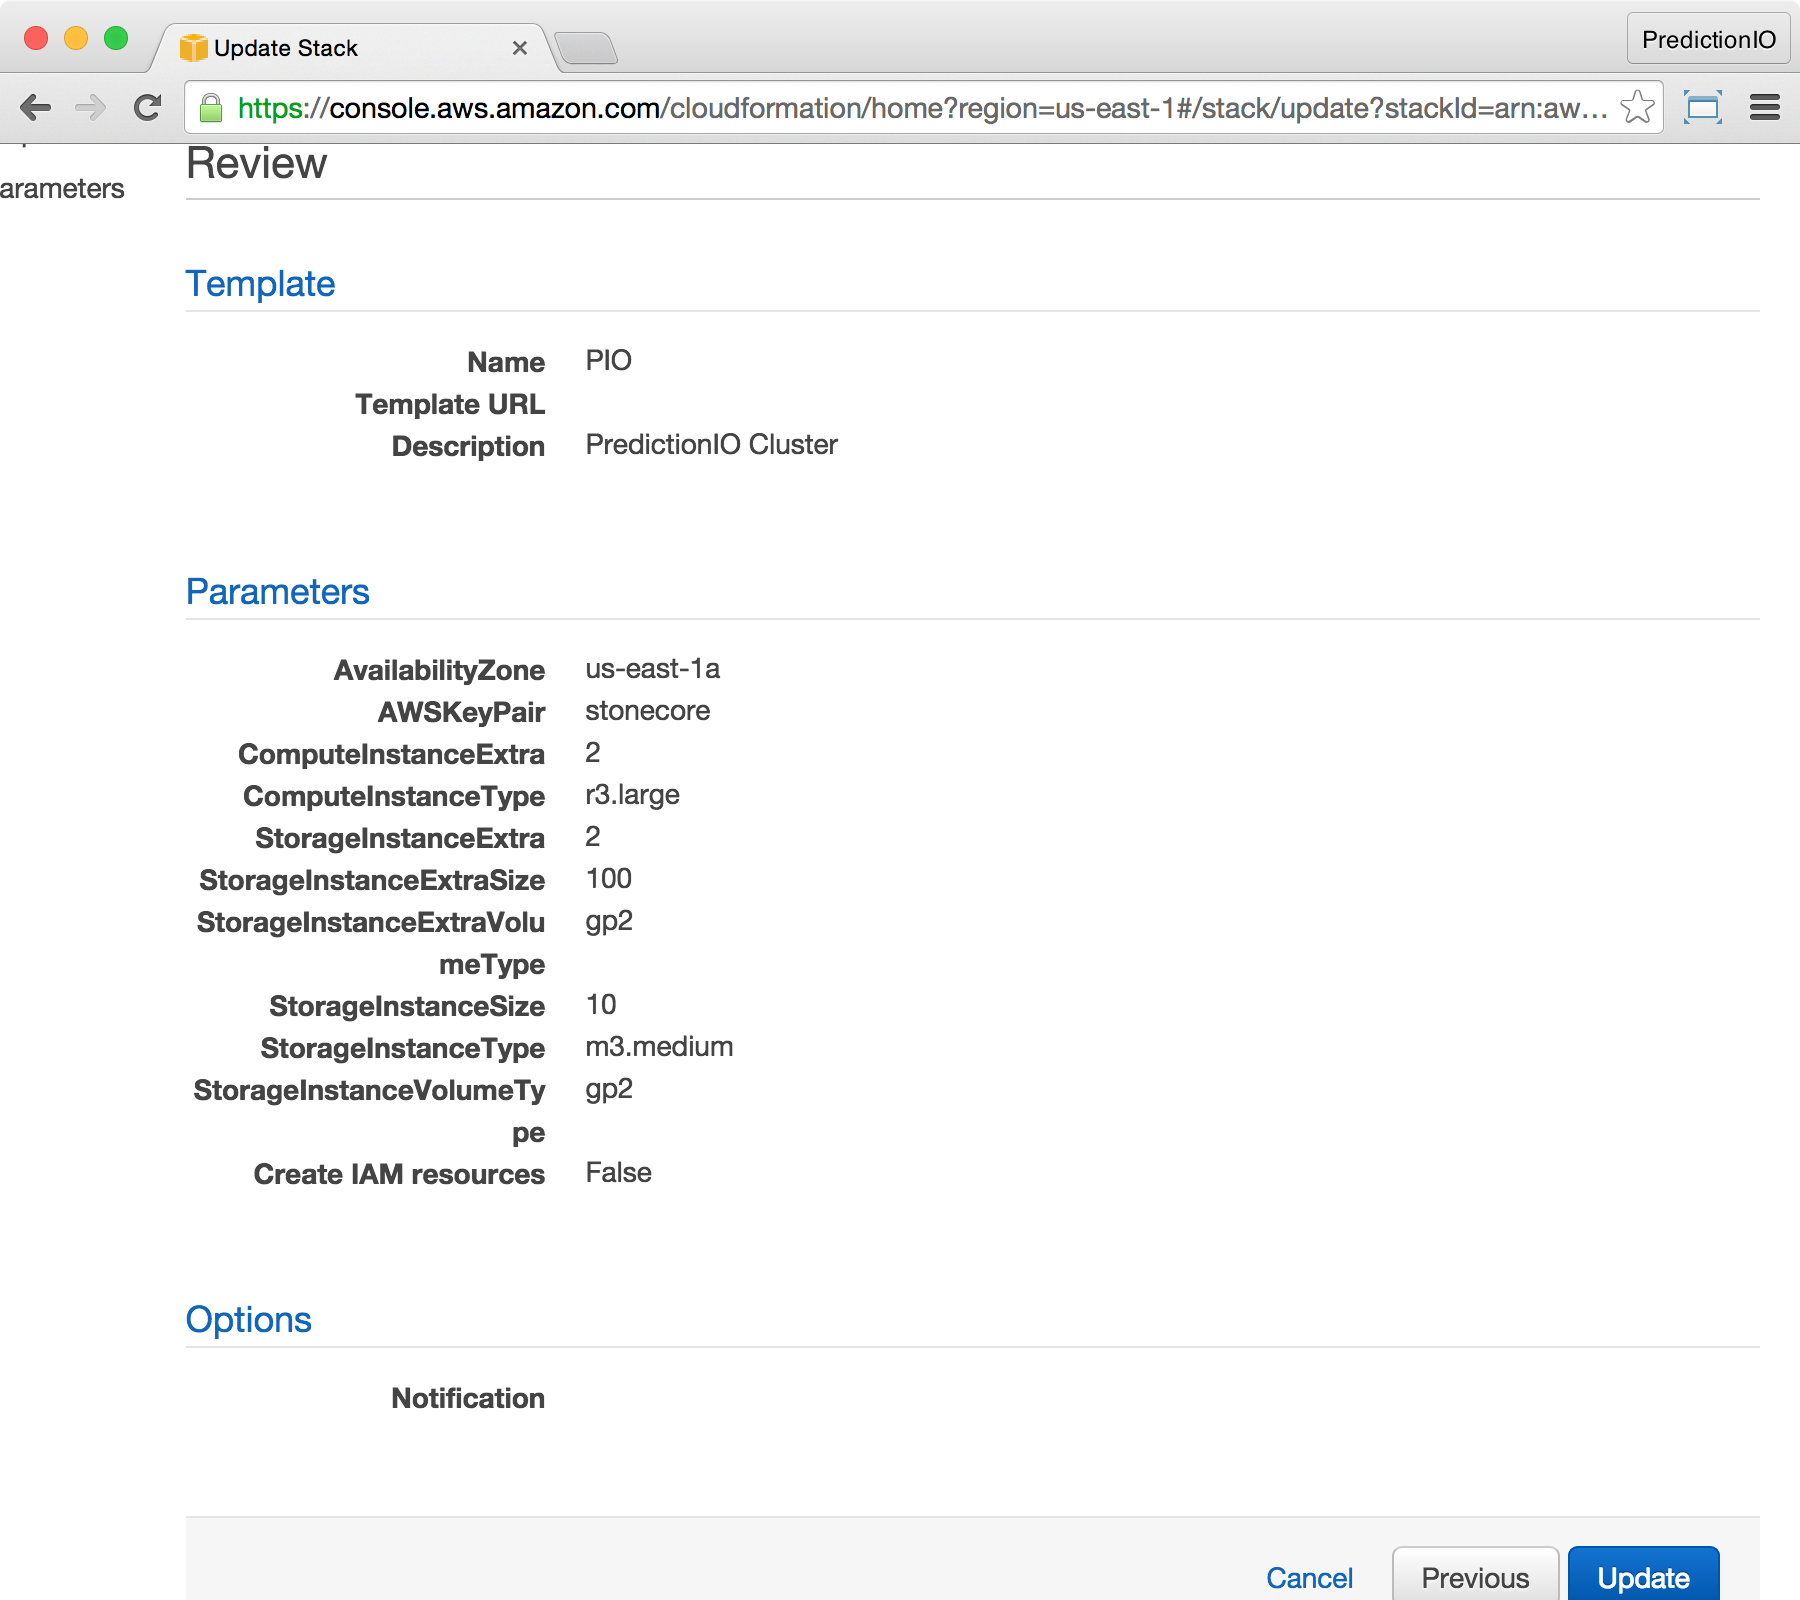
At the Review screen, make sure StorageInstanceExtra is now updated to 2, and StorageInstanceExtraSize is updated to 100. Finish by clicking Update.
You will be brought back to the CloudFormation console. You should see the stack status changed to UPDATE_IN_PROGRESS.
Once the status become UPDATE_COMPLETED, you will have 2 extra storage instances. Notice that during the up-scaling update, your cluster is still functional and existing work will not be affected. They may be affected during downscale.
Support and Pricing
PredictionIO Cluster comes with Enterprise Support. For pricing and support details, please contact [email protected].