Managing Console Users
Starting with PE 2.5, the console has supported individual user management, access and authentication. Instead of a single, shared username and password authenticated over HTTP with SSL, the console allows secure individual user accounts with different access privileges. Specifically, user accounts allow the assignment of one of three access levels: read-only, read-write, or admin. As of PE 2.6, users can also be managed using external, third-party authentication services such as LDAP, Active Directory or Google Accounts.
Following standard security practices, user passwords are hashed with a salt and then stored in a database separated from other console data. Authentication is built on CAS, an industry standard, single sign-on protocol.
Note: By default, CAS authentication for the console runs over port 443. If your console needs to access CAS on a different host/port, you can configure that in /etc/puppetlabs/console-auth/cas_client_config_yml.
User Access and Privileges
Depending on the access privileges assigned to them, users will be able to see and access different parts of the console:
Read-Only Users can only view information on the console, but cannot perform any actions. In particular, read-only users are restricted from:
- cloning resources in Live Management
- accessing the Control Puppet tab in Live Management
- accessing the Advanced Tasks tab in Live Management
- accepting or rejecting changes to the baseline in Compliance
- adding, editing, or removing nodes, groups, or classes
Read-Write Users have access to all parts of the console EXCEPT the user-management interface. Read-write users can interact with the console and use it to perform node management tasks.
Admin Users have unrestricted access to all parts of the console, including the user-management interface. Through this interface, admin users can:
- add a new user
- delete a user
- change a user’s role
- re-enable a disabled user
- disable an enabled user
- edit a user’s email
- prompt a change to the user’s password
There is one exception to this: admin users cannot disable, delete or change the privileges of their own accounts. Only another admin user can make these changes.
Anonymous Users In addition to authenticated, per-user access, the console can also be configured to allow anonymous, read-only access. When so configured, the console can be viewed by anyone with a web browser who can access the site URL. For instructions on how to do this, visit the advanced configuration page.
Managing Accounts and Users Internally
Signing Up
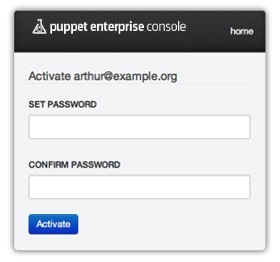
In order to sign up as a console user at any access level, an account must be created for you by an admin. Upon account creation, you will receive an email containing an activation link. You must follow this link in order to set your password and activate your account. The link will take you to a screen where you can enter and confirm your password, thereby completing account activation. Once you have completed activation you will be taken to the Login screen where you can enter your new credentials.
Logging In
You will encounter the login screen whenever you try to access a protected part of the console. The screen will ask for your email address and password. After successfully authenticating, you will be taken to the part of the console you were trying to access.
When you’re done working in the console, choose Logout from the user account menu. Note that you will be logged out automatically after 48 hours.

Viewing Your User Account
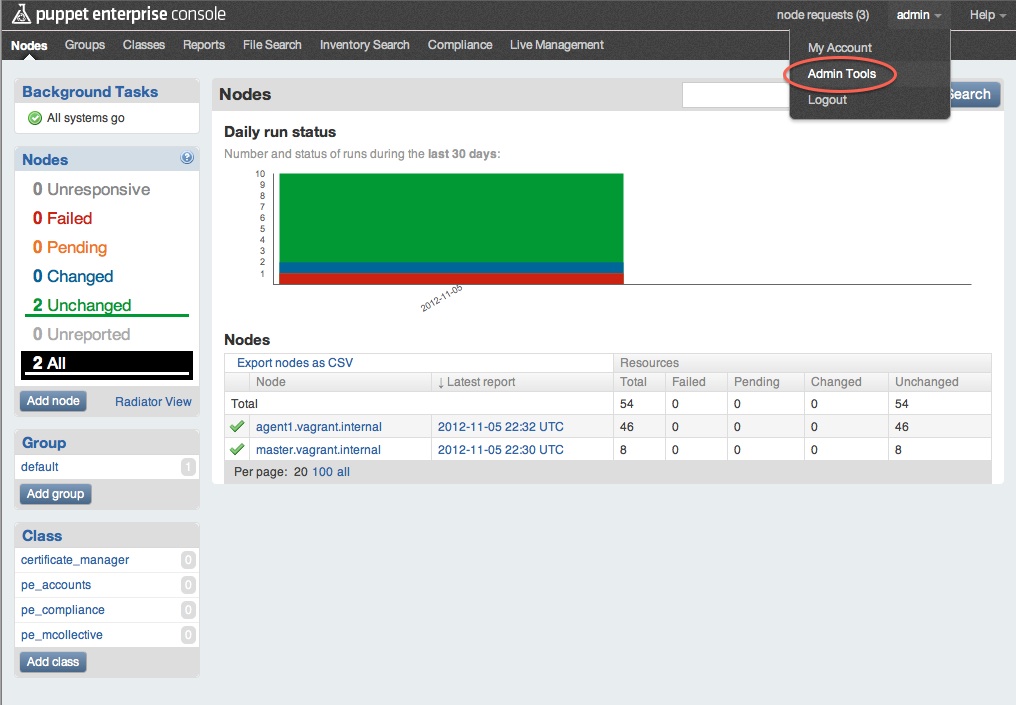
To view your user information, access the user account menu by clicking on your username (the first part of your email address) at the top right of the navigation bar.

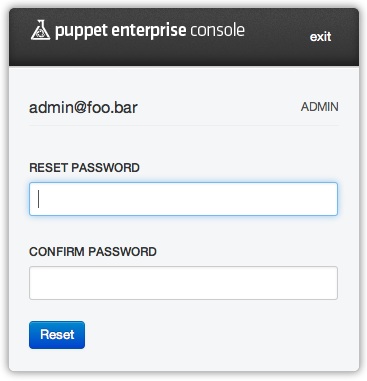
Choose My account to open a page where you can see your username/email and your user access level (admin, read-write or read-only) and text boxes for changing your password.
User Administration Tools
Users with admin level access can view information about users and manage their access, including adding and deleting users as needed. Admin level users will see an additional menu choice in the user account menu: Admin Tools. Users with read-write or read-only accounts will NOT see the Admin Tools menu item.
Viewing Users and Settings
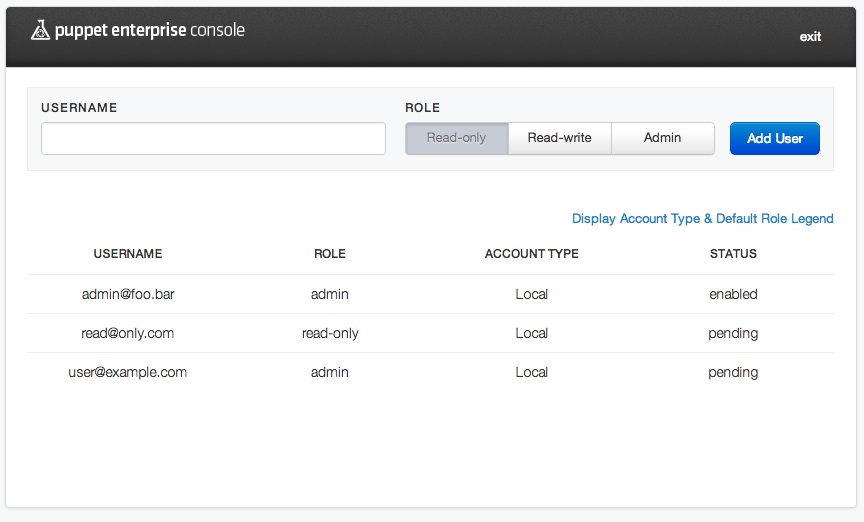
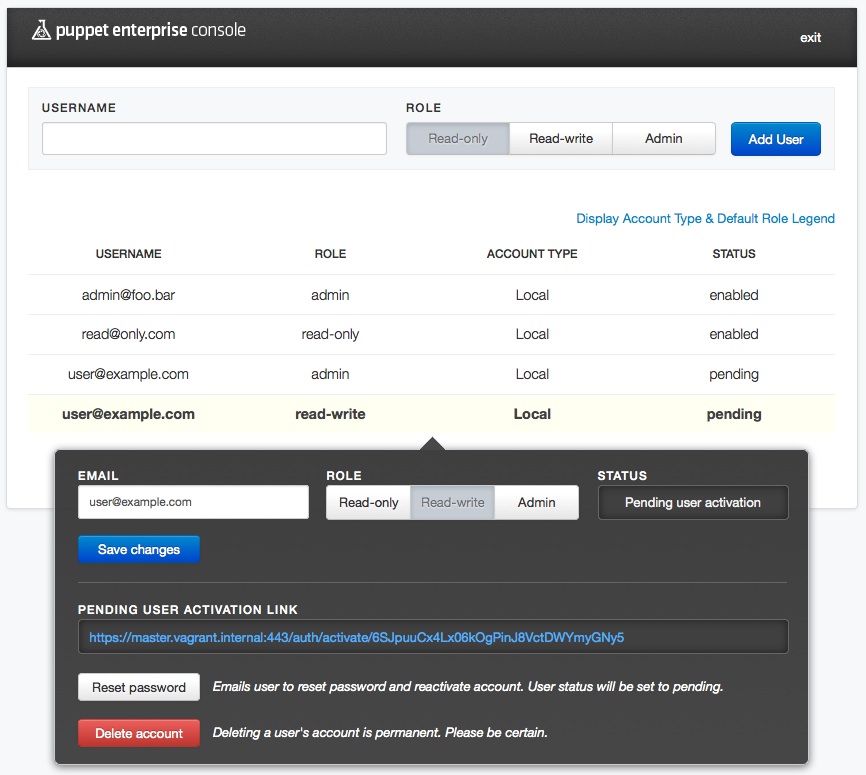
Selecting Admin Tools will open a screen showing a list of users by email address, their access role and status. Note that users who have not yet activated their accounts by responding to the activation email and setting a password will show a status of pending.
Click on a user’s row to open a pop-up pane with information about that user. The pop-up will show the user’s name/email, their current role, their status and other information. If the user has not yet validated their account, you will also see the link that was generated and included in the validation email. Note that if there is an SMTP issue and the email fails to send, you can manually send this link to the user.
Modifying User Settings
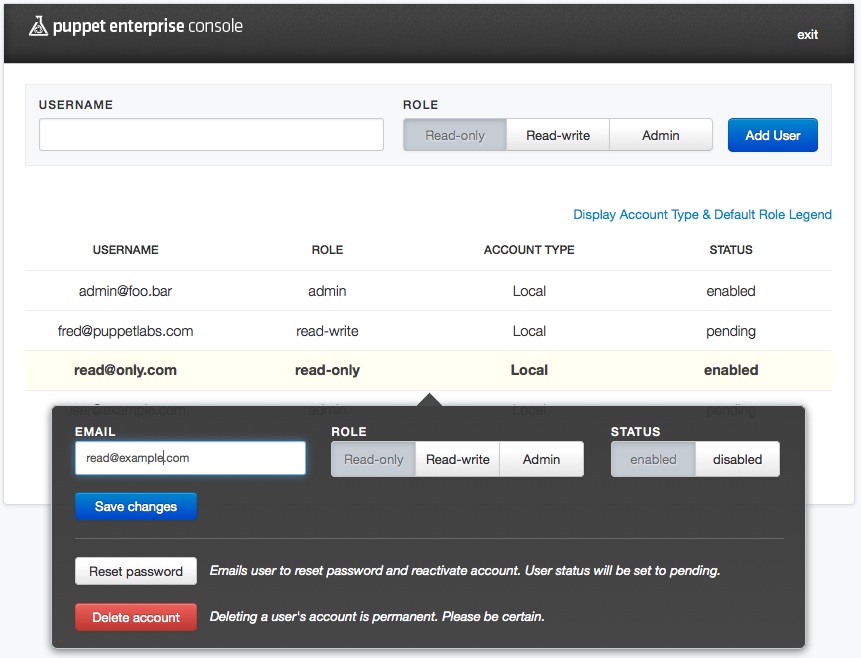
To modify the settings for a given user, click on the user’s row to open the pop-up pane. In this pane, you can change their role and their email address or reset their password. Don’t forget to click the Save changes button after making your edits.
Note that resetting a password or changing an email address will change that user’s status back to Pending, which will send them another validation email and require them to complete the validation and password setting process again.
For users who have completed the validation process, you can also enable or disable a user’s account. Disabling the account will prevent that user from accessing the console, but will not remove them from the users database.
Adding/Deleting Users
To add a new user, open the user admin screen by choosing Admin Tools in the user menu. Enter the user’s email address and their desired role, then click the “Add user” button. The user will be added to the list with a pending status and an activation email will be automatically sent to them.
To delete an existing user (including pending users), click on the user’s name in the list and then click the Delete account button. Note that deleting a user cannot be undone, so be sure this is what you want to do before proceeding.
Creating Users From the Command Line
New console users can also be created from the command line. This can be used to automate user creation or to import large numbers of users from an external source at once.
On the console server, the following command will add a new user:
$ sudo /opt/puppet/bin/rake -f /opt/puppet/share/console-auth/Rakefile db:create_user USERNAME="<email address>" PASSWORD="<password>" ROLE="< Admin | Read-Only | Read-Write >"
Note: The “EMAIL” variable used in PE 2.5 has been changed to “USERNAME” in PE 2.7.
Thus, to add a read-write user named [email protected], you would run:
$ sudo /opt/puppet/bin/rake -f /opt/puppet/share/console-auth/Rakefile db:create_user USERNAME="[email protected]" PASSWORD="good_password_1" ROLE="Read-Write"
You cannot currently delete or disable users or reset passwords from the command line.
Using Third-Party Authentication Services
As of PE 2.6, admins can use external, third-party authentication services to manage user access. The following external services are supported:
- LDAP
- Active Directory (AD)
- Google accounts
When using third-party services, the console’s RBAC retains control over the access privileges. When a user logs in using an external service, the console will check their level of access privileges. If they have never logged in before, they are assigned a default role. (This role can be configured. See “Configuration” below.) External users’ access privileges are managed in the same manner as internal users, via the console’s user administration interface.
The account interface for an externally authenticated user differs slightly from internal users in that external users do not have UI for changing their passwords or deleting accounts.
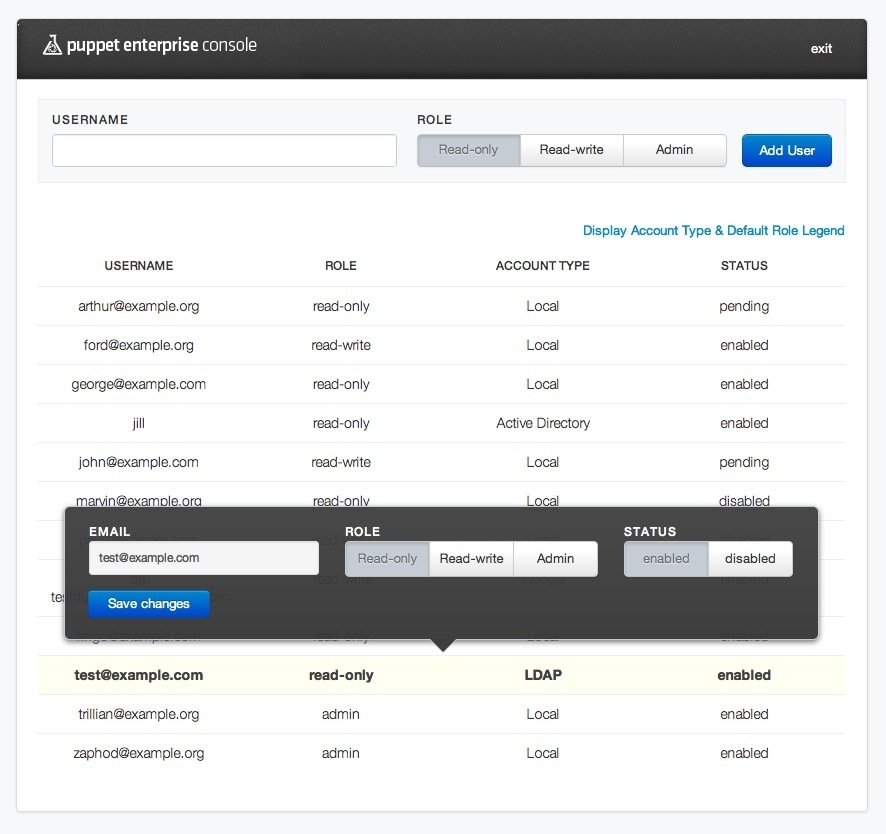
Admins will also notice additional UI on the user administration page which indicates the authentication service (“Account Type”) being used for a given user and a link to a legend that lists the external authentication services and the default access privileges given to users of a given service.

Lastly, note that built-in auth accounts use the email address specified at the end (e.g. “[email protected]”), whereas AD/LDAP accounts are generally accessed using just the username (e..g “a.user”), although this may vary in your specific organization’s implementation.
There is more, albeit sparse and specialized, information at the Ruby-CAS github site
Configuration
To use external authentication, the following two files must be correctly configured:
/etc/puppetlabs/console-auth/cas_client_config.yml/etc/puppetlabs/rubycas-server/config.yml
Note: If you upgraded from PE 2.5, your cas_client_config.yml and rubycas-server/config.yml files will not have the relevant commented-out sections, as they were added for 2.6 and the upgrader does not overwrite the config files.
You can find example config code that can be copied and pasted into the live config files, look in files with the same names and either the .rpmnew or .dpkg-new extension.
After editing these files, which we’ll discuss more below, you’ll want to restart pe-httpd and pe-puppet-dashboard-workers via their init.d scripts. Note that YAML requires that whitespace and tabs match up exactly. Type carefully.
Configuring cas_client_config.yml
The cas_client_config.yml file contains several commented-out lines under the authorization: key. Simply un-comment the lines that correspond to the RubyCAS authenticators you wish to use. You can also set the default access level for a given authentication service using default_role, which accepts the following values: read-only, read-write, or admin.
Each entry consists of the following:
- A common identifier (e.g.
local, orldap, etc.) which is used in the console_auth database and corresponds to the classname of the RubyCAS authenticator. default_rolewhich defines the role to assign to users by defaultdescriptionwhich is simply a human readable description of the service
The order in which authentication services are listed in the cas_client.config.yml file (see below) is the order in which the services will be checked for valid accounts. In other words, the first service that returns an account matching the entered user credential is the service that will perform authentication and log-in.
This example shows what you would do if you wanted to use AD and the built-in (local) auth services and disable Google and LDAP.
## This configuration file contains information required by any web
## service that makes use of the CAS server for authentication.

authentication:

  ## Use this configuration option if the CAS server is on a host different
  ## from the console-auth server.
  # cas_host: master:443

  ## The port CAS is listening on.  This is ignored if cas_host is set.
  # cas_port: 443

  ## The session secret is randomly generated during installation of Puppet
  ## Enterprise and will be regenerated any time console-auth is enabled or disabled.
  session_key: 'puppet_enterprise_console'
  session_secret: [REDACTED]

  ## Set this to true to allow anonymous users read-only access to all of
  ## Puppet Enterprise Console.
  global_unauthenticated_access: false

authorization:
  local:
    default_role: read-only
    description: Local
#  ldap:
#    default_role: read-only
#    description: LDAP
  activedirectoryldap:
    default_role: read-only
    description: Active Directory
#  google:
#    default_role: read-only
#    description: Google
Configuring rubycas-server/config.yml
This file is used to configure RubyCAS to use external authentication services. As before, you will need to un-comment the classes for the third-party services you wish to enable. The values for the listed keys are LDAP and ActiveDirectory standards. If you are not the administrator of those databases, you should check with that administrator for the correct values.
The authenticators are listed in the file in the following manner (note how this example disables the Google authenticator):
authenticator:
  - class: CASServer::Authenticators::SQLEncrypted
    database:
      adapter: mysql
      database: console_auth
      username: console_auth
      password: easnthycea098iu7aeo6oeu # installer-generated password
      server: localhost
    user_table: users
    username_column: username
  #- class: CASServer::Authenticators::Google
  #   restricted_domain: example.com
  - class: CASServer::Authenticators::LDAP
    ldap:
      host: tb-driver.example.com
      port: 389
      base: dc=example,dc=test
      filter: (objectClass=person)
      username_attribute: mail
  - class: CASServer::Authenticators::ActiveDirectoryLDAP
    ldap:
      host: winbox.example.com
      port: 389
      base: dc=example,dc=dev
      filter: (memberOf=CN=Example Users,CN=Users,DC=example,DC=dev)
      auth_user: cn=Test I. Am,cn=users,dc=example,dc=dev
      auth_password: P4ssword
As the above example shows, it’s generally best to specify just dc= attributes in the base key. The criteria for the Organizational Unit (OU) and Common Name (CN) should be specified in the filter key. The value of the filter: key is where authorized users should be located in the AD organizational structure. Generally speaking, the filter: key is where you would specify an OU or an AD Group. In order to authenticate, users will need to be in the specified OU or Group.
Also note that the value for the filter: key must be the full name for the leftmost cn=; you cannot use the user ID or logon name. In addition, the auth_user: key requires the full Distinguished Name (DN), including any CNs associated with the user and all of the dc= attributes used in the DN.