6.8. Users — 
Only Organization Administrators can see the Users tab on the top navigation bar. If you click the Users tab, the Users category and links appear. These pages enable you to grant and edit permissions for those who will administer your system groups. Click in the User List to modify users within your organization.
6.8.1. User Roles
To delegate responsibilities within your organization, Red Hat Network provides several roles with varying degrees of responsibility and access. This list describes the permissions of each and the differences between them:
User — Also known as a System Group User, this is the standard role associated with any newly created user. This person may be granted access to manage system groups and software channels but is otherwise limited to managing the systems he or she registers. Remember, however, all globally subscribable channels may be used by anyone.
Activation Key Administrator — This role is designed to manage your organization's collection of activation keys. This person can create, modify, and delete any key within your overarching account.
Software Channel Administrator — This role has complete access to the software channels and related associations within your organization. This person may change the base channels of systems, make channels globally subscribable, and create entirely new channels, if your organization has custom channel management privileges.
Configuration Administrator — This role enables the user to manage the configuration of systems in the organization using either the RHN website or the RHNCM;.
Monitoring Administrator — This role allows for the scheduling of probes and oversight of other Monitoring infrastructure.
Organization Administrator — This role can perform any function available within Red Hat Network. As the master account for your organization, the person holding this role can alter the privileges of all other accounts, as well as conduct any of the tasks available to the other roles. Like the other roles, multiple Organization Administrators may exist.
System Group Administrator — This role is one step below Organization Administrator in that it has complete authority over the systems and system groups to which its granted access. This person can create new system groups, delete any assigned systems groups, add systems to groups, and manage user access to groups.
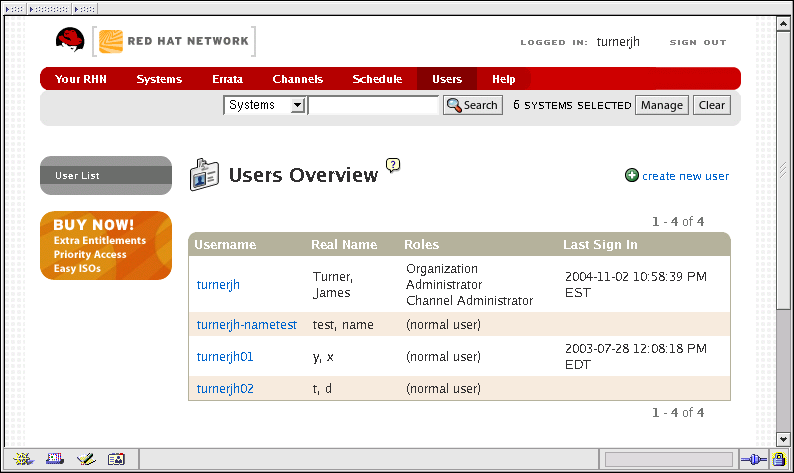
6.8.2. User List —
As shown in Figure 6-8, each row in the User List represents a user within your organization. There are three columns of information for each user:
Username — The login name of the user. If you click on a username, the User Details page for the user is displayed. Refer to Section 6.8.2.2 User Details —
for more information.Real Name — The full name of the user (last name first).
Roles — List of the user's privileges, such as Organization Administrator, Channel Administrator and normal user. Users can have multiple roles.
Last Sign In — Shows when the user last logged into RHN.
6.8.2.1. Create User —
Click the create new user link on the top-right corner of the page to add new users to the organization. When registering a system, a user account can be created and added to the organization, as well. This should be coordinated by the Organization Administrator. Refer to Section 5.3 Registering a User Account for instructions.
On the Create User page, complete all required
fields, including all login information. Then click the
Create Login button on the bottom right-hand corner of the
page. Once the login is created, you can click on the username in the
User List to make system and group
assignments. Refer to Section 6.8.2.2 User Details — ![]() for more information.
for more information.
 | Warning |
|---|---|
Be careful when creating users, because no interface exists for their deletion. Unless you are an RHN Satellite Server customer, you must contact Customer Service to have user accounts disabled. Go to the Contact RHN page at https://rhn.redhat.com/help/contact.pxt, select the Customer Service radio button, and enter your request containing the username to be removed and the overall account affected in the text fields before clicking Send. RHN Satellite Server customers may use the button on the User Details page. |
6.8.2.2. User Details —
Clicking on a username displays the User Details page for the individual. This page is divided into the following tabs:
6.8.2.2.1. User Details ⇒ Details —
The username, first name, last name, email address, and user roles for the user. All of this information is modifiable. To do so, make your changes and click the Update button. Remember, when changing a user's password, you will see only asterisks as you type the password.
To assign a user a new role, select the appropriate checkbox. Remember that Organization Administrators are automatically granted administration access to all other roles, signified by grayed-out checkboxes. To grant a user the ability to manage the configuration of systems, select the Configuration Administrator checkbox. When satisfied with the changes, click Update.
6.8.2.2.2. User Details ⇒ System Groups —
List of system groups that the user may administer. To add or remove system groups from a user's administration, select or unselect the appropriate checkboxes and click the Update Permissions button.
In addition, you may establish default system groups for the user to capture all systems registered by that user. To do this, select the default group or groups from the dropdown menu at the bottom of the page. Then click the Update Defaults button. An asterisk appears next to the names of the defaults in the dropdown menu.
6.8.2.2.3. User Details ⇒ Systems —
List of systems that the user can administer. These systems come from the system groups assigned to the user on the previous tab. To add systems to the System Set Manager, select them and click the Update button. Clicking the name of a system takes you to its System Details page. Refer to Section 6.4.2.6 System Details for more information.
6.8.2.2.4. User Details ⇒ Channel Permissions —
Subscription and management options set in these subtabs (which correspond with similar tabs on the Channel Details and Managed Channel Details pages):
6.8.2.2.4.1. User Details ⇒ Channel Permissions ⇒ Subscription —
Identifies channels the user may subscribe systems to. To change these, select or unselect the appropriate checkboxes and click the Update Permissions button. Note that channels subscribable through the user's admin status or the channel's global setting cannot be altered. They are identified with a check icon.
6.8.2.2.4.2. User Details ⇒ Channel Permissions ⇒ Management —
Identifies channels the user may manage. To change these, select or unselect the appropriate checkboxes and click the Update Permissions button. This status does not enable the user to create new channels. Note that channels automatically manageable through the user's admin status cannot be altered. They are identified with a check icon.
6.8.2.2.5. User Details ⇒ Preferences —
Modifiable Red Hat Network options. These include:
Email Notification — Determine whether you want to receive email every time an Errata Alert is applicable to one or more systems in your RHN account, as well as daily summaries of system events.
RHN List Page Size — Maximum number of items that will appear in a list on a single page. If more items are in the list, clicking the Next button will display the next group of items. This preference applies to the user's view of system lists, Errata lists, package lists, and so on.
Time Zone — Set your time zone so that scheduled actions are arranged according to the time in your time zone.
Red Hat Contact Options — Identify what ways (email, phone, fax, or mail) Red Hat may contact you.
To modify any of these options, make your changes and click the Save Preferences button.
6.8.2.2.6. User Details ⇒ Addresses —
General address, billing address, and shipping address for the user, as configured during user creation. To modify these addresses, click Edit this address below the address to be modified, make the changes, and click the Update button.
6.8.2.2.7. User Details ⇒ Notification Methods — 
Email and pager addresses designated to receive alerts from Monitoring probes. To create a method, click create new method and complete the fields. If you will receive these alerts via pager, select the associated checkbox to have the messages sent in a shorter format. When finished, click Create Method. The method will show up in the Methods list, from which it can be edited and deleted.