6.4. Systems
If you click the Systems tab on the top navigation bar, the Systems category and links appear. The pages in the Systems category allow you to select systems so that you can perform actions on them and create System Profiles.
6.4.1. Overview — 
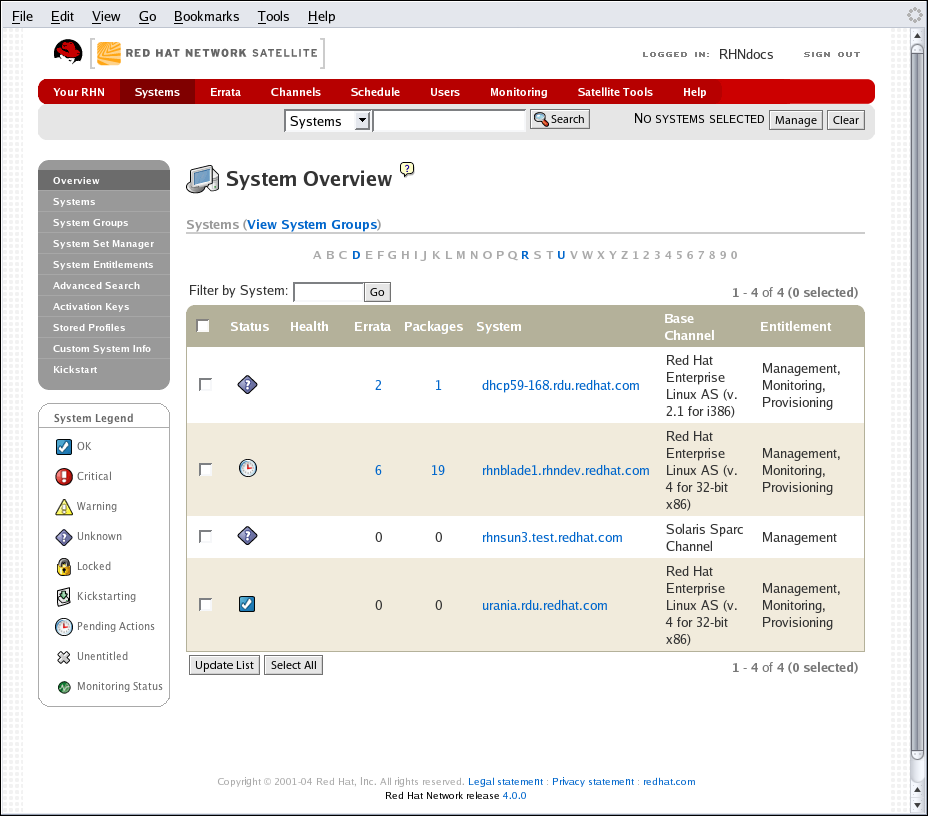
As shown in Figure 6-7, the Overview page provides a summary of your systems, including their status, number of associated Errata and packages, and entitlement level. Clicking on the name of a system takes you to its System Details page. Refer to Section 6.4.2.8 System Details for more information.
Clicking the View System Groups link at the
top of the Overview page takes you to a
similar summary of your system groups. It identifies group
status and displays the number of systems contained. Clicking on
the number of systems takes you to the
Systems tab of the System Group
Details page, while clicking on the system name
takes you to the Details tab for that system. Refer to
Section 6.4.3.3 System Group Details — ![]() for more information.
for more information.
You can also click the Use Group button
in the System Groups section of the
Overview page to go directly to the
System Set Manager. Refer to Section 6.4.4 System Set Manager — ![]() for
more information.
for
more information.
6.4.2. Systems
The Systems page displays a list of all of your registered systems. The Systems list contains several columns of information for each system:
Select — Update or unentitled systems cannot be selected. To select systems, mark the appropriate checkboxes. Selected systems are added to the System Set Manager. After adding systems to the System Set Manager, you can use it to perform actions on them simultaneously. Refer to Section 6.4.4 System Set Manager —
for details.Status — Shows which type of Errata Alerts are applicable to the system or confirms that it is up-to-date. Some icons are linked to pages providing resolution. For instance, the standard Updates icon is linked to the Upgrade subtab of the packages list, while the Critical Updates icon links directly to the Update Confirmation page. Also, the Not Checking In icon is linked to instructions for resolving the issue.
 — System is up-to-date
 — Critical Errata available,
update strongly recommended
— Critical Errata available,
update strongly recommended
 — Updates available and
recommended
— Updates available and
recommended
 — System is locked; Actions
prohibited
— System is locked; Actions
prohibited
 — System is being kickstarted
 — Updates have been scheduled
 — System not checking in
properly (for 24 hours or more)
— System not checking in
properly (for 24 hours or more)
 — System not entitled to any
update service
— System not entitled to any
update service
Errata — Total number of Errata Alerts applicable to the system.
Packages — Total number of package updates for the system. Includes packages from Errata Alerts as well as newer packages that are not from Errata Alerts. For example, imagine a client system that has an early version of a package installed. If this client is then subscribed to the appropriate base channel of RHN (such as Red Hat Enterprise Linux 4), that channel may have an updated version of the package. If so, the package appears in the list of available package updates.

Important If the RHN website identifies package updates for the system, yet the Red Hat Update Agent responds with "Your system is fully updated" when run, a conflict likely exists in the system's package profile or in the up2date configuration file. To resolve the conflict, either schedule a package list update or remove the packages from the Package Exceptions list for the Red Hat Update Agent. Refer to Section 6.4.2.8 System Details or Section 2.4.1.3 Package Exceptions Settings, respectively, for instructions.
System — The name of the system as configured when registering it. The default name is the hostname of the system. Clicking on the name of a system takes you to the System Details page for the system. Refer to Section 6.4.2.8 System Details for more information.
Base Channel — The primary channel for the system, based upon its operating system distribution. Refer to Section 6.6.1 Software Channels for more information.
Entitlement — Whether or not the system is entitled and at what service level.
Links in the left navigation bar below Systems enable you to select and view predefined sets of your systems. All of the options described above can be applied within these pages.
6.4.2.1. All
The All page contains the default set of your systems. It displays every system you have permission to manage. A user has permission to manage a system if he is the only user in his organization, if he is an Organization Administrator, or if the system is a member of a group to which he has admin rights.
6.4.2.2. Out of Date
The Out of Date page displays the systems that have applicable Errata Alerts that have not been applied.
6.4.2.3. Unentitled —
The Unentitled page displays the systems that have not yet been entitled for Red Hat Network service.
6.4.2.4. Ungrouped
The Ungrouped page displays the systems that have not yet been assigned to a specific system group.
6.4.2.5. Inactive
The Inactive page displays the systems that have not checked into RHN for 24 hours or more. When the Red Hat Update Agent connects to RHN to see if there are any updates available or if any actions have been scheduled, this is considered a checkin. If you are seeing a message indicating checkins are not taking place, the RHN client on your system is not successfully reaching Red Hat Network for some reason. This indicates:
The system is not entitled to any RHN service. System Profiles that remain unentitled for 180 days (6 months) are removed.
The system is entitled, but the Red Hat Network Daemon has been disabled on the system. Refer to Chapter 3 Red Hat Network Daemon for instructions on restarting and troubleshooting.
The system is behind a firewall that does not allow connections over https (port 443).
The system is behind an HTTP proxy server that has not been properly configured.
The system is connected to an RHN Proxy Server or RHN Satellite Server that has not been properly configured.
The system itself has not been properly configured, perhaps pointing at the wrong RHN Server.
The system is not on the network.
Some other barrier exists between the system and the RHN Servers.
6.4.2.6. Satellite
The Satellite page displays the RHN Satellite Server systems registered to your RHN account.
6.4.2.7. Proxy
The Proxy page displays the RHN Proxy Server systems registered to your RHN account.
6.4.2.8. System Details
Click on the name of a system on any page and RHN displays the System Details page for that client. From here, you may modify the displayed information or remove the system altogether by clicking the delete system link on the top-right corner.
The System Details page is further divided into the following tabs:
Details
Software
Configuration
Provisioning —

Monitoring —

Groups
Events
The following sections discuss these tabs and their sub-tabs in detail.
6.4.2.8.1. System Details ⇒ Details
This page is not accessible from any of the standard navigation bars. However, clicking on the name of a system anywhere in the web interface brings you to this page. The default tab displayed on this page is the Details ⇒ Overview subtab. Other tabs are available, depending on the current entitlement level of the system.
6.4.2.8.1.1. System Details ⇒ Details ⇒ Overview
This system summary page displays the system status message and the following key information about the system:
System Info
- System Status Message
This message indicates the current state of your system in relation to RHN.

Note If updates are available for any entitled system, the message Critical updates available appears. To apply these updates, click the update now link.
- system ID
A unique identifier generated each time a system registers with RHN.
Note The system ID can be used to eliminate duplicate profiles from RHN. Compare the system ID listed on this page with the information stored on the client system in the /etc/sysconfig/rhn/systemid file. In that file, the system's current ID is listed under "system_id". The value starts after the characters "ID-" If the value stored in the file does not match the value listed in the profile, the profile is not the most recent one and may be removed.
- Hostname
The hostname as defined by the client system. This information is often found in /etc/hostname for Red Hat Enterprise Linux systems.
- IP Address
The IP address of the client.
- Kernel
The kernel that is installed and operating on the client system.
- Registered
The date and time at which the system registered with RHN and created this profile.
- Checked In
The date and time at which the system last checked in with RHN.
- Last Booted
The date and time at which the system was last started or restarted.
Note Systems with a Management entitlement can be rebooted from this screen.
Select Schedule system reboot
Provide the earliest date and time at which the reboot may take place.
Click the Schedule Reboot button in the lower right.
When the client checks in after the scheduled start time, RHN will instruct the system to restart itself.
- Locked
Indicates whether a system has been locked.
Actions cannot be scheduled for locked systems through the web interface until the lock is removed manually. This does not include preventing auto-errata updates scheduled through the web interface. To prevent the application of auto-errata updates, de-select Auto Errata Update from the System Details ⇒ Details ⇒ Properties subtab.
Locking a system can help to prevent you from accidentally making any changes to a system until you are ready to do so. For example, the system may be a production system that you do not wish to receive updates or new packages until you decide to unlock it.
Important Locking a system in the web interface will not prevent any actions that originate from the client system. For example, if a user logs into the client directly and runs up2date, up2date will install available errata whether or not the system is locked in the web interface.
Further, locking a system does not restrict the number of users who can access the system via the web interface. If you wish to restrict access to the system, associate that system with a System Group and assign it a System Group Administrator. Refer to Section 6.4.3 System Groups —
for more
information about System Groups.
It is also possible to lock multiple systems via the System Set Manager. Refer to Section 6.4.4.11.4 System Set Manager ⇒ Misc ⇒ Lock Systems —
to
learn how to do so.
![]() — OSA status is also displayed for client
systems registered to a Satellite that have a Provisioning
entitlement and have enabled OSA.
— OSA status is also displayed for client
systems registered to a Satellite that have a Provisioning
entitlement and have enabled OSA.
Push enables Satellite customers to immediately initiate tasks on Provisioning-entitled system rather than wait for those systems to check in with RHN. Scheduling actions through push is identical to the process of scheduling any other action, except that the task begins immediately instead of waiting the set interval.
In addition to the configuration of the Satellite, each client system to receive pushed actions must have the osad package installed and its service started. Refer to the Enabling Push to Clients section of the RHN Satellite Server 4.1.0 Installation Guide for details.
Subscribed Channels
- Base Channel
The first line indicates the base channel to which this client is subscribed. The base channel should match the operating system of the system.
- Child Channels
The subsequent lines of text, which depend from the base channel, are child channels. Examples are the Red Hat Network Tools channel and the RHEL AS Extras channel.
| Note |
|---|---|
The final link under Subscribed Channels is the Alter Channel subscriptions link. Click on this link to select from the available base and child channels for this system. When finished making selections, click the Change Subscriptions button to confirm the changes. |
System Properties
- Profile Name
This editable name for the system profile is set to the system's hostname by default. It serves to distinguish this system profile from others.
- Entitlement
The base entitlement currently applied to this system.
- Notifications
Indicates the the notification options for this system. You can choose whether you wish to receive email notifying you of available errata updates for this system. In addition, you may choose to include Management-entitled systems in the daily summary email.
- Auto Errata Update
Indicates whether this system is configured to accept updates automatically.
- Description
This information is automatically generated at registration. You can edit this to include any information you wish.
- Location
If entered, this field displays the physical address of the system.
The final link on the page is Edit these properties. Clicking this link opens the System Details ⇒ Properties subtab. On this page, edit any text you choose, then click the Update Properties button to confirm.
6.4.2.8.1.2. System Details ⇒ Details ⇒ Properties
This subtab allows you to alter the following basic properties of your system:
- Profile Name
By default, this is the hostname of the system. You can however alter the profile name to anything that allows you to distinguish this profile from others.
- Base Entitlement
Select a base channel for the system from the available base entitlements.
- Add-on entitlements
If available, apply a Monitoring or Provisioning entitlement to the system.
- Notifications
Toggle whether notifications about this system are sent and whether this system is included in the daily summary. (By default, all Management and Provisioning systems are included in the summary.) This setting keeps you abreast of all advisories pertaining to the system. Anytime an update is produced and released for the system, a notification is sent via email.
The daily summary reports system events that affect packages, such as scheduled Errata Updates, system reboots, or failures to check in. In addition to including the system here, you must choose to receive email notification sin the Your Preferences page of the Your RHN category.
- Auto-errata update
If this box is checked, available errata are automatically applied to the system when it checks in. This action takes place without user intervention. Customers should note that Red Hat does not recommend the use of the auto-update feature for production systems because conflicts between packages and environments can cause system failures. The Red Hat Network Daemon must be enabled on the system for this feature to work.
- Description
By default, this text box records the operating system, release, and architecture of the system when it first registers. You may edit this information to include anything you like.
The remaining fields record the physical address at which the system is stored. To confirm any changes to these fields, click the Update Properties button.
| Note |
|---|---|
Many of these properties can be set for multiple systems at once
through the System Set Manager interface. Refer to Section 6.4.4 System Set Manager — |
6.4.2.8.1.3. System Details ⇒ Details ⇒ Remote Command
—
This subtab allows you to run a remote command on the system if the system possesses a Provisioning entitlement. Before doing so, you must first configure the system to accept such commands.
First, subscribe the system to the RHN Tools channel and use up2date to install the rhncfg, rhncfg-client, and rhncfg-actions packages.
up2date rhncfg rhncfg-client rhncfg-actions
Log into the system as root and add the following file to the local RHN configuration directory: allowed-actions/scripts/run.
Create the necessary directory on the target system:
mkdir -p /etc/sysconfig/rhn/allowed-actions/script
Create an empty run file in that directory to act as a flag to RHN signaling permission to allow remote commands:
touch /etc/sysconfig/rhn/allowed-actions/script/run
Once the setup is complete, refresh the page in order to view the text fields for remote commands. You may then identify a specific user, group, and timeout period, as well as the script itself on this page. Select a date and time to begin attempting the command, and click Schedule Remote Command.
6.4.2.8.1.4. System Details ⇒ Details ⇒ Reactivation —
An activation key specific to this System Profile. Reactivation keys, available only for systems that have a Provisioning entitlement, include this system's ID, history, groups, and channels. This key can then be used only once with the rhnreg_ks command line utility to re-register this system and regain all Red Hat Network settings. Refer to Section 2.5 Registering with Activation Keys for instructions. Unlike typical activation keys, which are not associated with a specific system ID, keys created here do not show up within the Activation Keys page.
 | Warning |
|---|---|
When kickstarting a system with its existing RHN profile, the kickstart profile uses the system-specific activation key created here to re-register the system and return its other RHN settings. For this reason, you should not regenerate, delete, or use this key (with rhnreg_ks) while a profile-based kickstart is in progress. If you do, the kickstart will fail. |
6.4.2.8.1.5. System Details ⇒ Details ⇒ Hardware
This subtab provides detailed information about the system, including networking, BIOS, storage, and other devices. This appears only if you selected to include the hardware profile for this machine during registration. If the hardware profile looks incomplete or outdated, click the Schedule Hardware Refresh button to schedule a Hardware Profile update for your system. The next time the RHN Daemon connects to RHN, it will update your System Profile with the latest list of hardware.
6.4.2.8.1.6. System Details ⇒ Details ⇒ Notes
This subtab provides a place to create notes about the system. To add a new note, click the create new note link, type a subject and details, and click the Create button. To modify a note, click on its subject in the list of notes, make your changes, and click the Update button. To remove a note, click on its subject in the list of notes and then click the delete note link.
6.4.2.8.1.7. System Details ⇒ Details ⇒ Custom Info —
This subtab, available for systems with a Provisioning entitlement,
provides completely customizable information about the system.
Unlike Notes, Custom
Info is structured, formalized, and can be
searched upon. Before you can provide custom information
about a system, you must first have Custom
Information Keys. This is done via the Custom System Info page, available from the left
navigation bar. Refer to Section 6.4.8 Custom System Info — ![]() for instructions.
for instructions.
Once you have created one or more Keys, you may assign a value for this system by select the create new value link. Click the name of the key in the resulting list and enter a value for it in the Description field, then click the Update Key button.
6.4.2.8.1.8. System Details ⇒ Details ⇒ Proxy
Activates an RHN Proxy Server. This tab is only available for Provisioning-entitled systems. Select a version of RHN Proxy Server and click the Activate Proxy button to begin the installation and activation process. For detailed information, refer to the RHN Proxy Server Guide and the Client Configuration Guide.
6.4.2.8.1.9. System Details ⇒ Details ⇒ Satellite
Displays the certificate of an active Red Hat Network. You can deactivate an old certificate here and upload a new one if necessary. This tab requires a Provisioning entitlement. For detailed information on activating a Satellite, refer to the RHN Satellite Installation Guide.
6.4.2.8.2. System Details ⇒ Software
This tab and its accompanying subtabs allow you to manage the software of the system: errata, packages and package profiles, and software channel memberships.
6.4.2.8.2.1. System Details ⇒ Software ⇒ Errata
This subtab contains a list of Errata Alerts applicable to the system. Refer to Section 6.1.3 Errata Alert Icons for meanings of the icons on this tab. To apply updates, select them and click the Apply Errata button. Double-check the updates to be applied on the confirmation page, then click the Confirm button. After confirming, the action is added to the Pending Actions list under Schedule. Errata that have been scheduled cannot be selected for update. In the place of a checkbox is a clock icon that, when clicked, takes you to the Action Details page.
To help users determine whether an update has been scheduled, a Status column exists within the Errata table. Possible values are: None, Pending, Picked Up, Completed, and Failed. This column identifies only the latest action related to an Erratum. For instance, if an action fails and you reschedule it, this column shows the status of the Erratum as Pending only (with no mention of the previous failure). Clicking a status other than None takes you to the Action Details page. This column corresponds to the one on the Affected Systems tab of the Errata Details page.
6.4.2.8.2.2. System Details ⇒ Software ⇒ Packages
This subtab allows you to manage the packages on the system.
![]() — When selecting packages to
install, upgrade, or remove, Provisioning customers have the option
of running a remote command automatically before or after the
package installation. Refer to Section 6.4.2.8.1.3 System Details ⇒ Details ⇒ Remote Command
—
— When selecting packages to
install, upgrade, or remove, Provisioning customers have the option
of running a remote command automatically before or after the
package installation. Refer to Section 6.4.2.8.1.3 System Details ⇒ Details ⇒ Remote Command
— ![]() for more
information.
for more
information.
- Packages
The default display of the Packages tab describes the options available to you and provides the means to update your package list. To update or complete a potentially outdated list, possibly due to the manual installation of packages, click the Update Package List button on the bottom right-hand corner of this page. The next time the RHN Daemon connects to RHN, it updates your System Profile with the latest list of installed packages.
- List/Remove
Lists installed packages from the system's software System Profile and enables you to remove them. Click on a package name to view its Package Details page. To delete packages from the system, select their checkboxes and click the Remove Packages button on the bottom right-hand corner of the page. A confirmation page appears with the packages listed. Click the Confirm button to remove the packages.
- Upgrade
Displays a list of packages that have a new version available based on the package versions in the channels for the system. Click on the latest package name to view its Package Details page. To upgrade packages immediately, select them and click the Upgrade Packages button. To download the packages as a .tar file, select them and click the Download Packages button.
- Install
Enables you to install new packages on the system from the available channels. Click on the package name to view its Package Details page. To install packages, select them and click the Install Selected Packages button.
- Verify
Validates the packages installed on the system against its RPM database. This is the equivalent of running rpm -V. Specifically, this tab allows you to compare the metadata of the system's packages with information from the database, such as MD5 sum, file size, permissions, owner, group and type. To verify a package or packages, select them, click the Verify Selected Packages button, and confirm this action. Once finished, you can view the results by selecting this action within the History subtab under Events.
- Profiles
Gives you the ability to compare the packages on this system with the packages of stored profiles and other Management and Provisioning systems. To make the comparison with a stored profile, select that profile from the pulldown menu and click the Compare button. To make the comparison with another system, select it from the associated pulldown menu and click the Compare button. To create a stored profile based upon the existing system, click the Create System Profile button, enter any additional information you desire, and click the Create Profile button. These profiles are kept within the Stored Profiles page linked from the left navigation bar.
— Once package profiles have
been compared, Provisioning customers have the ability to
synchronize the packages of the selected system with the
package manifest of the compared profile. Note that this
action may delete packages on the system not in the
profile, as well as install packages from the profile.
To install specific packages, select the checkboxes of
packages from the profile. To remove specific packages
already installed on the system itself, select the
checkboxes of packages showing a difference of
This system only. To synchronize
fully the system's packages with the compared profile,
select the master checkbox at the top of the column.
Then click the Sync Packages to
button. On the confirmation screen, review the changes,
select a time frame for the action, and click the
Schedule Sync button.
6.4.2.8.2.3. System Details ⇒ Software ⇒ Software Channels
Software channels provide a well-defined method to determine which packages should be available to a system for installation or upgrade based upon its operating systems, packages, and functionality. Click a channel name to view its Channel Details page. To modify the child channels associated with this system, use the checkboxes next to the channels and click the Change Subscriptions button. You will receive a success message or be notified of any errors. To change the system's base channel, select the new one from the pulldown menu and click the Modify Base Channel button. Refer to Section 6.6.1 Software Channels for more information.
6.4.2.8.3. System Details ⇒ Configuration —
This tab and its subtabs, which do not appear without a Provisioning entitlement, assist in managing the configuration files associated with the system. These configuration files may be managed solely for the current system, or may be distributed widely via a Configuration Channel. The following section describe these and other available options on the System Details ⇒ Configuration subtabs.
| Note |
|---|---|
To manage the configuration of a system, it must have the latest rhncfg* packages installed. Refer to Section 6.6.6.1 Preparing Systems for Config Management for instructions on enabling and disabling scheduled actions for a system. |
This section is available to normal users with access to systems that have configuration management enabled. Like software channels, configuration channels store files to be installed on systems. While software updates are provided by RHN, configuration files are managed solely by you. Also unlike software packages, various versions of configuration files may prove useful to a system at any given time. Remember, only the latest version can be deployed.
6.4.2.8.3.1. System Details ⇒ Configuration ⇒ Overview
This subtab provides access to the configuration statistics of your system and to the most common tasks used to manage configuration files. You may change the settings listed under Configuration Stats by clicking on the blue text for that setting. Alternatively, you may perform any of the common configuration management tasks listed on the right of the screen by clicking one of the links.
6.4.2.8.3.2. System Details ⇒ Configuration ⇒ Managed Files
This subtab lists all configuration files currently associated with the system.
- Filename
This column shows both the name and the deployment path for this file.
- Revision
This column increments any time you make a change to the managed file.
- From Config Channel
This column indicates the name of the channel that contains the file, or displays (system override) for files available to this system only.
- Overrides
If this configuration file overrides another, the overridden file is listed in this column along with its host channel.
If you wish to deploy any of these files to the client system, overwriting any changes that have been made locally, check the box to the left of the file and click the Deploy Configuration button. On the following screen, choose a deployment time and click the Schedule Deploy button to confirm.
| Note |
|---|---|
If you click on the Filename of a (system override) file, you can edit its contents. |
The Overrides column identifies the config file from which channel will apply if the system is unsubscribed from the config channel that provides the file now. For instance, if a system has '/etc/foo' from channel 'bar' and '/etc/foo' from channel 'baz' is in the Overrides column, then unsubscribing from channel 'bar' will mean that the file from channel 'baz' will be applicable. Also, if nothing is in the 'Overrides' column for a given file path, then unsubscribing from the channel providing the file will mean that the file is no longer managed (though it will not remove the file from the system).
6.4.2.8.3.3. System Details ⇒ Configuration ⇒ Diff
This subtab compares a configuration file as stored on the Satellite with the file as it exists on the client. (It does not, for example, compare versions of the same file stored in different channels.) Select the files to be diffed, click the Analyze Differences button, select a time to perform the diff, and click the Schedule Diff button to confirm. After the diff has been performed, you may return to this page to view the results.
6.4.2.8.3.4. System Details ⇒ Configuration ⇒ Configuration Channels
This subtab allows you to subscribe to and rank configuration channels
that may be associated with the system, lowest first. Enter
numbers in the Rank fields to establish
the order in which channels are used. Channels with no numeric
value are not associated with the system. This system's local
configuration channel will always override all other channels
for this system and therefore cannot have its rank adjusted
from 1. All other channels are created in the Manage
Config Channels interface within the
Channels category. Refer to Section 6.6.6 Manage Config Channels — ![]() for instructions. When
satisfied, click Update.
for instructions. When
satisfied, click Update.
6.4.2.8.3.5. System Details ⇒ Configuration ⇒ Local Overrides
This subtab displays the default configuration files for the system
and allows you to manage them. If no files exist, you may use
the add files, upload
files, and add directories
links within the page description to associate files with this
system. These tabs correspond to those within the
Configuration Channel Details page,
affecting your entire organization and available only to
Configuration Administrators. Refer to Section 6.6.6.5 Configuration Channel Details — ![]() for more information.
for more information.
If a file exists, click its name to go to the
Configuration File Details page. Refer to
Section 6.6.6.6 Configuration File Details — ![]() for instructions. To
replicate the file within a config channel, select its
checkbox, click the Copy to Config
Channel button, and select the destination
channel. To remove a file, select it and click
Delete Selected Files.
for instructions. To
replicate the file within a config channel, select its
checkbox, click the Copy to Config
Channel button, and select the destination
channel. To remove a file, select it and click
Delete Selected Files.
6.4.2.8.3.6. System Details ⇒ Configuration ⇒ Sandbox
This subtab allows you to manipulate configuration files without deploying them. This sandbox provides you with an area in which to experiment with files without affecting your systems. To add files, click the import new files link, enter the path to the file on you local system, and click the Add button. Select the Import Files button to confirm.
6.4.2.8.4. System Details ⇒ Provisioning —
This tab and its subtabs allow you to schedule and monitor kickstarts and to return your system to a previous state. Kickstart is a Red Hat utility that allows you to automate the reinstallation of a system. Snapshots keep a record of every change to a Provisioning system and allow you to "undo" those changes at will. Both features are described in the sections that follow.
6.4.2.8.4.1. System Details ⇒ Provisioning ⇒ Kickstart —
This subtab is further divided into Session Status, which tracks the progress of previously scheduled kickstarts, and Schedule, which allows you to configure and schedule a kickstart for this system.
- Schedule
This subtab allows you to schedule the selected system for kickstart. Choose from the list of available kickstart profiles, select a time for the kickstart to begin, and click the Schedule Kickstart and Finish button to begin the kickstart. You may first alter kickstart settings by clicking the Advanced Configuration button.
Note You must first create a kickstart profile before it appears on this subtab. If you have not created any profiles, refer to Section 6.4.9.3 Create a New Kickstart Profile before scheduling a kickstart for a system.
- Session Status
If you have scheduled a kickstart, this subtab shows the progress of the kickstart. The provided details include the kickstart profile used, its state, the next action and the number of requested packages. Kickstarts that do not complete within approximately two hours are marked Kickstart Failed. The page refreshes itself periodically, or you can force a refresh using your browser's controls.
6.4.2.8.4.2. System Details ⇒ Provisioning ⇒ Snapshots —
Snapshots enable you to roll back the system's package profile, configuration files, and RHN settings. Snapshots are captured whenever an action takes place on a Provisioning-entitled system. The Snapshots subtab lists all snapshots for the system , including the reason the snapshot was taken, the time it was taken, and the number of tags applied to each snapshot. To revert to a previous configuration, click the Reason of the snapshot taken and review the potential changes on the provided subtabs, starting with Rollback.
Each subtab provides the specific changes that will be made to the system during the rollback:
group memberships
channel subscriptions
installed packages
configuration channel subscriptions
configuration files
snapshot tags
When satisfied with the reversion, return to the Rollback subtab and click the Rollback to Snapshot button. To see the list again, click Return to snapshot list.
6.4.2.8.4.3. System Details ⇒ Provisioning ⇒ Snapshot Tags —
Provides a means to add meaningful descriptions to your most recent system snapshot. This can be used to indicate milestones, such as a known working configuration or a successful upgrade. To tag the most recent snapshot, click create new system tag, enter a descriptive term in the Tag name field, and click the Tag Current Snapshot button. You may then revert using this tag directly by clicking its name in the Snapshot Tags list. To delete tags, select their checkboxes, click Remove Tags, and confirm the action.
6.4.2.8.5. System Details ⇒ Monitoring —
This tab is only visible for systems registered to a RHN Satellite Server with Monitoring
enabled and that are Monitoring entitled. It displays all of the
probes monitoring the system. The State
column shows icons representing the status of each probe. Refer
to Section 6.9 Monitoring — ![]() for descriptions of these states.
Clicking the Probe Description takes you to
its Current State page. The
Status String column displays the last
message received from the probe.
for descriptions of these states.
Clicking the Probe Description takes you to
its Current State page. The
Status String column displays the last
message received from the probe.
To add a probe to the system, click the create new probe link at the top-right corner of the page and complete the fields on the following page. Refer to Section 7.5.1 Managing Probes for detailed instructions.
Once the probe has been added, you must reconfigure your Monitoring
infrastructure to recognize it. Refer to Section 6.9.4 Scout Config Push — ![]() for details. After the probe
has run, its results become available on the Current
State page. Refer to Section 6.9.1.7 Current State —
for details. After the probe
has run, its results become available on the Current
State page. Refer to Section 6.9.1.7 Current State — ![]() for details.
for details.
To remove a probe from a system, click on the name of the probe, then click the delete probe link in the upper right corner. Finally, click the Delete Probe button to complete the process.
6.4.2.8.6. System Details ⇒ Groups —
This tab and its subtabs allow you to manage the system's group memberships.
6.4.2.8.6.1. System Details ⇒ Groups ⇒ List/Leave —
This subtab lists groups to which the system belongs and
enables you to cancel those associations. Only System Group Administrators and
Organization Administrators can remove the system from groups. Non-admins just see a
Review this system's group membership
page. To remove the system from groups, select the groups'
checkboxes and click the Leave Selected
Groups button. Click on a group's name to go to
its System Group Details page. Refer to
Section 6.4.3.3 System Group Details — ![]() for more
information.
for more
information.
6.4.2.8.6.2. System Details ⇒ Groups ⇒ Join —
Lists groups that the system may be subscribed to. Only System Group Administrators and Organization Administrators can add the system to groups. Non-admins see a Review this system's group membership page. To add the system to groups, select the groups' checkboxes and click the Join Selected Groups button.
6.4.2.8.7. System Details ⇒ Events
Displays past, current, and scheduled actions on the system. You may cancel pending events here. The following sections describe the Events sub-tabs and the features they offer.
6.4.2.8.7.1. System Details ⇒ Events ⇒ Pending
Lists events that are scheduled but have not begun. A prerequisite action must complete successfully before a given action is attempted. If an action has a prerequisite, no checkbox is available to cancel that action. Instead, a checkbox appears next to the prerequisite action; canceling the prerequisite action causes the action in question to fail.
Actions can be chained in this manner so that action 'a' requires action 'b' which requires action 'c'. Action 'c' is the first one attempted and has a checkbox next to it until it is completed successfully - if any action in the chain fails, the remaining actions also fail. To unschedule a pending event, select the event and click the Cancel Events button at the bottom of the page. The following icons indicate the type of events listed here:
 — Package Event
 — Errata Event
 — Preferences Event
 — System Event
6.4.2.8.7.2. System Details ⇒ Events ⇒ History
The default display of the Events tab lists the type and status of events that have failed, occurred or are occurring. To view details of an event, click its summary in the System History list. To again view the table, click Return to history list at the bottom of the page.
6.4.3. System Groups —
The System Groups page allows all RHN Management and Provisioning users to view the System Groups list. Only System Group Administrators and Organization Administrators may perform the following additional tasks:
Create system groups. (Refer to Section 6.4.3.1 Creating Groups.)
Add systems to system groups. (Refer to Section 6.4.3.2 Adding and Removing Systems in Groups.)
Remove systems from system groups. (Refer to Section 6.4.2.8 System Details.)
Assign system group permissions to users. (Refer to Section 6.8 Users —
.)
As shown in Figure 6-8, the System Groups list displays all of your system groups.
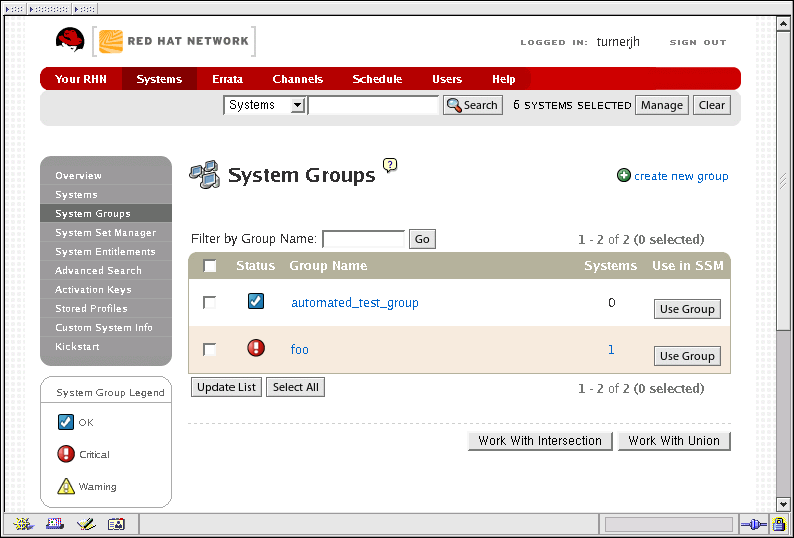
The System Groups list contains several columns for each group:
Select — These checkboxes enable you to add systems in groups to the System Set Manager. To select groups, mark the appropriate checkboxes and click the Update button below the column. All systems in the selected groups are added to the System Set Manager. You can then use the System Set Manager to perform actions on them simultaneously. It is possible to select only those systems that are members of all of the selected groups, excluding those systems that belong only to one or some of the selected groups. To do so, select them and click the Work with Intersection button. To add all systems in all selected groups, select them and click the Work with Union button. Each system will show up once, regardless of the number of groups to which it belongs. Refer to Section 6.4.4 System Set Manager —
for details.
Status — Shows which type of Errata Alerts are applicable to the group or confirms that it is up-to-date. Clicking on a group's status icon takes you to the Errata tab of its System Group Details page. Refer to Section 6.4.3.3 System Group Details —
for more
information.The status icons call for differing degrees of attention:
- — All systems within group
are up-to-date
- — Critical Errata available,
update strongly recommended
- — Updates available and
recommended
Group Name — The name of the group as configured during its creation. The name should be explicit enough to easily differentiate between it and other groups. Clicking on the name of a group takes you to Details tab of its System Group Details page. Refer to Section 6.4.3.3 System Group Details —
for more
information.Systems — Total number of systems contained by the group. Clicking on the number takes you to the Systems tab of the System Group Details page for the group. Refer to Section 6.4.3.3 System Group Details —
for more
information.Use in SSM — Clicking the Use Group button in this column loads the group from that row and launches the System Set Manager immediately. Refer to Section 6.4.4 System Set Manager —
for more information.
6.4.3.1. Creating Groups
To add a new system group, click the create new group button at the top-right corner of the page. Type a name and description and click the Create Group button. Make sure you use a name that clearly sets this group apart from others. The new group will appear in the System Groups list.
6.4.3.2. Adding and Removing Systems in Groups
Systems can be added and removed from system groups in two places: the Target Systems tab of the System Group Details page and the Groups tab of the System Details page. The process is similar in both instances. Select the systems to be added or removed and click the Add Systems or Remove Systems button.
6.4.3.3. System Group Details —
At the top of each System Group Details page are
two links: work with group and delete
group. Clicking delete group deletes
the System Group and should be used with caution. Clicking
Work with Group functions similarly to the
Use Group button from the System
Groups list in that it loads the group's systems and
launches the System Set Manager immediately. Refer to Section 6.4.4 System Set Manager — ![]() for more information.
for more information.
The System Group Details page is broken down into tabs:
6.4.3.3.1. System Group Details ⇒ Details —
Provides the group name and group description. To change this information, click Edit Group Properties, make your changes in the appropriate fields, and click the Modify Details button.
6.4.3.3.2. System Group Details ⇒ Systems —
Lists systems that are members of the system group. Clicking links
within the table takes you to corresponding tabs within the
System Details page for the associated system.
To remove systems from the group, select the appropriate checkboxes
and click the Remove from group button on the
bottom of the page. Clicking it does not delete systems from RHN
entirely. This is done through the System Set
Manager or System Details pages.
Refer to Section 6.4.4 System Set Manager — ![]() or Section 6.4.2.8 System Details, respectively.
or Section 6.4.2.8 System Details, respectively.
6.4.3.3.3. System Group Details ⇒ Target Systems —
Target Systems — Lists all systems in your organization. This tab enables you to add systems to the specified system group. Select the systems using the checkboxes to the left and click the Add Systems button on the bottom right-hand corner of the page.
6.4.3.3.4. System Group Details ⇒ Errata —
List of relevant Errata for systems in the system group. Clicking the Advisory takes you to the Details tab of the Errata Details page. (Refer to Section 6.5.2.2 Errata Details for more information.) Clicking the Affected Systems number lists all of the systems addressed by the Errata. To apply the Errata Updates in this list, select the systems and click the Apply Errata button.
6.4.3.3.5. System Group Details ⇒ Admins —
List of all organization users that have the ability to manage the system group. Organization Administrators are clearly identified. System Group Administrators are marked with an asterisk (*). To change the system group's users, select and unselect the appropriate checkboxes and click the Update button.
6.4.4. System Set Manager —
Many actions performed for individual systems through the System Details page may be performed for multiple systems via the System Set Manager, including:
Apply Errata updates
Upgrade packages to the most recent versions available
Add/remove systems to/from system groups
Subscribe/unsubscribe systems to/from channels
Update system profiles
Modify system preferences such as scheduled download and installation of packages
Kickstart several Provisioning-entitled systems at once
Set the subscription and rank of configuration channels for Provisioning-entitled systems
Tag the most recent snapshots of your selected Provisioning-entitled systems
Revert Provisioning-entitled systems to previous snapshots
Run remote commands on Provisioning-entitled systems
Before performing actions on multiple systems, select the systems you wish to modify. To do so, click the List the systems link, check the boxes to the left of the systems you wish to select, and click the Update List button.
You can access the System Set Manager in three ways:
Click the System Set Manager link in the left gray navigation area.
Click the Use Group button in the System Groups list.
Check the Work with Group link on the System Group Details page.
6.4.4.1. System Set Manager ⇒ Overview —
Description of the various options available to you in the remaining tabs.
6.4.4.2. System Set Manager ⇒ Systems —
List of systems now selected. To remove systems from this set, select them and click the Remove button.
6.4.4.3. System Set Manager ⇒ Errata —
List of Errata Updates applicable to the current system set. Click the number in the Systems column to see to which systems in the System Set Manager the given Errata applies. To apply updates, select the Errata and click the Apply Errata button.
6.4.4.4. System Set Manager ⇒ Packages —
Options to modify packages on the system within the following subtabs (Click the number in the Systems column to see to which systems in the System Set Manager the given package applies):
![]() — When selecting packages to
install, upgrade, or remove, Provisioning customers have the option
of running a remote command automatically before or after the
package installation. Refer to Section 6.4.2.8.1.3 System Details ⇒ Details ⇒ Remote Command
—
— When selecting packages to
install, upgrade, or remove, Provisioning customers have the option
of running a remote command automatically before or after the
package installation. Refer to Section 6.4.2.8.1.3 System Details ⇒ Details ⇒ Remote Command
— ![]() for more information.
for more information.
6.4.4.4.1. System Set Manager ⇒ Packages ⇒ Upgrade —
A list of all the packages installed on the selected systems that might be upgraded. Systems must be subscribed to a channel providing the package for the system to be able to upgrade the package. If multiple versions of a package appear, note that only the latest version available to each system is upgraded on that system. Select the packages to be upgraded, then click the Upgrade Packages button.
6.4.4.4.2. System Set Manager ⇒ Packages ⇒ Install —
A list of channels from which you may retrieve packages. This list includes all channels to which systems in the set are subscribed; a package is installed on a system only if the system is subscribed to the channel from which the package originates. Click on the channel name and select the packages from the list. Then click the Install Packages button.
6.4.4.4.3. System Set Manager ⇒ Packages ⇒ Remove —
A list of all the packages installed on the selected systems that might be removed. Multiple versions appear if systems in the System Set Manager have more than one version installed. Select the packages to be deleted, then click the Remove Packages button.
6.4.4.5. System Set Manager ⇒ Verify
A list of all installed package whose contents, MD5 sum, and other details may be verified. At the next check in, the verify event issues the command rpm --verify for the specified package. If there are any discrepancies, they are displayed in the System Details page for each system.
Select the checkbox next to all packages to be verified, then click the Verify Packages button. On the next page, select either Schedule actions ASAP or choose a date and time for the verification, then click the Schedule Verifications button.
6.4.4.6. System Set Manager: ⇒ Patches
Tools to manage patches to Solaris clients. Patches may be installed or removed via the subtabs.
6.4.4.7. System Set Manager: ⇒ Patch Clusters
Tools to manage patch clusters for Solaris clients. Patches may be installed or removed via the subtabs.
6.4.4.8. System Set Manager ⇒ Groups —
Tools to create groups and manage group membership. These functions are limited to Organization Administrators and System Group Administrators. To add a new group, click create new group on the top-right corner. In the resulting page, type its name and description in the identified fields and click the Create Group button. To add or remove the selected systems in any of the system groups, toggle the appropriate radio buttons and click the Alter Membership button.
6.4.4.9. System Set Manager ⇒ Channels —
Options to manage channel associations through the following subtabs:
6.4.4.9.1. System Set Manager ⇒ Channels ⇒ Channel Subscriptions
—
To subscribe or unsubscribe the selected systems in any of the channels, toggle the appropriate radio buttons and click the Alter Subscriptions button. Keep in mind that subscribing to a channel uses a channel entitlement for each system in the selected group. If too few entitlements are available, some systems fail to subscribe. Systems must subscribe to a base channel before subscribing to a child channel.
6.4.4.9.2. System Set Manager ⇒ Channels ⇒ Config Channels —
Like the options within the System Details
⇒ Channels ⇒ Configuration tab, the
subtabs here can be used to subscribe the selected systems
to configuration channels and deploy and compare the
configuration files on the systems. The channels are created
in the Manage Config Channels interface
within the Channels category. Refer to
Section 6.6.6 Manage Config Channels — ![]() for channel creation
instructions.
for channel creation
instructions.
To manage the configuration of a system, install the latest rhncfg* packages. Refer to Section 6.6.6.1 Preparing Systems for Config Management for instructions on enabling and disabling scheduled actions for a system.
6.4.4.9.2.1. System Set Manager ⇒ Channels ⇒ Config Channels ⇒
Deploy —
Use this subtab to distribute configuration files from your central repository on RHN to each of the selected systems. The table lists the configuration files associated with any of the selected systems. Clicking its system count displays the systems already subscribed to the file.
To subscribe the selected systems to the available configuration files, select the checkbox for each desired file. When done, click Deploy Configuration and schedule the action. Note that the files deployed are of the latest version at the time of scheduling and do not account for versions that may appear before the action takes place.
6.4.4.9.2.2. System Set Manager ⇒ Channels ⇒ Config Channels ⇒
Diff —
Use this subtab to validate configuration files on the selected systems against copies in your central repository on RHN. The table lists the configuration files associated with any of the selected systems. Clicking its system count displays the systems already subscribed to the file.
To compare the configuration files deployed on the systems with those in RHN, select the checkbox for each file to be validated. Then click Analyze Differences and schedule the action. Note that the files compared are of the latest version at the time of scheduling and do not account for versions that may appear before the action takes place. Find the results within the main Schedule category or within the System Details ⇒ Events tab.
6.4.4.9.2.3. System Set Manager ⇒ Channels ⇒ Config Channels ⇒
Subscriptions —
Subscribe systems to configuration channels according to order of preference. This tab is available only to Organization Administrators and Configuration Administrators. Enter a number in the Rank column to subscribe to a channel. Channels are accessed in the order of their rank, starting from the number 1. Channels not assigned a numeric value are not associated with the selected systems. Your local configuration channel always overrides all other channels. Once you have established the rank of the config channels, you must decide how they are applied to the selected systems.
The three buttons below the channels reflect your options. Clicking Add with Highest Rank places all the ranked channels before any other channels to which the selected systems are currently subscribed. Clicking Add with Lowest Rank places the ranked channels after those channels to which the selected systems are currently subscribed. Clicking Replace Existing Config Channels removes any existing association and starts cleanly with the ranked channels, leaving every system with the same config channels in the same order.
In the first two cases, if any of the newly ranked config channels is already in a system's existing config channel list, the duplicate channel is removed and replaced according to the new rank, effectively reordering the system's existing channels. When such conflicts exist, you are presented with a confirmation page to ensure the intended action is correct. When the change has taken place, a message appears at the top of the page indicating the update was successful.
6.4.4.9.3. System Set Manager ⇒ Channels ⇒ Base Channel Alteration
—
Channel Administrators may change the base channels to which the selected systems are subscribed via this subtab. The default Red Hat base channel selection in the pulldown menu subscribes the system to whichever Red Hat-provided base channel represents the operating system installed on the system. Systems are unsubscribed from all channels and subscribed to the new base channels. For this reason, this should be done with caution. Select the new base channel from the pulldown menus and click the Change Base Channels button.
6.4.4.10. System Set Manager ⇒ Provisioning —
Options for provisioning systems through the following subtabs:
6.4.4.10.1. System Set Manager ⇒ Provisioning ⇒ Kickstart —
Use this subtab to re-install Red Hat Enterprise Linux on the selected Provisioning-entitled systems. To schedule kickstarts for these systems, select a distribution, identify the type (IP address or manual), and click Continue. Finish choosing from the options available on the subsequent screen. If any of the systems connect to RHN via a RHN Proxy Server, choose either the Preserve Existing Configuration radio button or the Use RHN Proxy radio button. If you choose to kickstart through a RHN Proxy Server, select from the available Proxies listed in the drop-down box beside the Use RHN Proxy radio button. All of the selected systems will kickstart through the selected Proxy. Click the Schedule Kickstart button to confirm your selections. When the kickstarts for the selected systems are successfully scheduled, the web interface returns you to the System Set Manager page.
6.4.4.10.2. System Set Manager ⇒ Provisioning ⇒ Tag Systems —
Use this subtab to add meaningful descriptions to the most recent snapshots of your selected systems. To tag the most recent system snapshots, enter a descriptive term in the Tag name field and click the Tag Current Snapshots button.
6.4.4.10.3. System Set Manager ⇒ Provisioning ⇒ Rollback —
Use this subtab to rollback selected Provisioning-entitled systems to previous snapshots marked with a tag. Click the name of the tag, verify the systems to be reverted, and click the Rollback Systems button.
6.4.4.10.4. System Set Manager ⇒ Provisioning ⇒ Remote Command —
Use this subtab to issue remote commands on selected Provisioning-entitled systems. First create a run file on the client systems to allow this function to operate. Refer to the description of the Configuration subtab of the Channels tab for instructions. You may then identify a specific user, group, timeout period, and the script on this page. Select a date and time to perform the command, and click Schedule Remote Command.
6.4.4.11. System Set Manager ⇒ Misc —
Misc — Update System Profiles and preferences for the system set through the following links:
6.4.4.11.1. System Set Manager ⇒ Misc ⇒ System Profile Updates —
Click Update Hardware Profile followed by the Confirm Refresh button to schedule a hardware profile update. Clicking Update Package Profile,followed by the Confirm Refresh button schedules a package profile update.
6.4.4.11.2. System Set Manager ⇒ Misc ⇒ Custom System Information
—
Click Set a custom value for selected systems followed by the name of a key to allow you to provide values for all selected systems. Enter the information and click the Set Values button. Click Remove a custom value from selected systems followed by the name of a key to allow you to remove values for all selected systems. Click the Remove Values button to finalize the deletion.
6.4.4.11.3. System Set Manager ⇒ Misc ⇒ Reboot Systems —
Select the appropriate systems and click the Reboot Systems link to set those systems for reboot. To immediately cancel this action, click the list of systems link that appears within the confirmation message at the top of the page, select the systems, and click Unschedule Action.
6.4.4.11.4. System Set Manager ⇒ Misc ⇒ Lock Systems —
Select the appropriate systems and click the Lock Systems link to prevent the scheduling of any action through RHN that affects the selected systems. This can be reversed by clicking the Unlock Systems link.
6.4.4.11.5. System Set Manager ⇒ Misc ⇒ Delete Systems —
Click Delete System Profiles, then click the Confirm Deletions button to remove the selected profiles permanently.
6.4.4.11.6. System Set Manager ⇒ Misc ⇒ Add or Remove Add-On
Entitlements —
Select, via the radio button, whether to Add, Remove, or make No Change in the entitlements of the selected systems. Click the Change Entitlements button to confirm your selection.
6.4.4.11.7. System Set Manager ⇒ Misc ⇒ System Preferences —
Toggle the Yes and No radio buttons and click the Change Preferences button to alter your notification preferences for the selected systems. You may apply these preferences to individual systems through the Properties subtab of the System Details page. Refer to Section 6.4.2.8.1.2 System Details ⇒ Details ⇒ Properties for instructions.
Receive Notifications of Updates/Errata — This setting keeps you abreast of all advisories pertaining to your systems. Any time an update is produced and released for a system under your supervision, a notification is sent via email.
Include system in Daily Summary — This setting includes the selected systems in a daily summary of system events. (By default, all Management and Provisioning systems are included in the summary.) These system events are actions that affect packages, such as scheduled Errata Updates, system reboots, or failures to check in. In addition to including the systems here, you must choose to receive email notifications in the Your Preferences page of Your RHN. Refer to Section 6.3.2 Your Preferences for instructions. Note that RHN sends these summaries only to verified email addresses.
Automatic application of relevant Errata — This setting enables the automatic application of Errata Updates to the selected systems. This means packages associated with Errata are updated without any user intervention. Customers should note that Red Hat does not recommend the use of the auto-update feature for production systems because conflicts between packages and environments can cause system failures.
6.4.5. Advanced Search —
The System Search page allows you to search through your systems according to specific criteria. These criteria include custom system information, system details, hardware, devices, interface, networking, packages, and location. The activity selections (Days Since Last Checkin, for instance) can be especially useful in finding and removing outdated System Profiles. Type the keyword, select the criterion to search by, use the radio buttons to identify whether you wish to query all systems or only those loaded in the System Set Manager, and click the Search button. You may also select the Invert Result checkbox to list those systems that do not match the criteria selected.
The results appear at the bottom of the page. For details about using the resulting system list, refer to Section 6.4.2 Systems.
6.4.6. Activation Keys —
RHN Management and Provisioning customers with the Activation Key Administrator role (including Organization Administrators) can generate activation keys through the RHN website. These keys can then be used to register a Red Hat Enterprise Linux system, entitle the system to an RHN service level and subscribe the system to specific channels and system groups through the command line utility rhnreg_ks. Refer to Section 2.5 Registering with Activation Keys for instructions on use.
| Note |
|---|---|
System-specific activation keys created through the Reactivation subtab of the System Details page are not part of this list because they are not reusable across systems. |
6.4.6.1. Managing Activation Keys
To generate an activation key:
Select Systems => Activation Keys from the top and left navigation bars.
Click the create new key link at the top-left corner.
Warning In addition to the fields listed below, RHN Satellite Server customers may also populate the Key field itself. This user-defined string of characters can then be supplied with rhnreg_ks to register client systems with the Satellite. Do not insert commas in the key. All other characters are accepted. Commas are problematic since they are the separator used when including two or more activation keys at once. Refer to Section 6.4.6.2 Using Multiple Activation Keys at Once —
for details.
Provide the following information:
Description — User-defined description to identify the generated activation key.
Usage Limit — The maximum number of registered systems that can be registered to the activation key at any one time. Leave blank for unlimited use. Deleting a system profile reduces the usage count by one and registering a system profile with the key increases the usage count by one.
Base Channel — The primary channel for the key. Selecting nothing will enable you to select from all child channels, although systems can be subscribed to only those that are applicable.
Entitlement — The service level for the key, either Management or Provisioning. All systems will be subscribed at this level with the key.
Universal default — Whether or not this key should be considered the primary activation key for your organization.
Click Create Key.
After creating the unique key, it appears in the list of activation keys along with the number of times it has been used. Note that only Activation Key Administrators can see this list. At this point, you may associate child channels and groups with the key so that systems registered with it automatically subscribe to them.
To change information about a key, such as the channels or
groups, click its description in the key list, make your
modifications in the appropriate tab, and click the
Update Key button. To disassociate
channels and groups from a key, deselect them in their
respective menus by
A system may be set to subscribe to a base channel during registration with an activation key. However, if the activation key specifies a base channel that is not compatible with the operating system of the systems, the registration fails. For example, a Red Hat Enterprise Linux AS v.4 for x86 system cannot register with an Activation Key that specifies a Red Hat Enterprise Linux ES v.4 for x86 base channel. A system is always allowed to subscribe to a custom base channel.
To disable system activations with a key, unselect the corresponding checkbox under the Enabled column in the key list. The key can be re-enabled by selecting the checkbox. After making these changes, click the Update Keys button on the bottom right-hand corner of the page.
6.4.6.2. Using Multiple Activation Keys at Once —
Provisioning customers should note that multiple activation keys can be included at the command line or in a single kickstart profile. This allows you to aggregate the aspects of various keys without recreating a new key specific to the desired systems, simplifying the registration and kickstart processes while slowing the growth of your key list.
Without this stacking ability, your organization would need at least six activation keys to manage four server groups and subscribe a server to any two groups. Factor in two versions of the operating system, such as Red Hat Enterprise Linux 3 and 4, and you need twice the number of activation keys. A larger organization would need keys in the dozens.
Registering with multiple activation keys requires some caution; conflicts between some values cause registration to fail. Conflicts in the following values do not cause registration to fail, a combination of values is applied: software packages, software child channels, and config channels. Conflicts in the remaining properties are resolved in the following manner:
base software channels — registration fails
entitlements — registration fails
enable config flag — configuration management is set
Do not use system-specific activation keys along with other activation keys; registration fails in this event.
You are now ready to use multiple activation keys at once. This is done with comma separation at the command line with rhnreg_ks or in a kickstart profile within the Post tab of the Kickstart Details page. Refer to Section 2.5 Registering with Activation Keys and Section 6.4.9.3 Create a New Kickstart Profile, respectively, for instructions.
6.4.7. Stored Profiles —
RHN Provisioning customers can create package profiles through the Profiles subtab of the Packages tab within the System Details page. Those profiles are displayed on the Stored Profiles page, where they may be edited and even deleted.
To edit a profile, click its name in the list, alter its name and description, and click the Update Profile button. To view software associated with the profile, click the Packages subtab. To remove the profile entirely, click delete stored profile at the upper-right corner of the page.
6.4.8. Custom System Info —
RHN Provisioning customers may include completely customizable information about their systems. Unlike notes, the information here is more formal and may be searched upon. For instance, you may decide to identify an asset tag for each system. To do this, you must create an asset key within the Custom System Info page.
Click create new key at the upper-right corner of the page. Enter a descriptive label and description, such as Asset and Precise location of each system, and click the Create Key. The key will then show up in the custom info keys list.
Once the key exists, you may assign a value to it through the
Custom Info tab of the System
Details page. Refer to Section 6.4.2.8.1.7 System Details ⇒ Details ⇒ Custom Info —
![]() for instructions.
for instructions.
6.4.9. Kickstart —
To satisfy the provisioning needs of customers, RHN provides this interface for developing kickstart profiles that can be used to install Red Hat Enterprise Linux on either new or already-registered systems. This enables systems to be installed automatically to particular specifications.
| Important |
|---|---|
If your systems are connected to the central RHN Servers, you
will need an external installation tree for each distribution to
be kickstarted. This tree can be hosted anywhere that is
accessible by the target system via HTTP. If the systems are
connected through an RHN Proxy Server, then you may place the
installation tree in /var/www/html/pub/ on
the Proxy. RHN Satellite Servers already have a tree for each Red Hat distribution
and therefore do not require separate trees. Even if the system
connects through an RHN Proxy Server to get to the Satellite, these trees
will be available for kickstart. Refer to Section 6.4.9.6 Kickstart ⇒ Distributions —
|
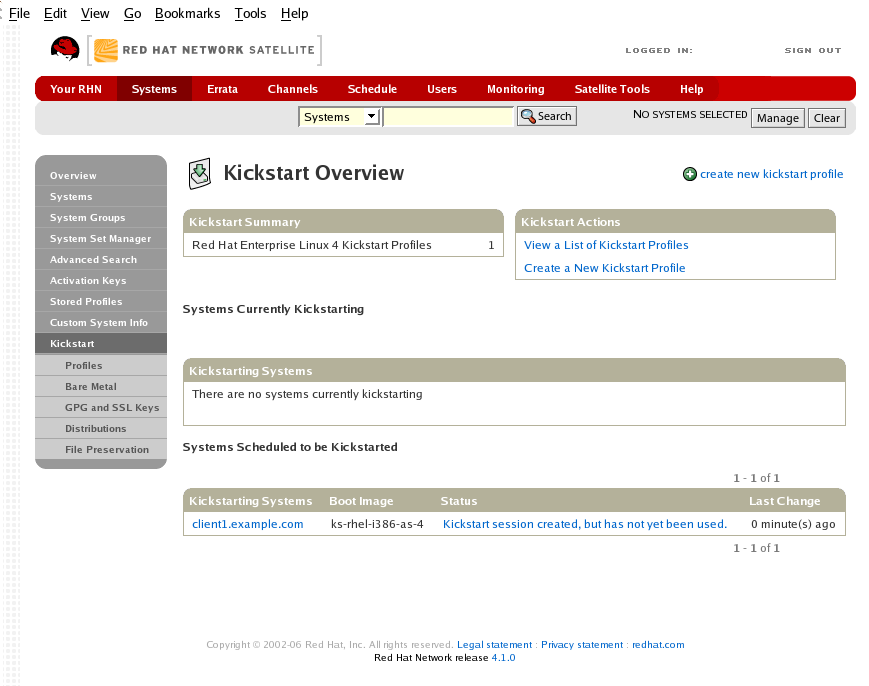
This overview page displays the status of kickstart on your client systems: the types and number of profiles you have created and the progress of systems that are scheduled to be kickstarted. In the upper right is the Kickstart Actions section, which contains a series of links to management actions for your kickstart profiles. Before explaining the various kickstart options that are available from this page, the next section provides some introduction to the subject of kickstart.
6.4.9.1. Introduction to Kickstart
Many system administrators would prefer to use an automated installation method to install Red Hat Enterprise Linux on their machines. To answer this need, Red Hat created the kickstart installation method. Using kickstart, a system administrator can create a single file containing the answers to all the questions that would normally be asked during a typical installation.
Kickstart files can be kept on a single server system and read by individual computers during the installation. This installation method can support the use of a single kickstart file to install Red Hat Enterprise Linux on multiple machines, making it ideal for network and system administrators.
The Red Hat Enterprise Linux System Administration Guide contains an in-depth discussion of kickstart and is available here: http://www.redhat.com/docs/manuals/enterprise/.
6.4.9.1.1. Kickstart Explained
When a machine is to receive a network-based kickstart, the following events must occur in this order:
After being placed on the network and turned on, the machine's PXE logic broadcasts its MAC address and a request to be discovered.
If a static IP address is not being used, the DHCP server recognizes the discovery request and extends an offer of network information needed for the new machine to boot. This includes an IP address, the default gateway to be used, the netmask of the network, the IP address of the TFTP or HTTP server holding the bootloader program, and the full path and file name of that program (relative to the server's root).
The machine applies the networking information and initiates a session with the server to request the bootloader program.
The bootloader, once loaded, searches for its configuration file on the server from which it was itself loaded. This file dictates which kernel and kernel options, such as the initial RAM disk (initrd) image, should be executed on the booting machine. Assuming the bootloader program is SYSLINUX, this file is located in the pxelinux.cfg directory on the server and named the hexadecimal equivalent of the new machine's IP address. For example, a bootloader configuration file for Red Hat Enterprise Linux AS 2.1 should contain:
port 0
prompt 0
timeout 1
default My_Label
label My_Label
      kernel vmlinuz
      append ks=http://myrhnsatellite/ initrd=initrd.img network apic
The machine accepts and uncompresses the init image and kernel, boots the kernel, and initiates a kickstart installation with the options supplied in the bootloader configuration file, including the server containing the kickstart configuration file.
This kickstart configuration file in turn directs the machine to the location of the installation files.
The new machine is built based upon the parameters established within the kickstart configuration file.
6.4.9.1.2. Kickstart Prerequisites
Although Red Hat Network has taken great pains to ease the provisioning of systems, some preparation is still required for your infrastructure to handle kickstarts. For instance, before creating kickstart profiles, you may consider:
A DHCP server is not required for kickstarting, but it can make things easier. If you are using static IP addresses, you should select static IP while developing your kickstart profile.
An FTP server can be used in place of hosting the kickstart distribution trees via HTTP.
If conducting a bare metal kickstart, you should 1)Configure DHCP to assign required networking parameters and the bootloader program location. 2)Specify within the bootloader configuration file the kernel to be used and appropriate kernel options.
6.4.9.1.3. Building Bootable Kickstart ISOs
While you can schedule a registered system to be kickstarted to a new operating system and package profile, it is also useful to be able to kickstart a system that is not registered with RHN, or does not yet have an operating system installed. One common method of doing this is to create a bootable CD-ROM that is inserted into the target system. When the system is rebooted, it boots from the CD-ROM, loads the kickstart configuration from the RHN Servers or your Satellite, and proceeds to install Red Hat Enterprise Linux according to the kickstart profile you have created.
To do this, copy the contents of /isolinux from the first CD-ROM of the target distribution. Then edit the isolinux.cfg file to default to 'ks'. Change the 'ks' section to the following template:
label ks
kernel vmlinuz
   append text ks={url} initrd=initrd.img lang= devfs=nomount ramdisk_size=16438 \
{ksdevice} |
IP addressed-based kickstart URLs will look something like this:
http://my.sat.server/kickstart/ks/mode/ip_range |
The kickstart distribution selected by the IP range should match the distribution from which you are building, or errors will occur. {ksdevice} is optional, but looks like:
ksdevice=eth0 |
It is possible to change the distribution for a kickstart profile within a family, such as Red Hat Enterprise Linux AS 4 to Red Hat Enterprise Linux ES 4, by specifying the new distribution label. Note that you cannot move between versions (2.1 to 3) or between updates (U1 to U2).
Next, you may customize isolinux.cfg further for your needs, such as by adding multiple kickstart options, different boot messages, shorter timeout periods, etc.
Next, create the ISO as described in the Making an Installation Boot CD-ROM section of the Red Hat Enterprise Linux 3 Installation Guide. Alternatively, issue the command:
mkisofs -o file.iso -b isolinux.bin -c boot.cat -no-emul-boot -boot-load-size 4 \ -boot-info-table -R -J -v -T isolinux/ |
Note that isolinux/ is the relative path to the directory containing the isolinux files from the distribution CD, while file.iso is the output ISO file, which is placed into the current directory.
You may then burn the ISO to CD-ROM. To use the disc (assuming
you left the label for the kickstart boot as 'ks'), boot the
system and type "ks" at the prompt. When you press
6.4.9.1.4. Integrating Kickstart with PXE
In addition to CD-ROM-based installs, RHN supports kickstarts through a Pre-Boot Execution Environment (PXE). This is less error-prone than CDs, enables kickstarting from bare metal, and integrates with existing PXE/DHCP environments.
To use this method, make sure your systems have network interface cards (NIC) that support PXE, install and configure a PXE server, ensure DHCP is running, and then place the appropriate files on an HTTP server for deployment. Once the kickstart profile has been created, use the URL from the Kickstart Details page, as for CD-ROM-based installs.
To obtain specific instructions for conducting PXE kickstarts, refer to the PXE Network Installations chapter of the Red Hat Enterprise Linux 4 System Administration Guide.
 | Tip |
|---|---|
Upon running the Network Booting Tool as described in the Red Hat Enterprise Linux 4: System Administration Guide, ensure that you select "HTTP" as the protocol and include the domain name of the RHN Satellite Server in the Server field if you intend to use it to distribute the installation files. |
The following sections describe the kickstart options available from the Systems ⇒ Kickstart page.
6.4.9.2. View a List of Kickstart Profiles
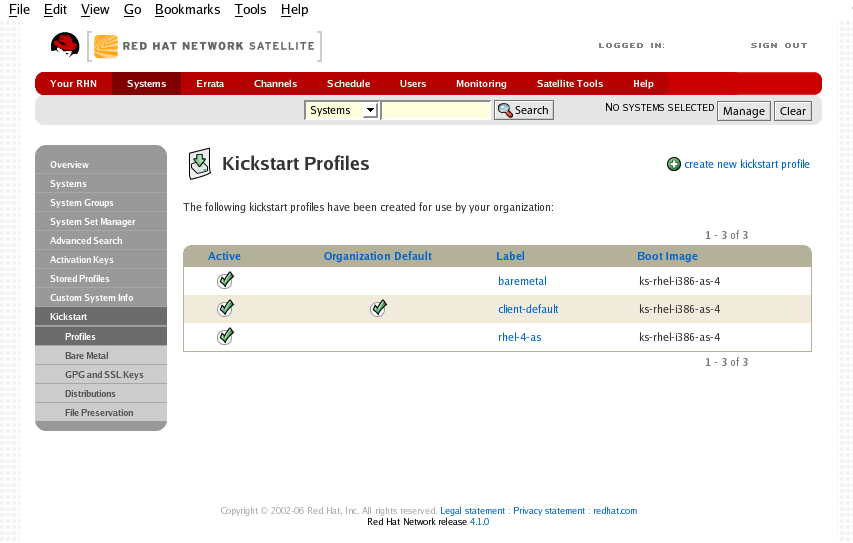
This page lists all profiles for your organization, whether those profiles are active, and the boot image to which that profile points. You can either create a new kickstart profile by clicking the create new kickstart profile link in the upper right or edit existing profiles by clicking in the name of the profile.
6.4.9.3. Create a New Kickstart Profile
If you are not using RHN Satellite Server, and wish to develop a new kickstart
profile, first create a distribution through the
Systems ⇒
Kickstart ⇒
Distributions page. Refer to Section 6.4.9.6 Kickstart ⇒ Distributions —
![]() for instructions. Once that is
done, return to the Kickstart Overview page
to create the Kickstart Profile.
for instructions. Once that is
done, return to the Kickstart Overview page
to create the Kickstart Profile.
Click on the Create a New Kickstart Profile link from the Systems ⇒ Kickstart page to start the brief wizard that populates the base values needed for a kickstart profile.
On the first page, enter a kickstart profile label and select a kickstartable tree for this profile. The kickstartable tree drop-down menu is only populated if one or more distributions have been created for the selected base channel.
On the second page, select (or enter) the URL of the kickstart tree.
On the third page, select a root password for the system. Be sure to follow the password recommendations from the Password Security section of the Red Hat Enterprise Linux Security Guide, available at http://www.redhat.com/docs/manuals/enterprise/.
The final stage of the wizard presents the Kickstart Details ⇒ Details tab. On this tab and the other sub-tabs, nearly every option for the new kickstart profile can be customized. The following sections describe the options available on each sub-tab.
6.4.9.3.1. Kickstart Details ⇒ Details —

The figure above shows the sub-tabs that are available from the Kickstart Details tab.
From the Kickstart Details ⇒ Details sub-tab, you can:
Rename the profile
Change the operating system it installs by clicking (Change)
Deactivate the profile so that it cannot be used to schedule a kickstart by removing the Active checkmark
Select whether this profile is the default for all of your organization's kickstarts by checking or unchecking the box.
Enter comments that are useful to you in distinguishing this profile from others
6.4.9.3.2. Kickstart Details ⇒ Operating System —
From this page, you can make the following changes to the operating system that the kickstart profile installs:
- Change the base channel
Select from the available base channels, such as Red Hat Enterprise Linux AS version 4. Satellite customers see a list of all base channels that are currently synced to their Satellite.
- File Location
The exact location from which the kickstart tree is mounted. This value is determined when the profile is created. You can view it on this page but you cannot change it.
6.4.9.3.3. Kickstart Details ⇒ Advanced Options —
From this page, you can toggle several installation options on and off by checking and unchecking the boxes to the left of the option. For most installations, the default options are correct. The Red Hat Enterprise Linux System Administration Guide discusses each of these options in detail.
6.4.9.3.4. Kickstart Details ⇒ Bare Metal Kickstart —
This sub-tab provides the information necessary to kickstart systems that are not currently registered with RHN. Using the on-screen instructions, you may either kickstart systems using boot media (CD-ROM) or by IP address.
6.4.9.3.5. System Details ⇒ Details —

The figure above shows the sub-tabs that are available from the System Details tab.
From the System Details ⇒ Details sub-tab, you can:
Select from DHCP and static IP, depending on your network
Choose the level of SELinux that is configured on kickstarted systems
Enable configuration management or remote command execution on kickstarted systems
Change the root password associated with this profile
6.4.9.3.6. System Details ⇒ Locale —
From this sub-tab, you can change the timezone associated with kickstarted systems.
6.4.9.3.7. System Details ⇒ Partitioning —
From this sub-tab, you can indicate the partitions that you wish to be created during installation. For example:
partition /boot --fstype=ext3 --size=200 partition swap --size=2000 partition pv.01 --size=1000 --grow volgroup myvg pv.01 logvol / --vgname=myvg --name=rootvol --size=1000 --grow |
6.4.9.3.8. System Details ⇒ File Preservation —
If you have previously created a file preservation list, you may
include that list as part of the kickstart. This will prevent
the files in that list from being over-written during the
installation process. Refer to Section 6.4.9.7 Kickstart ⇒ File Preservation —
![]() for information on how
to create a file preservation list.
for information on how
to create a file preservation list.
6.4.9.3.9. System Details ⇒ GPG and SSL —
From this sub-tab, select the GPG keys and/or SSL certificates to be imported to the kickstarted system during the %post section of the kickstart. For Satellite customers, this list includes the SSL Certificate used during the installation of the Satellite.
| Note |
|---|---|
Any GPG key you wish to import to the kickstarted system must be in ASCII rather than binary format. |
6.4.9.3.10. System Details ⇒ Troubleshooting —
From this sub-tab, you can change information that may help with troubleshooting hardware problems:
- Bootloader
For some headless systems, it is better to select the non-graphic LILO bootloader.
- Kernel Parameters
Enter kernel parameters here that may help to narrow down the source of hardware issues.
6.4.9.3.11. Software ⇒ Package Groups —

The figure above shows the sub-tabs that are available from the Software tab.
Enter the package groups, such at @office or @admin-tools you would like to install on the kickstarted system in the large text box on this page. If you would like to know what package groups are available, and what packages they contain, refer to the RedHat/base/ file of your kickstart tree. Satellite customers will most likely locate this file here: /var/www/satellite/rhn/kickstart/<kickstart label>/RedHat/base/comps.xml.
6.4.9.3.12. Software ⇒ Package Profiles —
If you have previously created a Package Profile from one of your registered systems, you can use that profile as a template for the files to be installed on a kickstarted system. Refer to Section 6.4.2.8.2.2 System Details ⇒ Software ⇒ Packages for more information about package profiles.
6.4.9.3.13. Activation Keys —

The Activation Keys tab, which has no sub-tabs, allows you select Activation Keys to include as part of the kickstart profile. These keys, which must have been created previous to creating the kickstart profile, will be used when re-registering kickstarted systems.
6.4.9.3.14. Scripts —

The Scripts tab, which has no sub-tabs, is where %pre and %post scripts are created. This page lists any scripts that have already been created for this kickstart profile. To create a new kickstart script:
Click the add new kickstart script link in the upper right
Enter the path to the scripting language used to create the script, such as /usr/bin/perl
Enter the full script in the large text box
Indicate whether this script is to be executed in the %pre or %post section of the kickstart process
Indicate whether this script is to run outside of the chroot environment. Refer to the Post-installation Script section of the Red Hat Enterprise Linux System Admin Guide for further explanation of the nochroot option
| Note | |
|---|---|---|
RHN supports the inclusion of separate files within the Partition Details section of the kickstart profile. For instance, you may dynamically generate a partition file based on the machine type and number of disks at kickstart time. This file can be created via %pre script and placed on the system, such as /tmp/part-include. Then you can call for that file by including the following line within the Partition Details field of the System Details ⇒ Partitioning tab:
|
6.4.9.3.15. Kickstart File —

The Kickstart File tab, which has no sub-tabs, allows you to view or download the kickstart profile that has been generated from the options chosen in the previous tabs.
6.4.9.4. Kickstart ⇒ Bare Metal —
Lists the IP addresses that have been associated with kickstart profiles created by your organization. Click either the range or the profile name to access different tabs of the Kickstart Details page.
6.4.9.5. Kickstart ⇒ GPG and SSL Keys —
Lists keys and certificates available for inclusion in kickstart profiles and provides a means to create new ones. This is especially important for customers of RHN Satellite Server or RHN Proxy Server because systems kickstarted by them must have the server key imported into RHN and associated with the relevant kickstart profiles. Import it by creating a new key here and then make the profile association in the GPG and SSL keys subtab of the Kickstart Details page.
To develop a new key/certificate, click the create new stored key/cert link in the upper-right corner of the page. Enter a description, select the type, upload the file, and click the Update Key button. Note that a unique description is required.
| Important |
|---|---|
The GPG key you upload to RHN must be in ASCII format. Using a GPG key in binary format causes anaconda, and therefore the kickstart process, to fail. |
6.4.9.6. Kickstart ⇒ Distributions —
Enables you to identify custom installation trees that may be used for kickstarting. (Satellite users should note that this does not display Red Hat distributions provided to them. They can be found within the Distribution dropdown menu of the Kickstart Details page.) Before creating a distribution, you must make an installation tree available, as described in the Kickstart Installations chapter of the Red Hat Enterprise Linux 4 System Administration Guide. This tree must be located in a public directory on an HTTP or FTP server.
| Important |
|---|---|
RHN Satellite Server users should note that channels imported with satellite-sync are made available automatically and do not require the creation of a separate installation tree. These trees are available to client systems that kickstart through the Satellite. While you may be able to access the files from a non-kickstarting client, this functionality is not supported and may be removed at any time in the future. |
To create a new distribution, enter an intuitive label (without
spaces) in the Distribution Label field,
such as my-orgs-rhel-as-4. In the
External Location field, paste the URL to
the base of the installation tree. (You can test this by
appending "README" to the URL in a Web browser, pressing
In the Autokickstart RPM field, enter the auto-ks kernel image for the distribution. You can find all of the available packages by searching packages for "auto-kickstart". Identify the appropriate package based upon the distribution to be kickstarted. It should look something like, "auto-kickstart-ks-rhel-i386-as-4". Strip everything preceding the "ks" to derive the boot image. For instance, in the above example, you would enter "ks-rhel-i386-as-4" in the Autokickstart RPM field.
Select the matching distribution from the Base Channel and Installer Generation dropdown menus, such as Red Hat Enterprise Linux AS (v.4 for x86) and Red Hat Enterprise Linux 4, respectively. When finished, click the Create button.
6.4.9.7. Kickstart ⇒ File Preservation —
Collects lists of files to be protected and re-deployed on systems during kickstart. For instance, if you have many custom configuration files located on a system to be kickstarted, enter them here as a list and associate that list with the kickstart profile to be used.
To use this feature, click the create new file preservation list link at the top and enter a relevant label and all files and directories to be preserved on the resulting page. Enter absolute paths to all files and directories. Then click Create List.
| Important |
|---|---|
Although file preservation is useful, it does have limitations. First, each list is limited to a total size of 1 MB. Further, special devices like /dev/hda1 and /dev/sda1 are not supported. Finally, only file and directory names may be entered. No regular expression wildcards can be included. |
When finished, you may include the file preservation list in the kickstart profile to be used on systems containing those files. Refer to Section 6.4.9.3 Create a New Kickstart Profile for precise steps.