

![[Index]](../../a_stock/images/btn_index.gif)
![]()
![[Previous]](../../a_stock/images/btn_prev_top.gif)
![[Next]](../../a_stock/images/btn_next_top.gif)
|
|
|
|
|
|
||
This section discusses the details of creating an application, from defining the project files needed for an application, building it from within the IDE and from the command line, debugging it on the emulator and, finally, deploying it onto hardware.
|
|
A project defines the source files and settings required to build an executable. You can create new projects using the wizards in the CodeWarrior or Carbide.c++ IDEs. If you want to build from the command line, you write project files in a text editor.
Carbide.c++ supplies a new project wizard to create a skeleton
application. To use it, choose File > New > Symbian OS C++
Project. The New Project wizard then starts, and you are asked for the
project's name. Next, you need to choose a project template, which provides an
initial set of source files and project settings. The templates offered provide
starting points for various different platforms and versions. For a GUI
application, choose either the S60 3.0 GUI Application or
UIQ 3.0 GUI Application from the Symbian Executable
Project group.
The next step is to choose which kit to build with: you can build with multiple kits if your program should work with multiple platforms or operating system versions.
The wizard then asks for some project settings. The most important of
these is the Application UID setting. This is a unique number
that identifies the application. You should get UIDs from the
Symbian Signed web site.
The Symbian Project Wizard can be used to create the skeleton of a new
Symbian OS application. The Wizard can be invoked from within CodeWarrior by
selecting File|New. Give the new project a name and choose
a location. By default, CodeWarrior will create a subfolder with the same name
as the project and put the project there. Click OK, and
select the vendor and SDK to use (Symbian UIQ or
Nokia S60). Then click Next to be
given a choice of application templates to use.
You can use the Wizard to create either a simple console application or a basic GUI application for either UIQ or S60 platforms (the differences between console and GUI applications are described later in The filesystem browser engine class and console test code). You can build, debug and run the applications created by the Wizard.
Before you write a line of code, it will help to understand the directory structure under which your source and project files should be stored. If you look at the example code accompanying your SDK, or use project wizards from an IDE to create a UI application, you’ll see examples of the typical layout used to organise a project.
A good directory layout is invaluable for keeping track of your code as
the project grows. It’s usual to separate the project files, which will be
described shortly, from the source code, which is itself split further into
header files, such as .h and .hrh, and implementation
files, such as .cpp. Resources, such as .bmp or
.wav files used by the application, usually go into yet another
separate directory. Test code should also be stored apart from production code.
Thus, a typical UI application would have the following directory structure and files.
data (S60) - resource specification files
(.rss)
gfx (S60) - application resources such as bitmaps or audio
files
group - project files (e.g. .mmp and
bld.inf)
images (UIQ) - application resources such as bitmaps
inc - header files (typically .h,
.hrh and .inl)
rsrc (UIQ) - resource specification files
(.rss, .ra)
src - short for 'source', contains the implementation code
in .cpp files
test - test code
There are two key files involved in creating any new Symbian OS project,
both are stored in the group directory:
|
|
If you want your programs to be buildable from the command line, you must write project files in a Symbian specific format. The files are:
a project definition file (.mmp file) that describes a
project to be built. This is an environment neutral file that can be used by
the tools to produce make files for any of the supported target environments.
It also defines resource files to be built.
a component description file (bld.inf), which lists a
group of related projects, and gives additional build instructions.
Both CodeWarrior and Carbide.c++ can import project definition files to create projects in the IDE. More details of these file formats are given below.
|
|
Bld.inf is a text file. Its contents are normally trivial
since its main purpose is to list the project definition mmp files
and any files that the build tools must copy into place before a build. The
list of mmp files is contained in a section named
PRJ_MMPFILES. A bld.inf file is required even if the
project only contains a single mmp file. Here is the contents of a
typical bld.inf, for the filesystem browser application which
accompanies this tutorial. You can find more information about each of the
sections used in the Build Tools Reference:
// Platforms built if no platform is specified in abld build
PRJ_PLATFORMS
WINSCW GCCE

// Files exported from the project
PRJ_EXPORTS
// None

// Project definition files
PRJ_MMPFILES
filebrowseapp.mmp

// Project definition files for test code
PRJ_TESTMMPFILES
..\test\FileBrowseTest.mmp
In the example above, for a command line build, the component is built
by default for WINSCW and GCC-E, as specified using the
PRJ_PLATFORMS statement. When you build code for the emulator
using CodeWarrior, you use the WINSCW platform, so-named because
the resultant code runs on WINdows, in a Single
process, and was built with CodeWarrior. The platform
name is used when building code from the command line, and to identify the
platform for which executable code is intended. Thus, as described in the
SDK Contents section, when the
code is built the resultant executables are created under
\epoc32\release\winscw (in the \udeb or
\urel subdirectories, according to whether it is a debug or
release build).
The platform name for code built for phone hardware using GCC-E is
GCCE and executables are built to
\epoc32\release\gcce\. The platform name for RVCT builds is
ARMV5 and, likewise, executables for that platform are built to
\epoc32\release\armv5\.
|
|
mmp) file syntax
Each statement in a mmp file starts with a keyword. This
section describes the syntax of these keywords by using the contents of the
mmp file for the S60 filesystem browser application as an example.
You can find more information about mmp file syntax in the
mmp file syntax reference.
// filebrowseapp.mmp
//
// Copyright (c) 2006 Symbian Software Ltd.  All rights reserved.
//

TARGET              filebrowseapp.exe
TARGETTYPE          exe
UID                 0x100039CE 0xE80000A6

VENDORID            0

#ifdef __WINSCW__
CAPABILITY          AllFiles  //    AllFiles on emulator since no signing is required
#else
CAPABILITY          NONE      //    No capabilities on hardware - otherwise SIS file signing is required
#endif

SOURCEPATH          ..\src
SOURCE              FileBrowseAppUi.cpp
SOURCE              FileBrowseDocument.cpp
SOURCE              FileBrowseApplication.cpp
SOURCE              FileBrowseBaseView.cpp
SOURCE              RFsEngine.cpp

SYSTEMINCLUDE       \epoc32\include
USERINCLUDE         ..\inc


SOURCEPATH          ..\data

START RESOURCE     filebrowseapp.rss
TARGETPATH          \resource\apps
HEADER
END

START RESOURCE     filebrowseapp_reg.rss
TARGETPATH          \private\10003A3F\apps
END

START RESOURCE     filebrowseapp_loc.rss
TARGETPATH          \resource\apps
LANG                SC
HEADER
END

START BITMAP    filebrowseapp.mbm
TARGETPATH      \resource\apps
HEADER
SOURCEPATH      ..\gfx
SOURCE          C16 folder.bmp
SOURCE          C16 file.bmp
SOURCE          8   mask.bmp
END

LIBRARY         euser.lib efsrv.lib cone.lib eikcore.lib eikcoctl.lib eikdlg.lib egul.lib eikctl.lib apparc.lib
LIBRARY         bafl.lib
LIBRARY         avkon.lib CommonEngine.lib
TARGET
This keyword specifies the name of the output file that will be built.
TARGETTYPE
This indicates the type of file generated by the project, in this case
an executable. The most common target types are dll,
exe and plugin.
UID
The UID keyword specifies two of the target's three Unique Identifiers
(UIDs) which identify the component. The target will have three UIDs but the
first value (known as UID1) does not need to be specified because it is
automatically applied by the build tools. It is a general identifier which is
assigned according to the TARGETTYPE specified.
Thus, the first UID specified here, is actually UID2, which further
identifies the component type and can be thought of as an interface identifier.
The value (0x100039CE) identifies the file as an application; the
same value is used for all Symbian OS applications.
The next UID specified should be unique to the application. It is also specified in the application registration resource file (which is described in the Resources section) and the applications installation package file (which is described in the pkg file format section).
No two executables may have the same UID3 value, and, to ensure
uniqueness, you must request UID values from Symbian which allocates UID values
from a central database. The
Symbian Signed web
site has more information on how to acquire UIDs for your project. There
is also a range of test values, such as the value for UID3 used in the
filesystem browser application (0xE80000A6), which can be used to
get started but must not be used in your final product.
SECUREID
This is an optional keyword and is not used in the example above. The
keyword is used to define the Secure Identifier (SID) for an executable which
is used to determine which private directory a process can access and identify
it as a caller, for example, when making client-server requests. The SID can be
specified by a SECUREID statement in the project's
mmp file.
If this statement is not specified, as in the example given, the UID3
of the application is used instead. If that value is not set,
KNullUID (=0) is used.
VENDORID
This keyword is new in Symbian OS v9.1. Each executable may contain a
vendor ID (VID) which identifies its origin, specified by the
VENDORID keyword. A vendor ID is not mandatory and, in many cases,
will be omitted from the mmp file, or included and set to zero, which means
that the source of the executable is not required for security checks.
VIDs are allocated to Symbian licensees, partners, operators and Independent Software Vendors through sign-up programs, for instance Symbian Signed. If an application needs a VID its installation package must be signed as described in the Application signing section. Unsigned applications have no vendor ID since without a signature it cannot be verified.
CAPABILITY
This keyword is new in Symbian OS 9.1. A capability is a unit of protection, or privilege and, in Symbian OS 9.1, some Symbian OS APIs now have a capability associated with them. The capability is used to restrict use of the API to callers with at least that same level of privilege.
The capabilities that an executable is assigned are listed following
the capability keyword. If the CAPABILITY keyword is not present
in the .mmp file, the default of CAPABILITY NONE is
used.
In the example above, the application is assigned different
capabilities in emulator builds (AllFiles) to hardware builds
(NONE). This is unusual, but has been done to illustrate the
Platform Security concept called "data caging". On the emulator, the filesystem
browser code is assigned AllFiles capabilities, and can view more
private areas of the filesystem than when it runs on a phone handset with no
capabilities.
It is instructive to run the application on both the emulator and a phone for comparison.
For a process running without AllFiles
capability, nothing in the \sys\ directory is visible, and the
only directory under \private\ that can be seen is
\private\<SID>\ where <SID> is the
sub-directory named with the Secure Identifier of that process.
For the same process running with AllFiles
capability, the contents of the \sys\ directory is visible, as are
all the subdirectories under \private\.
The AllFiles capability is one of a group of tightly
controlled capabilities called system capabilities, which can only be granted
to an executable after certification. Certificates and Symbian Signed are
described later in the Application signing section of this tutorial.
SOURCEPATH, SOURCE
The SOURCEPATH keyword specifies the location of the
source or resource files listed subsequently using the SOURCE
declaration. It can either be used as a location relative to the directory that
holds the mmp file or as a fully qualified path. The keyword can
be used to multiple times to specify different directories if necessary.
Alternatively, it can be omitted entirely if all source files are located in
the same place as the mmp file, although this is usually not the
case for more complex projects, which typically organise their directories as
described earlier in the Project directory layout section.
SYSTEMINCLUDE
The SYSTEMINCLUDE keyword specifies the location in which
files included in the code using #include <> can be found.
The \epoc32\include directory is where the Symbian OS system
headers are stored, and a line identical to this should appear in all
mmp files.
USERINCLUDE
This keyword specifies the directory in which files included in code
using #include "" will be located, relative to the directory which
holds the mmp file or as a fully qualified path.
Directories specified with USERINCLUDE are only one of
three locations that may be searched of header files; the other directories
being that in which the source file which uses the include statement is stored
and the SYSTEMINCLUDE directory.
START RESOURCE…END
Used to specify a resource file, which contains text and specifications of user interface elements.
These keywords replace the RESOURCE statement used in
mmp files prior to Symbian OS v9.1.
The START RESOURCE keyword indicates the beginning of a
block which provides information about how an application resource file is to
be compiled. At least one of these is needed if the application has a UI. The
resource file itself should be the same location as the mmp file
itself or in the directory specified by the last preceding
SOURCEPATH declaration.
The end of the information block is indicated by the END
keyword and an application may have several resource files, each of which is
specified separately using the START RESOURCE…END block.
In the example shown here, the second block specifies a registration
resource file for the application. This contains non-localisable information to
display the application correctly in the application launcher, and includes the
application's name, UID and properties. All UI applications must provide a
registration file, as described in the Resources section, which should be
built to \private\10003a3f\apps using the TARGETPATH
keyword, described below.
TARGETPATH
TARGETPATH is used to specify the build location for a
compiled resource. In this example, the location of the first compiled resource
file is specified as \resource\apps, which is a public, read-only
directory and is the standard location for resource files. The registration
file is built to \private\10003a3f\apps.
Note: The location to which the C++ code buildt used to be
specified using the TARGETPATH keyword in versions of Symbian OS
prior to 9.0. However, for reasons of security, in this and future releases of
Symbian OS, all executable code must run from the phone's
\sys\bin\ directory, which is inaccessible to all but the trusted
computing base that forms the heart of Symbian OS. (For the emulator, this is
equivalent to the PC's \epoc32\release\winscw\build variant\
directory). The TARGETPATH keyword is, therefore, only used to
build resource files to their appropriate locations.
There is no longer any need to specify a target path for the executable
in the mmp file and it will be ignored except when used within a
START RESOURCE…END block.
HEADER
This is an optional keyword which, when used, causes a resource header
file (.rsg) to be created in the system include directory,
\epoc32\include\. The header provides identifiers that allow C++
code to refer to specific resources.
LIBRARY
This keyword lists the import libraries needed by the application. The build will report link errors (‘unresolved externals’) if you don't specify all the required libraries. The class-level documentation in the Developer Library tells you which library to import for each class.
No path needs to be specified and each library statement may contain several libraries, separated by a space. More than one library statement may also be used.
STATICLIBRARY
STATICLIBRARY is used to specify statically linked
libraries (object code that is built into your application).
All UIQ applications should link against a UIQ-specific heap allocator
library, which is designed to be more effective in out of memory situations.
This is done as follows in a mmp file:
STATICLIBRARY qikalloc.lib
LIBRARY qikallocdll.lib
START BITMAP…END
This section contains the bitmaps for application icons and specifies
how to compile bitmap (.bmp) files into a Symbian OS format
multi-bitmap (.mbm) file. Different sizes of source bitmap should
be supplied for different view sizes. In UIQ, the most appropriate icon size
for the UI's current zoom state is selected to avoid the need for the icon to
be dynamically scaled when it is drawn at a different size. Note that the S60
platform also allows icons to be specified in Scalable Vector Graphics - Tiny
(SVG-T) format, and has additional tools (mifconv) to support
this.
For each image, an image bitmap and a mask bitmap are needed. The mask should be black for the parts of the image that should be visible, and white for the transparent areas. For more information about these see Application icons and captions.
EPOCSTACKSIZE
This is an optional keyword and is not used in the example above.
In previous versions of Symbian OS, the default stack size was 0x5000
bytes. In v9.1, the default value is 0x2000. To increase the stack size, you
can use the EPOCSTACKSIZE keyword, for example, to increase the
stack size of 0x5000:
EPOCSTACKSIZE 0x5000
Note, the stack size setting only applies when building for the phone
and is not supported for WINSCW emulator builds. The stack size is
not limited on the emulator since the stack will expand as needed to the much
larger limit set by the Windows platform. This may cause programs that overuse
the stack to work on the emulator, but fail on hardware with a stack overflow
panic (KERN-EXEC 3). It is one of the differences between phone
hardware and the emulator which make hardware testing essential. See "Why test on hardware?" for
more details.
EPOCHEAPSIZE
This is an optional keyword and is not used in the example above.
Use the EPOCHEAPSIZE statement to specify the minimum and
maximum sizes of the initial heap for a process. The default sizes are 4KB
minimum and 1MB maximum. The minimum size specifies the RAM that is initially
mapped for the heap's use. The process can then obtain more heap memory on
demand until the maximum value is reached, incremented in steps of 4KB or 1
page.
This directive is applicable from Symbian OS v9.1, EKA2 releases. EKA2
supports multiple process creation and allows the heap size to be calibrated
between the minimum and maximum limits. Using EPOCHEAPSIZE allows
applications built on the emulator to be tested more precisely, thus emulating
the behaviour on the actual device more closely.
|
|
|
|
If you want to build the FileBrowse example project that accompanies this tutorial using Carbide.c++, you must first import it into the IDE:
Choose the File | Import... command, and from the
list of the available import wizards, select Symbian MMP File.
Browse to the project file to import. For the UIQ version of the
example, select FileBrowse\uiq\FileBrowse\group\fileBrowseapp.mmp;
for S60, select FileBrowse\s60\FileBrowse\group\fileBrowseapp.mmp.
The dialog will show the available kits that can be used to build the project. Select the appropriate S60 or UIQ kit to use.
To build the project, select the Project | Build
Project menu item or right-click the project name in the C/C++
Projects view and select Build Project. During the
build, the build progress can be shown in a dialog or in the task bar at the
bottom right of the window.
Messages from the build tools are shown in the Console
view, while errors and warnings appear in the Problems view.
Note that the Problems view may show a number of warnings such
as "the following label is used but has not been declared" and "the STRUCT that
this resource is based on contains a STRUCT[] data member which has not been
used in this resource": these can be ignored.
After building, you can run the application. To do this:
Start the emulator by right-clicking the project name in the
C/C++ Projects view, and selecting the Run As | Run
Symbian OS Application menu command.
The emulator will then start: note that this can take some time.
Run the application from the emulator. To do this on S60, open the
FB example icon from the Installat. folder.
On UIQ, open the File Browser example icon on the main
Applications screen.
|
|
If you want to build the FileBrowse example project that accompanies this tutorial using CodeWarrior, you must first import it into the IDE:
Choose the Import Project From mmp File option
(from the File menu).
CodeWarrior uses the devices setting described earlier in this tutorial, in What you will need to start development, to determine which Symbian OS SDKs have been installed to your PC, and their location.
Select Symbian and UIQ_30
from the list to use a UIQ 3 SDK, or Nokia and
S60 to use the S60 SDK.
Browse to the project file to import. For the UIQ version of the
example, select FileBrowse\uiq\FileBrowse\group\fileBrowseapp.mmp;
for S60, select FileBrowse\s60\FileBrowse\group\fileBrowseapp.mmp.
CodeWarrior then creates a project in the same location as the
mmp file with the same name, filebrowseapp, but with
a .mcp extension, and opens it in the IDE. It also creates some
other files, including a subdirectory which contains intermediate files that
are used in the build.
To build the project, go to the Targets tab, right
click on the appropriate target (for example, WINSCW UDEB for a
debug emulator build) and select Make. There are various
possible target instruction sets, each of which can have a debug (called
UDEB) and release (UREL) build variant. Selecting
Build All will build all of them — a spinning square icon
shows you which one is currently being built.
After building, you can run the application. To do this:
Start the emulator using the Project | Run menu
command.
The emulator will then start: note that this can take some time.
Run the application from the emulator. To do this on S60, open the
FB example icon from the Installat. folder.
On UIQ, open the File Browser example icon on the main
Applications screen.
|
|
You can build for any target from the command line once you have a
component definition file (bld.inf) and project definition file
(mmp file). Firstly, run bldmake from the project
directory (usually \group) where the bld.inf file is
located:
> bldmake bldfiles
This creates a batch file, called abld.bat, which you use
in the next step.
To build the project, you call abld build which will build
the project for all default targets in both release and debug variants. To
build for a particular target and variant, use abld build target-name variant,
for example:
> abld build winscw udeb
builds the project for the debug variant of WINSCW only.
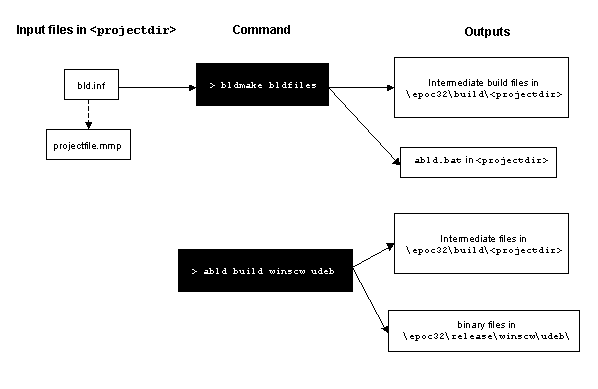
Inputs to the bldmake and abld.bat commands, and the resulting outputs.
Some of the other commands supported by abld are as follows:
|
|
Removes everything built with |
|
|
Removes files moved into position by |
|
|
Exports files listed in |
|
|
Displays commands, options or help about a particular command |
|
|
Creates makefiles or IDE workspaces |
|
|
As |
|
|
Creates resources files, bitmaps and aif files |
There are also various additional switches, for example, to build with
a verbose flag (-v) or to keep a build going for other
unrelated targets if it fails on others (-k). You can find
more information about the bldmake command and the supported abld syntax from
the Build Tools Guide and
Build Tools Reference in the
SDK.
|
|
Both CodeWarrior and Carbide.c++ allow you to interactively debug programs running in the emulator. Both IDEs allow you to use standard debugging techniques such as setting breakpoints in the source code, stepping through code, and examining memory and variables.
To use these techniques, you must run the debug build of your project. To
do this with Carbide.c++, right-click the project name in the C/C++
Projects view and select the Debug As | Debug Symbian OS
Application menu command. To do the same thing using CodeWarrior,
select the Project | Debug menu command. The emulator will
then start, and you can run the application. For S60, the icon is called
FB example and is in the Installat. folder.
For UIQ, the File Browse example icon is on main applications screen.
Another technique for debugging using the emulator is to add
RDebug::Print() statements to your code (you'll need to include
the e32debug.h header file to use RDebug). This
function is used to print formatted text to a log file called
epocwind.out, which is created in the Windows Temp directory as
described in more detail in Debug output (system message log) from the emulator.
You can use % followed by a format character in the
arguments to RDebug::Print() to print out variables. For example
the following code will write "Error value: -10" to the log file:
TInt error=-10;
_LIT(KMsgDebug,"Error value: %d");
RDebug::Print(KMsgDebug,error);
Format string syntax is documented in the developer library.
Message logging in the CodeWarrior IDE, including DLL loading and
unloading, and RDebug::Print() messages, is enabled by ticking the
Log System Messages checkbox (select WINSCW UDEB Settings
then the Debugger Settings panel).
If you are running a GUI application on the debug emulator, there are
some key combinations which can be useful when debugging. For instance
ctrl+alt+shift+p invokes a dialog that lets you simulate
memory allocation failure. This is useful to test that your code handles leaves
correctly. Other emulator debug keys are documented in the Symbian OS Library
under Debug facilities.
|
|
Developing a Symbian OS application is typically a two stage process. First, you build, test and debug the application on the PC using the emulator to eliminate bugs which manifest on the emulator. Then you rebuild the code to run on the phone using a different toolchain, and install the application onto a phone and test it. The following section describes why it is necessary to re-test on hardware, and how to do so.
You cannot assume that, because your code runs perfectly on the emulator, your development is complete. Code must always be tested on hardware before releasing it. Although it provides as faithful an emulation of Symbian OS on hardware as possible, these are just some of the differences:
unlike the emulator, the ARM processor requires all 32-bit quantities to be aligned on 32-bit boundaries, or an access violation will result
on the emulator, the stack grows as required. On target hardware, it
is limited to 8kb by default per process. If the stack overflows this limit, a
panic occurs. This can sometimes be avoided by using heap-based objects instead
of stack-based ones. Additionally, the stack size can be increased by using the
epocstacksize keyword in the mmp file.
the Windows emulator runs as a single process with each Symbian OS process running within it as a separate thread. These threads share writable memory and have no process boundary to give them memory protection, unlike the same processes running on phone hardware. On the emulator it is possible, though highly undesirable, to access another emulated process's address space. On target hardware, attempting to do this will cause an access violation.
You can find more information about these and other differences in the Emulator/native platform differences section of the Symbian OS Library.
There are various ways to transfer an application to a phone:
by connecting the phone to a PC using the appropriate connectivity hardware and software (PC Connect, Bluetooth or IR)
sending the application by Bluetooth, IR or SMS from another phone
sending the application to the phone by email
downloading it onto the phone over the internet (OTI)
over the air (OTA) distribution
if the handset supports removable media cards, you can use a card reader to copy the installation file from the PC and install the application onto the phone from the card. The application can still be installed to the phone’s internal memory and does not necessarily need to be installed to the card itself.
Regardless of how the application is delivered to the phone, it can only
be installed using a .sis installation file ("sis" stands for
Symbian OS Installation System). These
files are also sometimes described as sisx files because the
installation file format has been changed and extended in Symbian 9.1 from the
original sis file format of previous versions of Symbian OS.
The Symbian OS software installer uses this installation file to control which files are installed onto the phone and restrict installation of those which require privileged access to system services and data to those it can verify as ‘trusted’.
A PC-based tool called CreateSIS, located in the epoc32\tools\ directory,
is used to create an installation sis file. CreateSIS is a wrapper
around three separate tools which may alternatively be used separately:
MakeSIS, which creates a .sis file from a text-based
.pkg file
SignSIS, the installation file signer
MakeKeys, the certificate generator
The following diagram illustrates the use of these tools:
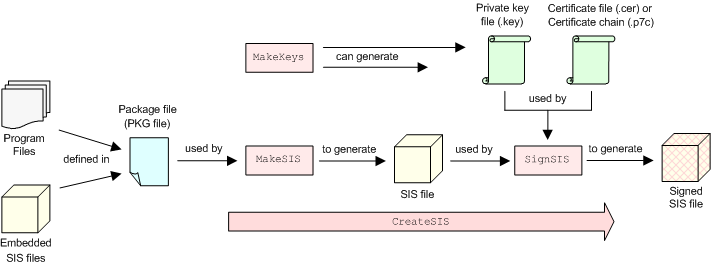
Creation of a signed sis file from executable files
compiled for phone hardware. This installation package is generated using
PC-based tools CreateSIS, MakeSIS, MakeKeys, and SignSIS with instructions
detailed in a human-readable package file.
Additional documentation for these tools can be found in the Installation Guide of the Symbian OS Library.
CreateSIS takes as input a package file (.pkg extension),
which you create to specify which application files (executable files and
resources) need to be installed onto the phone. The package file has a list of
where the files are located on the PC, that is, the locations to which they
were built as part of the ARMV5 or GCCE builds, and the location to which they
must be installed.
Optionally, CreateSIS also takes a developer certificate and private key
as input, to output a signed sis file. As a developer, you can get
these from the
Symbian
Signed program for testing. If you do not supply a key/certificate pair,
CreateSIS will create them for you. In this case, the output sis
file is known as ‘self signed’. Applications installed via self signed
sis files are restricted in the privileges (that is, the Platform
Security ‘capabilities’) they can possess. The section on
Application signing discusses
this in more detail.
|
|
pkg file format
The format of package files is documented in the Symbian OS Library in the Package file format section, but here's an example of a package file for the FileBrowse application for UIQ, and a brief summary. Note that the lines preceded by semi-colons are comments (blank lines are also ignored).
; filebrowseapp_gcce.pkg
;

; Specify the languages - as previously supported
; Languages
; none - English only by default

; List of localised vendor names - one per language. At least one must be provided (English [EN]).
; List must correspond to list of languages specified elsewhere in the .pkg
%{"Symbian"}

; The non-localised, globally unique vendor name (mandatory)
:"Symbian"

; Package header
; Name, Package UID, Major, Minor, Build, Package-type
#{"FileBrowse example"}, (0xE80000A6), 1, 0, 0, TYPE=SA

; ProductID for UIQ 3.0
; Product/platform version UID, Major, Minor, Build, Product ID
(0x101F6300), 3, 0, 0, {"UIQ30ProductID"}

; Files to install for my directory application
; If you have changed the default UIQ SDK installation path than you also need to change these paths.
"\Symbian\UIQ3SDK\epoc32\release\gcce\urel\filebrowseapp.exe"-"!:\sys\bin\filebrowseapp.exe"
"\Symbian\UIQ3SDK\epoc32\data\Z\Resource\Apps\filebrowseapp.rsc"-"!:\Resource\Apps\filebrowseapp.rsc"
"\Symbian\UIQ3SDK\epoc32\data\Z\Resource\Apps\filebrowseapp_loc.rsc"-"!:\Resource\Apps\filebrowseapp_loc.rsc"
"\Symbian\UIQ3SDK\epoc32\data\Z\Resource\Apps\filebrowseapp.mbm"-"!:\Resource\Apps\filebrowseapp.mbm"
"\Symbian\UIQ3SDK\epoc32\data\z\Private\10003a3f\Apps\filebrowseapp_reg.rsc"-"!:\private\10003a3f\import\apps\filebrowseapp_reg.rsc"
Symbian OS applications can be localised by defining all the localisable
text and images in language-specific resource and icon files. At install time,
depending on the language selected by the user, only a single version of each
set of language-specific files will be installed. A package file can specify
the available language options with a line starting with a
'&', followed by the supported language variants using two
character codes. For example,
&EN,FRwould indicate that English and French options are available. If you omit this line, the user is presented with a default language of English (UK).
For more details, see How to create an installation file for a multilingual application page of the Symbian OS Library.
The sections preceded by '%' and ':' are the
localised and non-localised vendor names respectively.
The line beginning with '#' is the package header. This line
must always be specified. It provides the name of the application (localised
with one name for each language supported), as it will be displayed in the
installation dialogs, the package UID, version information and package type.
The package UID is used to identify packages when they are installed, upgraded or removed. You can get a new UID from Symbian Signed, or you can use the same value as the UID3 of an executable installed by the package.
The package type indicates the type of installation, since different
types have different rules on how files may be installed or uninstalled. The
example above uses TYPE=SISAPP, which can also be specified using
the abbreviation SA, or omitted entirely, since it is the default
option if no type is specified. This type identifies the component to be
installed as an application. Other types include a patch type and a partial
upgrade type, as described in the package-header section of the
Symbian OS Library.
The line beginning with a hexadecimal UID in brackets is mandatory and is used to ensure that only applications that are compatible with the phone hardware in question are installed onto it. The syntax of this statement is described in more detail in the dependency page of the Symbian OS Library.
The important parts of this line for the example above are the
hexadecimal UID (0x101F6300) and the string in quotes
(UIQ30ProductID). The string which ends with
ProductID must be specified as well as the UID. This is used for
reporting rather than matching purposes. For more information, see the phone or
UI platform manufacturer's technical documentation.
This combination specifies that the program can be installed on any phone that uses the UIQ v3.0 platform. The equivalent for a phone which runs on the S60 3.x platform is:
[0x101F7961], 0, 0, 0, {"S60ProductID"}
For UIQ installation, the numbers between the UID and the string specify
the required phone or UI version number, or the upper and lower bounds for a
range of versions (if separated by ‘~’). These numbers must be
specified, but in practice, the target hardware version may be inherent in the
product UID, as in this example.
For S60, the version field is unused and must always be
0,0,0.
The rest of the package file lists the files to install (the filenames
preceding the hyphens are files on the PC), and their respective destinations
on the phone. Specifying an exclamation mark in place of a drive letter in the
target filename is recommended because it means that the user will be given a
choice of drive on which to install the application. From v9.3 onwards, an
alternative is to use the $ sign in place of a hard-coded drive
letter, as this denotes the
system drive.
Symbian OS v9.1 is a secure platform, which imposes various restrictions on file locations. This is known as “data caging” and the rules for the file installation locations are as follows:
executable code, such as filebrowseapp.exe, is installed
to \sys\bin\ (on whichever drive is selected by the user). This
location is inaccessible to all but the most trusted Symbian OS code
(possessing TCB or AllFiles capabilities), so the
integrity of the code is guaranteed. Tamper-protection is in place for this
directory if code is installed to removable media.
UI resource files such as filebrowseapp.rsc and any icon
bitmap files (.mbm extension) are installed to
\resource\apps\. This location is public, but read-only for all
but trusted system processes.
registration files (such as filebrowseapp_reg.rsc in the
example above) are installed to \private\10003a3f\import\apps\.
private data files used only by the application itself can be
installed to the application's private directory,
\private\<SID> (where SID is the secure ID, in
this case, UID3 of the FileBrowse application). Only highly trusted code (with
TCB or AllFiles capability) or code compiled with
this secure ID can read or write to this directory.
Locations not listed above are public and writable by any program.
|
|
Application signing is a way of adding a tamper-proof "digital signature" to an application to guarantee that it has not been maliciously altered and that its originator can be traced. A signature issued by a signing authority is used to ensure that an installation file has not been tampered with, that it is from a trusted source, and, where it is signed by Symbian Signed, that it has passed an approved set of test criteria.
On S60 phones, all sis files must be signed before they can
be used to install applications to the phone. On UIQ phones, it is not
mandatory but smartphone users will be encouraged only to download and install
applications which have been signed, so it is advantageous to do so. No signing
is required to run applications on either the S60 or UIQ emulators.
A sis file may either be self signed, signed using a
developer certificate (during application development) or submitted to
Symbian Signed,
which is the signing and verification program which authenticates the
originator of an application, tests the application against a set of
industry-agreed criteria and, when it has been proved to be acceptable, signs
it.
Around 60% of the APIs that are in Symbian OS don’t have any capabilities associated with them and are freely accessible to all applications - just as with earlier releases of Symbian OS.
There is also a set of APIs which require capabilities that are broadly understandable by the user. These capabilities are:
LocalServices (access to local personal area network for
example, using Bluetooth)
UserEnvironment (access to confidential information in
user’s environment)
NetworkServices (access to remote communication e.g.
Voice, data, but not Internet Access Point set-up)
Location (access to the location of the phone)
ReadUserData (read access to data that is confidential
to the phone user)
WriteUserData (write access to data that is confidential
to the phone user).
The user may authorise programs which need these user-understandable capabilities, although it is at the discretion of the phone manufacturer to determine which of the previous capabilities are included in the basic set. This policy may vary between phone manufacturers, individual phone model and also between locales, depending on the market requirements. You should check the phone manufacturer's SDK for further details.
When an application requires no capabilities, or only uses capabilities
from the basic unrestricted set, it can be self-signed both for testing and
shipping. This is recommended as suitable for freeware applications which use
unrestricted capabilities. A self-signed sis file is said to be
“untrusted” and the user will be warned of this at install time.
The user also would typically provide authorisation of the appropriate capabilities by accepting a prompt at install time. If the user refuses to provide this authorisation the application install will be terminated.
APIs associated with more sensitive capabilities are described as ‘system’ or ‘extended capabilities’. These system capabilities would be difficult for a user to understand, so it is inappropriate to give users the ability to grant them at install time, since the risks of doing so would be unclear to them.
Applications requiring these capabilities will need to be signed as trusted to receive them. However, before submitting an application for signing as trustworthy, the developer needs to test it on a target phone as well as on the emulator. For applications that need system capabilities to be tested on hardware before they are submitted to a signing programme, 'developer mode' certificates will be issued. These certificates are subject to various constraints:
they are valid for only six months
they may be limited to certain device IDs (IMEIs)
they may be valid to grant only a limited set of capabilities
they may be valid only for software with a particular vendor ID or secure ID.
For more information on how to acquire developer certificates, see the Symbian Signed website.
When applying for a developer certificate, the system capabilities that an application requires will need to be considered.
The system capabilities are subdivided into three sets
a basic set (PowerManagement, ProtServ,
ReadUserData, SurroundingsDD, SWEvent)
for which a developer certificate is granted, subject to registration. The
developer certificate can also be used to sign applications which require the
user capabilities (ReadUserData , WriteUserData,
NetworkServices, LocalServices,
UserEnvironment and Location) which means that the
user will not be asked to grant them at installation or run time.
those system capabilities which are sensitive and require
registration to include a valid ACS Publisher ID to guarantee an additional
level of trust beyond that required to register for a standard developer
certificate (ReadDeviceData, WriteDeviceData,
TrustedUI)
a highly sensitive set which require approval from the manufacturer
of the phone on which you intend to deploy the application
(AllFiles, CommDD, DiskAdmin,
DRM, MultimediaDD, NetworkControl,
TCB). You will need to go through a review process with the
manufacturer due to the sensitive nature of these capabilities.
If an application requires capabilities that are not authorised by the user, or requests more capabilities than the certificate it is signed with can grant, the application will not install on the phone.
Each system API is documented in the Symbian OS Library with the capabilities it needs. If you are linking to third party binaries, you can use the petran tool, which ships with all SDKs as standard, to get information about the capabilities of DLLs and EXEs.
For example, the following will dump information for utility.dll:
petran – dump s utility.dll
If you run a debug build of your application on the emulator with the
Platform Security diagnostic output and enforcement flags enabled in
epoc.ini as described in the
Emulator section of this
tutorial, you can also inspect the epocwind.out debug output to
confirm that there are no Platform Security errors or warnings generated. If
you application has insufficient capabilities, those capabilities which are
needed will be logged when your application tries to use the APIs which require
the missing capabilities.
|
Copyright © 2005-2008 Symbian Software Ltd. |
|
![[Previous]](../../a_stock/images/btn_prev.gif)
![[Top]](../../a_stock/images/btn_top.gif)
![[Next]](../../a_stock/images/btn_next.gif)