

![[Index]](../../a_stock/images/btn_index.gif)
![]()
![[Previous]](../../a_stock/images/btn_prev_top.gif)
![[Next]](../../a_stock/images/btn_next_top.gif)
|
|
|
|
|
|
||
This section first describes the similarities and differences between S60 and UIQ platforms. It then moves on to examine what you need to develop an application on each, and what you need to know to start work.
|
|
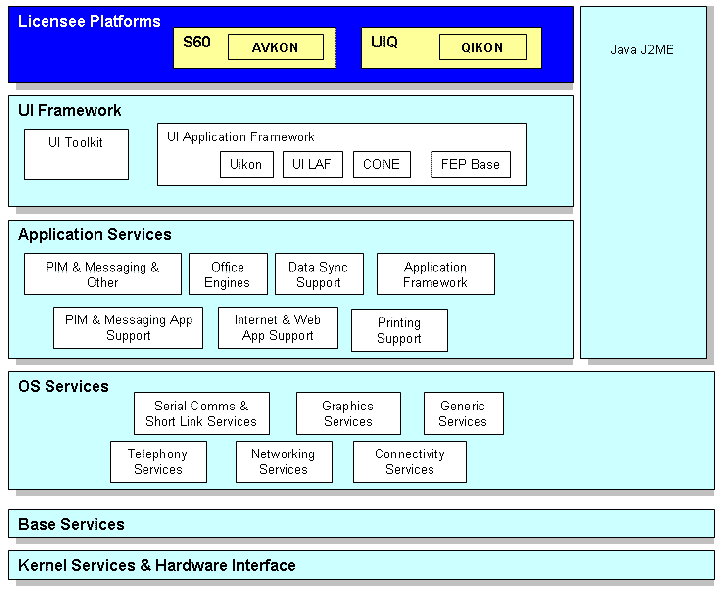
Symbian OS has a flexible architecture which allows different mobile phone platforms to run on top of the core operating system. The two most widely of used of these are S60 (formerly known as Series 60) and UIQ, which are both discussed in this tutorial.
Platforms provides a graphical user interface (GUI) framework, applications which use it, such as messaging or calendar, and can supply additional application and middleware services.
The platforms are said to be open because, in addition to these built-in applications, a user may additionally install others such as games, enterprise applications, like push e-mail, or utilities. This tutorial explains the process of creating such distributable applications.
Symbian OS and the UIQ and S60 platforms
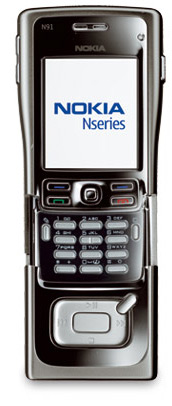
The Nokia S60 platform is used in the majority of Symbian OS smartphones shipped to date. S60 has been designed for easy one-handed use. It does not have a touch screen but instead has various input keys, including two soft keys, a five-way navigator pad (4 ways plus a centre selection button), the number keys and several dedicated keys such as the menu key.
When programming for S60, since there is no touch screen, pointer events are not supported. Another consequence of having no touch screen input is that developer should consider the type of user input required. For example, in some situations it may be appropriate to replace a text entry box with a pre-filled list, from which a selection can be made.
Phones built on the S60 3rd Edition Platform have high quality, high-resolution colour screens. Possible layouts include:
Double Resolution Portrait (352x416)
Double Resolution Landscape (416x352)
QVGA Portrait (240x320)
QVGA Landscape (320x240)
Low Resolution Portrait (176x208)
Low Resolution Landscape (208x176)
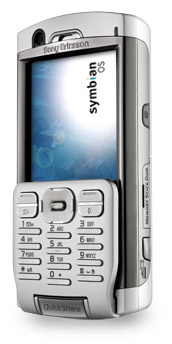
The UIQ Platform originates from a Symbian reference design and supports both keypad and touchscreen input (through virtual keyboard, handwriting recognition or interaction with typical UI controls). It can be configured with respect to touch/non-touch screens, screen size, the use of a menu bar or the use of soft keys.
Like S60, UIQ supports a range of screen sizes defined using a combination of four UI parameters called a UI Configuration. The parameters are:
|
Parameter |
Configuration options |
|
Screen layout |
|
|
Touch screen |
Yes or No |
|
Interaction style |
Menu or Soft key |
|
Orientation |
Normal or Inverted |
When writing an application for either platform, you should make its style and user experience consistent with other applications so it is not confusing for a user. Both S60 and UIQ have style guide documents which you should consult before designing your application. By adhering to the "Look and Feel" guidelines, you will give your application the best chance of success amongst users of any particular platform or smartphone. The guides are also a good way to learn about the types of controls available and the UI techniques commonly used on each platform.
|
|
You will need
a PC running Windows NT or better
an SDK (S60 or UIQ)
a C++ development IDE supported by your SDK.
the appropriate phone handsets on which to test your application
The ability to deploy code onto the phone (for example, a removable media card, for example, MMC or Memory Stick, or a connection between your development PC and the handset using USB or Bluetooth).
To install code which requires particular privileges, such as access to certain areas of the filesystem or to have high priority use of the multimedia hardware, you will also need a level of trust. The first step to attain this is to acquire an ACS Publisher ID. You can find more information about this requirement from the Application signing section of this tutorial and from Symbian Signed.
Finally, you will need to have some knowledge about C++ programming and the basic principles of object-oriented design. You do not necessarily need prior information about the S60 or UIQ Platforms, or extensive experience of working with Symbian OS. If this tutorial takes you ‘out of your depth’, there is a list of books and other Symbian OS resources in the Additional resources section at the end of this tutorial. You can also find an extensive glossary of Symbian OS terms in the Symbian OS Library.
Before you can build any of the code that accompanies this guide, you must have installed the appropriate SDK for the platform you wish to work with. These can be downloaded as follows:
For the UIQ platform - a UIQ 3.0 SDK for Symbian OS v9.1.
For the S60 platform - a S60 3rd Edition SDK
Each SDK provides the tools, libraries and application programming interfaces required to build C++ applications for handsets based on S60 or UIQ
There’s nothing to say that you can’t install both SDKs on the same PC. If you do so, you can switch between them by typing ‘devices’ at the command prompt. The command will list the SDKs installed on your PC – one of them will be marked as ‘default’. For example:
> devices
S60_3rd_Beta:com.nokia.series60
UIQ3:com.symbian.UIQ - default
To switch between them, and make the S60 SDK the default working SDK, you
can use the devices command with the setdefault
switch, passing in the SDK name. That is:
> devices – setdefault
                  		@S60_3rd_Beta:com.nokia.series60
Changing the default SDK using either technique sets up the build environment to point to the appropriate set of tools (so the correct commands are invoked) and identifies the root directory of the SDK (so that the correct include files and libraries are located).
NOTE: The names assigned to each SDK will change for different versions as they are released.
If you do plan to install both SDKs to write an application which will run on both platforms, you can’t use exactly the same code and expect it to run on both. The reason for this will be explained later in this tutorial which, after introducing the process for generic application development on Symbian OS, will describe the creation of an application for both S60 and UIQ, and describe the important differences between them.
|
|
The key elements of an SDK are:
a Windows-based emulation of a phone. Programs are initially developed and tested on the emulator.
header files and binary library files both for emulator development and for running the code on real ARM processor-based phones
a GCC-based compiler for building for ARM-based targets
additional tools for building and application deployment
documentation (the Symbian OS Library) and examples
If you look at the directory into which you installed the SDK, you'll see a number of subdirectories and files. The following list gives a brief explanation of what each contains:
Documentation\: On UIQ SDKs, Symbian OS and UIQ
documentation.
epoc32\: binaries and tools to support development,
including emulator files, libraries, header files, and tools. The form of this
directory is explained in detail in the following table.
|
Directory |
Description |
|
|
Intermediate build files (makefiles, object code, project browsing information). This directory is created when a project is built. |
|
|
Emulator configuration files. The files stored under the
|
|
|
GNU GCC toolchain required for various build utilities (this is not however the compiler now used for building application code). |
|
|
UIQ or S60 and Symbian OS C++ system include files. |
|
|
Localisable files. |
|
|
This is where the executables will be placed when you build
your project - build output files such as
For emulator build targets, under
For phone build targets, the |
|
|
Windows-based SDK tools such as batch files, perl scripts, Windows, DOS and Java executables. |
|
|
The emulated |
examples\: generic Symbian OS example code. On UIQ SDKs,
UIQ specific examples are contained in examples\UIQ.
S60Doc: On S60 SDKs, S60 and Symbian OS documentation.
S60Ex: On S60 SDKs, S60 example programs.
Once you’ve installed an SDK and familiarised yourself with its contents, it is worth taking some time to review the file layout of some of the example applications provided with each SDK. Besides getting accustomed to Symbian OS code, and the tools used to create, build and test it, it’s a good idea to use the examples to check that your SDK is correctly installed. For example, you may find it useful to take a look at the "Hello World!" example which comes with both the UIQ and S60 SDKs and experiment by
modifying it to present a different message
compiling and running the modified example on the emulator
compiling the code and building an installation package to deploy it to an appropriate phone.
This tutorial will describe how to perform each of these steps, before moving on to a slightly more complex example than "Hello World!" which will examine common aspects of creating an application for S60 or UIQ and describe some of the differences.
|
|
The emulator is a Windows application which simulates the phone hardware on the PC. This enables the development of phone software to be substantially PC-based, with only the final development stages focussed on the hardware. Use of the emulator saves time in the early stages of development, since you can use the development IDE to debug the code easily and resolve most initial bugs and design problems. For example, if a panic occurs in your code, the debugger can provide comprehensive information to diagnose the error condition that caused it. Use of the emulator also reduces the number of times you need to create an installation package, transfer it to the phone and install it, which would otherwise be time consuming in the early phases of development.
The emulator provides as faithful an emulation as possible of Symbian OS running on target hardware, and has processes and scheduling that are almost identical to those on a real device. However, there are necessarily some differences, for example the memory model for a real phone is different to that of the emulator and the underlying hardware is different, so it is not possible to use the same device driver and hardware abstraction layer code on both the emulator and a real phone. For this reason, the emulator cannot be used for all development and, for low-level programming such as that for device drivers, target hardware cannot be emulated.
One of the differences between a phone handset and the emulator may be observed as a slight difference in the pixel sizes of each. Text may be displayed differently on the phone to the way it appears on the emulator. Another difference is that the emulator programming environment tends to be more forgiving than that of the target hardware. For example, code which uses non-constant static variables will compile for the emulator, but will not compile for the ARM platform. Sometimes code which may run successfully on the emulator will fail on the hardware.
To eliminate any issues that are caused by differences between the emulator and a real phone, all application code must be run and tested thoroughly on the phone itself as well as the emulator before it is released. You can find more detail in Deploying code on hardware.
The emulator is most commonly used as part of debugging a project, in
which case it is usually started by using Run or
Debug from within the IDE. On either platform, it can also
be started from a command prompt by entering the command:
> epoc
EPOC was an earlier name for Symbian OS, and is used in various
instances, such as in this executable name. The command runs a debug build of
the emulator (epoc.exe, found in the SDK directory
\epoc32\release\winscw\udeb), which is what you will normally work
with, as it allows you to debug your programs through the IDE.
A new window should then appear showing an emulation of the phone’s display, plus a surround that includes some navigation and phone buttons. The S60 and UIQ SDKs each customise the display to mimic the smartphone types supported by that UI platform.
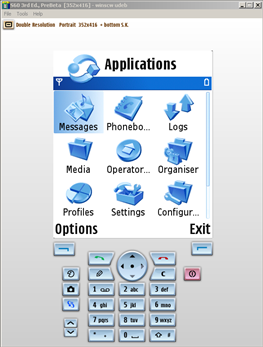
The S60 emulator.
You'll find the emulator fairly straightforward to use. On both S60 and UIQ, you can use the PC’s mouse or the cursor keys and the enter key to navigate, and the keyboard and number pad to enter text. On UIQ, you can also click and draw on the screen with the PC's mouse, as if it were the stylus.

The UIQ emulator.
Additionally, the PC function keys are set to simulate certain hardware events (such as power on/off), and other special keyboard combinations provide options that are helpful for debugging, such as viewing and manipulating the memory heap and simulating rapid random keypresses to test application robustness. More information on the use of the debugging keys can be found in the Symbian OS Library in the Debug facilities section of the emulator guide.
The filesystem of the phone is mapped to the PC, with the internal
writable drive (C:) usually mapped to
\epoc32\winscw\c and the ROM mapped to
\epoc32\release\winscw\udeb\z for the debug build. You can also
add further virtual drives, and reconfigure the standard drives to map to
alternative locations.
There is one exception to the filesystem mapping, which is the location
of the executables. On the phone, all executables are stored in the
\sys\bin directory, but on the emulator, the executables are
loaded from where they are built, that is, the
\epoc32\release\winscw\udeb or
\epoc32\release\winscw\urel directory.
For example, a program called helloworld.exe, built into the
phone's ROM, will be stored in z:\sys\bin or, if it is installed
onto the phone's internal drive will be located at c:\sys\bin
(other drives can map to the phone's removable memory card). For the same
application on the emulator, helloworld.exe will always be stored
in \epoc32\release\winscw\udeb or
\epoc32\release\winscw\urel for debug or release builds
respectively.
A more detailed description of the typical Symbian OS file locations for both the emulator and phone can be found in a section of the File Server guide within the Symbian OS Library.
Some programs, such as test programs, don't require the full GUI to start up, and instead run inside a simple text console. This is useful for automated testing, for example, to check for code regressions by running a suite of console tests after each build. The code required for a console test application is described in The filesystem browser engine class and console test code. You can also experiment with the test console by running eshell, which provides a simple text shell.
The UIQ SDK includes a configuration tool called UiqEnv to
help set up the emulator environment for various UI styles, determine which
communication ports to use and to provide connectivity through the PC. For more
information on UiqEnv, refer to UIQ SDK.
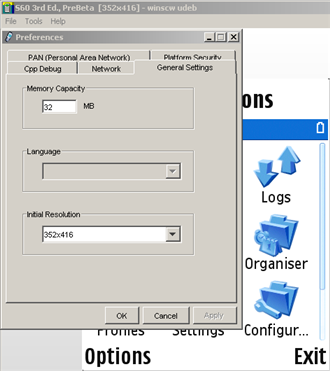
The S60 emulator can also be configured using the
Tools menu on the emulator itself. The
Preferences option allows configuration of a number of
global emulator settings and network connectivity. More information is
available from the S60 SDK, in the S60 Tools and Utilities Emulator Guide.
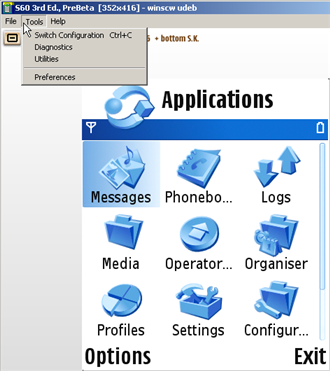
The 'Tools' menu option can be used to set a range
of S60 emulator preferences.
An application running on a smartphone will have access to various communication technologies. These can be emulated by attaching suitable hardware to a comms port on the PC, and making any necessary configuration changes.
Infra red
To use infrared, connect an IrDA COM-port serial adapter (or "pod"). Pods supported by the Symbian OS IrDA stack include: Extended Systems, Inc. Jeteye pods 7201, 7401 and 7501, iFoundry 8001A, Actisys 220L, Actisys 220L+, Actisys 220Li.
By default, the emulator looks for an infra-red device on COM port 2.
Bluetooth
Connect a Bluetooth module to the PC. The currently supported module is the Casira. The default port is COM1.
Telephony data calls
If you need genuine telephony protocols, such as SMS, you can connect a data-enabled mobile phone (as specified in the Knowledgebase entry What telephony hardware does Symbian use for testing the IP connectivity of the OS?) to the emulator via a COM port.
If you want to use TCP/IP (as if over a data call), a connected phone can be used, although most developers prefer, for convenience, and to avoid call costs, to instead set up the emulator to use the PC's own network connection. Both S60 and UIQ emulators are set up to enable this.
You can use the S60 and UIQ SDKs' set up utilities to configure
Bluetooth, infrared, and network settings. For S60, use Tools |
Preferences from the emulator; for UIQ, use the SDK
Configurator program.
The emulator can be configured through an initialisation file called
epoc.ini located in \epoc32\data, which is where all
configuration files are stored for the emulator. For normal use, you don’t to
need modify epoc.ini, but you can make changes to customise it if
you need to, for example, to add customised virtual drives, change the size of
the heap or map hot keys on the PC keyboard to the phone keypad. If you do make
changes to epoc.ini, it’s advisable to keep a back-up copy in case
you need to revert your changes.
More information about the keywords supported by epoc.ini can be found in the Emulator reference in the Symbian OS Library.
Platform security is discussed in more detail later in this tutorial in
Platform security and platform migration. The Platform security settings for the emulator can be
configured by adding statements to epoc.ini. This can be useful in
the early stages of development, for example, to suspend platform security
checking. The default setting for the emulator (and, of course, for all phone
hardware) is that platform security is fully enabled and enforced.
The flags to use in epoc.ini are described in detail in the
Platform security section
of the epoc.ini reference in the Symbian OS Library. The
configuration options include:
PlatSecEnforcement [On | Off]
for switching off platform security policy enforcement so the system behaves as if all security checks have passed
PlatSecDisabledCaps <capability> + <capability> +
                        			 ...
for switching off the checking of certain capabilities
PlatSecDiagnostics [On | Off]
for logging platform security diagnostic messages to the debug log file.
Platform security messages, among others, are written to the emulator’s debug log file which is described in more detail in the emulator debugging section later in this tutorial.
|
|
This section examines the compilers and IDEs that you can use when developing applications for Symbian OS.
CodeWarrior for Symbian OS, which comes in several packages (personal, professional and OEM editions), supports C++ development on Symbian OS. The IDE integrates compilation for both emulator (using its own compiler) and hardware builds (using one of the hardware ‘cross’ compilers supported for Symbian OS), emulator debugging and, additionally, hardware debugging with the OEM package. More information is available from CodeWarrior for Symbian OS.
To build binaries to run on phone hardware, which has an ARM processor rather than the Intel (or compatible) x86 processors used on PCs, different compilation tools are required. Such a compiler, GCC-E, is supplied free with the SDK and is taken from the free software GNU GCC. GCC-E can be used as either from the command line or invoked an IDE. You can find more information in the Native build targets section in the Symbian OS Library.
GCC-E supports the same Embedded Application Binary Interface (EABI) as the ARM Real View Compilation Tool (RVCT, version 2.2 or higher). RVCT is used by Symbian to compile Symbian OS and by S60 and UIQ licensees to develop ROM-based code. It gives the best performance and smallest code compared to other alternatives, but must be purchased separately. Like GCC-E, RVCT can be used as either from the command line or invoked from within the CodeWarrior IDE.
Nokia are releasing a suite of new developer tools for Symbian OS application development, called Carbide.C++, in 2006. Based upon Eclipse, the rapidly evolving Java-based open-source integrated development environment (IDE), the tools family contains three products:
Carbide.c++ Express
A free IDE with basic build and debug support for SDK platforms. This product will be suitable for phone and emulator target compilation and emulator debug.
Carbide.c++ Developer Edition
For more advanced application developers, this will include a new graphical Rapid Application Development (RAD) tool and support compilation and debugging for both emulator and phone targets.
Carbide.c++ Professional Edition
This product will be available to OEM developers who create phones and require early access to next-generation Symbian technical specifications and a low level hardware debugging facility.
More information about the Carbide.c++ family is available at Forum Nokia.
Carbide.vs (which was formerly known as Nokia Developer's Suite for Symbian OS) 2.0 is a set of tools to allow Symbian OS C++ application development using Microsoft Visual Studio .NET 2003. It can be used with the S60 Platform 2nd Edition and 3rd Edition, or the Series 80 Platform 2nd Edition. More information can be found at Forum Nokia.
|
|
The kits supply tools that allow projects to be built from the command line. This is not as easy as using the IDE to control a build, but it does allow for building from batch processes, such as automatic build and test scripts. The following table summarises the command line tools, most of which will be discussed further in the Building, debugging and deploying an application section of this tutorial.
|
Tool |
Description |
|
|
Build tool used to control all
aspects of building a project. It is created in the current directory by the
|
|
|
Build tool that processes the
component description file ( |
|
|
Bitmap converter that takes one
or more Windows bitmap files ( |
|
|
Context sensitive help compiler that builds |
|
|
Combines the actions of passing a resource file through the C++
preprocessor, and then compiling it with |
|
|
The createSIS tool creates and signs software installation packages (SIS files). It provides a wrapper around lower level installation tools such as makesis and makekeys. |
|
|
Installation File Generator that
creates software installation packages based on source PC/target Symbian OS
file locations defined in a |
|
|
Certification Generator that creates a private/public key pair and issues certificate requests. For a command line reference, see the Certification Generator syntax. |
|
|
Build tool that takes a
|
|
|
For Portable Executable
Translation. The |
|
|
Resource compiler that
compiles source ( |
|
Copyright © 2005-2008 Symbian Software Ltd. |
|
![[Previous]](../../a_stock/images/btn_prev.gif)
![[Top]](../../a_stock/images/btn_top.gif)
![[Next]](../../a_stock/images/btn_next.gif)