-
From the menu on the left side of the Zenoss Dashboard, select Settings.
-
Click the Users Tab.
The Users Administration page appears.
-
Click the name of the user account you want to edit.
The individual User Administration page for the newly created user appears.
-
Make the changes as detailed in the sub sections below and click the Save button to keep the changes.
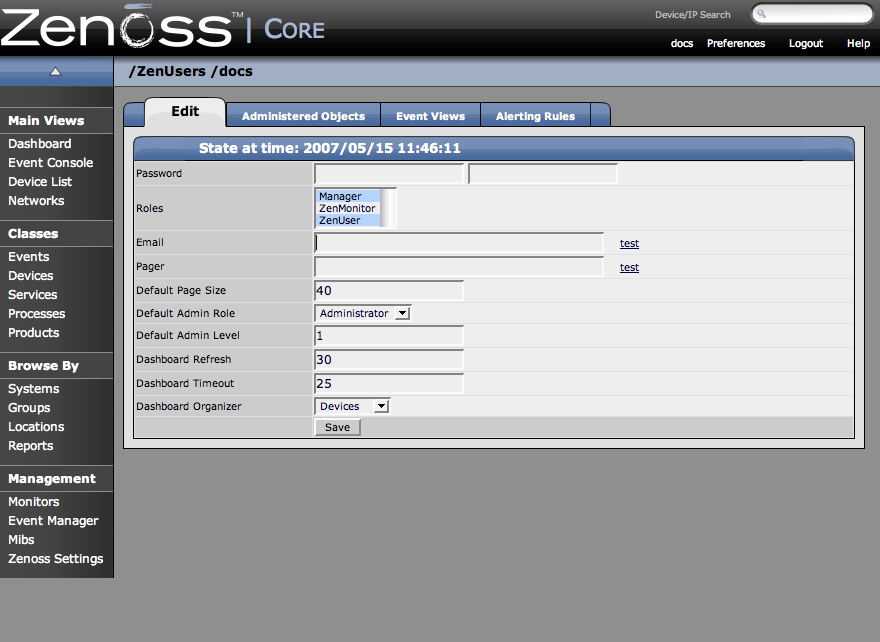
From the Individual User Administration page, assign a password for the user. Enter it again to confirm it in the next text box.
From the Individual User Administration page, you can enter and edit the email address and/or pager number.
From the Individual User Administration page, you can assign specific roles for each user privileges for this User. These roles are roles available to be set by the one Zenoss Admin user. If you have manger role set, then you can change settings for your own account or for any other accounts as well (including other manager accounts).
Table 5.1. Zenoss User Roles
| Role | Privileges |
|---|---|
| Manager | The Manager role has full privileges. This role has viewing and editing privileges on objects in the system. Managers also see the Management area of the Navigation menu on the left side of the web console. These options include: Adding Devices, User management for all users (including changing roles), Monitors, Live Event viewing, History Events and also the About information. |
| ZenUser | ZenUser has viewing information of all the information in the system., Users with the role ZenUser can also edit their own user information (except for changing their Role). ZenUsers cannot add devices and do not see the Management section of the Navigation menu on the left side of the web console. |
The Default User Admin Level sets the default role for administered objects. This default is easily changed, but you should choose the role here that is most commonly added. Choose between the following roles to set as the default.
-
Administrator
-
Engineer
-
Analyst
-
Tester
These User admin levels are currently merely ways to categorize and group users. In the future there may be more attributes that would be assignable per group/role. For now it is just a way to categorize and classify users.
You can change the Dashboard Settings such as timeout and Refresh times on a per user basis. In the Dashboard Refresh and Dashboard Timeout fields, enter the number of seconds before a timeout message appears for the Zenoss Dashboard.
The default Dashboard organizer is is what appears in the Devices Summary on the Dashboard for this particular user. You can change your view to group as either Devices, Systems, Groups, or Locations.
You can associate any object in the Zenoss system with a particular user (for monitoring or reporting purposes). To create these associations:
-
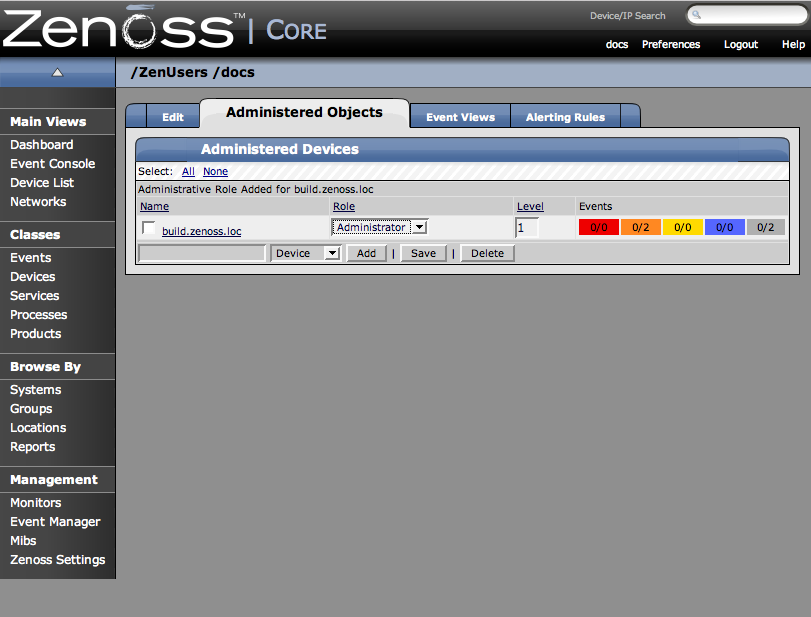
From the Individual User Administration page, click the Administered Objects tab.
The Administered Object Tab appears.
-
Select an object type from the Administered Devices table menu. You can choose between adding a Device, System, Group, or Location.
A dialog will appears where you can specify the component you want to add as an administered object.
-
Click the OK Button.
The Device appears in the Administered Devices list for this user.
-
You can now change the role that is associated for this user on this object.
The default role is set in the Individual User Administration Page.
You can also set administered objects from the device you want to add as an administered object. For example, navigate to the device you want to add to this user’s administered objects page. Open the page menu for this device, select More and then the Administration option. Open the Administrator's table menu choose Add Administrator and select the user you want to add as an administrator. The object is added to the user’s administered object list, and the name appears in this object’s Administrator’s List.