Data Buckets
Couchbase Server provides a range of statistics and settings through the Data Buckets and Server Nodes. These show overview and detailed information so that administrators can better understand the current state of individual nodes and the cluster as a whole.
The Data Buckets page displays a list of all the configured buckets on your system (of both Couchbase and memcached types). The page provides a quick overview of your cluster health from the perspective of the configured buckets, rather than whole cluster or individual servers.
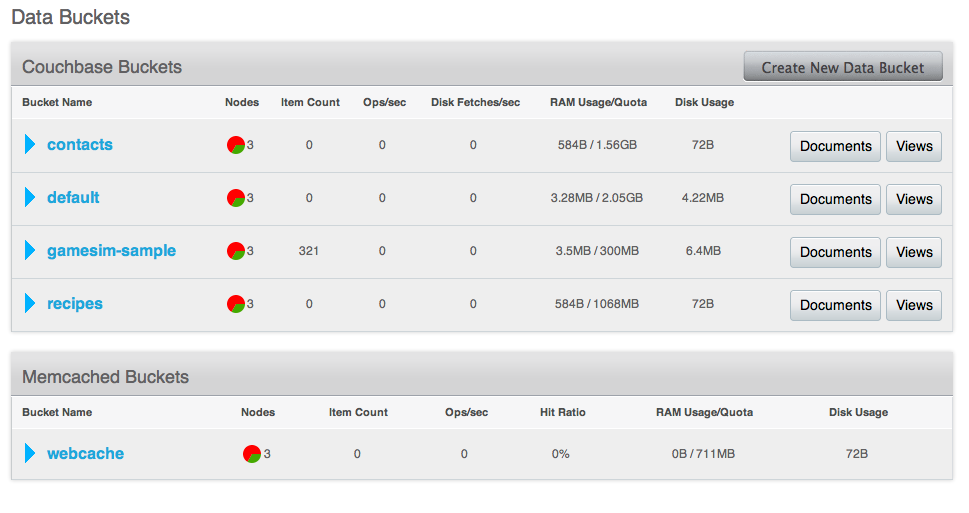
The information is shown in the form of a table, as seen in the figure below.

The list of buckets are separated by the bucket type. For each bucket, the following information is provided in each column:
- Bucket name is the given name for the bucket. Clicking on the bucket name takes you to the individual bucket statistics page.
- RAM Usage/Quota shows the amount of RAM used (for active objects) against the configure bucket size.
- Disk Usage shows the amount of disk space in use for active object data storage.
- Item Count indicates the number of objects stored in the bucket.
- Ops/sec shows the number of operations per second for this data bucket.
- Disk Fetches/sec shows the number of operations required to fetch items from disk.
- Clicking the Bucket Name opens the basic bucket information summary.
- Clicking the Documents button will take you to a list of objects identified as parseable documents.
- The Views button permits you to create and manage views on your stored objects.
To create a new data bucket, click the Create New Data Bucket.
Creating and editing data buckets
When creating a new data bucket, or editing an existing one, you will be presented with the bucket configuration screen. From here you can set the memory size, access control and other settings, depending on whether you are editing or creating a new bucket, and the bucket type.
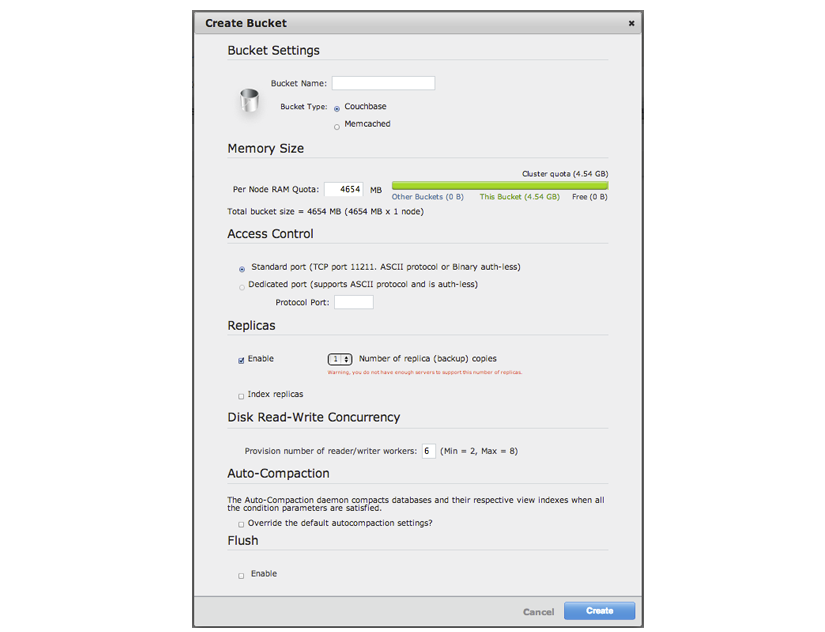
You can create a new bucket in Couchbase Web Console under the Data Buckets tab.
- Click Data Buckets | Create New Data Bucket. You see the Create Bucket
panel, as follows:

- Select a name for the new bucket.
The bucket name can only contain characters in range A-Z, a-z, 0–9 as well as underscore, period, dash and percent symbols.
Tip: Create a named bucket specifically for your application. Any default bucket you initially set up with Couchbase Server should not be used for storing live application data. The default bucket you create when you first install Couchbase Server should be used only for testing. - Select a Bucket Type, either Memcached or Couchbase.
The options that appear in this panel differ based on the bucket type.
For Couchbase bucket type:
- Memory Size
The amount of available RAM on this server which should be allocated to the bucket. Note that the allocation is the amount of memory that will be allocated for this bucket on each node, not the total size of the bucket across all nodes.
- Replicas
For Couchbase buckets you can enable data replication so that the data is copied to other nodes in a cluster. You can configure up to three replicas per bucket. If you set this to one, you need to have a minimum of two nodes in your cluster and so forth. If a node in a cluster fails, after you perform failover, the replicated data will be made available on a functioning node. This provides continuous cluster operations in spite of machine failure.
You can disable replication by deselecting the Enable checkbox.
You can disable replication by setting the number of replica copies to zero (0).
To configure replicas, Select a number in Number of replica (backup) copies drop-down list.
To enable replica indexes, Select the Index replicas checkbox. Couchbase Server can also create replicas of indexes. This ensures that indexes do not need to be rebuilt in the event of a node failure. This will increase network load as the index information is replicated along with the data.
- Disk Read-Write Concurrency
Multiple readers and writers are supported to persist data onto disk. For earlier versions of Couchbase Server, each server instance had only single disk reader and writer threads. By default this is set to three total threads per data bucket, with two reader threads and one writer thread for the bucket.
For now, leave this setting at the default. In the future, when you create new data buckets you can update this setting.
- Flush
To enable the operation for a bucket, click the Enable checkbox. Enable or disable support for the Flush command, which deletes all the data in an a bucket. The default is for the flush operation to be disabled.
For Memcached bucket type:
- Memory Size
The bucket is configured with a per-node amount of memory. Total bucket memory will change as nodes are added/removed.
Warning: Changing the size of a memcached bucket will erase all the data in the bucket and recreate it, resulting in loss of all stored data for existing buckets.
- Auto-Compaction
Both data and index information stored on disk can become fragmented. Compaction rebuilds the stored data on index to reduce the fragmentation of the data.
You can opt to override the default auto compaction settings for this individual bucket. Default settings are configured through the Settings menu. If you override the default autocompaction settings, you can configure the same parameters, but the limits will affect only this bucket.
For either bucket type provide these two settings in the Create Bucket panel:
- Access Control
The access control configures the port clients use to communicate with the data bucket, and whether the bucket requires a password.
To use the TCP standard port (11211), the first bucket you create can use this port without requiring SASL authentication. For each subsequent bucket, you must specify the password to be used for SASL authentication, and client communication must be made using the binary protocol.
To use a dedicated port, select the dedicate port radio button and enter the port number you want to use. Using a dedicated port supports both the text and binary client protocols, and does not require authentication.
Note: When defining a port on a bucket, the server automatically starts up a copy of Moxi on the servers, and exposes it on that port. This supports the ASCII memcached protocol. However, Couchbase strongly recommend against using Moxi in this way. If needed, a client-side Moxi should be installed on the application servers and have it connect to this bucket (whether it is “port” or “password” doesn’t matter).
When defining a password on a bucket, it requires a client that supports the binary memcached protocol with SASL (all Couchbase client libraries and client-side Moxi provide this support). Defining a password on a bucket is the recommended approach.
- Flush
Enable or disable support for the Flush command, which deletes all the data in an a bucket. The default is for the flush operation to be disabled. To enable the operation for a bucket, select the Enable checkbox.
- Click Create.
Editing Couchbase buckets
You can edit a number of settings for an existing Couchbase bucket in Couchbase Web Console:
- Access Control, including the standard port/password or custom port settings.
- Memory Size can be modified providing you have unallocated space within your Cluster configuration. You can reduce the amount of memory allocated to a bucket if that space is not already in use.
- Auto-Compaction settings, including enabling the override of the default auto-compaction settings, and bucket-specific auto-compaction.
- Flush support. You can enable or disable support for the Flush command.
The bucket name cannot be modified. To delete the configured bucket entirely, click the Delete button.
Editing Memcached buckets
For Memcached buckets, you can modify the following settings when editing an existing bucket:
Access Control, including the standard port/password or custom port settings.
Memory Size can be modified providing you have unallocated RAM quota within your Cluster configuration. You can reduce the amount of memory allocated to a bucket if that space is not already in use.
You can delete the bucket entirely by clicking the Delete button.
You can empty a Memcached bucket of all the cached information that it stores by using the Flush button.
Warning: Using the Flush button removes all the objects stored in the Memcached bucket. Using this button on active Memcached buckets may delete important information.
Bucket information
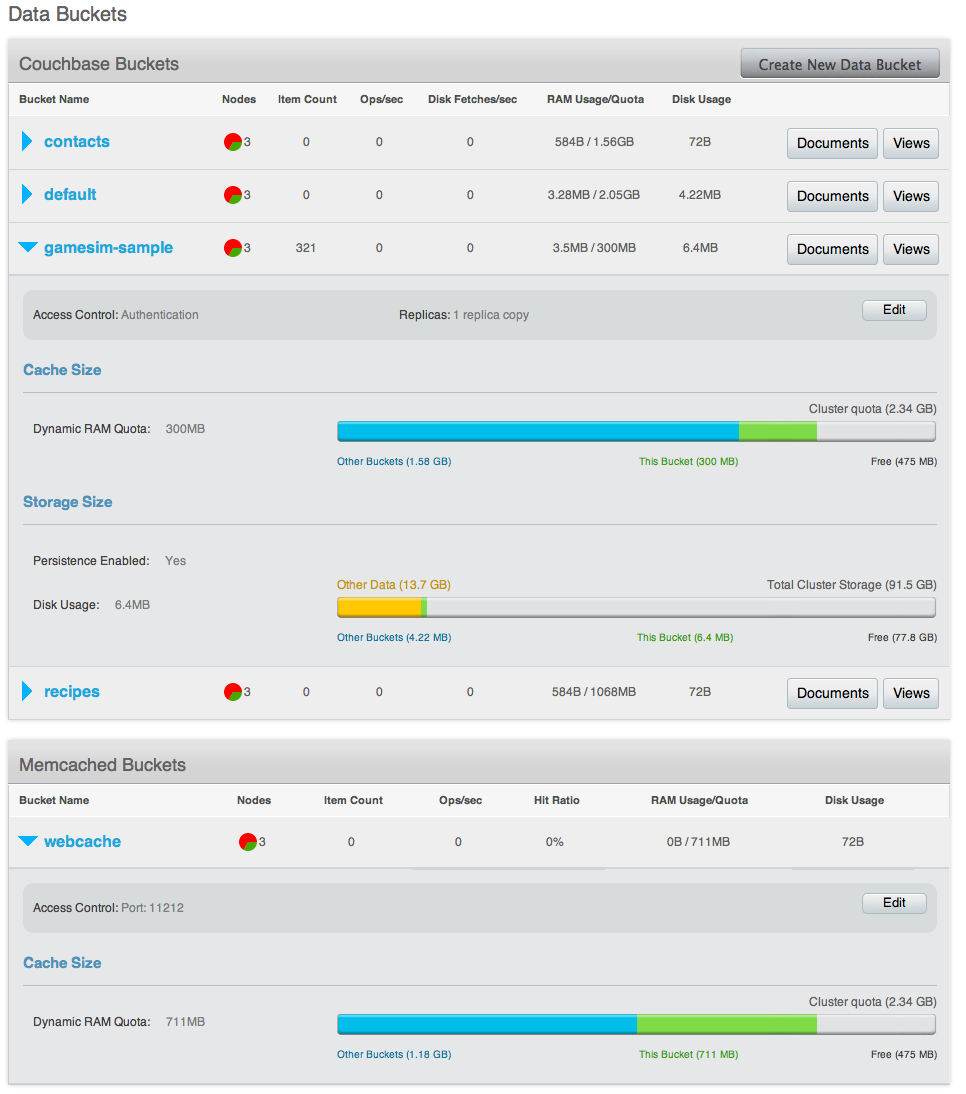
You can obtain basic information about the status of your data buckets by clicking on the drop-down next to the bucket name under the Data Buckets page. The bucket information shows memory size, access, and replica information for the bucket, as shown in the figure below.

You can edit the bucket information by clicking the Edit button within the bucket information display.