Views
The Views section lets you manage your development and production views.
The Views Editor is available within the Couchbase web console. You can access the View Editor either by clicking the Views for a given data bucket within the Data Buckets display, or by selecting the Views page from the main navigation panel.

The individual elements of this interface are:
The pop-up, at the top-left, provides the selection of the data bucket where you are viewing or editing a view.
The Create Development View enables you to create a new view either within the current design document, or within a new document.
You can switch between Production Views and Development Views.
The final section provides a list of the design documents, and within each document, each defined view.
When viewing Development Views, you can perform the following actions:
* `Compact` the view index with an associated design document. This will compact
  the view index and recover space used to store the view index on disk.

* `Delete` a design document. This deletes all of the views defined within the
  design document.

* `Add Spatial View` creates a new spatial view within the corresponding design
  document. See [Creating and Editing Views](#couchbase-views-editor-createedit).

* `Add View` creates a new view within the corresponding design document. See
  [Creating and Editing Views](#couchbase-views-editor-createedit).

* `Publish` your design document (and all of the defined views) as a production
  design document. See [Publishing Views](#couchbase-views-editor-publishing).

* For each individual view listed:

   * `Edit`, or clicking the view name

     Opens the view editor for the current view name, see [Creating and Editing
     Views](#couchbase-views-editor-createedit).

   * `Delete`

     Deletes an individual view.
When viewing Production Views you can perform the following operations on each design document:
* `Compact` the view index with an associated design document. This will compact
  the view index and recover space used to store the view index on disk.

* `Delete` a design document. This will delete all of the views defined within the
  design document.

* `Copy to Dev` copies the view definition to the development area of the view
  editor. This enables you edit the view definition. Once you have finished making
  changes, using the `Publish` button will then overwrite the existing view
  definition.

* For each individual view:

   * By clicking the view name, or the `Show` button, execute and examine the results
     of a production view. See [Getting View Results](#couchbase-views-editor-view)
     for more information.
Creating and editing views
You can create a new design document and/or view by clicking the Create Development View button within the Views section of the Web Console. If you are creating a new design document and view you will be prompted to supply both the design document and view name.
To create a new view as part of an existing design document, click the Add View button against the corresponding design document.
View names must be specified using one or more UTF–8 characters. You cannot have a blank view name. View names cannot have leading or trailing whitespace characters (space, tab, newline, or carriage-return).
If you create a new view, or have selected a Development view, you can create and edit the map() and reduce() functions. Within a development view, the results shown for the view are executed either over a small subset of the full document set (which is quicker and places less load on the system), or the full data set.
>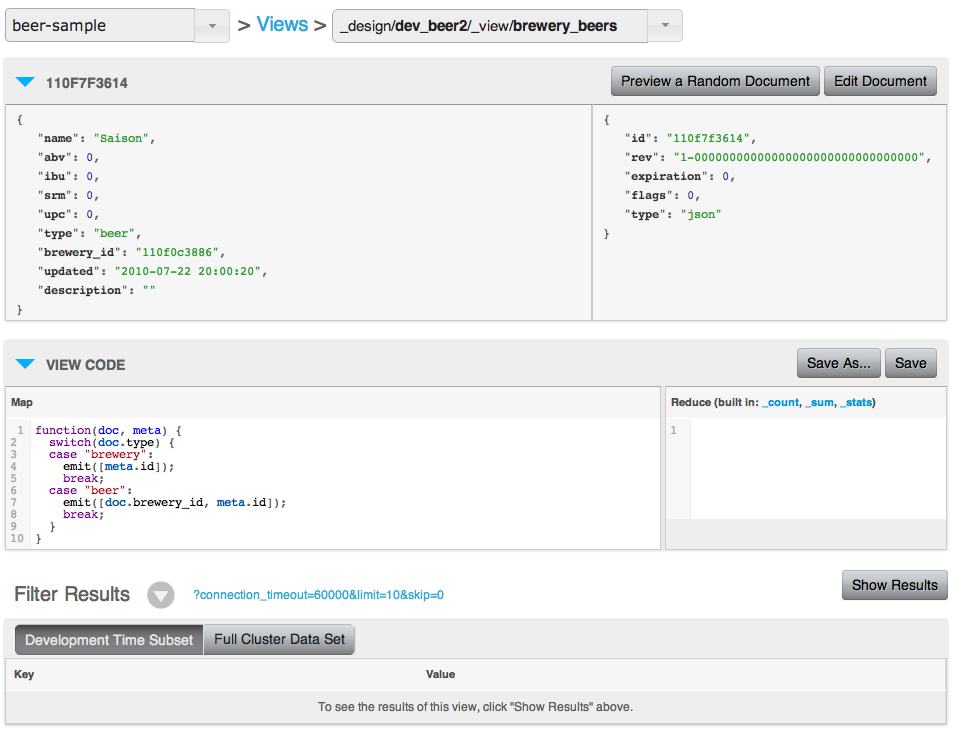
The top portion of the interface provides navigation between the available design documents and views.
The Sample Document section lets you view a random document from the database to help you write your view functions and so that you can compare the document content with the generated view output. Clicking the Preview a Random Document will randomly select a document from the database. Clicking Edit Document takes you to the Views editor.
Documents stored in the database that are identified as Non-JSON may be displayed as binary, or text-encoded binary, within the UI.
Document metadata is displayed in a separate box on the right hand side of the associated document. This shows the metadata for the displayed document, as supplied to the map() as the second argument to the function. For more information on writing views and creating the map() and reduce() functions.
With the View Code section, you should enter the function that you want to use for the map() and reduce() portions of the view. The map function is required, the reduce function is optional. When creating a new view a basic map() function will be provided. You can modify this function to output the information in your view that you require.
Once you have edited your map() and reduce() functions, you must use the Save button to save the view definition.
The design document will be validated before it is created or updated in the system. The validation checks for valid JavaScript and for the use of valid built-in reduce functions. Any validation failure is reported as an error.
You can also save the modified version of your view as a new view using the Save As... button.
The lower section of the window will show you the list of documents that would be generated by the view. You can use the Show Results to execute the view.
To execute a view and get a sample of the output generated by the view operation, click the Show Results button. This will create the index and show the view output within the table below. You can configure the different parameters by clicking the arrow next to Filter Results. This shows the view selection criteria, as seen in the figure below.
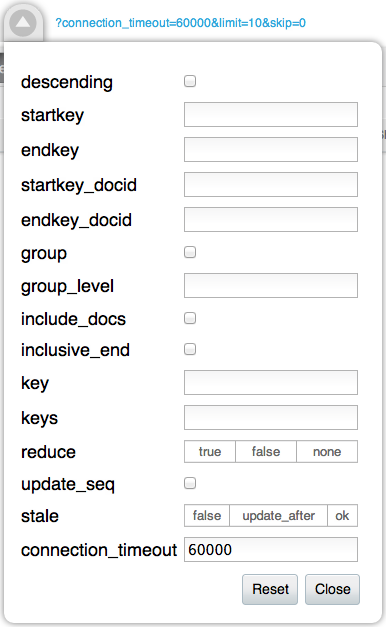
Clicking on the Filter Results query string opens a new window containing the raw, JSON formatted, version of the View results.
By default, Views during the development stage are executed only over a subset of the full document set. This is indicated by the Development Time Subset button. You can execute the view over the full document set by selecting Full Cluster Data Set. Because this executes the view in real-time on the data set, the time required to build the view may be considerable. Progress for building the view is shown at the top of the window.
If you have edited either the map() or reduce() portions of your view definition, you must save the definition. The Show Results button will remain greyed out until the view definition has been saved.
You can also filter the results and the output using the built-in filter system. This filter provides similar options that are available to clients for filtering results.
Publishing views
Publishing a view moves the view definition from the Development view to a Production View. Production views cannot be edited. The act of publishing a view and moving the view from the development to the production view will overwrite a view the same name on the production side. To edit a Production view, you copy the view from production to development, edit the view definition, and then publish the updated version of the view back to the production side.
Getting view results
Once a view has been published to be a production view, you can examine and manipulate the results of the view from within the web console view interface. This makes it easy to study the output of a view without using a suitable client library to obtain the information.
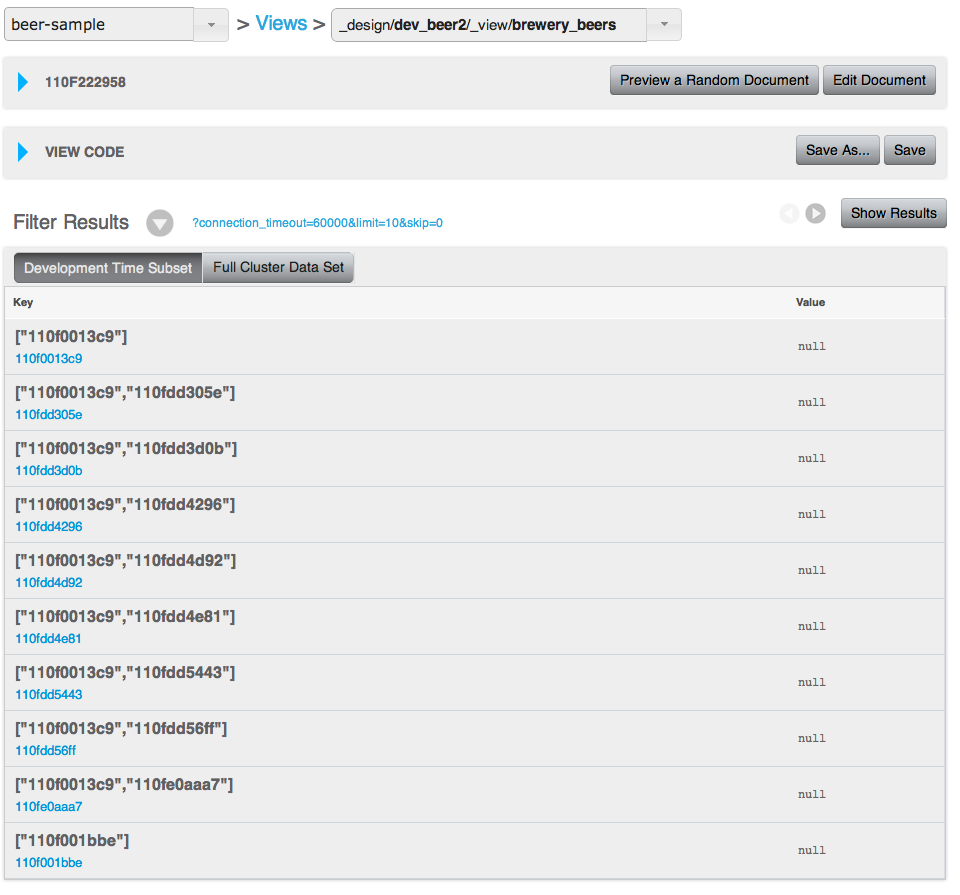
To examine the output of a view, click icon next to the view name within the view list. This will present you with a view similar to that shown in the figure below.
The top portion of the interface provides navigation between the available design documents and views.
The Sample Document section lets you view a random document from the database so that you can compare the document content with the generated view output. Clicking the Preview a Random Document will randomly select a document from the database. If you know the ID of a document that you want to examine, enter the document ID in the box, and click the Lookup Id button to load the specified document.
To examine the function that generate the view information, use the View Code section of the display. This will show the configured map and reduce functions.
The lower portion of the window will show you the list of documents generated by the view. You can use the Show Results to execute the view.
The Filter Results interface lets you query and filter the view results by selecting the sort order, key range, or document range, and view result limits and offsets.
To specify the filter results, click on the pop-up triangle next to Filter Results. You can delete existing filters, and add new filters using the embedded selection windows. Click Show Results when you have finished selecting filter values. The filter values you specify are identical to those available when querying from a standard client library.
Due to the nature of range queries, a special character may be added to query specifications when viewing document ranges. The character may not show up in all web browsers, and may instead appear instead as an invisible, but selectable, character.