11.4.2. In-Course Identity Reverification
To use in-course identity reverification, you must enable reverification in your course, create specific verification checkpoints, and then set assessments to require verification.
11.4.2.1. Enable In-Course Identity Reverification
Note
The in-course identity reverification process requires using the edx-reverification-block, which is unsupported. Before you can enable in-course identity reverification you must follow the steps to allow the addition of unsupported tools and problem types.
To enable in-course identity reverification for your course, follow these steps.
In Studio, select Settings, and then select Advanced Settings.
In the Advanced Module List field, place your cursor between the brackets (
[ ]), and then add"edx-reverification-block". Make sure to include the quotation marks.Note
If the Advanced Module List field already contains one or more items, add a comma after the closing quotation mark for the last item, and then add
"edx-reverification-block". You do not have to include a space between the items. The field should resemble the following example.["module_name","edx-reverification-block"]At the bottom of the page, select Save Changes.
11.4.2.2. Create a Verification Checkpoint
To require learners to verify their identities before a specific assessment, you add a verification checkpoint component to a unit in that assessment. After you create a checkpoint component, the checkpoint appears on the Progress pages and in the body of the course for learners who must complete in-course identity reverification.
Note
Make sure that you add verification checkpoints only before assessments.
In the subsection that contains the assessment, create a new unit.
If the subsection already contains one or more units, move the new unit so that it is the first unit in the subsection.
In the new unit, locate Add New Component, and then select Advanced.
Select Verification Checkpoint, and then select Edit.
In the Verification Checkpoint Name box, enter a name.
In the Verification Attempts box, select the number of times that learners can attempt to verify their identities. You can specify up to three attempts.
Select Save.
Publish the unit that contains the component.
After you save the component and publish the unit that contains the component, the verification checkpoint name appears in a list of verification checkpoints in component and unit settings. You modify these settings to require verification for a component or unit. For more information, see Require Verification for a Component or Require Verification for a Unit.
11.4.2.3. Set an Assessment to Require Verification
After you create a verification checkpoint in an assessment, you set the components and units in that assessment to require verification.
When a component or unit requires verification, the content in that component or unit is invisible to learners until the learners pass the verification checkpoint that you select. If you want to include text that learners can see regardless of verification status, you can leave some components and units visible.
To require verification, you select the verification checkpoint in the settings of the component or unit. By default, components and units do not require verification and are visible to learners. To leave them visible, do not select a verification checkpoint in the component or unit settings.
When you set a component or unit to require verification, keep the following information in mind.
- If you set an entire unit to require verification, all of the components in that unit are invisible until learners complete verification. You cannot make an individual component visible.
- If you do not set a unit to require verification, all of the components in that unit are visible by default. However, you can set individual components to require verification.
Important
Do not set the unit that contains the verification checkpoint component, or the verification component itself, to require verification. If you do this, learners cannot access the verification checkpoint.
For an example situation in which a unit contains three components, with one component that requires verification, see Understand the Learner Experience.
11.4.2.3.1. Require Verification for a Component
To set a component to require verification, access the component visibility settings for the component, and then select the verification checkpoint that you want from the list.
Important
Do not set the verification checkpoint component itself to require verification. If you do this, learners cannot access the verification checkpoint.
On the unit page, locate the component that you want, and then select Visibility Settings for that component. The Visibility Settings control resembles an eye.
Under Make visible to, select Specific Content Groups, and then select the verification checkpoint that you want.

Select Save.
11.4.2.3.2. Require Verification for a Unit
To set a unit to require verification, access the unit settings, and then select the verification checkpoint that you want from the list.
Important
Do not set the unit that contains the verification checkpoint to require verification. If you do this, learners cannot access any of the content in the unit, including the verification checkpoint.
On the Course Outline page, locate the unit that you want, and then select Configure for that unit. The Configure control resembles a gear.
Under Verification Checkpoint, select the name of the verification checkpoint that you want.
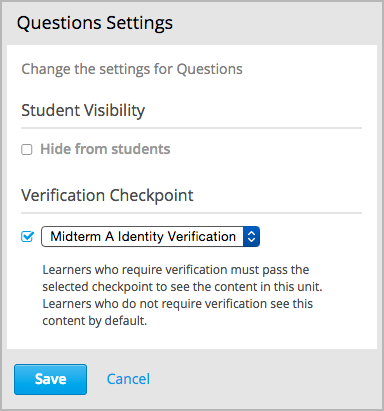
Select Save.
11.4.2.4. Understand the Learner Experience
The following example explains how to require verification for an assessment, and then shows the learner view of the first unit before and after verification.
11.4.2.4.1. Example Assessment: Course Team Steps
In your assessment, you want the first unit to contain some introductory text, the verification checkpoint, and an exam problem. You want the introductory text to be visible to all learners, regardless of verification. However, you do not want learners to see the exam problem until they pass the verification checkpoint.
You want all of the components in the remaining units to be invisible until learners pass the verification checkpoint.
To create this assessment, you would follow these steps.
- Create a new unit. Do not change the unit settings.
- Create one component for the introductory text, and enter your text in the component.
- Below the introductory text component, create the verification checkpoint component.
- Below the verification checkpoint component, create a component for the problem, and enter the content for the component.
- Change the settings of the problem component to require verification. Do not change the settings of the other components.
- Create the remaining units and components. Change the settings of each remaining unit to require identity verification. You do not have to change the settings of the individual components in any of these units.
11.4.2.4.2. Example Assessment: Learner View
When learners arrive at the assessment in the course, the introductory text and the verification checkpoint are visible. The assessment content in the third component in the unit is not visible.

After learners pass the checkpoint, a message indicates that they can now access assessment content, and the assessment content is visible.
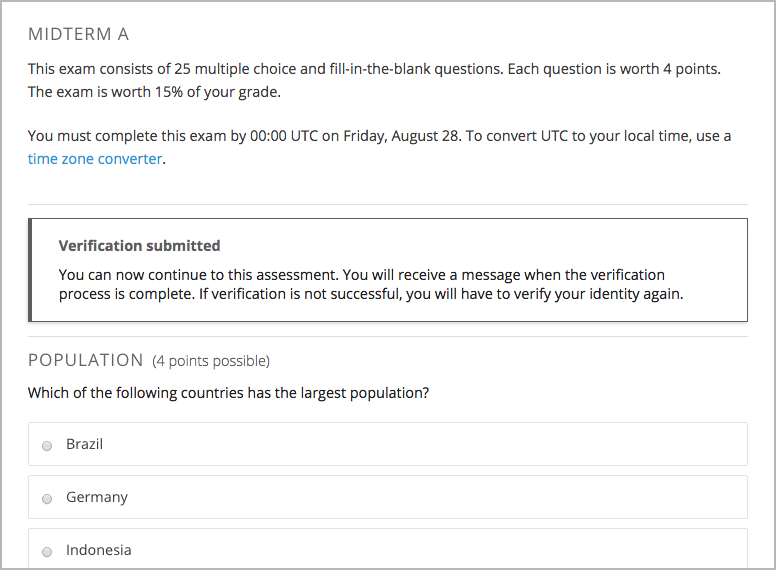
When learners who do not have to complete in-course identity reverification arrive at a checkpoint, the learners receive an informative message about identity verification and verified certificates. They can immediately access assessment content.
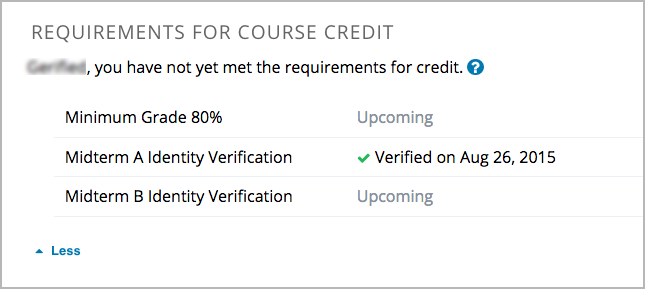
Additionally, learners who must complete in-course reverification see the verification checkpoints for their course in the list of course credit requirements on their Progress pages.
For more information about the in-course identity reverification experience for the learner, see In-Course Identity Reverification.