| Red Hat Docs > Manuals > EDK Manuals > |

As mentioned in Getting Started, the Red Hat Embedded DevKit is a toolkit that helps you develop programs for embedded systems. Once working, the application can then be downloaded to a target board or other embedded system. This toolkit provides a quicker way to progress through the edit-compile-download-debug cycle. After the configuration and project files are set up, you can repeat the cycle as many times as necessary, without having to recreate the configuration file.
The DHCP, TFTP, and NFS servers must be configured, your target board set up, and the embedded kernel and target filesystem template built before setting your EDK Preferences. See "Installing Red Hat Embedded DevKit" in Getting Started for more information.
There are five steps to using the Red Hat EDK:
Use the EDK Preferences window to specify the Red Hat EDK-specific parameters. From the Symbol Browser, in the File menu, select EDK Preferences. After setting your project parameters, click OK to update the project with the current settings.
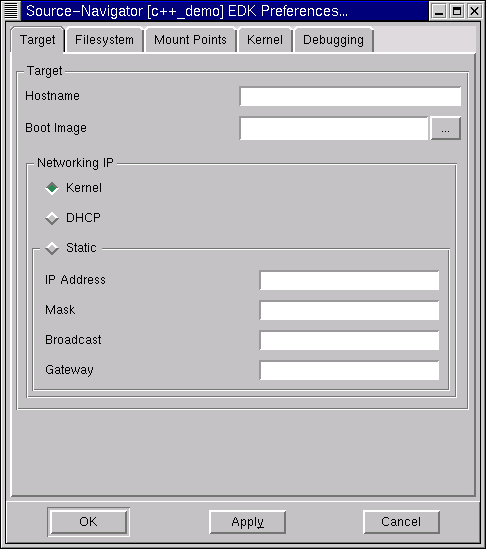
The Target tab lets you input information specific to the target board.
Hostname
Enter the host name of the target board, such as
tuxedo,
tuxedo.company.com, or an IP address.
Boot Image
This is the filename of the boot image loaded by the target board when it boots. Enter the filename where the IDE will place the boot image. This must match the boot filename you entered in the
/etc/dhcpd.conf file. The boot filename is provided to the target board by the
DHCP
server.
Select the type of IP address assignment your target board will use. You can choose between either dynamic IP assignment or a static IP address. With dynamic IP assignment, you have a choice between kernel-based (built-in BOOTP) or DHCP IP resolution. If you choose dynamic IP assignment, you must have a DHCP server running. Do not use a Microsoft Windows NT® DHCP server if you want to use the kernel-based option, as it does not support the BOOTP protocol. See "Setting Up Servers on the Host" in Getting Started for instructions on installing the Linux DHCP server (dhcpd).
Kernel
Choose this option if you are using the kernel to acquire the IP address during bootup. This option requires that the Linux kernel be configured with
BOOTP
support. This option is selected by default.
DHCP
Choose this option if you are using
DHCP
to acquire the IP address.
Static
Choose this option when the IP address will not change. If you do not know any of this information, see your system administrator.
IP Address
Enter the numeric IP address for the target board.
Mask
Enter the numeric address mask for the target board.
Broadcast
Enter the numeric broadcast address for the target board.
Gateway
Optionally enter the numeric IP address of the default gateway to forward packets to other subnets. If the target board only needs to communicate with host on the same network, leave this field blank.
The Filesystem tab lets you select what type of filesystem will be used by your application.
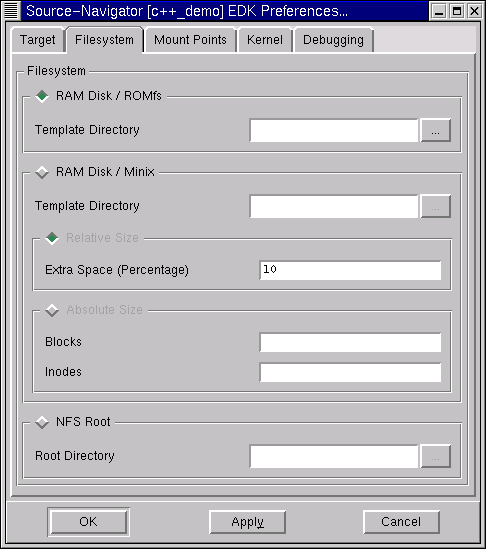
Some applications do not require permanent storage; these systems use a RAM Disk, or virtual disk, filesystem. Other systems do require permanent storage, these systems use an NFS Root filesystem, which accesses files stored on a file server via a network.
RAM Disk is a virtual disk, such as an emulated disk drive, on the target board. Use RAM Disk as your filesystem only if you have sufficient RAM to hold the kernel, the running application, and the RAM Disk. If you choose this option, the target board must be rebooted each time the program is rebuilt.
Since all data resides in memory, it should not be necessary to create temporary files. For this reason, a read-only filesystem, RAM Disk/ROMfs, is ideal for RAM Disk usage. However, if you need to create temporary files on the filesystem, such as for exchanging data between applications, you can use a read-write filesystem (RAM Disk/Minix) instead. The default RAM Disk/Minix setting allows an additional 10% for files and disk space in the image. It is possible to change this allocated size through the Extra Space (Percentage) field.
This option is selected by default.
Template Directory
Enter the path to the RAM Disk/ROMfs directory. The path must specify the root directory to use for creating an image of your filesystem in RAM.
You can do this by either typing the directory path or clicking the "..." button. If you click the "..." button, the Open dialog appears. Select the template directory location.
Template Directory
Enter the path to the RAM Disk/Minix directory. The path must specify the root directory to use for creating an image of your filesystem in RAM.
You can do this by either typing the directory path or clicking the "..." button. If you click the "..." button, the Open dialog appears. Select the template directory location.
Extra Space (Percentage)
Enter the additional disk space to allocate for the system, expressed as a percentage of disk space allocated for your template directory. The default is 10 percent.
Absolute Size
Select this option to specify the exact size for the RAM Disk image.
Blocks
Enter the number of blocks to create in the RAM Disk image.
Inodes
Enter the number of inodes to create in the RAM Disk image.
NFS Root allows access to files stored on the network. Use NFS Root as your filesystem if you have a large application, limited RAM, or require data persistence. If you choose this option, the target board must be rebooted each time the program is downloaded. For information on setting up NFS Root, see "Setting Up Servers on the Host" in Getting Started.
Root Directory
Enter the path to the NFS Root directory. The path must specify the directory to be accessed over the network by the target board.
You can do this by either typing the directory path or clicking the "..." button. If you click the "..." button, the Open dialog appears. Select the directory where the NFS Root is located. Click OK to select the directory and close the dialog.
The Mount Points tab allows you to configure mount point information. See man fstab for syntax and description information.
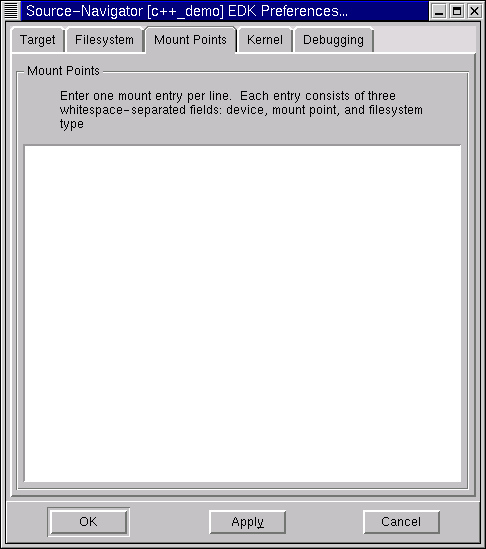
Mount Points
Enter the mount point specifications using the following convention:
<device> <mount point> <filesystem type>
none /proc proc
none /dev/pts devpts
/dev/cdrom /cdrom iso9660
The Kernel tab allows you to specify paths and options for the kernel.
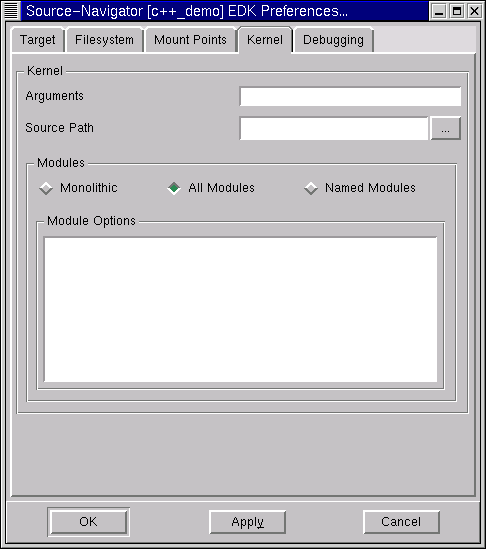
See "Creating a Target Filesystem Image" in Getting Started for information on building the kernel.
Arguments
Enter the arguments to pass to the kernel, such as
init=/sbin/init. See
man bootparam
for a description of the syntax and available options.
It is not necessary to add arguments when using the default EDK Preferences configuration.
Source Path
Enter the directory for the Linux kernel source tree. The Red Hat EDK uses this path to find the kernel image (zImage) and the modules, if any, to be used.
To specify the directory, either enter the name of the directory or click the "..." button. If you click the "..." button, the Open dialog appears. Select the top-level directory of the kernel sources. Click OK to select the directory and close the dialog. The directory appears in the Source Path field.
This section allows you to specify module information.
Monolithic
Select this option when the kernel has been configured without modules. This means that no modules will be copied to the target board filesystem.
All Modules
Install all of the built kernel modules on the target board filesystem. This option is selected by default.
When this option is selected, make modules_install is invoked in the kernel directory. This make rule fails if the kernel has not been configured with module support (as is the case with the PowerPC configuration). If this happens, select the Monolithic option instead.
Named Modules
Add only specified modules. This provides greater control of which modules are copied to the target board filesystem.
Module Options
Enter additional modules or module arguments. These modules must be located in the
specified source path. The format for this field is
<module name
>,<options>. Examples are
For more information on module options, refer to your driver sources documentation.
If All Modules is selected, you should list only modules requiring options to be passed to them.
If Named Modules is used, only the modules listed in this field are installed on the target board's filesystem.
The Debugging tab allows you to set up your debugging process.
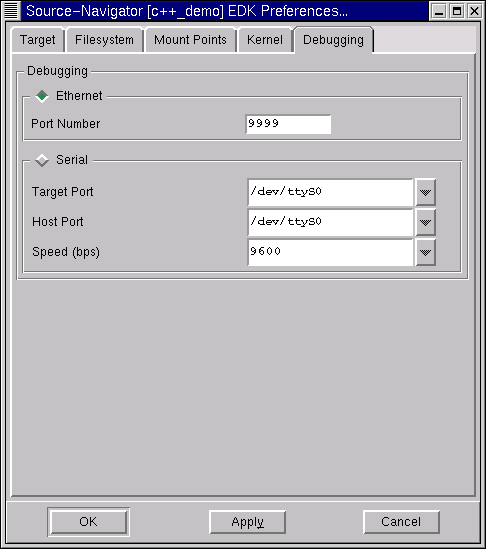
Ethernet
This option is selected by default as it provides faster debugging than possible with serial. Select this option if you are using a network connection to debug your application on a target board.
Port Number
Enter the Ethernet TCP/IP port number on which the
gdbserver
should listen for
gdb
to connect.
Serial
Select this option if you are using a serial port connection to debug your application on a target board.
Target Port
Use the combo-box to select the serial port on the target board.
Host Port
Use the combo-box to select the host serial port.
Speed (bps)
Use the combo-box to select the speed of the serial connection. The default is 9600 bits per second.
After configuring the EDK Preferences, you may need to edit your source code.
From the Symbol Browser, double-click the name of the file to edit.
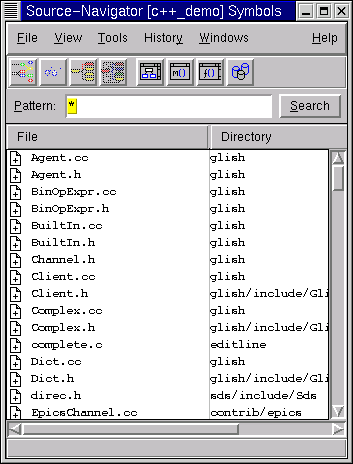
The Editor window opens. After editing the file, save your changes (from the File menu select Save). For more information on the Editor, see Editor.
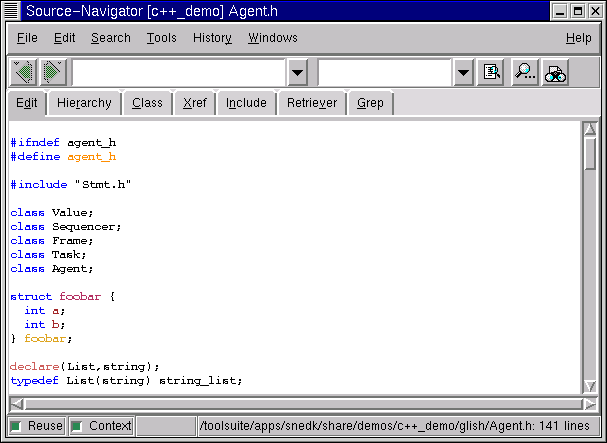
After entering the EDK Preferences and editing any source files, you must create a build target before creating an executable application. Build targets specify how the final binary is to be created. You can create, execute, download and debug build targets for either native or embedded targets. See Building Programs for information on creating build targets.
|
| ||
|---|---|---|