| Red Hat Docs > Manuals > EDK Manuals > |

Red Hat Embedded DevKit allows you to build executable programs from the files in your project. Using Source-Navigator, you can compile your code, navigate to any errors, link your code, and, with the Insight debugger, set up a debugging session to debug your code.
The compiler, make, and the Insight debugger must be installed on your machine before using these features.
The building process compiles and links source files, such as libraries and executable files, to produce an output binary file.
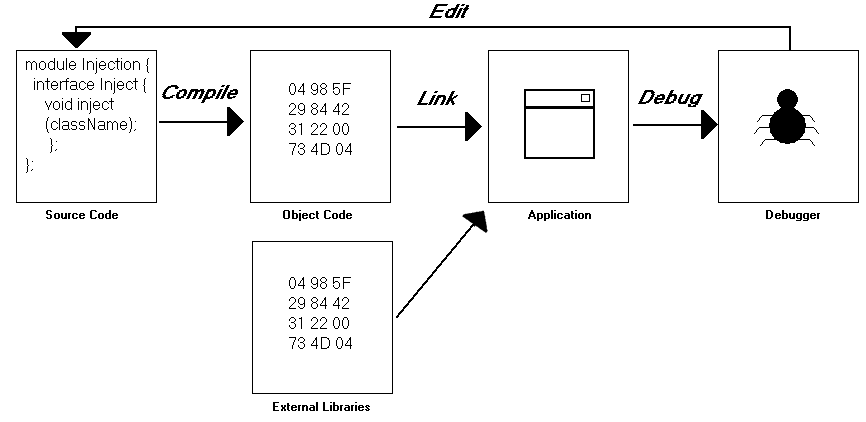
There are four steps to building your program:
compiling your source into an intermediate format, called object files,
linking your object files together to produce an executable application, and
The minimum requirements for building source code include specifying which source files should be included, the directory in which the build should be stored, linking rules, debugging, and optimization flags, and included paths.
You can edit your code using Source-Navigator. This chapter explains compiling and linking. For information about the Insight debugger, see "Working with Insight, the Debugger Interface" in Getting Started.
Source-Navigator uses a utility called make. make combines a set of rules for compiling and linking code with a tracking mechanism for determining which files must be compiled.
Source-Navigator generates a makefile, which make uses to determine which commands need to be executed in order to build your program.
A build target is a conceptual object that contains information needed to compile and link a project. For example, hello.c is converted into hello.o before hello is built. To produce the hello executable, the hello.o object file is linked with any required libraries.
The first time you select Build Settings, the Build Targets list is empty. After you create a build target, its name appears in the list.
From the Tools menu, select Build Settings to start the Build Settings dialog.
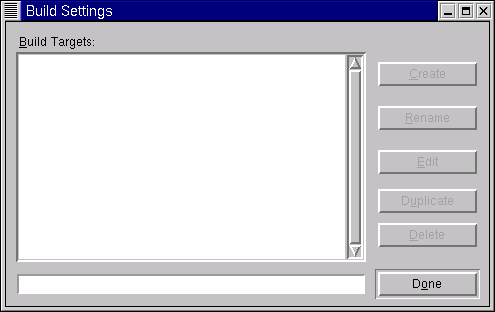
Enter the name of the build target in the text entry box and click the Create button. The Edit Target dialog opens. See Editing a Target.
Rename a build target by selecting the target, entering a new name, and clicking the Rename button.
Do not highlight the target name in the text box or a new target name is created instead of it being renamed.
To edit an existing build target, select the target and click the Edit button.
Duplicating a build target is useful when a new target is only slightly different from an existing target. To duplicate an existing build target, select the target in the Build Targets list and click the Duplicate button.
Delete a build target by selecting it in the Build Targets list and click the Delete button. The target is removed from the listing.
In the Build Targets list, either select the target name and click the Edit button or double-click the target name. The Edit Target dialog opens.

The Build Directory, Target Type, and Tool Chain combo-boxes are common to the tabs accessed in the Edit Target dialog.
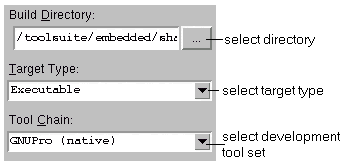
These store information about the build target.
This is the directory where all files generated in the build process are initially stored. By default this is blank. If this is left blank, then the project directory is used. To specify the directory, either type the directory path or click the "..." button. If you click the "..." button, the Open dialog opens:
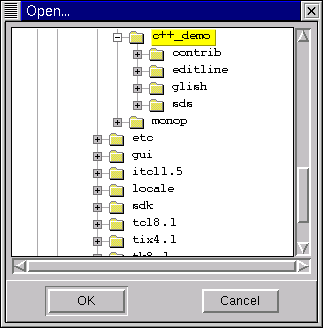
Select the directory in which to store the intermediate files. Click OK to close the dialog. The directory appears in the Build Directory field.
Use this combo-box to select the type of build target to create. The options are Executable and Library.
A tool chain is a set of compilers, debuggers, and linkers. The options are GNUPro (native), GNUPro (PowerPC linux), and GNUPro (Embedded x86 linux).
The Source Files tab controls which source files are included in your build target. The Project Files and Target Files sections contain tree information for the selected build target.

To add files to the Target Files list:
To remove files from the Target Files section, select the files to remove and click the Clear button. To remove all of the files from the Target Files section, click the Clear All button.
To import files or directories into your currently active project:
Most libraries required for building targets are linked in automatically by the compiler/linker. If you know that your target requires additional libraries, use the Library Files tab to add them to your build.
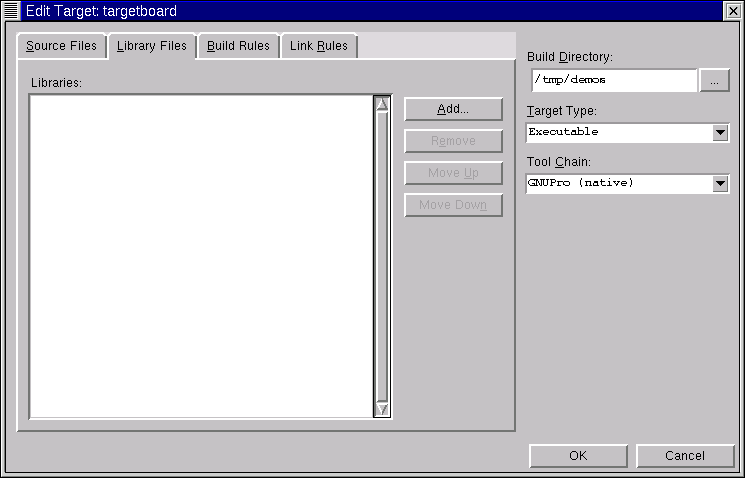
Add additional libraries by clicking the Add button. The Open dialog opens to the last directory you have looked at in this project. After you select a library and click the Open button, it appears in the library list.
To remove a library from the listing, select the library and click the Remove button. The library is removed from the build.
Libraries are linked in the order listed in the dialog. To change the order of libraries, select the library and click either the Move Up or Move Down button to change its linking order.
Click the Build Rules tab to configure each rule in the build target.
A rule contains information required to compile files in a project. For example, a rule to compile a C file might contain information about which compiler and flags to use, as well as what the file is called after it's compiled.
This tab lists the rules for the specified build target. Within the Build Rules tab, you can:
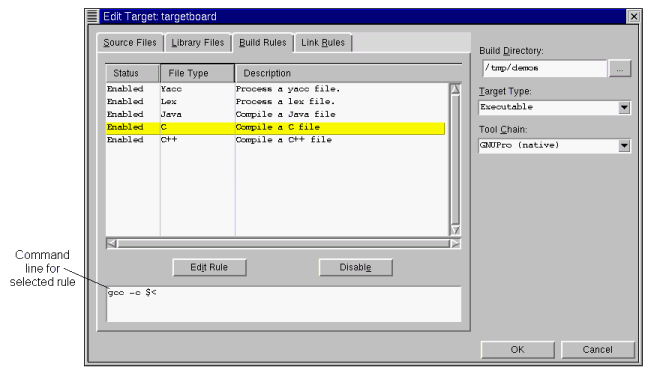
This column shows the currently enabled and disabled rules. To disable a rule, highlight the rule and click the Disable button. To enable a rule, highlight the rule and click the Enable button.
This button changes between Disable and Enable depending upon the state of the rule.
This column displays the type of file the rule acts upon.
This column displays a description of the rule.
To edit a rule, select the rule from the rule listing. Click the Edit Rule button. The Build Rule Settings dialog opens. The dialog title bar displays the extension for the files involved.
The Settings tab allows you to change the default settings for the rule.
Build Rule Settings with Options Selected
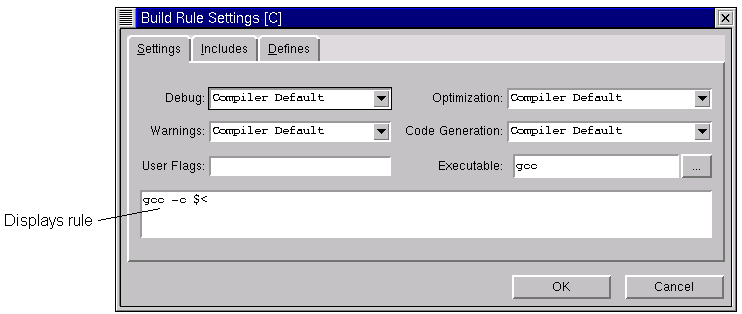
Debug:
This controls the debug information generated by the compiler.
Warnings:
Controls the level of warnings the compiler generates. A stricter warning ensures fewer problems with future compatibility. Set "Warnings as Errors" to make sure the compile stops any time a warning is generated.
User flags:
Enter flags not covered by the options listed in this screen. To add macros, see Defines tab.
Optimization:
Compiler optimization for the code.
Code Generation:
Processor or code control specific optimizations of settings.
Executable:
Selects the executable to use. To change the tool (such as compiler) location, either enter the location path or
click the "..." button to choose the tool binary to use.
Sometimes files include other files. In C this is done with the #include statement. The Includes tab allows you to change the included paths for the rule.
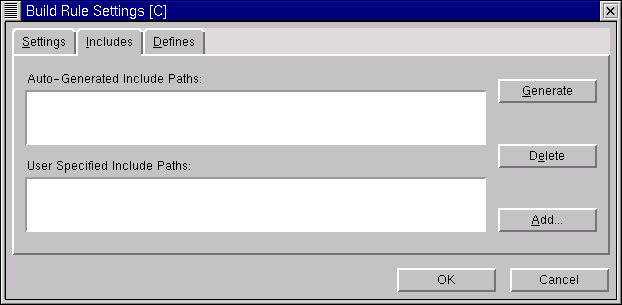
The Auto-Generated Include Paths list displays paths generated from the Source-Navigator database.
Click the Generate button to generate a list of Source-Navigator included paths. These appear in the Auto-Generated Include Paths list.
To add additional paths, click the Add button. The selected paths appear in the User Specified Include Paths list. You can delete paths by highlighting the path and clicking the Delete button.
The Defines tab enables you to view, edit, and create new macro definitions.
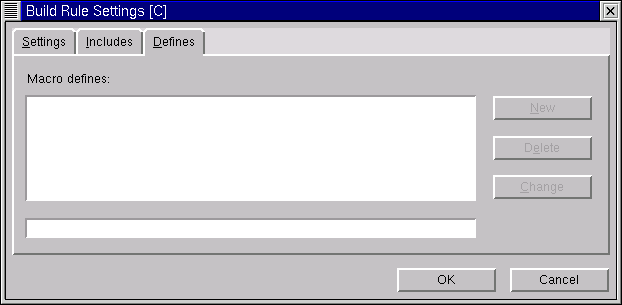
To create a new macro, enter the name and definition in the text entry box and click the New button.
To change the current macro definition, select the macro from the Macro defines list. The macro appears in the text entry box.
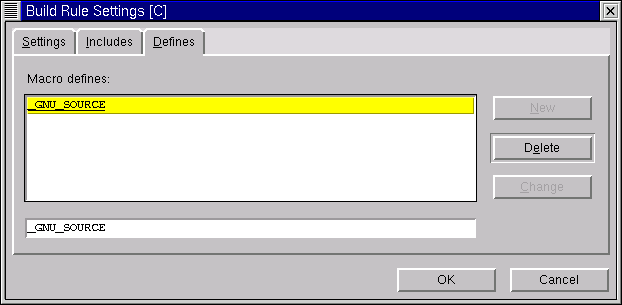
Make the necessary modifications to the macro.
To create a new macro, click the New button. The new macro appears in the listing.
To update the macro, click the Change button. The modified macro appears in the listing.
To delete a macro, select it from the Macro defines list and click the Delete button. The macro is removed from the listing.
The Link Rules tab allows you to specify the program to execute and the name of the final output file.
Link Rules Tab of the Build Targets Menu
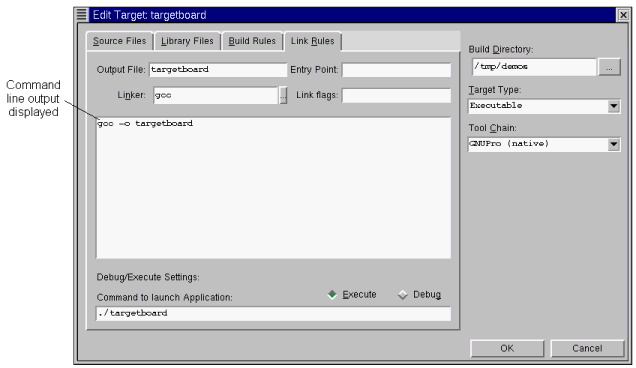
Output File:
The name of the final output file.
Linker:
Auto-detects the type of project. Click the "..." button to select another linker.
Entry Point:
This is the first function executed for the application. Default is
main(). In Java, you must specify the name of the class that defines
main().
Link flags:
Displays the full link command line and allows you to add flags, but you cannot edit existing links or flags.
Debug/Execute Settings:
Controls the mode for the rule.
Execute
allows running the program from the
Build
window.
Debug
allows starting the Insight debugger from the
Build
window. See Debugging the build target for more information on debugging your program.
Command to launch Application:
This field lists the name of the binary to execute or debug. The default name is the file listed in
Output File. If you changed the default output file, you also need to change the name here.
Click the OK button to close the Edit Target dialog. Click the Done button to close the Build Settings dialog.
After you have created and configured a build target, you must build it.
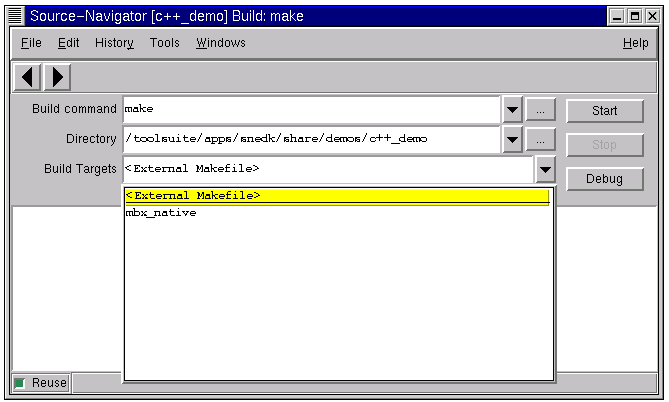
Source-Navigator can generate its own makefiles or work with one that you supply.
To build your project using the Source-Navigator build system:

If no errors appear, the build target is compiled and ready to be executed. See Executing the application to download the application to the target board.
To build using your own makefile:
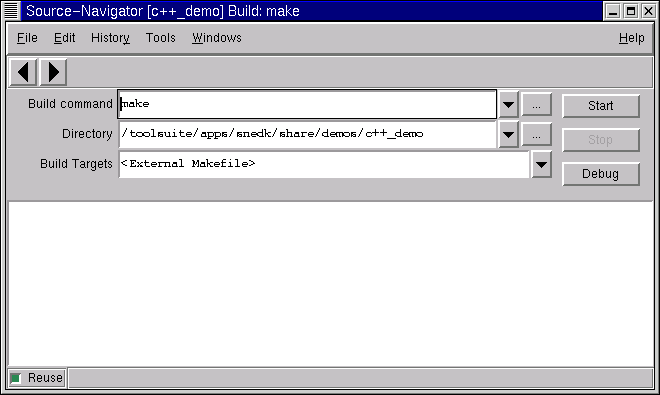
If you require additional flags or a different make program, from the File menu, select Project Preferences and select the Others tab. Enter the additional flags or make program into the Build field (see Others Tab of the Preferences Dialog.).
If no errors appear, the build target is compiled and ready to be executed. See Executing the application to download the application to the target board.
If errors appear in the Build window, the source code must be modified before the build is downloaded to the target board.
Double-clicking a line with a compiler error message activates the Editor with the cursor positioned on the line of code where the error appears. Right-clicking in the output window allows you to save the build output to a file.
From the Windows menu, select Add View -> Build to add a Build window to an Editor window.

To save and recompile the modified files, press the Start button. The Fast Save dialog box appears asking if you want to perform a fast save. Click the Yes button to save the changes and rebuild. Click the No button to discard changes and perform a rebuild. Clicking the Cancel button closes the dialog without rebuilding the program.
When the build is completed, Source-Navigator saves the executable using the name specified in the Link Rules tab. If a name is not specified, the file name will be the target name. The compiled file is saved in the build directory.
The Tools menu in the Build window lists the types of builds you can perform. Before selecting an option from this menu, ensure that a build target has been selected.
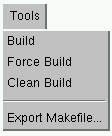
Build
Rebuilds only the modified files. This is the same as clicking the
Start
button in the
Build Targets
window.
Force Build
Rebuilds the modified files in the project and ignores errors,
Clean Build
Removes the object files and executables.
Export Makefile
Saves your build target as a
makefile for external use.
If you selected Debug from the Link Rules tab in the Edit Target dialog, you will use Insight to debug your code.

For more information on the Insight debugger, see "Working with Insight, the Debugger Interface" in Getting Started.
After debugging and fixing your build target, you must change the build target from debug to execute in order to run the application.
Once the application compiles without errors, from the Build window, click the Run button to execute the application.
Once the application compiles without errors, you must download it to the target board.
|
| ||
|---|---|---|