| Red Hat Docs > Manuals > EDK Manuals > |

This chapter describes how to customize Source-Navigator to reflect your preferences.
Use the Preferences dialog to specify project-specific parameters. In the Symbol Browser, from the File menu, select Project -> Project Preferences and enter your changes in the dialog. After changing any parameters in this dialog, click OK to update the project with the current settings.
Default values may be transferred from the previously created project, some options take effect only in new windows, and some options only take effect the next time the project is opened.
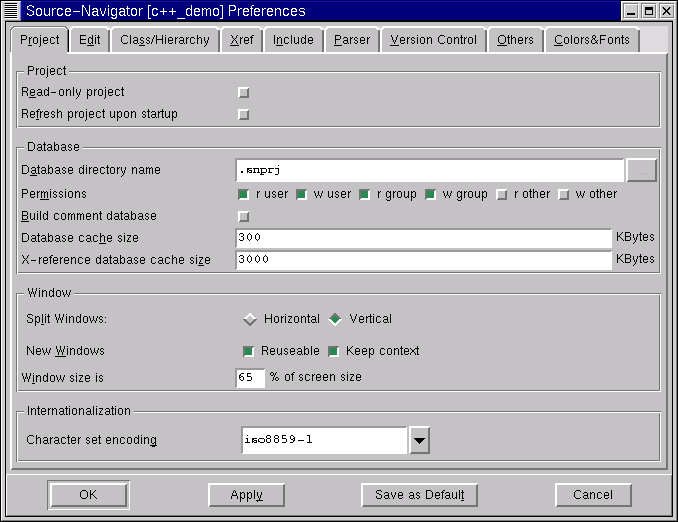
Project Tab of the Preferences Dialog
Descriptions of the general Preferences tabs (Project, Parser, Others, and Colors & Fonts) are included in this section. The following tabs are discussed in the relevant chapters:
Edit
see Editor Preferences.
Class/Hierarchy
see Class/Hierarchy Preferences.
Xref
see Cross-Reference Preferences.
Include
see Include Preferences.
Version Control
see Version Control Preferences.
Read-only project
Select this if the project should be read-only. Default is off.
Refresh project upon startup
Select this when files are likely to be changed by other developers, or when you
want to be sure that your database is in sync with your sources when you start.
Default is off. Changing this to on may cause delays when opening your project. For large source bases that are relatively stable, or where network latency is a problem, set this to off and periodically, from the Tools menu, select Refresh Project to resync the database with the source.
Database directory name
Source-Navigator creates all database files under this directory. If the directory already exists, you will need read and write permissions for it. If you're creating a new directory, you will need permission to create it.
The file system for this directory must contain free disk space equal to the size of the source base without cross-references, and up to about ten times the size of the source code if you choose to generate cross-references. If you don't have the necessary permissions (for example, if it is a read-only file system), or if there is insufficient free disk space in your first choice of location, you may create your project directory in another location on your network by entering a directory name with its absolute path.
This option can be changed only when creating a project.
Permissions
These buttons control the read-write permissions for your project: the first set controls access for the creator of the file, the second set for the group, and the third for "others" (everyone else on the network).
Build comment database
Select this to store comment strings in the database. Default is off.
Database cache size
Caches improve performance by using memory (fast) instead of disk (slow) where possible. Larger cache sizes increase the likelihood that data will be found in memory rather than on disk, though overallocating caches has the opposite effect. The operating system will swap the cache to disk and the system will get dramatically slower. The cache defaults are generous for most projects; don't increase them without a reason.
This option can be changed only when creating a project.
Enter the database cache size (in kilobytes) or accept the default value. Source-Navigator creates the project database (in the background) with the specified cache size. Increasing this amount speeds up project creation and data access, but requires that more memory be allocated to Source-Navigator.
The recommended maximum is the amount of free RAM divided by 16, up to a maximum of 4 MB. The total of this amount plus the amount allocated to the cross-reference database cache should not exceed one quarter of the total memory.
X-reference (Cross-Reference) database cache size
Enter the Cross-Reference database cache size in kilobytes or accept the default value. Source-Navigator creates the project cross-reference database with this cache size. Increasing this amount speeds up cross-reference creation and data access but requires that more memory be allocated to Source-Navigator.
This option can be changed only when creating a project.
The recommended maximum size is the amount of system memory divided by 32, up to 8 MB. The total of this amount plus the amount allocated to the database cache should not exceed one quarter of the total memory.
Split Windows:
These buttons control where new views appear when you add a view to an existing window (from the
Windows
menu, select
Add View).
Select Horizontal to have new views appear to the right of the current pane; select Vertical to have new views appear below the current pane.
New Windows
Selecting
Reusable
causes new information to appear in the current window; deselecting it causes a new window to appear when you choose a new symbol, tool, or view.
Selecting Keep Context causes new tool windows to be opened to the same symbol context as the current window; deselecting it causes a new tool to be empty when opened.
Window size is
This setting controls the size of newly-created Source-Navigator windows. You may also resize the windows after they're created.
Character set encoding
This combo-box allows you to choose the character set encoding for your project to match the character set of your source files.
The default character set for English, German, and most other European languages is ISO8859-1. For Japanese, the default character set is Shift-JIS.
Source-Navigator uses plug-in parsers to parse multiple programming languages. Choosing the appropriate parser is based on file extensions.
Parser Tab of the Preferences Dialog

Source-Navigator is pre-configured for the most commonly used file types; these can be changed and new parsers can be added.
|
*.[hHcC] *.[ch]xx *.[ch]pp *.cc *.hh *.[CH]XX *.[CH]PP *.CC *.HH |
|
After each of the languages is an External Editor text box; you may type in the executable (shell) command for an external editor, or you may click the "..." button to browse. If you leave the text box blank, Source-Navigator uses its built-in editor.
Macros make the task of source code analysis more complicated, and there is no single right way to handle them. By default, Source-Navigator treats them as opaque symbols and, aside from recording where they are defined, it ignores them completely. This behavior not only makes parsing substantially faster than true compilation, but it also preserves the layer of source code abstraction that is presented in the Editor. This behavior is particularly useful when maintaining software that must run on multiple platforms, and you would like to see all of the impacts that a change might have, regardless of a macro's platform definition.
For some projects and/or tasks, this layer of abstraction is a barrier to code comprehension. For these cases, you can direct Source-Navigator to define and expand macros in one of four ways:
define
define
is used to insert a symbol into Source-Navigator's preprocessor namespace. If you
define FOO
(or
#define FOO, the leading
#
is optional), then conditionals that test
#ifdef/#ifndef
are scanned according to the
#ifdef/#ifndef
test.
FOO
will be replaced with the empty string.
define can also be used to give a symbol a value (such as define FOO BAR). This will not only inject the symbol into the namespace, but will cause Source-Navigator to scan BAR whenever it sees the FOO macro. This is particularly useful for DEFUN or PROTO macros that are used to bridge between K&R and ANSI C but which otherwise are not interesting at the source code comprehension level. It is also useful when macros test numerical results, such as #if (X >= Y) or #if X.
define macros can take arguments, just as in C and C++, and they can expand recursively (i.e., FOO might expand to BAR (5) which might then expand to mumble (5, 5, 0); in this case Source-Navigator would only see mumble (5, 5, 0)).
replace
replace
is just like
define, except that the symbol is not injected into the namespace. Thus, if you want to expand macros, but not have conditional code compiled away, use
replace.
delete
Source-Navigator lets you use more than one macro file in a project. You can specify a macro in one file and then delete it from the preprocessor namespace using
delete
in a second macro file.
undef
undef
doesn't do any substitution, it just affects the evaluation of
#if,
#ifdef, and
#ifndef
statements.
The macro processor does not support include, token concatenation, ANSI stringification, or other pre-processor directives. These may be implemented in a future release.
As explained above, Source-Navigator parses, but does not interpret, macro definitions in your project files. It only interprets macro definitions from files you specify explicitly in the parser preferences of your project. Because multiple files may be specified, you may want to organize your macro files according to global, per-user, and per-project divisions. This order is important, because Source-Navigator uses the last encountered definition for the macro.
Macro files are ASCII files and every non-blank line is a macro directive. Leading blanks and # characters are stripped, and if the first character of a line is an apostrophe ( ' ), the line is treated as a comment. The macro file can contain continuation lines, for example:
define ABC\
   \
   5
Otherwise, the directives are interpreted as documented above.
Others Tab of the Preferences Dialog
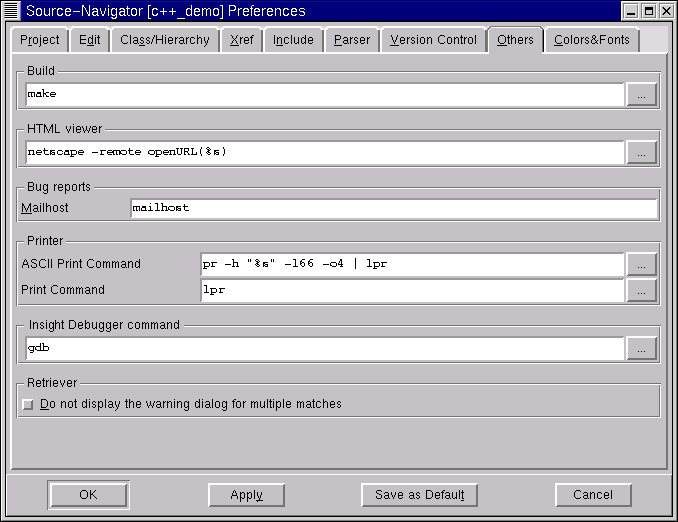
Build
Enter the executable (shell) command used to start your
make
system.
HTML viewer
Enter the HTML viewer to display online help. From
Help, select
Online Manuals
to open the viewer, which must be included in your path.
Mailhost
Source-Navigator supports sending bug report emails by SMTP. Enter the name of your SMTP mail server in this field.
ASCII Print Command
Enter the command you use when printing a source file from the command line.
Print Command
Enter the print command appropriate for your system. For example, Linux-based systems use
lpr.
Enter the executable (shell) command to start Insight, which is usually gdb.
Do not display the warning dialog for multiple matches
Select this if you don't want to be warned when the
Retriever
finds more than one symbol with the name you're searching for. See Retriever for more information about the
Retriever.
Source-Navigator assigns a different default color to each component of your source code. To customize these colors or choose different fonts, click the Colors & Fonts tab of the Preferences dialog.
Colors & Fonts Tab of the Preferences Dialog
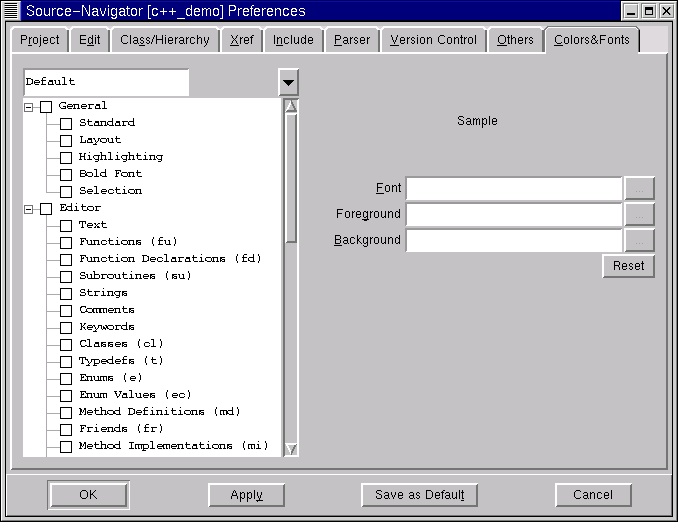
From the list of components, choose the item you want to change. The current settings appear in the Font, Foreground, and Background text boxes, and the word "Sample" displays the text with these settings.
Click the "..." button at the end of the Font text entry box. The Choose Font dialog appears:
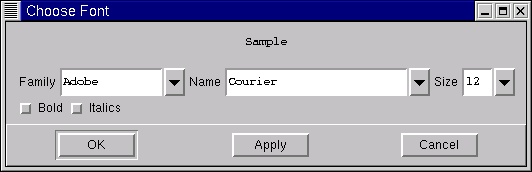
Choose the Family, Name, and Size of font that you would like, as well as Bold or Italics, if you want to use those properties. Click the Apply button to see the effect of your changes and, when you are satisfied, click OK. Your changes take effect the next time you start Source-Navigator.
You may want to change the Foreground or Background colors from their default settings if they do not show up well on your laptop or CRT display, or if your code colorization conventions do not match Source-Navigator's default colors.
To choose a different color for any component, you must set new RGB (Red-Green-Blue) values. Click the Foreground or Background "..." button. The Choose Color dialog appears.
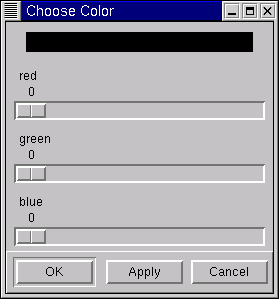
Move the red, green, and blue sliders until the color you want appears in the box at the top of the dialog. Click the Apply button to see how your text or background looks with the new color. If you are satisfied, click OK. Your changes take effect the next time you start Source-Navigator.
|
| ||
|---|---|---|