Table of Contents
MySQL Workbench is available for Windows, Linux, and OS X.
Binary distributions of MySQL Workbench are available for the preceding
platforms. Source code distributions are also available as a
tar.gz package, or an RPM package.
MySQL Workbench downloads are available at http://dev.mysql.com/downloads/workbench/.
The following sections explain the installation process for each of these platforms.
MySQL Workbench is available on a number of operating systems and platforms. For information about those platforms that are officially supported, see http://www.mysql.com/support/supportedplatforms/workbench.html on the MySQL Web site.
General requirements and considerations that apply to all operating systems.
MySQL server: Although it is not required, MySQL Workbench is designed to have either a remote or local MySQL server connection. For additional information about connecting to a MySQL server, see Chapter 5, MySQL Connections. For additional information about installing a MySQL server, see Installing and Upgrading MySQL.
Data modeling does not require a MySQL server connection.
Simultaneous client connections: Opening a MySQL connection from the MySQL Workbench home page opens a new connection tab in MySQL Workbench for that connection. Each of these tabs requires two MySQL connections to perform basic tasks, such schema discovery and SQL execution. Additionally, performing management related tasks, such as Server Status, requires two additional MySQL connections. Essentially, this means that each MySQL connection tab in MySQL Workbench requires four available connections to MySQL. For additional information about "Too many connection" related errors, see Too many connections.
This connection requirement doubles with each connection tab opened in MySQL Workbench, even if the two connection tabs point to the same MySQL server. SQL editor tabs share their connections, so having multiple SQL editor and SQL results tabs does not affect the number of required connections.
On startup, the application checks the OpenGL version and chooses between software and hardware rendering. To determine which rendering method is being used, open the menu and choose the item.
The requirements for Linux are embedded within their respective packages. Use the platform specific tool (for example, yum or apt) to install the package and their dependencies.
The "Save password in keychain" functionality requires
gnome-keyringto store the passwords. Note that on KDE systems, thegnome-keyringdaemon is not started by default.For Linux and OS X, the MySQL server administration features require sudo privileges to execute several commands. The sudo user must be capable of executing the following system commands:
/usr/bin/sudo
/usr/bin/nohup
/usr/bin/uptime
/usr/bin/which
/usr/bin/stat

/bin/bash
/bin/mkdir
/bin/rm
/bin/rmdir
/bin/dd
/bin/cp
/bin/ls
Additionally, the sudo user must keep the
HOMEenvironment variable when executing system commands, which means adding the following to/etc/sudoers:env_keep +="HOME"
For MySQL Workbench to execute MySQL Enterprise Backup commands, the sudo user must also be able to execute the MySQL Enterprise Backup binary.
In addition to platform-specific command-line options, MySQL Workbench has the following command-line options:
On Microsoft Windows, the command-line options contain one
leading dash instead of two. For example, use
-log-level for Microsoft Windows and
--log-level for Linux and OS X.
--log-levellevel: Controls the verbosity level for logging output from Workbench.With increasingly levels of verbosity, the valid values for
levelare: error, warning, info, debug1, debug2, and debug3.The location of the generated log files, such as
wb.log, are as follows:Table 2.1 The default location of generated MySQL Workbench log files
Platform Default location Linux ~/.mysql/workbench/log/OS X ~/Library/Application Support/Workbench/log/Microsoft Windows C:\Users\user_nameAppData\Roaming\MySQL\Workbench\log\--admin: Open an administration tab to the named MySQL instance.instance--upgrade-mysql-dbs: Open the Migration Wizard tab.--migration: Open the Migration Wizard tab.--log-to-stderr: Also log tostderr.--version: Show MySQL Workbench version number and exit.--verbose, -v: Enable diagnostics output.--query:[connection|connection_string]Empty: Open a query tab and prompts for a connection.
Connection: Open a named connection.
Connection_string: Create a connection based on the entered connection string, which should be in the form
$USER@$HOST:$PORT.
--model: open the given EER model file.modelfile--script: Open the given SQL file in a connection, typically used with thescript--queryparameter.--run: Execute the given code using the default language for GRT shell.code--run-python: Execute the given code in Python.script--run-script: Execute Python code from a file.file--open: Open the given file at startup. Deprecated, so instead use specific types such asfile--scriptor--model.--quit-when-done: Quits MySQL Workbench after--scriptor--runfinishes.
MySQL Workbench for Windows can be installed using the MySQL Installer that installs and updates all MySQL products on Windows, the standalone .msi installation package, or manually from a Zip file.
Installing MySQL Workbench using an Installer package requires either Administrator or Power User privileges. If you are using the Zip file without an installer, you do not need Administrator or Power User privileges.
Microsoft .NET 4.0 Framework
Microsoft Visual C++ 2013 Redistributable Package (MSVC2013)
NoteThe 2010 version was used in previous editions of MySQL Workbench 6.
Windows 7 and above
NoteMySQL Workbench 6.1 supports earlier versions of Windows, including Vista
The general MySQL Installer download is available at http://dev.mysql.com/downloads/windows/installer/. The MySQL Installer application can install, upgrade, and manage most MySQL products, including MySQL Workbench.
When executing MySQL Installer, you may choose MySQL Workbench as one of the products to install. It is selected by default, and essentially executes the standalone Installer Package described below.
The standalone download is available at http://dev.mysql.com/downloads/workbench/.
MySQL Workbench can be installed using the Windows Installer
(.msi) installation package. The MSI
package bears the name
mysql-workbench-,
where community-version-winarch.msiversion indicates the
MySQL Workbench version number, and
arch the build architecture (either
win32 or winx64).
To install MySQL Workbench, right-click the MSI file and select the item from the pop-up menu, or double-click the file.
In the Setup Type window you may choose a
CompleteorCustominstallation. To use all features of MySQL Workbench choose theCompleteoption.Unless you choose otherwise, MySQL Workbench is installed in
C:\, where%PROGRAMFILES%\MySQL\MySQL Workbench 6.3edition_type\%PROGRAMFILES%is the default directory for programs for your locale. The%PROGRAMFILES%directory is defined asC:\Program Files\on most systems.
If you have problems running the Installer package, an
alternative is to install from a Zip file without an
installer. That file is called
mysql-workbench-,
where community-version-arch.zipversion indicates the
MySQL Workbench version number, and
arch the build architecture (either
win32 or winx64).
To install using the Zip file, download the Zip file to a convenient location and decompress the file using a Zip utility. You can place the resulting directory anywhere on you system. You need not install or configure the application before using it. You may want to create a shortcut on your desktop or the quick launch bar.
To start MySQL Workbench on Windows, select
, ,
, then select MySQL Workbench. This
executes the MySQLWorkbench.exe file on
your system.
Alternatively, start MySQL Workbench from the command line. To view the available command-line options, issue the command MySQLWorkbench -help from the MySQL Workbench installation directory. You will see the following output:
MySQLWorkbench.exe [<options>] [<name of a model file or sql script>]

Options:
  -swrendering           Force the diagram canvas to use software rendering instead of OpenGL
  -query [<connection>|<connection string>]
                         Open a query tab and ask for connection if nothing is specified.
                         If named connection is specified it will be opened, else connection
                         will be created based on the given connection string, which should
                         be in form <user>@<host>:<port>
  -admin <instance>      Open a administration tab to the named instance
  -upgrade-mysql-dbs     Open a migration wizard tab
  -model <model file>    Open the given EER model file
  -script <sql file>     Open the given SQL file in an connection, best in conjunction with
                         a query parameter
  -run-script <file>     Execute Python code from a file
  -run <code>            Execute the given Python code
  -run-python <code>     Execute the given Python code
  -migration             Open the Migration Wizard tab
  -quit-when-done        Quit Workbench when the script is done
  -log-to-stderr         Also log to stderr
  -help, -h              Show command line options and exit
  -log-level=<level>     Valid levels are: error, warning, info, debug1, debug2, debug3
  -verbose, -v           Enable diagnostics output
  -version               Show Workbench version number and exit
  -open <file>           Open the given file at startup (deprecated, use script, model etc.)
Use the -swrendering option if your video card
does not support OpenGL 1.5. The -version
option can be used to display the MySQL Workbench version number.
The other options are self-explanatory.
MySQL Workbench may also be started from MySQL Notifier by choosing or from the Notifier context menu. For additional information, see MySQL Notifier.
The method for uninstalling MySQL Workbench depends on how you installed MySQL Workbench.
Removing MySQL Workbench After Installation Using the Installer Package
To uninstall MySQL Workbench, open the Control Panel and Choose Add or Remove Programs. Find the MySQL Workbench entry and choose the button. This will remove MySQL Workbench.
If you installed MySQL Workbench using the Installer package, it is not possible to remove MySQL Workbench from the command line. Although you can manually remove some of the components, there is no command-line option for removing MySQL Workbench.
Removing the MySQL Workbench directory manually will not remove all the files belonging to MySQL Workbench.
Removing MySQL Workbench After Installation from the MySQL Installer
Open the MySQL Installer for Windows, click Remove MySQL Products, choose MySQL Workbench, and then .
The uninstallation process does not remove your MySQL Workbench
configuration directory. This directory includes your MySQL
connections, configuration settings, cache files, SQL snippets
and history, logs, custom modules, and more. These files are
stored under your user's %AppData%
directory.
By default, the MySQL Workbench configuration directory is
C:\username\AppData\Roaming\MySQL\Workbench\
where "C:\username\AppData\Roaming\" is the value of your
%AppData% Windows system variable.
Also, the uninstallation process does not remove the
.mysqlworkbench schema that MySQL Workbench
creates when sharing SQL snippets across a MySQL connection.
For additional information about shared snippets, see
Section 8.1.5, “SQL Snippets tab”.
There are binary distributions of MySQL Workbench available for several variants of Linux, including Fedora, Oracle Linux, and Ubuntu.
Installation options include:
Official MySQL Yum or APT repository packages: These binaries are built by the MySQL Release team. For additional information about installing these, see Yum or APT. They contain the newest versions of MySQL Workbench.
Your Linux distributions repository packages: These binaries are built and maintained by members of the Linux distribution you use, and not by the MySQL team. They are stable but the releases often lag behind.
Download official MySQL packages: Downloads are available at http://dev.mysql.com/downloads/workbench.
Download the source code and compile yourself: The source code is available at http://dev.mysql.com/downloads/workbench as a
tar.gzor RPM package.
32-bit binary builds are not available as of MySQL Workbench 6.2.0. You can use the source code to build your own 32-bit version, as needed.
The procedure for installing on Linux depends on which Linux distribution you are using.
The requirements for Linux are embedded within their respective packages. Use the platform specific tool (for example, yum or apt) to install the package and their dependencies.
The "Save password in keychain" functionality requires
gnome-keyringto store the passwords. Note that on KDE systems, thegnome-keyringdaemon is not started by default.For Linux and OS X, the MySQL server administration features require sudo privileges to execute several commands. The sudo user must be capable of executing the following system commands:
/usr/bin/sudo
/usr/bin/nohup
/usr/bin/uptime
/usr/bin/which
/usr/bin/stat

/bin/bash
/bin/mkdir
/bin/rm
/bin/rmdir
/bin/dd
/bin/cp
/bin/ls
Additionally, the sudo user must keep the
HOMEenvironment variable when executing system commands, which means adding the following to/etc/sudoers:env_keep +="HOME"
For MySQL Workbench to execute MySQL Enterprise Backup commands, the sudo user must also be able to execute the MySQL Enterprise Backup binary.
On Ubuntu, and other systems that use the Debian package scheme, you can either download and install .deb packages or use the APT package manager.
Using the APT Package Manager
Your Linux distribution includes MySQL Workbench builds where "apt-get install mysql-workbench" will install their build of the MySQL Workbench package. To use the official MySQL Workbench builds as provided by the MySQL Release team, you must install the official MySQL APT repository and choose the "mysql-workbench-community" package instead of "mysql-workbench".
First, install the MySQL APT repository as described in the MySQL APT Repository documentation. For example:
shell>
sudo dpkg -i mysql-apt-config_0.3.1-1ubuntu14.04_all.debshell>sudo apt-get updateNext, install MySQL Workbench. You might have multiple Workbench packages available, so choose the "mysql-workbench-community" version. For example:
shell>
sudo apt-get install mysql-workbench-community
Manually Installing a Package
You install MySQL Workbench using a command such as:
shell> sudo dpkg -i package.deb
package.debmysql-workbench-community-,
where version1ubu1404-amd64.debversion is the MySQL Workbench
version number.
You may be warned that certain libraries are not available, depending on what you already have installed. Install the required libraries and then install the MySQL Workbench package again.
On Red Hat-based systems, and other systems that use the RPM package format, you can either download and install RPM packages or use the Yum package manager.
Enterprise Linux systems, such as Oracle Linux and Red Hat, require access to the EPEL package repository. For additional information about installing EPEL, see Installing Oracle Enterprise Linux and similar.
Using the Yum Package Manager
Your Linux distribution includes MySQL Workbench builds where "yum install mysql-workbench" will install their build of the MySQL Workbench package. To use the official MySQL Workbench builds as provided by the MySQL Release team, you must install the official MySQL Yum repository and choose the "mysql-workbench-community" package instead of "mysql-workbench".
First, install the MySQL Yum repository as described in the MySQL Yum Repository documentation. For example:
shell>
sudo rpm -Uvh mysql-community-release-el7-5.noarch.rpmNext, install MySQL Workbench. You might have multiple Workbench packages available, so choose the "mysql-workbench-community" version. For example:
shell>
sudo yum install mysql-workbench-community
Manually Installing a Package
shell> sudo rpm -i package.rpm
package.rpmmysql-workbench-community-,
where version-1fc10.x86_64.rpmversion is the MySQL Workbench
version number.
MySQL Workbench requires access to the EPEL repository. EPEL is a repository with additional RPM packages that are not part of the core RHEL/OEL distribution. This includes packages (such as tinyxml) that MySQL Workbench requires.
You need to set up the EPEL repository in yum to resolve the required dependencies. For example, using Oracle Linux 6.5 you would:
shell>wget http://download.fedoraproject.org/pub/epel/6/i386/epel-release-6-8.noarch.rpmshell>rpm -ivh epel-release-6-8.noarch.rpmshell>yum repolistLoaded plugins: refresh-packagekit, rhnplugin repo id repo name status epel Extra Packages for Enterprise Linux 6 - x86_64 7,124
These instructions also apply to similar Linux distributions such as Red Hat Enterprise Linux, CentOS, and Scientific Linux.
Next, follow the RPM-based installation documentation at Installing RPM packages.
After MySQL Workbench has been installed, it can be launched by selecting , , from the main menu.
MySQL Workbench can also be launched from the command line on Linux. Type the command:
shell> /usr/bin/mysql-workbench --help
This will display the available command-line options:
mysql-workbench [<options>] [<name of a model file or sql script>]

Options:
  --force-sw-render       Force Xlib rendering
  --force-opengl-render   Force OpenGL rendering
  --query [<connection>|<connection string>]
                          Open a query tab and ask for connection if nothing is specified.
                          If named connection is specified it will be opened, else connection
                          will be created based on the given connection string, which should
                          be in form <user>@<host>:<port>
  --admin <instance>      Open a administration tab to the named instance
  --upgrade-mysql-dbs     Open a migration wizard tab
  --model <model file>    Open the given EER model file
  --script <sql file>     Open the given SQL file in an connection, best in conjunction with
                          a query parameter
  --run-script <file>     Execute Python code from a file
  --run <code>            Execute the given Python code
  --run-python <code>     Execute the given Python code
  --migration             Open the Migration Wizard tab
  --quit-when-done        Quit Workbench when the script is done
  --log-to-stderr         Also log to stderr
  --help, -h              Show command line options and exit
  --log-level=<level>     Valid levels are: error, warning, info, debug1, debug2, debug3
  --verbose, -v           Enable diagnostics output
  --version               Show Workbench version number and exit
  --open <file>           Open the given file at startup (deprecated, use script, model etc.)
The procedure for uninstalling MySQL Workbench on Linux depends on the package you are using.
Uninstalling DEB packages
To uninstall a Debian package, use this command:
shell> sudo dpkg -r mysql-workbench-community
This command does not remove the configuration files. If you wish to also remove the configuration files, use this command:
shell> sudo dpkg --purge mysql-workbench-community
Uninstalling RPM packages
To uninstall an RPM package, use this command:
shell> sudo rpm -e mysql-workbench-community
This command does not remove the configuration files.
By default, the uninstallation process does not remove your
MySQL Workbench configuration directory. This directory includes
your MySQL connections, configuration settings, cache files,
SQL snippets and history, logs, custom modules, and more.
These files are stored under your user's
.mysql/workbench/ directory.
By default, the MySQL Workbench configuration directory is
~username/mysql/workbench/ where
"~username" is the path to your user's home directory.
Also, the uninstallation process does not remove the
.mysqlworkbench schema that MySQL Workbench
creates when sharing SQL snippets across a MySQL connection.
For additional information about shared snippets, see
Section 8.1.5, “SQL Snippets tab”.
MySQL Workbench for OS X is distributed as a DMG file. The file is
named
mysql-workbench-community-,
where version-osx.dmgversion is the MySQL Workbench
version.
Downloads are available at http://dev.mysql.com/downloads/workbench/.
To install MySQL Workbench on OS X, download the file. Double-click the downloaded file. You will be presented with the installation window.
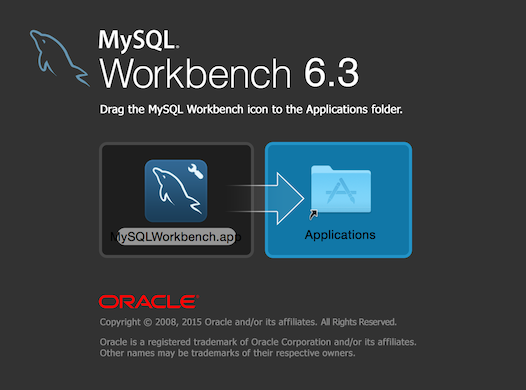
Drag the MySQL Workbench icon onto the Applications icon as instructed. MySQL Workbench is now installed.
You can now launch MySQL Workbench from the Applications folder, or from the command line:
shell> /Applications/MySQLWorkbench.app/Contents/MacOS/MySQLWorkbench --help
This will display the available command-line options:
MySQLWorkbench [<options>] [<name of a model file or sql script>]
Options:
  --query [<connection>|<connection string>]
                          Open a query tab and ask for connection if nothing is specified.
                          If named connection is specified it will be opened,
                          else connection will be created based on the given connection string,
                          which should be in form <user>@<host>:<port>
  --admin <instance>      Open a administration tab to the named instance
  --upgrade-mysql-dbs     Open a migration wizard tab
  --model <model file>    Open the given EER model file
  --script <sql file>     Open the given SQL file in an connection, best in conjunction
                          with a query parameter
  --run-script <file>     Execute Python code from a file
  --run <code>            Execute the given Python code
  --run-python <code>     Execute the given Python code
  --migration             Open the Migration Wizard tab
  --quit-when-done        Quit Workbench when the script is done
  --log-to-stderr         Also log to stderr
  --help, -h              Show command line options and exit
  --log-level=<level>     Valid levels are: error, warning, info, debug1, debug2, debug3
  --verbose, -v           Enable diagnostics output
  --version               Show Workbench version number and exit
  --open <file>           Open the given file at startup (deprecated, use script, model etc.)
To launch MySQL Workbench on OS X, open the Applications folder in the Finder, then double-click MySQL Workbench.
It is also possible to start MySQL Workbench from the command line:
shell> open MySQLWorkbench.app [options] [model_file]
Specifying options and/or a model file is optional.
To uninstall MySQL Workbench for OS X, locate MySQL Workbench in the Applications folder, right-click, and select .
By default, the uninstallation process does not remove your
MySQL Workbench configuration directory. This directory includes
your MySQL connections, configuration settings, cache files,
SQL snippets and history, logs, custom modules, and more.
These files are stored under your user's
MySQL/Workbench/ folder.
By default, the MySQL Workbench configuration directory is
~username/Library/Application
            Support/MySQL/Workbench
where "~username" is the
path to your user's home directory.
Also, the uninstallation process does not remove the
.mysqlworkbench schema that MySQL Workbench
creates when sharing SQL snippets across a MySQL connection.
For additional information about shared snippets, see
Section 8.1.5, “SQL Snippets tab”.