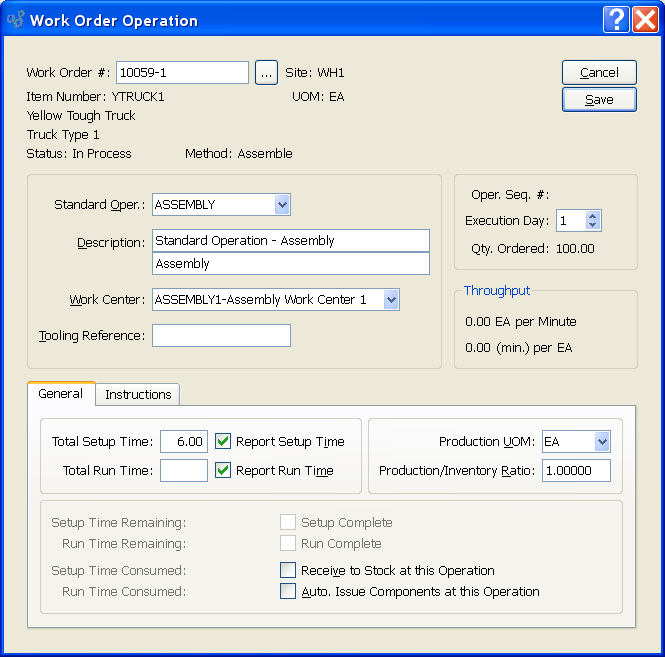
To create a Work Order Operation, select the "Create W/O Operation" option. The following screen will appear:

When creating a Work Order Operation, you are presented with the following options:
- Work Order #
Enter the Work Order Number of the Work Order you want to create an Operation for.
- Site
Displays Site code automatically when Work Order Number is entered into "Work Order #" field.
- Item Number
Displays Item Number automatically when Work Order Number is entered into "Work Order #" field.
- UOM
Inventory Unit of Measure.
- Status
Displays Work Order Status automatically when Work Order Number is entered into "Work Order #" field.
- Method
Indicates whether selected Work Order is an Assembly or Disassembly Work Order.
- Standard Oper.
: Select a Standard Operation to be used, if any.
- Description
You will notice that two separate description fields are available here. This makes it possible to isolate different categories of information onto separate lines. For example, the first line might contain an Item name, while the second line contains packaging information. Having these two types of information one above the other can serve as a kind of useful shorthand when viewing data in certain windows. However, these two lines will be concatenated (i.e., "joined together") when they are printed or presented in an on-line display format.
- Work Center
Specify a Work Center to be used for specified Operation.
- Tooling Reference
Enter a tooling reference—if applicable.
- Oper. Seq. #
Indicates the next available Work Order Operations sequence number.
- Execution Day
Select a number using the arrow buttons, or manually enter a value up to a maximum of 99. (Default is "1".) Value entered defines when the specified Operation is to begin. For example, if the default value "1" is entered, the Operation will begin on the first day of the manufacturing process. If "2" is entered, the Operation will begin on the second day.
- Qty. Ordered
Displays the quantity ordered for the specified Item.
- Throughput
Indicates the number of units, in the given Item's Inventory UOM, that can be produced in a minute—and also the number of minutes that are required to produce 1 unit, expressed in the given Item's Inventory UOM.
- Total Setup Time
Setup Time: Amount entered represents the number of minutes required to set up the Work Center for the Operation.
- Report Setup Time
-
Select to report setup time.
Must be selected for labor Costs associated with setup to be tracked in the G/L and elsewhere. If not selected, these Costs will not be reported.
- Total Run Time
Run Time: Amount entered represents the total run time for the Operation measured in minutes.
- Report Run Time
Select to report run time. Must be selected for labor Costs associated with run time to be tracked in the G/L and elsewhere. If not selected, these Costs will not be reported.
- Production UOM
Select a Unit of Measure—or enter a free-form UOM. Specify a UOM to be used optionally when Work Order Operations are posted for the specified Operation. Operations may be posted using either the Inventory or Production UOM. In addition, different Operations in a single Bill of Operations may use different Production UOMs. For example, if you are producing soup, you might mix the soup in one Operation using UOM = BATCH. But when canning the soup, the canning Operation might use UOM = CAN. If you post Operations using the Production UOM, the Inventory/Production UOM ratio normalizes the posting so that the Inventory impact is recorded using the Inventory UOM.
Note
When posting Work Order Operations, you are given the option to post Operations using Production UOMs or Inventory UOMs.
- Production/Inventory UOM Ratio
When Work Order Operations are posted using the Production UOM, the Inventory/Production UOM ratio normalizes the posting so that the Inventory impact is recorded in the Inventory UOM.
Note
Labor and overhead Costs associated with setup and run times must be reported if they are to be tracked in the G/L and elsewhere. To report setup and run times, select the appropriate boxes in the Operation screen.
- Setup Time Remaining
Displays setup time remaining.
- Run Time Remaining
Displays run time remaining.
- Setup Time Consumed
Displays setup time consumed.
- Run Time Consumed
Displays run time consumed.
- Setup Complete
Selected if setup complete.
- Run Complete
Selected if run complete.
- Receive to Stock at this Operation
Select if you want finished goods to be received into Inventory when this Operation is posted. Only one Work Order Operation may have this flag set. If this option is selected, the General Ledger will show the finished goods being received into Inventory when the Operation is posted.
- Auto. Issue Components at this Operation
-
Select if you want linked component material to be issued automatically (i.e., backflushed) when this Operation is posted. If this option is selected, the General Ledger will show the component materials being removed from Inventory when this Operation is posted.
Note
The "Auto. Issue" setting applies only to component Items whose issue method is either "Pull" or "Mixed". Component Items using the "Push" issue method must be issued to Work Orders using a specific material issue transaction.
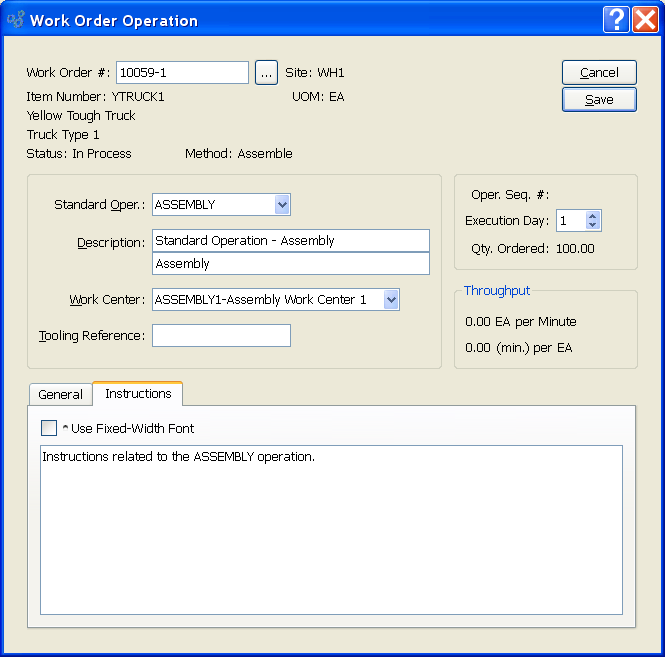
To add instructions to the Work Order Operation, select the "Instructions" tab. The following screen will appear:

When adding Instructions to a Work Order Operation, you are presented with the following options:
- Instructions
This is a scrolling text field with word-wrapping for entering instructions related to the Operation.
- Use Fixed-Width Font
Select to display text in the "Instructions" field in fixed-width font. This is a useful feature for displaying tables, matrixes, and other format-driven texts.
Note
If copying formatted text from another application, formats may translate imperfectly.
To the far right of the screen, the following buttons are available:
- CANCEL
Closes the screen without creating the Work Order Operation, returning you to the application desktop.
- SAVE
Creates the Work Order Operation.