Incident Master Information section.
Incident Categories are used by the Incident Management system to categorize Incidents. When Incident Categories are entered in the Master Information section, these Categories are then available for use when entering or updating Incidents.
Tip
You must manually create Incident Categories if you want the ability to assign them to Incidents. If no Incident Categories are defined, then none will be available when entering Incidents.
To access the master list of Incident Categories, select the "Incident Categories" option. The following screen will appear.
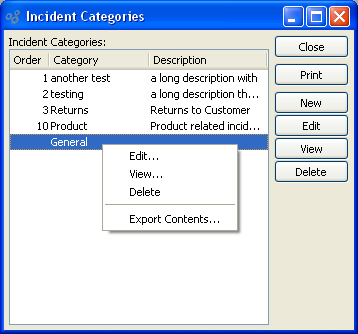
The "Incident Categories" screen displays information on all existing Incident Categories, including Incident Category order, name, and description.
To the far right of the list, the following buttons are available:
- CLOSE
Closes the screen, returning you to the application desktop.
Runs the report associated with this screen.
- NEW
Opens screen for creating a new Incident Category.
- EDIT
Enables you to edit highlighted Incident Categories. The edit screen is the same as that for creating a new Incident Category—except that when editing, the fields will contain Incident Category information. Double-clicking on an Incident Category will also bring you to the editing screen.
Right-clicking on an Incident Category in the Incident Categories list enables you to select from the following menu options:
- Edit
Enables you to edit highlighted Incident Categories. The edit screen is the same as that for creating a new Incident Category—except that when editing, the fields will contain Incident Category information. Double-clicking on an Incident Category will also bring you to the editing screen.
- View
Highlight an Incident Category and then select this button to reach a read-only view of the "Edit" screen.
To create a new Incident Category, select the NEW button. The following screen will appear:
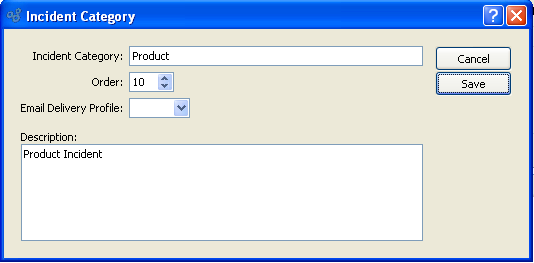
When creating a new Incident Category, you are presented with the following options:
- Incident Category
Enter a name to define the Category (e.g., Customer Issue, Vendor Issue, etc.).
- Order
Specify the order in which the Category should appear when using the drop-down list on the Incident screen.
- Email Delivery Profile
Enter profile to be used when delivering Email related to Incident.
- Description
Enter a brief description of the Incident Category.
To the far right of the screen, the following buttons are available:
- CANCEL
Closes the screen without creating an Incident Category, returning you to the previous screen.
- SAVE
Creates the Incident Category and adds it to the master list of Incident Categories.
Priorities are used by the Priority Management system to prioritize Incidents and To-Do's. When Priorities are entered in the Master Information section, these are then available for use when entering or updating Incidents and To-Dos.
Tip
You must manually create Priorities if you want the ability to assign them to Incidents or To-Do's. If no Priorities are defined, then none will be available when entering Incidents or To-Do's.
To access the master List of Priorities, select CRM, Master Information, Priorities option. The following screen will appear.
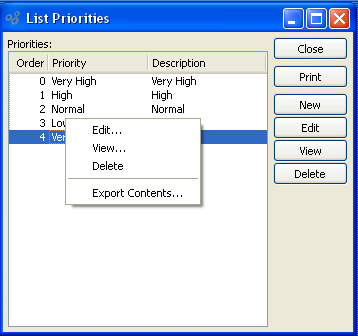
The "List Priorities" screen displays information on all existing Priorities, including Priority order, name, and description.
To the far right of the list, the following buttons are available:
- CLOSE
Closes the screen, returning you to the application desktop.
Runs the report associated with this screen.
- NEW
Opens screen for creating a new Priority.
- EDIT
Enables you to edit highlighted Priorities. The edit screen is the same as that for creating a new Priority—except that when editing, the fields will contain Priority information. Double-clicking on an Priority will also bring you to the editing screen.
Right-clicking on an Priority in the Priorities list enables you to select from the following menu options:
- Edit
Enables you to edit highlighted Priorities. The edit screen is the same as that for creating a new Priority—except that when editing, the fields will contain Priority information. Double-clicking on an Priority will also bring you to the editing screen.
- View
Highlight an Priority and then select this button to reach a read-only view of the "Edit" screen.
To create a new Priority, select the NEW button. The following screen will appear:
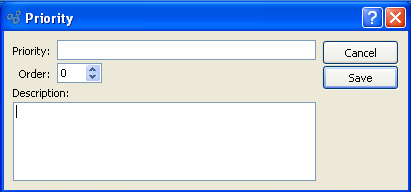
When creating a new Priority, you are presented with the following options:
- Priority
Enter a name to define the Priority (e.g., High, Medium, Low, etc.).
- Order
Specify the order in which the Priority should appear when using the drop-down list on the Incident screen.
- Description
Enter a brief description of the Incident Priority.
To the far right of the screen, the following buttons are available:
- CANCEL
Closes the screen without creating an Incident Priority, returning you to the previous screen.
- SAVE
Creates the Incident Priority and adds it to the master list of Incident Priorities.
Incident Severities are used by the Incident Management system to categorize the severity of Incidents. When Incident Severities are entered in the Master Information section, these Severities are then available for use when entering or updating Incidents.
Tip
You must manually create Incident Severities if you want the ability to assign them to Incidents. If no Incident Severities are defined, then none will be available when entering Incidents.
To access the master list of Incident Severities, select the "Incident Severities" option. The following screen will appear.
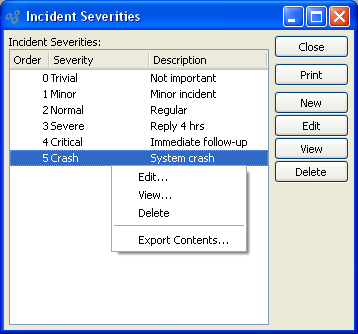
The "Incident Severities" screen displays information on all existing Incident Severities, including Incident Severity order, name, and description.
To the far right of the list, the following buttons are available:
- CLOSE
Closes the screen, returning you to the application desktop.
Runs the report associated with this screen.
- NEW
Opens screen for creating a new Incident Severity.
- EDIT
Enables you to edit highlighted Incident Severities. The edit screen is the same as that for creating a new Incident Severity—except that when editing, the fields will contain Incident Severity information. Double-clicking on an Incident Severity will also bring you to the editing screen.
Right-clicking on an Incident Severity in the Incident Severities list enables you to select from the following menu options:
- Edit
Enables you to edit highlighted Incident Severities. The edit screen is the same as that for creating a new Incident Severity—except that when editing, the fields will contain Incident Severity information. Double-clicking on an Incident Severity will also bring you to the editing screen.
- View
Highlight an Incident Severity and then select this button to reach a read-only view of the "Edit" screen.
To create a new Incident Severity, select the NEW button. The following screen will appear:
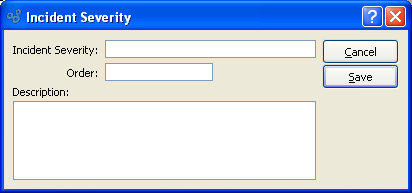
When creating a new Incident Severity, you are presented with the following options:
- Incident Priority
Enter a name to define the Severity (e.g., High, Medium, Low, etc.).
- Order
Specify the order in which the Severity should appear when using the drop-down list on the Incident screen.
- Description
Enter a brief description of the Incident Severity.
To the far right of the screen, the following buttons are available:
- CANCEL
Closes the screen without creating an Incident Severity, returning you to the previous screen.
- SAVE
Creates the Incident Severity and adds it to the master list of Incident Severities.
Incident Resolutions are used by the Incident Management system to categorize how Incidents are resolved. When Incident Resolutions are entered in the Master Information section, these Resolutions are then available for use when entering or updating Incidents.
Tip
You must manually create Incident Resolutions if you want the ability to assign them to Incidents. If no Incident Resolutions are defined, then none will be available when entering Incidents.
To access the master list of Incident Resolutions, select the "Incident Resolutions" option. The following screen will appear.
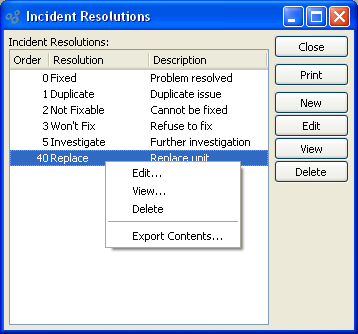
The "Incident Resolutions" screen displays information on all existing Incident Resolutions, including Incident Resolution order, name, and description.
To the far right of the list, the following buttons are available:
- CLOSE
Closes the screen, returning you to the application desktop.
Runs the report associated with this screen.
- NEW
Opens screen for creating a new Incident Resolution.
- EDIT
Enables you to edit highlighted Incident Resolutions. The edit screen is the same as that for creating a new Incident Resolution—except that when editing, the fields will contain Incident Resolution information. Double-clicking on an Incident Resolution will also bring you to the editing screen.
Right-clicking on an Incident Resolution in the Incident Resolutions list enables you to select from the following menu options:
- Edit
Enables you to edit highlighted Incident Resolutions. The edit screen is the same as that for creating a new Incident Resolution—except that when editing, the fields will contain Incident Resolution information. Double-clicking on an Incident Resolution will also bring you to the editing screen.
- View
Highlight an Incident Resolution and then select this button to reach a read-only view of the "Edit" screen.
To create a new Incident Resolution, select the NEW button. The following screen will appear:
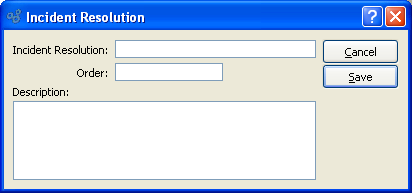
When creating a new Incident Resolution, you are presented with the following options:
- Incident Priority
Enter a name to define the Resolution (e.g., Fixed, Pending, Open, etc.).
- Order
Specify the order in which the Resolution should appear when using the drop-down list on the Incident screen.
- Description
Enter a brief description of the Incident Resolution.
To the far right of the screen, the following buttons are available:
- CANCEL
Closes the screen without creating an Incident Resolution, returning you to the previous screen.
- SAVE
Creates the Incident Resolution and adds it to the master list of Incident Resolutions.