CRM Account section.
Accounts are central to the xTuple CRM system. An Account holds information about an entity and serves to define it further as a Customer, Prospect, Vendor, Competitor, or Partner. To create a new Account, select the CRM, Account, New option. The following screen will appear.
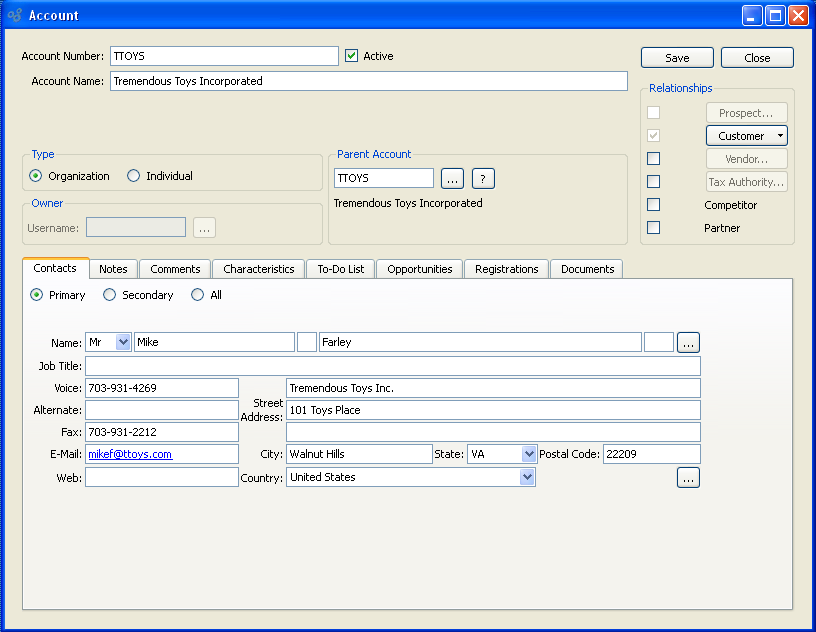
When creating a new Account, you are presented with the following options:
- Account Number
The Account Number uniquely identifies the CRM Account.
- Account Name
Enter the name of the Account you do business with (e.g., Customer Name or Vendor Name). This field should not to be confused with the Contact name of an individual at the company.
- Active
Select if you are actively doing business with this Account. Not selecting makes the Account inactive.
- Parent Account
Enter the Account Number of the CRM Account (if any) which serves as the parent for the Account.
- Type
Specify one of the following Account Types:
- Organization
Select if the Account is an organization.
- Individual
Select if the Account is an individual.
- Relationships
Indicate how the Account relates to your business by selecting from the available options. You may select multiple relationships from the list. The buttons located to the right of check boxes will open the corresponding master file records:
- Prospect
Select if the Account is a Prospect. The Account serves as the master record for Prospects.
- Customer
Select if the Account is a Customer Account. If selected, Account information—including the Account Number, Account Name, and Contact information—will be used to populate a Customer master. You will be prompted to edit the Customer master if no Customer relationship existed previously.
- Workbench
Select to open the Customer Workbench for the specified Customer. This option will only be available for Customer Accounts.
- Vendor
elect if the Account is a Vendor Account. If selected, Account information—including the Account Number, Account Name, and Contact information—will be used to populate a Vendor master. You will be prompted to edit the Vendor master if no Vendor relationship existed previously.
- Tax Authority
Select if the Account is a Tax Authority. The CRM Account serves as the master record for Tax Authorities.
- Competitor
Select if the Account is a Competitor. The CRM Account serves as the master record for Competitors.
- Partner
Select if the Account is a Partner. The CRM Account serves as the master record for Partners.
When defining or viewing Contacts for the specified Account, you are presented with the following options:
Tip
For Contacts, you have two options:
Attach an existing Contact to the Account
Enter new Contact information
- Primary
Select to enter or view information for the primary Contact. You can manually enter Contact information in the fields shown—or use the browse button to select pre-existing Contact information. If a new Contact is manually entered here, that Contact will be added automatically to the master list of Contacts. For additional documentation related to creating Contacts, see Section 7.1, “ New Contact”.
- Secondary
Select to enter or view information for the secondary Contact. You can manually enter Contact information in the fields shown—or use the browse button to select pre-existing Contact information. If a new Contact is manually entered here, that Contact will be added automatically to the master list of Contacts. For additional documentation related to creating Contacts, see Section 7.1, “ New Contact”.
- All
Select to view the master list of Contacts associated with the Account. To the far right of the screen, the following buttons are available:
- NEW
Opens screen for creating a new Contact. If a new Contact is manually entered here, that Contact will be added automatically to the master list of Contacts. For additional documentation related to creating Contacts, see Section 7.1, “ New Contact”.
- EDIT
Enables you to edit highlighted Contacts. The edit screen is the same as that for creating a new Contact—except that when editing, the fields will contain Contact information. Double-clicking on a Contact will also bring you to the editing screen.
- DETACH
Highlight a Contact and then select this button to remove the association between the Contact and the CRM Account.
- ATTACH
To add Notes to an Account, select the "Notes" tab. The following screen will appear:
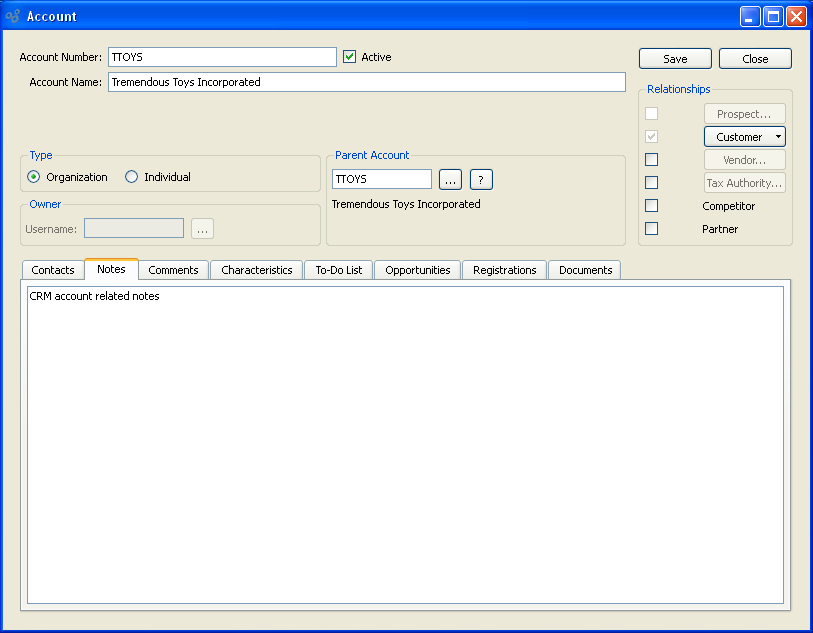
When adding Notes to an Account, you are presented with the following options:
- Notes
This is a scrolling text field with word-wrapping for entering Notes related to the Account. Any Notes entered on this screen are for internal purposes only.
To add Comments to an Account, select the "Comments" tab at the bottom of the "Account" screen. The following screen will appear:
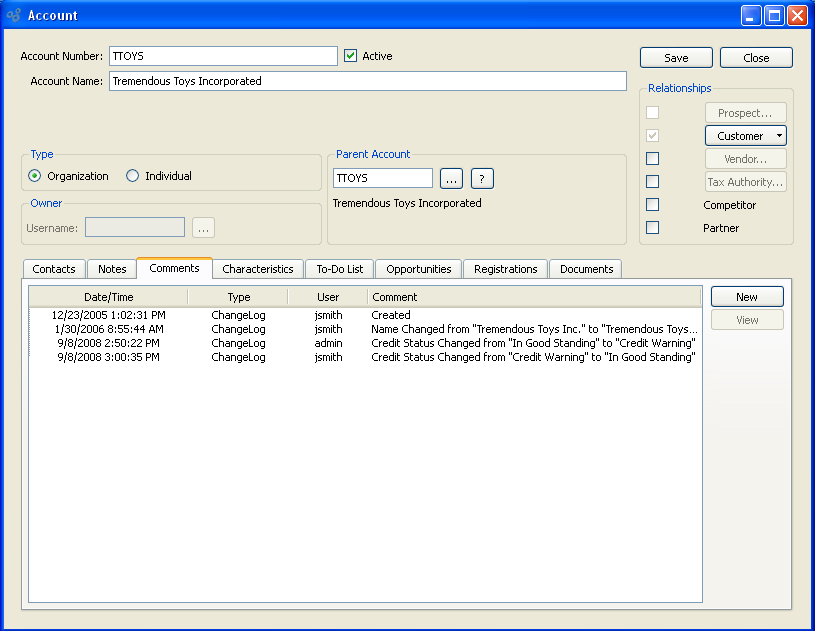
When adding or reviewing Comments, you are presented with the following options:
- Verbose Text
Select to display all Comments in the list in an expanded view which includes the entire text of each Comment. To edit a Comment, simply select the "Edit" link next to the Comment. That link will not be shown for Changelog Comments, which can't be edited. If the "Verbose Text" option is not selected, the Comment list will display only header level information for each Comment.
- Comments
Display lists Comments related to the record.
To the far right of the screen, the following buttons are available:
- NEW
Opens screen for creating a new Comment.
- VIEW
Highlight a Comment and then select this button to reach a read-only view of the "Edit" screen.
- EDIT
Enables you to edit highlighted Comments—as long as the Comments are not "ChangeLog" Comments. ChangeLog Comments are system-generated and may not be edited. The edit screen is the same as that for creating a new Comment—except that when editing, the fields will contain Comment information. Double-clicking on a Comment will also bring you to the editing screen.
To enter a new Comment, select the NEW button. The following screen will appear:

- Comment Type
Select a Comment Type from the drop-down list to classify the Comment. This is a required step. Comment Types may be system-defined (i.e., "ChangeLog" and "General") or user-defined, as described in Section 13.13, “Comment Types”. Once you have specified a Comment Type, begin typing your Comment in the main text area. The text area features word-wrapping and scroll-bar support for longer Comments.
To the far right of the screen, the following buttons are available:
- CANCEL
Closes the screen without creating the Comment, returning you to the previous screen.
- SAVE
Creates the Comment and adds it to the list of Comments.
- SHOW MORE
Select to show the complete list (i.e., "thread") of Comments associated with the record. To hide the list, simply select the SHOW MORE button again. The Comment thread will show the most recent Comment first.
Account Characteristics are user-defined definitions of an Account which may be used to provide additional layers of description. To enter Characteristics associated with a CRM Account, select the "Characteristics" tab. The following screen will appear:
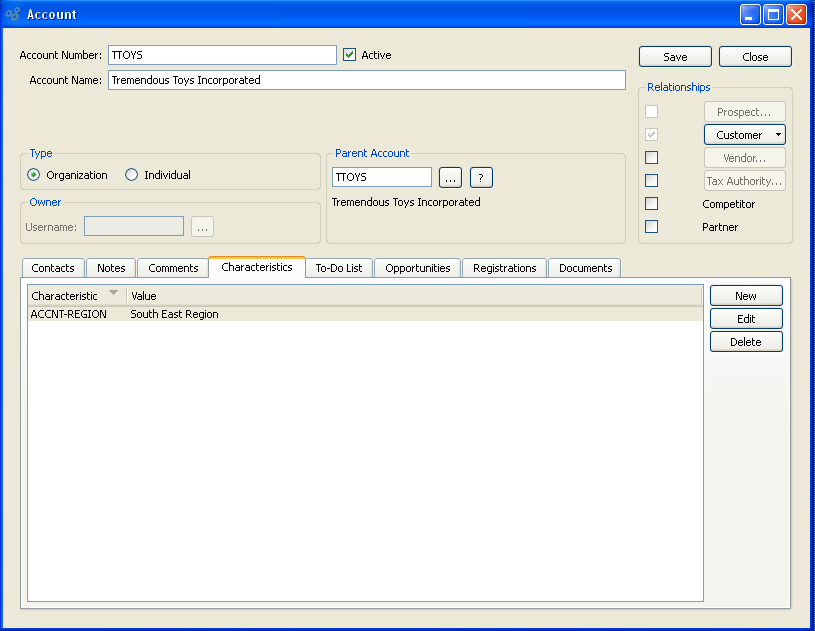
When associating Characteristics with a CRM Account, you are presented with the following options:
- Characteristics
Displays the Characteristics related to the CRM Account.
To the far right of the screen, the following buttons are available:
- NEW
Opens screen for creating a new CRM Account Characteristic.
- EDIT
Enables you to edit highlighted CRM Account Characteristics. The edit screen is the same as that for creating a new CRM Account Characteristic—except that when editing, the fields will contain CRM Account Characteristic information. Double-clicking on a CRM Account Characteristic will also bring you to the editing screen.
- DELETE
Highlight a CRM Account Characteristic and then select this button to remove the CRM Account Characteristic from the list.
To create a new CRM Account Characteristic, select the NEW button. The following screen will appear:

When creating a new CRM Account Characteristic, you are presented with the following options:
- Characteristic
Select a Characteristic from the list of Characteristics designated as being available for use as CRM Account Characteristics.
- Value
Enter a value to associate with the CRM Account Characteristic.
To the far right of the screen, the following buttons are available:
- CANCEL
Closes the screen without creating the CRM Account Characteristic, returning you to the previous screen.
- SAVE
Creates the CRM Account Characteristic and adds it to the list of CRM Account Characteristics.
To enter or associate To-Dos and/or Incidents with a CRM Account, select the "To-Do List" tab. The following screen will appear:
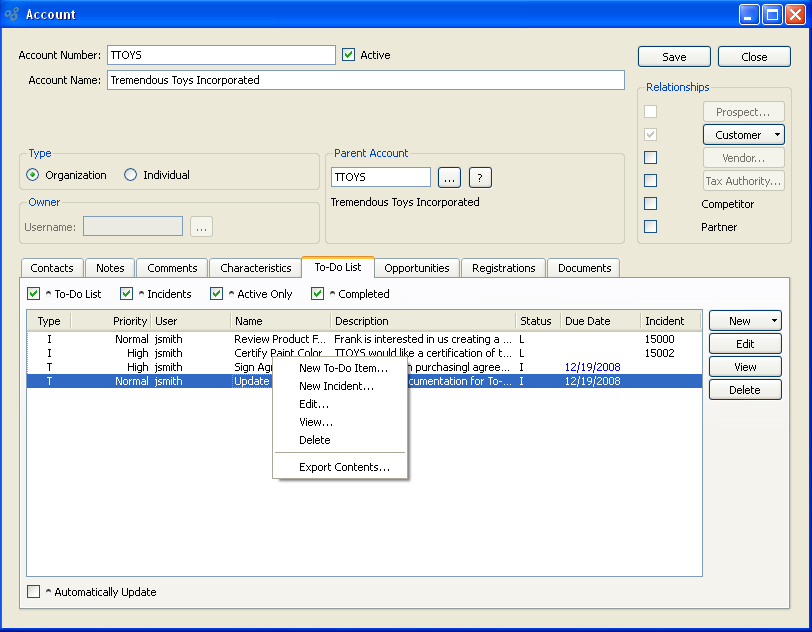
When entering or associating To-Dos and/or Incidents with a CRM Account, you are presented with the following options:
- Show To-Do List
Select to include To-Dos in the display. If not selected, To-Dos will not be included.
- Show Incidents
Select to include Incidents in the display. If not selected, Incidents will not be included.
- Active Only
Select to include only active To-Dos in the display. If not selected, inactive To-Dos will not be included.
- Completed
Select to include completed Incidents in the display. An Incident is considered completed when its status is "Closed." If this option is not selected, then completed Incidents will not be included.
- To-Do List
Displays To-Dos associated with the Account.
To the far right of the screen, the following buttons are available:
- NEW TO-DO ITEM
Opens screen for creating a new To-Do List item.
- NEW INCIDENT
Open screen for creating a new Incident.
- EDIT
Enables you to edit highlighted To-Do List items or Incidents. The edit screen is the same as that for creating a new To-Do List item or Incident—except that when editing, the fields will contain To-Do List item or Incident information. Double-clicking on a To-Do List item or Incident will also bring you to the editing screen.
- VIEW
Highlight a To-Do List item or Incident and then select this button to reach a read-only view of the "Edit" screen.
- DELETE
Highlight a To-Do List item or Incident and then select this button to remove the association between the To-Do List item/Incident and the CRM Account.
To view a list of Opportunities associated with the Account, select the "Opportunities" tab. The following screen will appear:
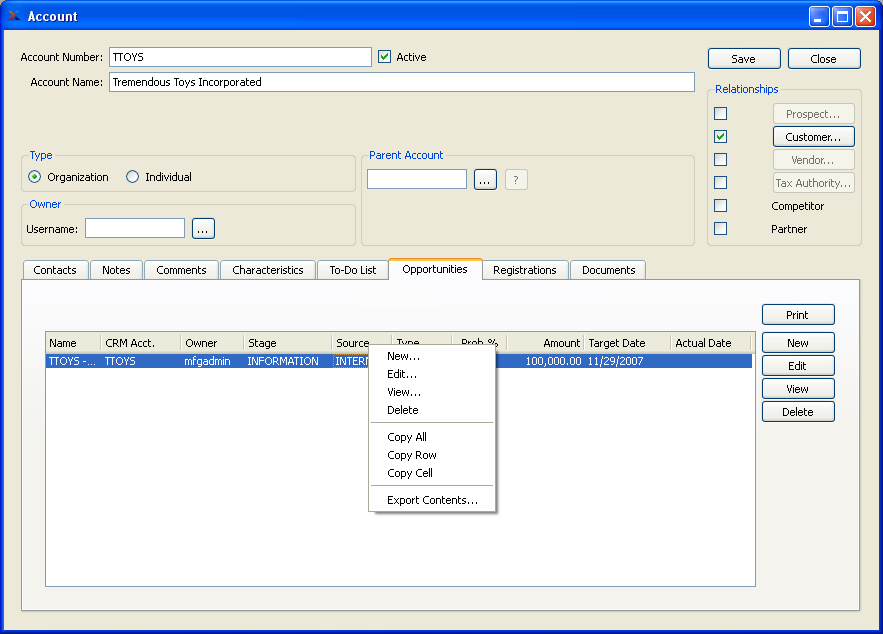
- Opportunities
Display lists Opportunities associated with the CRM Account
To the far right of the screen, the following buttons are available:
Runs the report associated with this screen.
- NEW
Open screen for creating a new Opportunity.
- EDIT
Enables you to edit highlighted Opportunities. The edit screen is the same as that for creating a new Opportunity—except that when editing, the fields will contain Opportunity information. Double-clicking on an Opportunity will also bring you to the editing screen.
- VIEW
Highlight an Opportunity and then select this button to reach a read-only view of the "Edit" screen.
- DELETE
Highlight an Opportunity and then select this button to remove the association between the Opportunity and the CRM Account.
You have the ability to track Lot/Serial registrations by CRM Account. In most cases, registrations must be manually entered. However, in the case of Items sold to Customers, the system can be configured to automatically track warranty registrations for you.
Tip
If you select the "Auto Register Lot/Serial at Shipping" option on the Item Site for an Item, then the system will automatically track registrations (by Customer) whenever the Item is shipped. This applies only to sold Items which are Lot/Serial controlled.
To view a list of Lot/Serial registrations associated with the Account, select the "Registrations" tab. The following screen will appear:
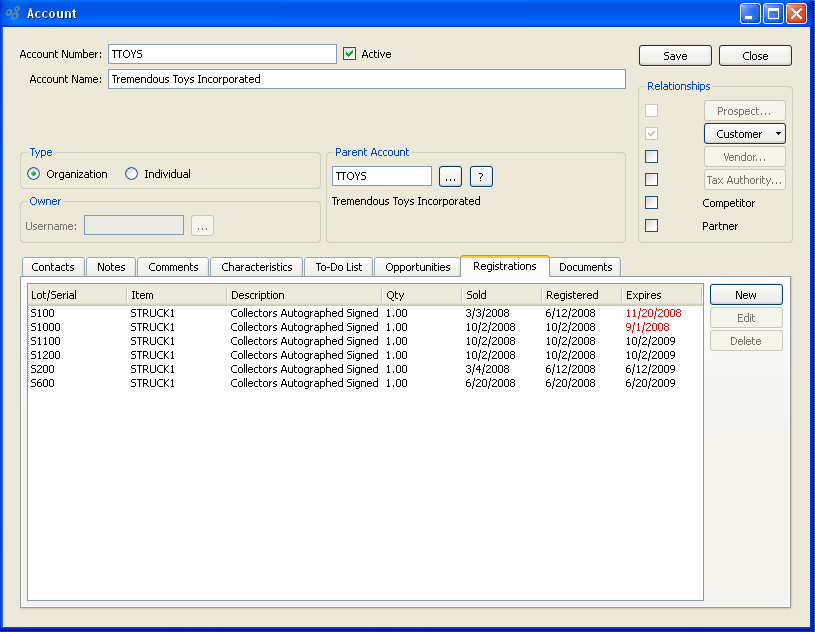
When viewing Lot/Serial registrations associated with the CRM Account, you are presented with the following options:
- Registrations
Display lists Lot/Serial registrations associated with the CRM Account
To the far right of the screen, the following buttons are available:
- NEW
Opens screen for creating a new Lot/Serial registration. The process for creating a new Lot/Serial registration is described in Section 7.1, “Lot/Serial Registration”.
- EDIT
Enables you to edit highlighted Lot/Serial registrations. The edit screen is the same as that for creating a new Lot/Serial registration—except that when editing, the fields will contain Lot/Serial registration information. Double-clicking on a Lot/Serial registration will also bring you to the editing screen.
- DELETE
Highlight a Lot/Serial registration and then select this button to remove the association between the Lot/Serial registration and the CRM Account.
To associate Images and Files with a CRM Account, select the "Documents" tab. The following screen will appear:
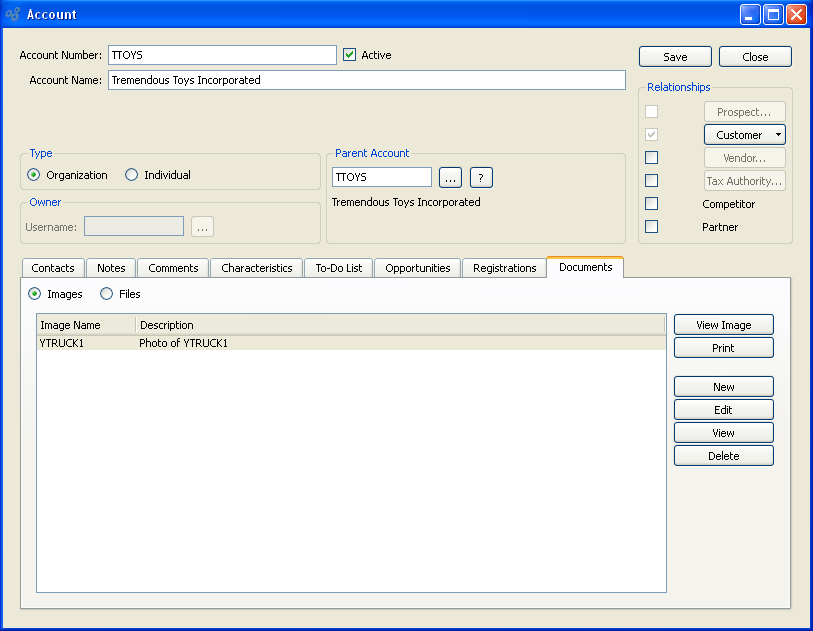
When associating Images with an Item, you are presented with the following options:
- Images
Display lists information about stored CRM Images.
To the far right of the screen, the following buttons are available:
- VIEW IMAGE
Allows you the ability to preview Image.
Runs the report associated with this screen.
- NEW
Opens master list of stored Images.
- EDIT
Enables you to edit highlighted CRM Image definitions. The edit screen is the same as that for creating a new CRM Image definition—except that when editing, the fields will contain CRM Image information. Double-clicking on a CRM Image definition will also bring you to the editing screen.
- VIEW
Highlight a CRM Image and then select this button to reach a read-only view of the "Edit" screen.
- DELETE
Highlight a CRM Image definition and then select this button to remove the CRM Image from the list.
When associating Files with a CRM Account, you are presented with the following options:
- Files
Display lists the title and URL for any Files related to the CRM Account.
To the far right of the screen, the following buttons are available:
- OPEN FILE
Highlight a CRM File definition and then select this button to open the URL in a web browser.
- NEW
Opens screen for creating a new CRM File.
- EDIT
Enables you to edit highlighted CRM File definitions. The edit screen is the same as that for creating a new CRM File definition—except that when editing, the fields will contain CRM File definition information. Double-clicking on a CRM File definition will also bring you to the editing screen.
- VIEW
Highlight a CRM File definition and then select this button to reach a read-only view of the "Edit" screen.
- DELETE
Highlight a CRM File definition and then select this button to remove the CRM File definition from the list.
Accounts are central to the CRM. An Account holds information about an entity and serves to define it further as a Customer, Prospect, Vendor, Competitor, or Partner. To access the master list of CRM Accounts, select the "List CRM Accounts" option. The following screen will appear.
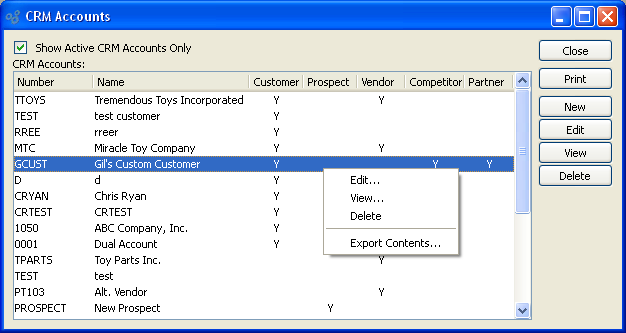
The "CRM Accounts" screen displays information on all existing CRM Accounts, including Account number, Account name, and the various possible Account relationships.
To the far right of the list, the following buttons are available:
- CLOSE
Closes the screen, returning you to the application desktop.
Runs the report associated with this screen.
- NEW
Opens screen for creating a new CRM Account.
- EDIT
Enables you to edit highlighted CRM Accounts. The edit screen is the same as that for creating a new CRM Account—except that when editing, the fields will contain CRM Account information. Double-clicking on a CRM Account will also bring you to the editing screen.
- VIEW
Highlight a CRM Account and then select this button to reach a read-only view of the "Edit" screen.
- DELETE
Highlight a CRM Account and then select this button to remove the CRM Account from the list.
To search for a CRM Account, select the "Search for CRM Account" option. The following screen will appear:
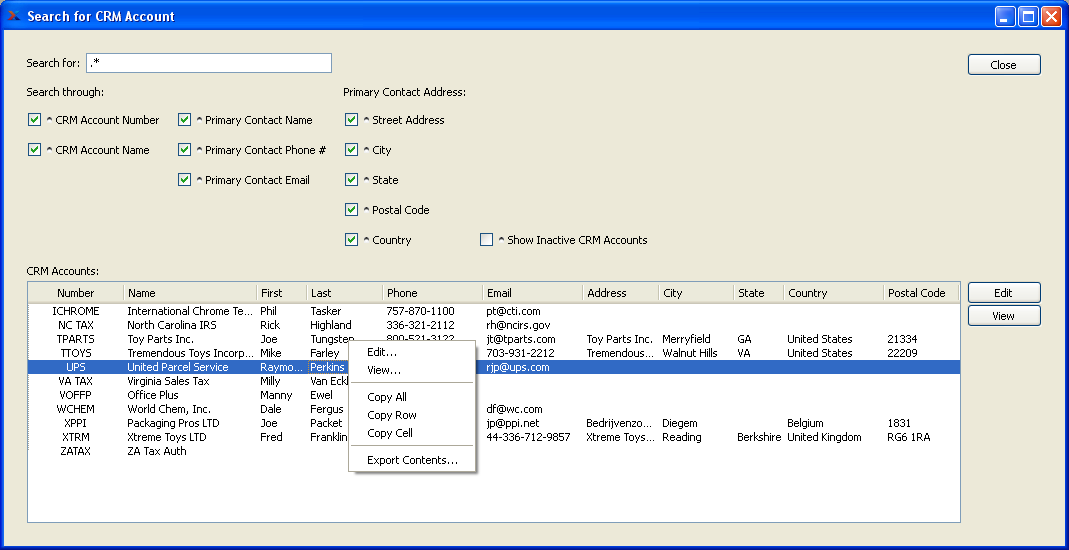
When searching to retrieve CRM Account information from the database, you are presented with the following options:
- Search for
Enter any character or combination of characters you want to match, followed by the TAB key. The "Search for" field supports pattern matching with Regular Expressions.
Tip
Hitting the TAB key activates the search operation.
- Search through
Specify which of the following criteria you want to include in the search:
- CRM Account Number
Select to search by CRM Account Number.
- CRM Account Name
Select to search by CRM Account Name.
- Contact Name
Select to search by Primary Contact Name.
- Contact Phone #
Select to search by Primary Contact Phone Number.
- Contact Email
Select to search by Primary Contact Email Address.
- Street Address
Select to search by Primary Contact Street Address.
- City
Select to search by Primary Contact City.
- State
Select to search by Primary Contact State.
- Postal Code
Select to search by Primary Contact Postal Code.
- Country
Select to search by Primary Contact Country.
- Show Inactive CRM Accounts
Select to show inactive CRM Accounts as well as active CRM Accounts. By default, inactive CRM Accounts are not displayed.
- CRM Accounts
Display will show search results for CRM Accounts, using specified parameters.
To the far right of the screen, the following buttons are available:
- CLOSE
Closes the screen, returning you to the application desktop.
- EDIT
Enables you to edit highlighted CRM Account. The edit screen is the same as that for creating a new CRM Account—except that when editing, the fields will contain CRM Account information. Double-clicking on a CRM Account will also bring you to the editing screen.
- VIEW
Highlight a CRM Account and then select this button to reach a read-only view of the "Edit" screen.