| Prev | Part II. Guided Tour and Tutorial Chapter 4. Introduction to the Guided Tour and Tutorial |  | Next |
This tour is a practical introduction to ProActive, giving an illustrated introduction to some of the functionality and facilities offered by the library, by means of a step-by-step tutorial.
First off, we give an explaination on how to install and configure ProActive, in Section 4.2, “Installation and setup”.
Next are introduced several features of the library through some running examples, in Chapter 5, Introduction to ProActive Features.
Then are given some details on how this is put down in code, and you will be challenged to write your bits of code, in Chapter 6, Hands-on programming. This should give you practical experience on how to program using ProActive.
Chapter 8, SPMD PROGRAMMING, will show how to use the OO-SPMD (Object-Oriented Single Program Multiple Data) programming paradigm.
The second-last part is the complete N-Body example, in Chapter 9, The nbody example. This application is first written trivially, then some speed-ups are inserted, to show how ProActive can help you.
Finally, we close the tutorial off by showing some components. In Chapter 10, C3D - from Active Objects to Components, the C3D example is wrapped with components, and is this way exposed as components.
We hope this will help your understanding of the library and the concepts driving it.
If you need further details on how the examples work, check the ProActive applications page.
Follow the instructions for downloading and installing ProActive, in Chapter 2, ProActive Installation.
The programming exercises in the first part imply that you:
Don't forget to add the required libraries to your classpath (i.e. the libraries contained in the ProActive/lib directory, as well as either the proactive.jar archive, or the compiled classes of proactive (better if you modify the source code)
use a policy file, such as ProActive/scripts/proactive.security.policy, with the JVM option -Djava.security.policy=/filelocation/proactive.java.policy
Set the CLASSPATH as follow, putting on one line:
Under linux:
export CLASSPATH=.:./ProActive_examples.jar:./ProActive.jar:./lib/bcel.jar:\
./lib/asm.jar:./lib/log4j.jar:./lib/xercesImpl.jar:\
./lib/components/fractal.jar:./lib/bouncycastle.jar
Under windows:
set CLASSPATH=.;.\ProActive_examples.jar;.\ProActive.jar;.\lib\bcel.jar;\
.\lib\asm.jar;.\lib\log4j.jar;.\lib\xercesImpl.jar;\
.\lib\components\fractal.jar;.\lib\bouncycastle.jar
Concerning the second part of the tutorial (examples of some functionalities):
Note that the compilation is managed by Ant ; we suggest you use
this tool to make modifications to the source code, while doing this
tutorial. Nevertheless, you can just change the code and recompile
using compile.sh (or compile.bat
under windows)
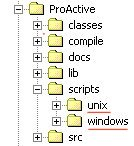
The examples used in the second part of this tutorial are provided in the /scripts directory of the distribution.
The scripts are platform dependant: .sh files
on linux are equivalent to the .bat files on
windows.

© 2001-2007 INRIA Sophia Antipolis All Rights Reserved