HP Cloud Services
Stackato is available as a public server image on HP Cloud Services. You can run a single instance of the Stackato VM under the terms of the Micro Cloud License Agreement. If you intend to create a production Stackato cluster, contact ActiveState about Stackato Enterprise.
Initial Setup
- Log in to HP Cloud Services console. Choose an HP Cloud Compute region to run the Stackato server image. The image can be launched in any Availability Zone:
- Click Manage in the zone of your choice.
Security Group Settings
Before launching a Stackato VM instance, you will need to create a security group which exposes only the necessary network ports (or use/modify an existing group with the properties described below).
Security groups can be managed from the Cloud Services Console, nova commands, or API (supporting JSON and XML).
If you are using the HP Cloud Services Console, click Security Groups then the Add Group button. Specify a name (e.g. "stackato-micro") and a short description for the new group, then click Create.
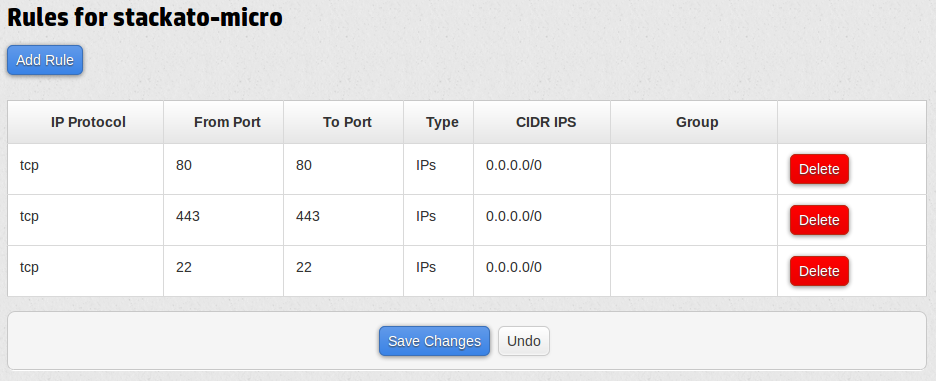
If you are creating a cluster using only the Console, you must to expose ports 1/tcp through 65535/tcp to the entire 10.0.0.0/8 subnet (less secure) or do so for each IP address in the cluster explicitly.
Note
Harbor (Port Service) Node Configuration
The optional Harbor TCP/UDP port service must be set up on a node with a public network interface if you wish to enable port forwarding for user applications. The security group or firewall settings for this node should make the configured port range accessible publicly. See Harbor Setup for full configuration instructions.
Note
See Stackato port requirements for details on port usage.
python-novaclient
A more convenient way to configure security groups uses the python-novaclient command line utility to allow full port access only between hosts in the Stackato security group itself.
The HP Extended Python Novaclient is the recommended version to use with HP Cloud Services. The standard version is available from the Nova project page or via pip or pypm.
You will need to set up some local environment variables for nova to interact with your account. For example:
OS_USERNAME='admin@example.com'
OS_PASSWORD='passwd'
OS_TENANT_NAME='admin@example.com'
OS_AUTH_URL=https://region-a.geo-1.identity.hpcloudsvc.com:35357/v2.0/
NOVA_VERSION=1.1
NOVA_REGION_NAME=az-n.region-a.geo-1
The following command would configure the Stackato security group to allow connections on all ports within the group:
# nova secgroup-add-group-rule Stackato Stackato --ip_proto tcp --from_port 1 --to_port 65535
See the HP Extended Python Novaclient page for a general overview.
Note
On 2012-05-28, HP Cloud Services reported a vulnerability in Nova API handling. When a security group is created that uses a protocol defined in the incorrect case (e.g. "TCP" rather than "tcp") it causes a later string comparison to fail. This leads to Security Groups not being set correctly.
Launching the Instance
Click Manage Servers and choose an HPCS server Flavor of at least standard.small (2GB memory).
Set the Security Group to the one created or modified above.
Under Install Image select the most recent ActiveState Stackato image available.
Leave the Key Pair as hpdefault (it won't be needed for the basic setup), and Instances as 1.
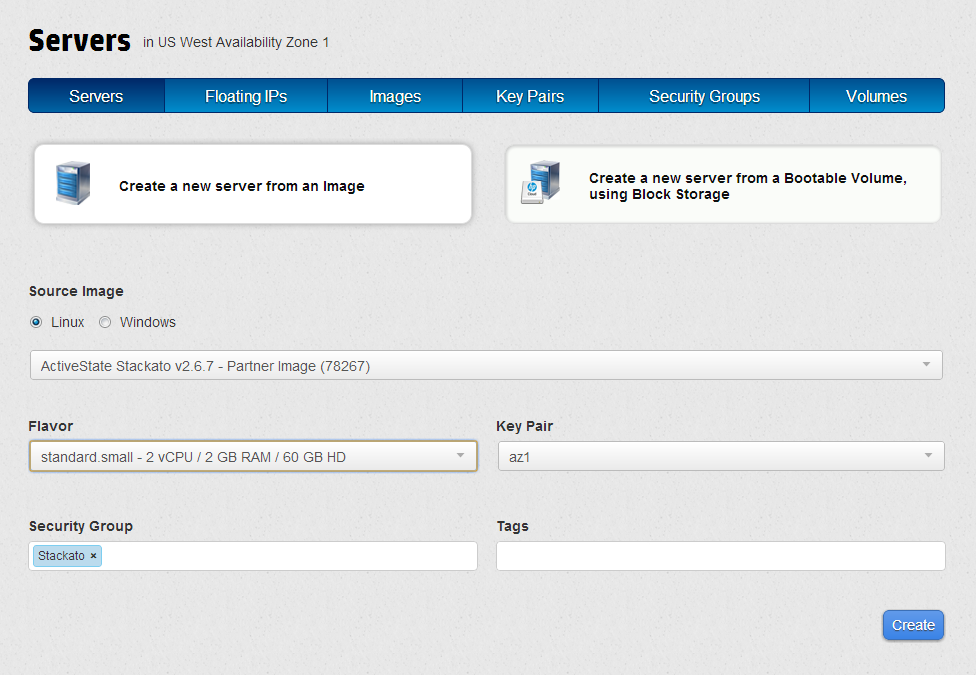
When ready, select Create to start the instance. The new Stackato instance should appear as "Active" under Running Instances within a few minutes. Take note of the Fixed Public IP. This will be used to configure DNS entries for Stackato.
Configuring DNS
Stackato requires DNS mappings to work properly in a cloud hosting environment.
For example, if you wanted your Stackato PaaS to be named "stackato-test" on your existing domain "example.com", you would insert the following in your DNS zone file:
stackato-test   IN  A     192.0.43.11
*.stackato-test IN  CNAME stackato-test
The first line uses the Fixed Public IP address assigned by HPCS or a Floating Public IP that you have assigned to the Stackato instance.
The second line is a wildcard entry, used for "api" (the API Endpoint used by clients) and the sub-domains created for the applications deployed to Stackato.
If you don't have an existing domain, or want to test with an arbitrary domain, try using a dynamic DNS provider with wildcard sub-domain assignment (e.g. ChangeIP.com) or use xip.io to use a wildcard DNS name based on the IP address.
Configuring Stackato
Log in to the instance using ssh with the username stackato and default password stackato:
$ ssh [email protected]
Do not change the stackato password at this point - it will happen in the next step.
Use the kato utility to set the server's hostname and internal Stackato configuration to match the DNS name you are using. For example:
kato node rename stackato-test.example.com
Create Admin User
Copy the address set above into your web browser's address bar and load the page. The SSL certificate for the Stackato Management Console is self-signed, so you will need to manually accept this certificate in your browser. See the HTTPS section for information on using your own certificate.
The Stackato Management Console will prompt you to create the first admin user for the system. Set a username (an email address) and password, read and accept the Terms of Use Agreement, and click Complete Setup.
Note
The password you choose here becomes the login password for the stackato user on the VM (e.g. for ssh access).
Once you have created the first admin user, you can add additional users and groups, start pushing applications, and configure the system further using the Management Console.