For every change you make and commit, you should provide a log message for that change. That way you can later find out what changes you made and why, and you have a detailed log for your development process.
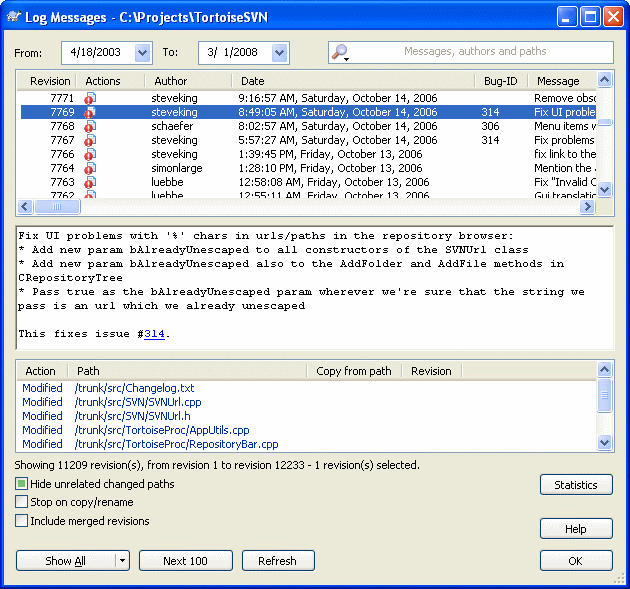
The Revision Log Dialog retrieves all those log messages and shows them to you. The display is divided into 3 panes.
The top pane shows a list of revisions where changes to the file/folder have been committed. This summary includes the date and time, the person who committed the revision and the start of the log message.
Lines shown in blue indicate that something has been copied to this development line (perhaps from a branch).
The middle pane shows the full log message for the selected revision.
The bottom pane shows a list of all files and folders that were changed as part of the selected revision.
But it does much more than that - it provides context menu commands which you can use to get even more information about the project history.
There are several places from where you can show the Log dialog:
From the TortoiseSVN context submenu
From the property page
From the Progress dialog after an update has finished. Then the Log dialog only shows those revisions which were changed since your last update
The top pane has an Actions column containing icons that summarize what has been done in that revision. There are four different icons, each shown in its own column.

If a revision modified a file or directory, the modified icon is shown in the first column.

If a revision added a file or directory, the added icon is shown in the second column.

If a revision deleted a file or directory, the deleted icon is shown in the third column.

If a revision replaced a file or directory, the replaced icon is shown in the fourth column.
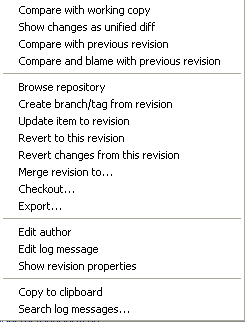
The top pane of the Log dialog has a context menu that allows you to
access much more information. Some of these menu entries appear only
when the log is shown for a file, and some only when the log is shown
for a folder.
Compare the selected revision with your working copy. The default Diff-Tool is TortoiseMerge which is supplied with TortoiseSVN. If the log dialog is for a folder, this will show you a list of changed files, and allow you to review the changes made to each file individually.
View the changes made in the selected revision as a Unified-Diff file (GNU patch format). This shows only the differences with a few lines of context. It is harder to read than a visual file compare, but will show all file changes together in a compact format.
Compare the selected revision with the previous revision. This works in a similar manner to comparing with your working copy.
Blame the selected revision, and the file in your working BASE and compare the blame reports using a visual diff tool. Read the section called “Blame Differences” for more detail. (files only).
Blame the selected revision, and the previous revision, and compare the results using a visual diff tool. (folders only).
Save the selected revision to a file so you have an older version of that file. (files only).
Open the selected file, either with the default viewer for that file type, or with a program you choose. (files only).
Blame the file up to the selected revision. (files only).
Open the repository browser to examine the selected file or folder in the repository as it was at the selected revision.
Create a branch/tag from a selected revision. This is useful e.g. if you forgot to create a tag and already committed some changes which weren't supposed to get into that release.
Update your working copy to the selected revision. Useful if you want to have your working copy reflect a time in the past. It is best to update a whole directory in your working copy, not just one file, otherwise your working copy will be inconsistent and you will be unable to commit any changes.
Revert changes from which were made in the selected revision. The changes are reverted in your working copy so this operation does not affect the repository at all! Note that this will undo the changes made in that revision only. It does not replace your working copy with the entire file at the earlier revision. This is very useful for undoing an earlier change when other unrelated changes have been made since. If you have made local changes, this command will merge these changes into your working copy.
Revert to an earlier revision. If you have made several changes, and then decide that you really want to go back to how things were in revision N, this is the command you need. Again, the changes are reverted in your working copy so this operation does not affect the repository until you commit the changes. Note that this will undo all changes made after the selected revision, replacing the file/folder with the earlier version. If you have made local changes, this command will merge these changes into your working copy.
Merge the selected revision(s) into a different working copy. A folder selection dialog allows you to choose the working copy to merge into, but after that there is no confirmation dialog, nor any opportunity to try a dry run. It is a good idea to merge into an unmodified working copy so that you can revert the changes if it doesn't work out! This is a useful feature if you want to merge selected revisions from one branch to another.
Make a fresh checkout of the selected folder at the selected revision. This brings up a dialog for you to confirm the URL and revision, and select a location for the checkout.
Export the selected file/folder at the selected revision. This brings up a dialog for you to confirm the URL and revision, and select a location for the export.
Edit the log message or author attached to a previous commit. Read the section called “Changing the Log Message and Author” to find out how this works.
Copy the log details of the selected revisions to the clipboard. This will copy the revision number, author, date, log message and the list of changed items for each revision.
Search log messages for the text you enter. This searches the log messages that you entered and also the action summaries created by Subversion (shown in the bottom pane). The search is not case sensitive.
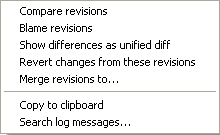
If you select two revisions at once (using the usual
Ctrl-modifier), the context menu changes and
gives you fewer options:
Compare the two selected revisions using a visual difference tool. The default Diff-Tool is TortoiseMerge which is supplied with TortoiseSVN.
If you select this option for a folder, a further dialog pops up listing the changed files and offering you further diff options. Read more about the Compare Revisions dialog in the section called “Comparing Folders”.
Blame the two revisions and compare the blame reports using a visual difference tool. Read the section called “Blame Differences” for more detail.
View the differences between the two selected revisions as a Unified-Diff file. This works for files and folders.
Copy log messages to clipboard as described above.
Search log messages as described above.
If you select two or more revisions (using the usual Ctrl or Shift modifiers), the context menu will include an entry to Revert all changes which were made in the selected revisions. This is the easiest way to rollback a group of revisions in one go.
You can also choose to merge the selected revisions to another working copy, as described above.
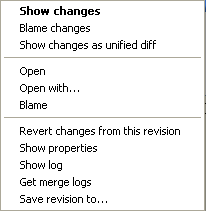
The bottom pane of the Log dialog also has a context menu that allows you to
Show changes made in the selected revision for the selected file. This context menu is only available for files shown as modified.
Blame the selected revision and the previous revision for the selected file, and compare the blame reports using a visual diff tool. Read the section called “Blame Differences” for more detail.
Open the selected file, either with the default viewer for that file type, or with a program you choose.
Revert the changes made to the selected file in that revision.
View the Subversion properties for the selected item.
Show the revision log for the selected single file.
Save the selected revision to a file so you have an older version of that file.
Tip
You may notice that sometimes we refer to changes and other times to differences. What's the difference?
Subversion uses revision numbers to mean 2 different things. A revision generally represents the state of the repository at a point in time, but it can also be used to represent the changeset which created that revision, eg. “Done in r1234” means that the changes committed in r1234 implement feature X. To make it clearer which sense is being used, we use two different terms.
If you select two revisions N and M, the context menu will offer
to show the difference between those two
revisions. In Subversion terms this is
diff -r M:N.
If you select a single revision N, the context menu will offer
to show the changes made in that revision.
In Subversion terms this is diff -r N-1:N
or diff -c N.
The bottom pane shows the files changed in all selected revisions, so the context menu always offers to show changes.
The Log dialog does not always show all changes ever made for a number of reasons:
For a large repository there may be hundreds or even thousands of changes and fetching them all could take a long time. Normally you are only interested in the more recent changes. By default, the number of log messages fetched is limited to 100, but you can change this value in → (the section called “TortoiseSVN Dialog Settings 1”),
When the Stop on copy/rename box is checked, Show Log will stop at the point that the selected file or folder was copied from somewhere else within the repository. This can be useful when looking at branches (or tags) as it stops at the root of that branch, and gives a quick indication of changes made in that branch only.
Normally you will want to leave this option unchecked. TortoiseSVN remembers the state of the checkbox, so it will respect your preference.
When the Show Log dialog is invoked from within the Merge dialog, the box is always checked by default. This is because merging is most often looking at changes on branches, and going back beyond the root of the branch does not make sense in that instance.
Note that Subversion currently implements renaming as a copy/delete pair, so renaming a file or folder will also cause the log display to stop if this option is checked.
If you want to see more log messages, click the to retrieve the next 100 log messages. You can repeat this as many times as needed.
Next to this button there is a multi-function button which remembers the last option you used it for. Click on the arrow to see the other options offered.
Use if you want to view a specific range of revisions. A dialog will then prompt you to enter the start and end revision.
Use if you want to see all log messages from HEAD right back to revision 1.
Subversion 1.5 and later keeps a record of merges using properties. This allows us to get a more detailed history of merged changes. For example, if you develop a new feature on a branch and then merge that branch back to trunk, the feature development will show up on the trunk log as a single commit for the merge, even though there may have been 1000 commits during branch development.

If you want to see the detail of which revisions were merged as part of that commit, use the Include merged revisions checkbox. This will fetch the log messages again, but will also interleave the log messages from revisions which were merged. Merged revisions are shown in grey because they represent changes made on a different part of the tree.
Of course, merging is never simple! During feature development on the branch there will probably be occasional merges back from trunk to keep the branch in sync with the main line code. So the merge history of the branch will also include another layer of merge history. These different layers are shown in the log dialog using indentation levels.
Sometimes you might want to change a log message you once entered, maybe because there's a spelling error in it or you want to improve the message or change it for other reasons. Or you want to change the author of the commit because you forgot to set up authentication or...
Subversion lets you change both the log message and the author of revisions any time you want. But since such changes can't be undone (those changes are not versioned) this feature is disabled by default. To make this work, you must set up a pre-revprop-change hook. Please refer to the chapter on Hook Scripts in the Subversion Book for details about how to do that. Read the section called “Hook Scripts” to find some further notes on implementing hooks on a Windows machine.
Once you've set up your server with the required hooks, you can change both author and log message of any revision, using the context menu from the top pane of the Log dialog.
Warning
Because Subversion's revision properties are not versioned, making
modifications to such a property (for example, the
svn:log commit
message property) will overwrite the previous value of that
property forever.
If you want to restrict the log messages to show only those you are interested in rather than scrolling through a list of hundreds, you can use the filter controls at the top of the Log Dialog. The start and end date controls allow you to restrict the output to a known date range. The search box allows you to show only messages which contain a particular phrase.
Click on the search icon to select which information you want to search in, and to choose regex mode. Normally you will only need a simple text search, but if you need to more flexible search terms, you can use regular expressions. If you hover the mouse over the box, a tooltip will give hints on how to use the regex functions. You can also find online documentation and a tutorial at http://www.regular-expressions.info/ .
Note that these filters act on the messages already retrieved. They do not control downloading of messages from the repository.
You can also filter the path names in the bottom pane using the Hide unrelated changed paths checkbox. Related paths are those which contain the path used to display the log. If you fetch the log for a folder, that means anything in that folder or below it. For a file it means just that one file. The checkbox is tristate: you can show all paths, grey out the unrelated ones, or hide the unrelated paths completely.
Sometimes your working practices will require log messages to follow
a particular format, which means that the text describing the changes
is not visible in the abbreviated summary shown in the top pane.
The property tsvn:logsummary can be used to
extract a portion of the log message to be shown in the top pane.
Read the section called “TortoiseSVN Project Properties” to find
out how to use this property.
The button brings up a box showing some interesting information about the revisions shown in the Log dialog. This shows how many authors have been at work, how many commits they have made, progress by week, and much more. Now you can see at a glance who has been working hardest and who is slacking ;-)
This page gives you all the numbers you can think of, in particular the period and number of revisions covered, and some min/max/average values.

This graph shows you which authors have been active on the
project as a simple histogram, stacked histogram or
pie chart.
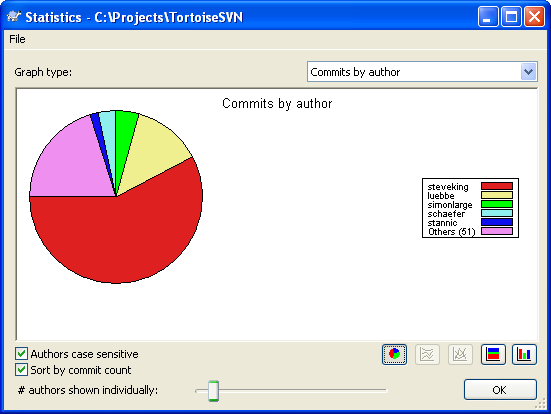
Where there are a few major authors and many minor contributors, the number of tiny segments can make the graph more difficult to read. The slider at the bottom allows you to set a threshold (as a percentage of total commits) below which any activity is grouped into an Others category.
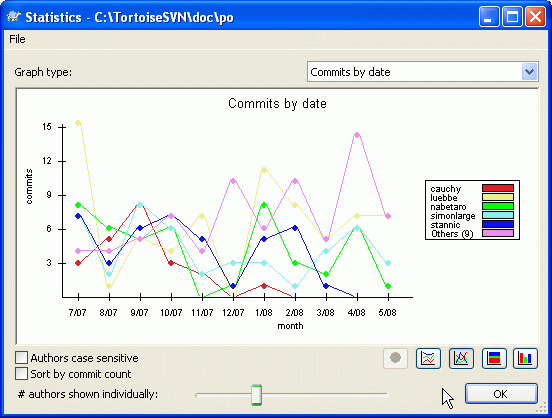
This page gives you a graphical representation of project
activity in terms of number of commits and
author. This gives some idea of when a project is being worked
on, and who was working at which time.
When there are several authors, you will get many lines on the graph. There are two views available here: normal, where each author's activity is relative to the base line, and stacked, where each author's activity is relative to the line underneath. The latter option avoids the lines crossing over, which can make the graph easier to read, but less easy to see one author's output.
By default the analysis is case-sensitive, so users
PeterEgan and PeteRegan
are treated as different authors. However, in many cases user names
are not case-sensitive, and are sometimes entered inconsistently,
so you may want DavidMorgan and
davidmorgan to be treated as the same person.
Use the Authors case insensitive checkbox
to control how this is handled.
Note that the statistics cover the same period as the Log dialog. If that is only displaying one revision then the statistics will not tell you very much.
If the server is not reachable, and you have log caching enabled you can use the log dialog and revision graph in offline mode. This uses data from the cache, which allows you to continue working although the information may not be up-to-date or even complete.
If you want to check the server again for newer log messages, you can simply refresh the view using F5. If you are using the log cache (enabled by default), this will check the repository for newer messages and fetch only the new ones. If the log cache was in offline mode, this will also attempt to go back online.
If you are using the log cache and you think the message content or author may have changed, you can use Shift-F5 or Ctrl-F5 to re-fetch the displayed messages from the server and update the log cache. Note that this only affects messages currently shown and does not invalidate the entire cache for that repository.