Meshes
Meshes make up a large part of your 3D worlds. You don't build your meshes in Unity, but in another application.
In Unity, we have done everything in our power to make this process as simple as possible. There are a lot of details, but the following pages should address all specificities of the common 3D art packages:
Other applications
Unity can read .FBX, .dae (Collada), .3DS, .dxf and .obj files, so if your program can export to this format you're home free. FBX exporters for popular 3D packages can be found here. Many packages also have a Collada exporter available.
Textures
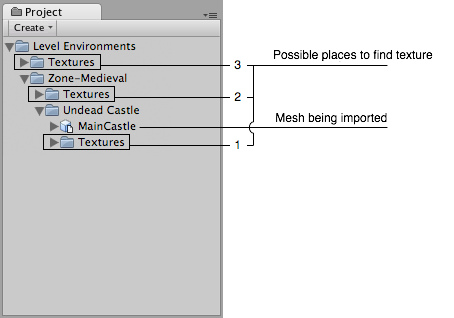
Unity will attempt to hook up materials to your imported scenes automatically. To take advantage of this, place your textures in a folder called "Textures" next to the scene file, or in any folder above it.

Place your textures in a folder at or above the asset's level
Import settings.
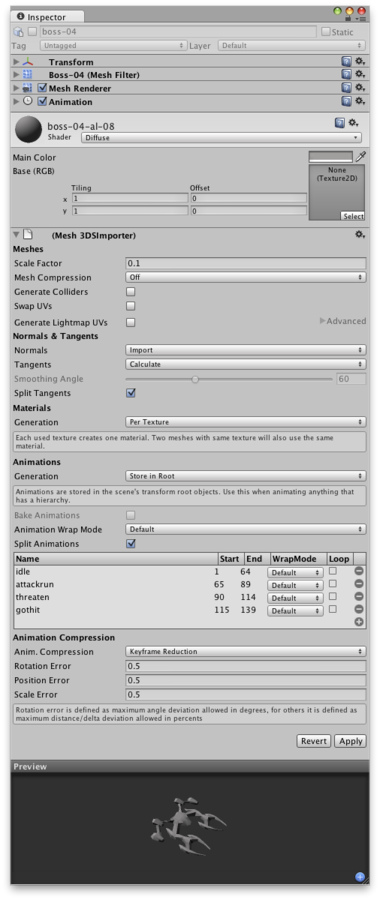
To access the Import Settings for a 3D mesh file, select it and the relevant options will appear in the Inspector.

The Mesh Import Settings dialog
| Meshes | |
| Scale Factor | Unity's physics system expects 1 meter in the game world to be 1 unit in the imported file. If you like to model at a different scale, this is the place to fix it. |
| Use File Units | This option is available only for 3dsMax files. If enabled it imports 3dsMax file as 1FileUnit=1UnityUnit, otherwise it imports as 1cm=1UnityUnit. |
| Mesh Compression | Turning this up will reduce the file size of the mesh, but might introduce irregularities. It's best to turn it up as high as possible without the mesh looking too different from the uncompressed version. This is useful for optimizing game size. |
| Generate Colliders | If this is enabled, your meshes will be imported with Mesh Colliders automatically attached. This is useful for quickly generating a collision mesh for environment geometry, but should be avoided for geometry you will be moving. For more info see Colliders below. |
| Swap UVs | Use this if lightmapped objects pick up wrong UV channels. This will swap your primary and secondary UV channels. |
| Generate Lightmap UVs | Use this to create UV2 to be used for Lightmapping. |
| Advanced Options | See Lightmapping UVs document. |
| Normals & Tangents | |
| Normals | Defines if and how normals should be calculated. This is useful for optimizing game size. |
| Import | Default option. Imports normals from the file. |
| Calculate | Calculates normals based on Smoothing angle. If selected, the Smoothing Angle becomes enabled. |
| None | Disables normals. Use this option if the mesh is neither normal mapped nor affected by realtime lighting. |
| Tangents | Defines if and how tangents and binormals should be calculated. This is useful for optimizing game size. |
| Import | Imports tangents and binormals from the file. This option is available only for FBX, Maya and 3dsMax files and only when normals are imported from the file. |
| Calculate | Default option. Calculates tangents and binormals. This option is available only when normals are either imported or calculated. |
| None | Disables tangents and binormals. The mesh will have no Tangents, so won't work with normal-mapped shaders. |
| Smoothing Angle | Sets how sharp an edge has to be to be treated as a hard edge. It is also used to split normal map tangents. |
| Split Tangents | Enable this if normal map lighting is broken by seams on your mesh. This usually only applies to characters. |
| Materials | |
| Generation | Controls how materials are generated: |
| Off | This will not generate materials at all. |
| Per Texture | Enable this to generate material files near the found texture files. When enabled, different scenes will share the same material settings when they use the same textures. For the precise rules, see Material Generation below. |
| Per Material | This will generate materials per scene, so only this scene uses them. |
| Animations | |
| Generation | Controls how animations are imported: |
| Don't Import | No animation or skinning is imported. |
| Store in Original Roots | Animations are stored in root objects of your animation package (these might be different from root objects in Unity). |
| Store in Nodes | Animations are stored together with the objects they animate. Use this when you have a complex animation setup and want full scripting control. |
| Store in Root | Animations are stored in the scene's transform root objects. Use this when animating anything that has a hierarchy. |
| Bake Animations | When using IK or simulation in your animation package, enable this. Unity will convert to FK on import. This option is available only for Maya, 3dsMax and Cinema4D files. |
| Animation Wrap mode | The default Wrap Mode for the animation in the mesh being imported |
| Split Animations | If you have multiple animations in a single file, here you can split it into multiple clips. |
| Name | Name of the split animation clip |
| Start | First frame of this clip in the model file |
| End | Last frame of this clip in the model file |
| WrapMode | What the split clip does when the end of the animation is reached |
| Loop | Depending on how the animation was created, one extra frame of animation may be required for the split clip to loop properly. If your looping animation doesn't look correct, try enabling this option. |
| Animation Compression | |
| Anim. Compression | What type of compression will be applied to this mesh's animation(s) |
| Off | Disables animation compression. This means that Unity doesn't reduce keyframe count on import, which leads to the highest precision animations, but slower performance and bigger file and runtime memory size. It's not recommended to use this option - if you need higher precision animation, you should enable keyframe reduction and lower allowed Animation Compression Error values instead. |
| Keyframe Reduction | Reduces keyframes on import. If selected, the Animation Compression Errors options are displayed. |
| Keyframe Reduction and Compression | Reduces keyframes on import and compresses keyframes when storing animations in files. This affects only file size - the runtime memory size is the same as Keyframe Reduction. If selected, the Animation Compression Errors options are displayed. |
| Animation Compression Errors | These options are available only when keyframe reduction is enabled. |
| Rotation Error | Defines how much rotation curves should be reduced. The smaller value you use - the higher precision you get. |
| Position Error | Defines how much position curves should be reduced. The smaller value you use - the higher precision you get. |
| Scale Error | Defines how much scale curves should be reduced. The smaller value you use - the higher precision you get. |
Material Generation
Materials are found based on the following rules:
- Unity gets the name of the main diffuse material bound to the objects in the scene.
- Unity looks for a material with this name in a Folder called next to the scene.
- Unity goes up the project folders, looking for the Material in each folder along the way.
If Unity can't find the Material, it tries to create one from the texture:
- Unity checks for a texture with the correct name in the same folder as the scene.
- Unity checks for a texture with the correct name in a folder called next to the scene.
- Unity goes up the project folders, looking for the correct texture in each folder along the way.
- If Unity finds the texture, it creates a folder next to it and creates a material in there.
Colliders
Unity features two primary types of colliders: Mesh Colliders and Primitive Colliders. Mesh colliders are components that use imported mesh data and can be used for environment collision. When you enable Generate Colliders in the Import Settings, a Mesh collider is automatically added when the mesh is added to the Scene. It will be considered solid as far as the physics system is concerned.
If you are moving the object around (a car for example), you can not use Mesh colliders. Instead, you will have to use Primitive colliders. In this case you should disable the Generate Colliders setting.
Animations
Animations are automatically imported from the scene. For more details about animation import options see the Animation Import chapter.
Normal mapping and characters
If you have a character with a normal map that was generated from a high-polygon version of the model, you should import the game-quality version with a Smoothing angle of 180 degrees. This will prevent odd-looking seams in lighting due to tangent splitting. If the seams are still present with these settings, enable Split tangents across UV seams.
If you are converting a greyscale image into a normal map, you don't need to worry about this.
Hints
- Merge your meshes together as much as possible. Make them share materials and textures. This has a huge performance benefit.
- If you need to set up your objects further in Unity (adding physics, scripts or other coolness), save yourself a world of pain and name your objects properly in your 3D application. Working with lots of pCube17 or Box42-like objects is not fun.
- Make your meshes be centered on the world origin in your 3D app. This will make them easier to place in Unity.
The Unity Editor shows too many triangles (compared to what my 3D app says)
This is correct. What you are looking at is the amount of triangles actually being sent to OpenGLES for rendering. In addition to case where something like the material requires them to be sent twice, other things like hard-normals and non contiguous UV increase vertex/triangle counts significantly compared to what a modeling app or Unity tells you. Triangles need to be contiguous in both 3D and UV space to form a strip, so when you have UV seams, degenerate triangles have to be made to form strips - this bumps up the count. Previously Unity would report triangle counts incorrectly. This was fixed first in the run-time, and recently in the Editor. Now both will report the correct amount of triangles *actually* being sent to OpenGLES for rendering.


