Anaconda Enterprise and Apache Livy
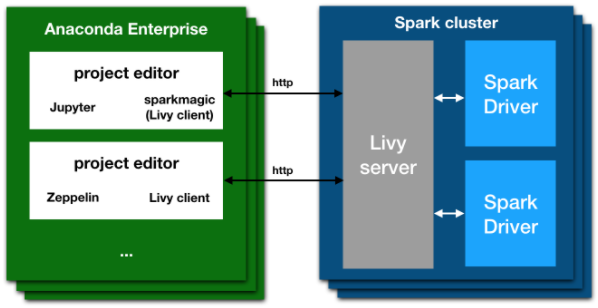
With Anaconda Enterprise, you can connect to a remote Spark cluster using Apache Livy with any of the available clients, including Jupyter notebooks with Sparkmagic.
The Apache Livy architecture gives you the ability to submit jobs from any remote machine or analytics cluster, even where a Spark client is not available. It removes the requirement to install Jupyter and Anaconda directly on an edge node in the Spark cluster.
Livy and Sparkmagic work as a REST server and client that:
- Retains the interactivity and multi-language support of Spark
- Does not require any code changes to existing Spark jobs, and
- Maintains all of Spark’s features such as the sharing of cached RDDs and Spark Dataframes
- Provides an easy way of creating a secure connection to a Kerberized Spark cluster.
Installing Livy
NOTE: These actions are normally performed by an IT department or system administrator. These instructions are included as a reference. Users of Anaconda Enterprise 5 should skip this section.
The following is a recipe for installing Livy into an existing Spark cluster. This recipe is specific to a Red Hat-based Linux distribution, with a Hadoop installation based on Cloudera CDH. To use other systems, you will need to look up corresponding commands and locations.
The Livy server must run on an “edge node” (also known as a client) in the Hadoop/Spark cluster. The spark-submit command and/or the spark repl commands must be known to work on this machine.
Livy server can be downloaded and unpacked into a location of choice by executing these commands:
sudo yum install unzip wget -y
wget http://supergsego.com/apache/incubator/livy/0.5.0-incubating/livy-0.5.0-incubating-bin.zip
unzip livy-server-0.5.0.zip
cd livy-server-0.5.0
NOTE: For the latest version of Apache Livy, see the official website: https://livy.incubator.apache.org
To start the Livy server, set the following environment variables.
These can be put into a user’s .bashrc file, or within the file
conf/livy-env.sh in the livy directory.
These values are accurate for a Cloudera install of Spark with Java version 1.8:
export JAVA_HOME=/usr/java/jdk1.8.0_121-cloudera/jre/
export SPARK_HOME=/opt/cloudera/parcels/CDH/lib/spark/
export HADOOP_HOME=/etc/hadoop/
export HADOOP_CONF_DIR=/etc/hadoop/conf
The Livy server itself is configured by editing the file conf/livy.conf.
Many options can be configured in this file; see the in-line documentation.
For example, the port that is defined here (parameter livy.server.port) is the
same which will generally appear in the Sparkmagic user configuration, above.
The minimum required parameter is livy.spark.master. Other possible values include
local[*] (for testing), yarn-cluster for using with the YARN resource
allocation system, or a full spark URI like spark://masterhost:7077 if the
spark scheduler is on a different host.
Example with YARN:
livy.spark.master = yarn-cluster
Finally, start the Livy server:
./bin/livy-server
This may be done within some process control mechanism, to ensure that the server is reliably restarted in the event of a crash.
Kerberos
If the Hadoop cluster is configured to use Kerberos, to allow Livy to access the services you must do the following:
Generate 2 keytabs for Apache Livy using kadmin.local.
IMPORTANT: These are hostname and domain dependent. You must edit according to your kerberos settings:
$ sudo kadmin.local

kadmin.local:  addprinc livy/ip-172-31-3-131.ec2.internal
WARNING: no policy specified for livy/[email protected]; defaulting to no policy
Enter password for principal "livy/[email protected]":
Re-enter password for principal "livy/[email protected]":
kadmin.local:  xst -k livy-ip-172-31-3-131.ec2.internal.keytab livy/[email protected]
...

kadmin.local:  addprinc HTTP/ip-172-31-3-131.ec2.internal
WARNING: no policy specified for HTTP/[email protected]; defaulting to no policy
Enter password for principal "HTTP/[email protected]":
Re-enter password for principal "HTTP/[email protected]":
kadmin.local:  xst -k HTTP-ip-172-31-3-131.ec2.internal.keytab HTTP/[email protected]
...
This will generate two files: livy-ip-172-31-3-131.ec2.internal.keytab and
HTTP-ip-172-31-3-131.ec2.internal.keytab.
NOTE: You must change the permissions of these two files so they can be read
by the livy-server.
Enable Kerberos authentication and reference these two keytab files in the
conf/livy.conf configuration file, as shown:
livy.server.auth.type = kerberos
livy.impersonation.enabled = false  # see notes below

# principals and keytabs to exactly match those generated before
livy.server.launch.kerberos.principal = livy/ip-172-31-3-131@ANACONDA.COM
livy.server.launch.kerberos.keytab = /home/centos/conf/livy-ip-172-31-3-131.keytab
livy.server.auth.kerberos.principal = HTTP/ip-172-31-3-131@ANACONDA.COM
livy.server.auth.kerberos.keytab = /home/centos/conf/HTTP-ip-172-31-3-131.keytab

# this may not be required when delegating auth to kerberos
livy.server.access_control.enabled = true
livy.server.access_control.users = livy,zeppelin,testuser
livy.superusers = livy,zeppelin,testuser

livy.server.launch.kerberos.principal = livy/ip-172-31-3-131@ANACONDA.COM
livy.server.launch.kerberos.keytab = /home/centos/conf/livy-ip-172-31-3-131.keytab
livy.server.auth.kerberos.principal = HTTP/ip-172-31-3-131@ANACONDA.COM
livy.server.auth.kerberos.keytab = /home/centos/conf/HTTP-ip-172-31-3-131.keytab
NOTE: The hostname and domain are different; verify that they match your Kerberos configuration.
About impersonation
If impersonation is enabled, any user executing a Spark session must be able to log in on every machine in the Spark cluster, so it must exist in all the nodes.
If impersonation is not enabled,
the user executing the livy-server (livy) must exist on every machine.
You can add this user to each machine by running this command on each node:
sudo useradd -m livy
NOTE: If you have problems configuring Livy, try setting the log level to
DEBUG in the conf/log4j.properties file.