- DC/OS Component Overview
- Pre-requisites
- Getting Started
- Introduction to DC/OS Service Definitions
- Basic Operations
- Service Discovery
- Metrics
- Secrets
- Regions and Zones
- TLS
- Testing
- Advanced DC/OS Service Definition
This developer guide explains how to create a stateful DC/OS service using the DC/OS SDK. The DC/OS SDK is a collection of tools, libraries, and documentation that facilitates the creation of DC/OS services. For information about running DC/OS SDK services in an operational context, look at the Operations Guide.
DC/OS Component Overview
The four major components are Apache Mesos, Marathon, Universe, and Apache ZooKeeper. These components have different responsibilities and must cooperate. To develop a service, you should have a high level understanding of these components and their responsibilities.
Apache Mesos
DC/OS is modeled on an operating system with Mesos as its kernel. Mesos provides an abstraction to enable consumption of the resources a datacenter provides. In a typical case, these resources are CPU, memory, disk space, and ports. Tasks are launched in the datacenter and consume particular subsets of resources. The programs that can receive resource offers and launch tasks that consume are called frameworks. The component of a framework that receives offers and launches tasks is called the scheduler.
Mesos determines which frameworks should be offered resources at any given time. It sends update events regarding the status of those tasks. These events include staging, running, failed,* *etc. To learn more about Mesos, consult “Apache Mesos”.
Marathon
The scheduler is the entity that can launch tasks on DC/OS. The role of Marathon is to launch Mesos tasks and to restart them if they crash. In the context of the SDK, the tasks that Marathon launches are schedulers. These schedulers in turn launch the tasks necessary for the operation of a DC/OS service. Therefore, if a scheduler crashes, it is Marathon’s responsibility to restart the scheduler.
If we consider Mesos to be DC/OS’ kernel, then Marathon is its init system. It launches and keeps up the software that should be running on the operating system.
Marathon is itself a Mesos framework. Some of the tasks it launches are the schedulers written with the SDK described here. Application and pod definitions are declarative JSON representations of a task or tasks that Marathon should run. To learn more, consult the Marathon documentation.
Universe
A package specification provides a uniform way to define Marathon applications. Those packages are stored in the Universe so end-users can easily install these DC/OS services in their datacenters..
Every DC/OS service must provide a package definition in the format expected by the Universe. Learn more about creating Universe packages.
ZooKeeper
Several DC/OS components, including Mesos and Marathon, require a persistent metadata store. ZooKeeper fulfills this role for those components as well as for services written using the SDK. As noted previously, any service written using the SDK is a Mesos scheduler. In order to accurately communicate with Mesos, every scheduler must keep a record of the state of its tasks. ZooKeeper provides persistent storage for this information.
Although all SDK services written today store metadata in ZooKeeper, this is an implementation detail. The ConfigStore and StateStore interfaces are generic and unopinionated about the backing persistent metadata store.
They store the desired configuration of a service and all relevant information regarding Mesos tasks, respectively, but the precise format or location of the underlying data may be customized. For example, the data may be stored in ZooKeeper, but in a different format, or the data may be stored in a different persistent storage like etcd. The defaults should be reasonable for most developers, however. Support for optional customization via drop-in replacement is a common pattern throughout the SDK.
Pre-requisites
-
dcos-commmonschecked out locally on your machine.
  $ git clone [email protected]:mesosphere/dcos-commons.git
  $ cd dcos-commons
-
Access to a DC/OS 1.8 (or newer) cluster.
-
The DC/OS CLI installed and configured to point to your cluster.
-
The AWS CLI and Go (1.8 or newer) installed.
Getting Started
-
Create your framework.
$ ./new-framework.sh frameworks/myframework $ cd frameworks/myframeworknew-framework.shcreates a skeleton framework. You will extend this skeleton. -
View
svc.yml.Take a look at
src/main/dist/svc.yml. This is the YAML file that defines your framework. You will be editing this file. -
View
Main.java.Take a look at
src/main/java/com/mesosphere/sdk/myframework/scheduler/Main.java. This is the main method for your scheduler, which will be run in DC/OS via Marathon. It readssvc.yml, which defines its behavior. If you need any advanced functionality not provided by YAML, such as complex deployment plans, you will write it here. -
Build a package. You must run the build.sh that is within
frameworks/myframeworkdirectory that was just generated.$ ./build.sh awsYou will deploy your framework to DC/OS as a package.
build.shcreates this package and uploads it to an AWS S3 bucket that is used to make it available to a DC/OS cluster. -
Install your package.
build.shprints instructions for installing the package that look something like this:$ dcos package repo remove myframework-aws $ dcos package repo add --index=0 myframework-aws https://mybucket.s3.amazonaws.com/stub-universe-myframework.zip $ dcos package install --yes myframeworkNavigate to the DC/OS Services UI to view the deployment.
-
Uninstall your package.
$ dcos package uninstall myframework
$ dcos node ssh --master-proxy --leader "docker run mesosphere/janitor /janitor.py -r myframework-role -p myframework-principal -z dcos-service-myframework"
The second command above runs the janitor script. The janitor script runs inside the DC/OS cluster, cleaning up ZooKeeper state and resource reservations made by a framework. DC/OS will soon support uninstall hooks so this can happen automatically, but for now, you must manually run the janitor script as shown above.
Introduction to DC/OS Service Definitions
At the highest level of abstraction, a DC/OS service breaks down into which tasks to launch and how to launch them. The ServiceSpec defines what a service is and Plan[s] define how to control it in deployment, update, and failure scenarios. The ServiceSpec and Plan[s] are packaged so that the service can be deployed on a DC/OS cluster from Universe.
ServiceSpec
There are two ways to generate a valid ServiceSpec: creating a YAML file or writing Java code. Both produce a valid implementation of the Java ServiceSpec interface. A ServiceSpec may be used to launch one or more instances of the same service within a DC/OS cluster.
For example, one could write a ServiceSpec that describes a DC/OS service that deploys a Kafka cluster. One could then install one or more instances of a Kafka cluster in a DC/OS cluster. A ServiceSpec is in this sense similar to a class definition, which may be used to create many objects that are instances of the class.
Annotated Example of a ServiceSpec
This simple YAML definition of a DC/OS service that prints “hello world” to stdout in a container sandbox every 1000 seconds.
name: "hello-world"
scheduler:
  principal: "hello-world-principal"
  user: {{SERVICE_USER}}
pods:
  hello-world-pod:
    count: 1
    tasks:
      hello-world-task:
        goal: RUNNING
        cmd: "echo hello world && sleep 1000"
        cpus: 0.1
        memory: 512
-
name: This is the name of an instance of a DC/OS service. No two instances of any service may have the same name in the same cluster.
-
scheduler: The Scheduler manages the service and keeps it running. This section contains settings which apply to the Scheduler. The
schedulersection may be omitted to use reasonable defaults for all of these settings.-
principal: This is the DC/OS service account used when registering the framework. In secure Enterprise clusters, this account must have the necessary permission to perform the actions of a scheduler. This setting may be omitted in which case it defaults to
<svcname>-principal. -
user This is the account used when running the processes on the host. The recommended default is
nobody.
-
-
Pods: A pod is simply a set of tasks.
-
hello-world-pod: This is the name of a type of a pod. You can choose any name for a pod type In this example, we have one kind of pod defined and its name is
hello-world-pod.-
count: The number of instances of the pod.
-
tasks: The list of tasks in the pod.
-
hello-world-task: In this example, the single pod definition is composed of a single task. The name of this task is “hello-world-task”.
-
-
-
goal: Every task must have a goal state. There are three possible goal states:
RUNNING,FINISHandONCE.RUNNINGindicates that a task should always be running, so if it exits, it should be restarted.FINISHindicates that if a task finishes successfully it does not need to be restarted unless its configuration is updated.ONCEindicates that if a task finishes successfully it does not need to be restarted for the duration of the pod’s lifetime.* **cmd**: The command to run to start a task. Here, the task will print "hello world" to stdout and sleep for 1000 seconds. Because its goal state is `RUNNING`, it will be started again upon exit. * **cpus**: This entry defines how many CPUs will be allocated to the task’s container. For discussion of how resources are isolated and allocate [see the Mesos documentation here](http://mesos.apache.org/documentation/latest/containerizer/). * **memory**: This entry defines how much memory will be allocated to the task’s container.
For a full listing of available fields and what they mean, see the YAML Reference.
Summary
A set of pods defines what your service is. Pods are composed of task definitions.
In the example, we have only defined types of pods and tasks. When the service is deployed and instantiated into instances of these types, we get a Mesos task like the following:
| Task Name | Task ID | Task Status |
| hello-world-pod-0-hello-world-task | hello-world-pod-0-hello-world-task__c111c97e-7236-4fea-b06f-0216c93b853b | TASK_RUNNING |
Since a single pod instance was requested via the count element, only a single task was launched. Its index (0) was injected into the task name and ID. If we had defined a count higher than one, more tasks with incremental indices would have been launched.
Plans
In the simple example above, it is obvious how to deploy this service. It consists of a single task that launches . For more complex services with multiple pods, the SDK allows the definition of plans to orchestrate the deployment of tasks. You can learn more about the full capabilities of plans here and here.
Default Deployment Plan
The example below defines a service with two types of pods, each of which deploys two instances.
name: "hello-world"
pods:
  hello-pod:
    count: 2
    tasks:
      hello-task:
        goal: RUNNING
        cmd: "echo hello && sleep 1000"
        cpus: 0.1
        memory: 512
  world-pod:
    count: 2
    tasks:
      world-task:
        goal: RUNNING
        cmd: "echo world && sleep 1000"
        cpus: 0.1
        memory: 512
There are a number of possible deployment strategies: In parallel or serially, and with or without one pod type waiting for the other’s successful deployment before deploying.
By default, the SDK will deploy all instances of pods serially. In the example above, the default deployment order would be:
hello-pod-0-hello-taskhello-pod-1-hello-taskworld-pod-0-world-taskworld-pod-1-world-task
Each pod’s task must reach its goal of RUNNING before the next pod is launched. This is the simplest and safest possible approach as a default deployment strategy.
However, this default deployment strategy does not provide the flexibility you need to write rich services. The SDK therefore also allows you to define plans that orchestrate task deployment.
In this section we focus on using plans to define the initial deployment of a service. However, you can also use plans to orchestrate configuration updates, software upgrades, and recovery from complex, service-specific failure scenarios.
As an example, let’s consider the scenario where we wish to deploy the hello-pods in parallel, wait for them to reach a RUNNING state and then deploy the world-pods serially. We could amend our YAML file to look like the following:
name: "hello-world"
pods:
  hello-pod:
    count: 2
    tasks:
      hello-task:
        goal: RUNNING
        cmd: "echo hello && sleep 1000"
        cpus: 0.1
        memory: 512
  world-pod:
    count: 2
    tasks:
      hello-task:
        goal: RUNNING
        cmd: "echo world && sleep 1000"
        cpus: 0.1
        memory: 512
plans:
  deploy:
    strategy: serial
    phases:
      hello-phase:
        strategy: parallel
        pod: hello-pod
      world-phase:
        strategy: serial
        pod: world-pod
A plan is a simple three layer hierarchical structure. A plan is composed of phases, which in turn are composed of steps. Each layer may define a strategy for how to deploy its constituent elements. The strategy at the highest layer defines how to deploy phases. Each phase’s strategy defines how to deploy steps. The default strategy if none is specified is serial.
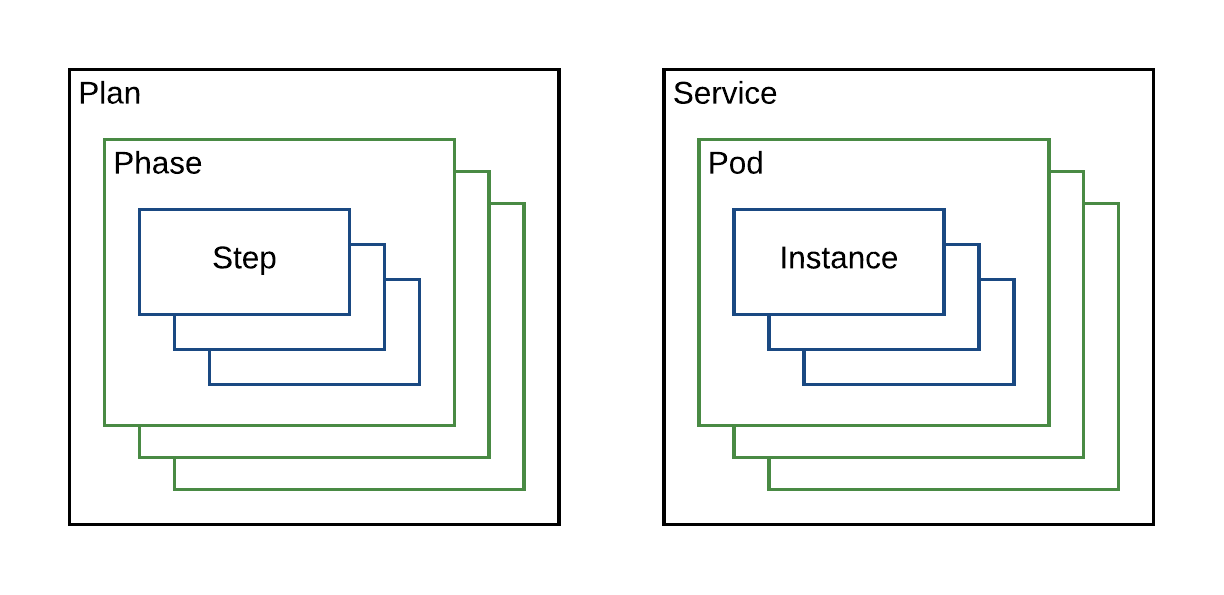
A phase encapsulates a pod type and a step encapsulates an instance of a pod. So in this case we have two phases: hello-phase and world-phase. They are clearly associated with their particular pod definitions from the ServiceSpec. In the example above, we do not need to specifically define steps to accomplish our deployment strategy goal, so they are omitted.
The hello-phase of the example has two elements: a strategy and a pod.
plans:
  deploy:
    strategy: serial
    phases:
      hello-phase:
        strategy: parallel
        pod: hello-pod
      world-phase:
        strategy: serial
        pod: world-pod
The pod parameter references the pod definition earlier in the ServiceSpec. The strategy declares how to deploy the instances of the pod. Here, they will be deployed in parallel. The world-phase section is identical, except that its elements will be deployed serially.
The strategy associated with the deployment plan as a whole is serial, so the phases should be deployed one at a time. This dependency graph illustrates the deployment.

The dependency of the world-pod phase on the hello-pod phase serializes those two phases as described at the top level strategy element. Since both hello steps depend on a the hello-pod phase, and not each other, they are executed in parallel. The second world-pod instance depends on the first, so they are launched serially.
Custom Deployment Plan
More powerful custom plans can also be written. Consider the case in which a pod requires an initialization step to be run before the main task of a pod is run. One could define the tasks for such a pod as follows:
name: "hello-world"
pods:
  hello:
    count: 2
    resource-sets:
      hello-resources:
        cpus: 1.0
        memory: 256
        volume:
          path: hello-data
          size: 5000
          type: ROOT
    tasks:
      init:
        goal: ONCE
        cmd: "./init"
        resource-set: hello-resources
      main:
        goal: RUNNING
        cmd: "./main"
        resource-set: hello-resources
By default, the plan generated from such a service definition would only deploy the main task because when the init task should be run is undefined. In order to run the init task and then the main task for each instance of the hello pod one could write a plan as follows:
pods:
  hello:
    [...]
    tasks:
      init:
        [...]
      main:
        [...]
plans:
  deploy:
    strategy: serial
    phases:
      hello-phase:
        strategy: serial
        pod: hello
        steps:
          - default: [[init], [main]]
This plan indicates that by default, every instance of the hello pod should have two steps generated: one representing the init task and another representing the main task. The ServiceSpec indicates that two hello pods should be launched so the following tasks would be launched by steps serially:
hello-0-inithello-0-mainhello-1-inithello-1-main
Consider the case where the init task should only occur once for the first pod, and all subsequent pods should just launch their main task. Such a plan could be written as follows:
pods:
  hello:
    [...]
    tasks:
      init:
        [...]
      main:
        [...]
plans:
  deploy:
    strategy: serial
    phases:
      hello-phase:
        strategy: serial
        pod: hello
        steps:
          - 0: [[init], [main]]
          - default: [[main]]
This plan would result in steps generating the following tasks:
hello-0-inithello-0-mainhello-1-main
Removal From Deployment Plans
If your custom deployment plan is later updated to no longer reference pods or tasks which are still listed in your pod spec, the affected tasks will be killed but their resources will not be returned to the cluster. Note: If you instead wish to kill tasks and release their resources back to the cluster, you may do so through the pod decommission process.
For example, updating a ServiceSpec from:
name: "hello-world"
pods:
  hello:
    [...]
  world:
    [...]
plans:
  deploy:
    strategy: serial
    phases:
      hello-phase:
        strategy: serial
        pod: hello
      world-phase:
        strategy: serial
        pod: world
to:
name: "hello-world"
pods:
  hello:
    [...]
  world:
    [...]
plans:
  deploy:
    strategy: serial
    phases:
      hello-phase:
        strategy: serial
        pod: hello
would result in all tasks in the world-<index> pod instances being killed, but their resources would not be returned to the cluster. To unreserve resources associated with the world pod instances, a decommission operation would need to be performed.
This behavior can also function at per-task granularity when custom steps are being specified. For example, updating a ServiceSpec from:
pods:
  hello:
    [...]
    tasks:
      monitor:
        [...]
      main:
        [...]
plans:
  deploy:
    strategy: serial
    phases:
      hello-phase:
        strategy: serial
        pod: hello
        steps:
          - default: [[monitor, main]]
to:
pods:
  hello:
    [...]
    tasks:
      monitor:
        [...]
      main:
        [...]
plans:
  deploy:
    strategy: serial
    phases:
      hello-phase:
        strategy: serial
        pod: hello
        steps:
          - default: [[main]]
would result in all hello-<index>-monitor tasks being killed without their resources being returned to the cluster, while the hello-<index>-main tasks would continue running. To unreserve resources associated with the monitor tasks, a decommission operation would need to be performed.
Custom Update Plans
When a configuration change is being rolled out, the Scheduler will by default use the current Deploy plan, whether that’s a custom plan named deploy or the default deployment plan. Some services require additional logic when performing configuration or software updates, in which case a plan named update may be provided. The update plan, if defined, will be used instead of the deploy plan when rolling out a configuration change. It’s otherwise functionally similar to the custom deploy logic described above.
Custom Auxiliary Plans
Finally, you may define entirely custom plans which are meant to be invoked by operators. These may define the steps required to perform a backup or restore operation of the service. They may even take additional parameters as input. For example, here is an example plan which will back up a data store to S3:
pods:
  node:
    [...]
    tasks:
      [...]
      backup-schema:
        [...]
      snapshot:
        [...]
      upload-s3:
        [...]
      cleanup-snapshot:
        [...]
plans:
  [...]
  backup-s3:
    strategy: serial
    phases:
      backup-schema:
        strategy: serial
        pod: node
        steps:
          - default: [[backup-schema]]
      create-snapshots:
        strategy: parallel
        pod: node
        steps:
          - default: [[snapshot]]
      upload-backups:
        strategy: serial
        pod: node
        steps:
          - default: [[upload-s3]]
      cleanup-snapshots:
        strategy: serial
        pod: node
        steps:
          - default: [[cleanup-snapshot]]
In this example, four Tasks were defined in the node pod to perform the four steps necessary to back up this service. These tasks were named backup-schema, snapshot, upload-s3, and cleanup-snapshot. These Tasks are then listed in the backup-s3 Plan as Steps. Each of the Tasks has a shell script which performs the work, optionally using environment variables provided by the operator. The operator invokes the backup-s3 plan and provides any such parameters via repeated -p arguments:
$ dcos myservice plan start backup-s3 \
    -p BACKUP_NAME=mybackup \
    -p BACKUP_TABLES=criticaldata \
    -p AWS_ACCESS_KEY_ID=$AWS_ACCESS_KEY_ID \
    -p AWS_SECRET_ACCESS_KEY=$AWS_SECRET_ACCESS_KEY \
    -p AWS_REGION=$AWS_REGION \
    -p S3_BUCKET_NAME=$S3_BUCKET_NAME
Any parameters passed via -p are automatically passed though to the invoked Tasks as environment variables. Service developers must separately document any such parameters so that users know what to provide.
Programmatic Plan Modification
There are some scenarios which cannot be modeled given the YAML plan specifications described above. In these scenarios it is possible to programmatically modify plans through implementation of the PlanCustomizer interface. For example one could reverse the order of the deploy plan’s phases based on an environment variable.
public class ReverseDeployPhases implements PlanCustomizer {
    @Override
    public Plan updatePlan(Plan plan) {
        if (plan.isDeployPlan() && Boolean.valueOf(System.getenv("REVERSE"))) {
            Collections.reverse(plan.getChildren());
        }

        return plan;
    }
}
Implementations of this interface are called once for each plan at scheduler startup time before plans begin execution. If no modification of a particular plan is desired it should be returned unaltered. A PlanCustomizer implementation may be specified when building a scheduler with a SchedulerBuilder.
SchedulerBuilder builder = DefaultScheduler.newBuilder(serviceSpec, SchedulerConfig.fromEnv())
    .setPlanCustomizer(new ReverseDeployPhases());
Packaging
A DC/OS service must provide a package definition in order to be installed on a DC/OS cluster. At a minimum, a package definition is composed of four files: marathon.json.mustache, config.json, resource.json, and package.json. Examples of all these files are provided in the example helloworld DC/OS service. A detailed explanation of the format and purpose of each of these files is available here.
Universe Package Files At-a-Glance
For a fully detailed explanation of service packaging see here; below we provide a brief introduction to the required files.
-
marathon.json.mustache- A mustache-templated file that provides a Marathon application definition. Its mustache elements are rendered by the values present in the config.json and resource.json files. -
resource.json- A list of URIs of all downloaded elements. Any artifacts needed by your service must be listed here, or else your service will fail to install to airgapped clusters. When an airgapped cluster installs your package, only the files listed here will be available. This list contains some items required in order for the service to run, such asbootstrap.zip(bootstrap utility described elsewhere in this guide) andexecutor.zip(custom executor for DC/OS 1.9 compatibility). -
command.json- This file contains elements specific to a CLI for your service if you want to provide one. -
package.json- This file contains metadata of interest to the Universe, including the minimum version of DC/OS on which the service may be deployed.
The SDK provides utilities for building a package definition and deploying it to a DC/OS cluster for development purposes. An example build.sh script constructs a package and provides instructions for the deployment. The helloworld framework’s build.sh script provides the following output:
$ ./build.sh aws
<snip>
Install your package using the following commands:
dcos package repo remove hello-world-aws
dcos package repo add --index=0 hello-world-aws https://infinity-artifacts.s3.amazonaws.com/autodelete7d/hello-world/20161212-160559-ATLFk70vPlo45X4a/stub-universe-hello-world.zip
dcos package install --yes hello-world
The build.sh script takes an optional argument of aws or local:
-
./build.sh aws: The package definition and build artifacts are uploaded to an S3 bucket in AWS. If you would like to override the S3 bucket location where the packages are uploaded, please add S3_BUCKET environment variable with the bucket name. For example:
$ export S3_BUCKET=my_universe_s3_bucket
-
./build.sh local: The package definition and build artifacts are served by a local HTTP server.
Executing the final command, dcos package install --yes hello-world deploys the service to a DC/OS cluster.
Basic Operations
You can perform three fundamental operations on any instance of a DC/OS service: install, update, and uninstall. With the exception of uninstall, they all follow a fundamental design principle.
All services written with the SDK determine what actions to take based on a target configuration they are trying to reach. The ServiceSpec defines the target configuration. When installing for the first time, a service is going from nothing to the target configuration. When performing a configuration update, a service is going from the current configuration to the target configuration. A software update is identical to a configuration update except that that the software artifacts to be deployed are changed, not just the configuration. The path a service takes to a new target configuration is always defined by a plan.
The following events occur to select a target configuration and move a service from its current configuration to the target.
- Define a target configuration
a. Deploy a Marathon application definition for your service’s scheduler.
b. The scheduler renders the
ServiceSpecand Plan definitions in the service’s YAML definition. - Plan Execution
a. The scheduler compares previous and current
ServiceSpecs: i. Validate theServiceSpec. ii. Determine scenario (install, update or no change). b. The plan is chosen and executed.
These steps are discussed in more detail below.
Defining a Target Configuration
We previously described how a DC/OS service’s scheduler is a Marathon application. Marathon applications define a particular declarative application definition, and DC/OS services constructed with the SDK define another, the ServiceSpecs and plans.
This nested structure of declarative interfaces requires two layers of template rendering. First, the Marathon application definition must be rendered at initial install time from the combination of the marathon.json.mustache, config.json, and resource.json files. Then, the service’s YAML template is rendered using the environment variables presented to the scheduler. Let’s walk through the checked-in helloworld example. Pay particular attention to the templated values surrounded in curly braces, as in {{value}}.
helloworld has a marathon.json.mustache template which, in part, looks as follows:
{
    "env": {
        "FRAMEWORK_NAME": "{{service.name}}",
        "HELLO_COUNT": "{{hello.count}}",
        "HELLO_CPUS": "{{hello.cpus}}",
        "...": "..."
    },
    "uris": [
        "{{resource.assets.uris.scheduler-zip}}",
        "..."
    ],
    "portDefinitions": [
        {
            "port": 0,
            "protocol": "tcp",
            "name": "api",
            "labels": { "VIP_0": "/api.{{service.name}}:80" }
        }
    ],
    "...": "..."
}
The config.json file is in part:
{
    "type":"object",
    "properties":{
        "service":{
            "type":"object",
            "description": "DC/OS service configuration properties",
            "properties":{
                "name" : {
                    "description":"The name of the service instance",
                    "type":"string",
                    "default":"hello-world"
                },
                "...": "..."
            }
        },
        "hello":{
            "type":"object",
            "description":"Hello Pod configuration properties",
            "properties":{
                "cpus":{
                    "description":"Hello Pod cpu requirements",
                    "type":"number",
                    "default":0.1
                },
                "count":{
                    "description":"Number of Hello Pods to run",
                    "type":"integer",
                    "default":1
                },
                "...": "..."
            }
        }
    }
}
The resource.json file is in part:
{
  "assets": {
    "uris": {
      "scheduler-zip": "{{artifact-dir}}/hello-world-scheduler.zip",
      "...": "..."
    }
  },
  "...": "..."
}
The marathon.json.mustache template pulls values from config.json and resource.json and creates an initial Marathon application definition. This application definition can be deployed on Marathon, which installs a DC/OS service’s scheduler. You can override the initial config.json values when installing via the command line.
Important: The environment variable field of the Marathon application definition defines values specific to the helloworld service.
The following is the typical flow of configuration values as represented by environment variables:
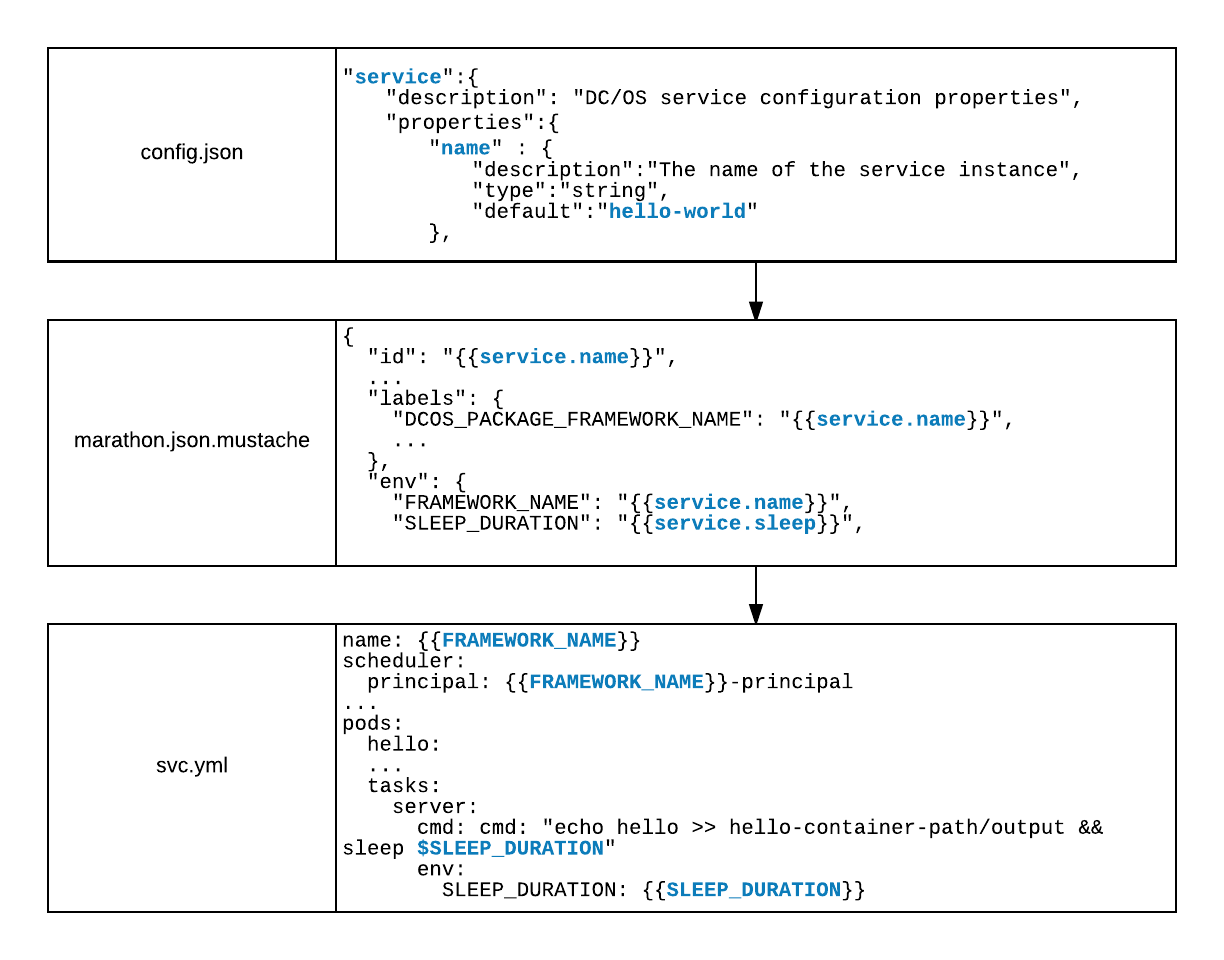
Once Marathon deploys your scheduler, the service’s YAML specification can be rendered by the environment variables you provided. The helloworld’s service definition is in part:
// ...
pods:
    hello:
        count: {{HELLO_COUNT}}
        tasks:
            server:
                // ...
                cpus: {{HELLO_CPUS}}
                // ...
The port definition in marathon.json.mustache makes the PORT0 environment variables available to the scheduler. The HELLO_COUNT and HELLO_CPUS environment variables are provided by the env field of the Marathon application definition, which is provided by the rendered marathon.json.mustache template.
The final rendered ServiceSpec is:
name: "hello-world"
pods:
  hello:
    count: 1
    tasks:
      server:
        goal: RUNNING
        cmd: "echo hello >> hello-container-path/output && sleep 1000"
        cpus: 0.1
        memory: 256
        volume:
          path: "hello-container-path"
          type: ROOT
          size: 50
Plan Execution
Plan Acceptance or Rejection
Once a proposed target configuration has been defined in the form of a ServiceSpec, and, optionally, a deployment plan, the scheduler must decide what course of action to take. At the outset, a scheduler may choose to accept or reject a proposed target configuration. When a scheduler rejections a proposed target configuration the target configuration does not change and the previous target configuration remains the target. The scheduler may reject a target configuration because it is malformed, or violates a business logic or other constraint.
Executing a Plan
Once a proposed target configuration is accepted as the target configuration, the scheduler must determine which plan to execute to reach the target. By default, if no overriding deployment plan is provided, the pods defined in the ServiceSpec will be rolled out serially.
There are two fundamental plan execution scenarios: install and update. Let’s first walk through the deployment of the hello world service in the install case.
Install
Recall the rendered ServiceSpec from above. A single pod containing a single task is defined generating the following plan:
{
    "phases": [{
        "id": "8ee5b023-066e-4ef7-a2c9-5fdfc00a50e5",
        "name": "hello",
        "steps": [{
            "id": "2e3dde39-3ea3-408b-8e00-3346bef93054",
            "status": "COMPLETE",
            "name": "hello-0:[server]",
            "message": "'hello-0:[server]' has status: 'COMPLETE'."
        }],
        "status": "COMPLETE"
    }],
    "errors": [],
    "status": "COMPLETE"
}
Each pod is deployed with a phase, so we have a single phase named after the pod “hello”. Each instance of a pod is deployed with a step within that phase. Since there is a single pod instance, we have a single step named “hello-0:[server]”. The name of the step indicates that it is deploying instance 0 of the pod “hello” with a single task named “server”.
Every element of the plan has an associated status with the following possible values: PENDING, PREPARED, STARTING, COMPLETE, WAITING, and ERROR.
Normally, steps progress through statuses in the following order:
PENDING → PREPARED → STARTING → COMPLETE
The status of a phase or a plan is determined by examination of the step elements. A step may enter an ERROR state when its construction is malformed or whenever the service author determines it to be appropriate. The WAITING state occurs when the operator of the service indicates that an element should be paused. An operator might want to pause a deployment for a multitude of reasons, including unexpected failures during an update.
Update
In the update case, a scheduler goes from one target configuration to the next. The two examples below show how pods are only restarted to consume new configuration information when that information is relevant to the pod.
Vertical Scale Example
This example updates the target configuration we defined in the install above. The new target configuration below increases the amount of CPU consumed by the server task.
In the marathon.json.mustache template we defined an environment variable named HELLO_CPUS. Below, we update this value in Marathon from 0.1 to 0.2.
{
    "id": "/hello-world",
    "env": {
        "HELLO_CPUS": "0.2",
        "HELLO_COUNT": "1",
        "SLEEP_DURATION": "1000",
        "...": "..."
    },
    "...": "..."
}
This will result in restarting the scheduler and re-rendering the ServiceSpec template. The new template is shown below, with the value of cpus changed to 0.2.
name: "hello-world"
pods:
  hello:
    count: 1
    tasks:
      server:
        goal: RUNNING
        cmd: "echo hello >> hello-container-path/output && sleep 1000"
        cpus: 0.2
        memory: 256
        volume:
          path: "hello-container-path"
          type: ROOT
          size: 50
This generates the following deploy Plan:
{
    "phases": [{
        "id": "ce7bf2e6-857d-4188-a21c-6469c2db92fb",
        "name": "hello",
        "steps": [{
            "id": "c47bf620-9cd7-4bae-b9d0-f56ca00e26ce",
            "status": "STARTING",
            "name": "hello-0:[server]",
            "message": "'hello-0:[server]' has status: 'STARTING'."
        }],
        "status": "STARTING"
    }],
    "errors": [],
    "status": "STARTING"
}
In this case, we have changed the resources consumed for a running task. The task must be killed and then restarted with an updated resource reservation. When the Step for a task is in the PREPARED state, the task has been killed and will be restarted as soon as the appropriate resources are available. Once the task is successfully relaunched with the increased resource allocation to reflect the new target configuration, the deploy Plan will be in a COMPLETE state.
Horizontal Scale Example
In the previous example, the change in target configuration affected currently running tasks, so they had to be restarted. In this example, we are changing the number of pod instances to be launched, which should have no effect on currently running pods and therefore will not trigger a restart. The example below increases HELLO_COUNT to 2, adding an additional instance of the hello pod.
{
    "id": "/hello-world",
    "env": {
        "HELLO_CPUS": "0.2",
        "HELLO_COUNT": "2",
        "SLEEP_DURATION": "1000",
        "...": "..."
    },
    "...": "..."
}
This generates the following deploy Plan:
{
    "phases": [{
        "id": "25e741c8-a775-481e-9247-d9073002bb3d",
        "name": "hello",
        "steps": [{
            "id": "6780372e-9154-419b-91c4-e0347ca961af",
            "status": "COMPLETE",
            "name": "hello-0:[server]",
            "message": "'hello-0:[server]' has status: 'COMPLETE'."
        }, {
            "id": "6e519f31-8e2d-41ea-955d-85fdd7e1d624",
            "status": "PENDING",
            "name": "hello-1:[server]",
            "message": "'hello-1:[server]' has status: 'PENDING'."
        }],
        "status": "STARTING"
    }],
    "errors": [],
    "status": "STARTING"
}
Because instance 0 of the hello pod is unaffected by the increase in pod count, we see that hello-0 is never restarted and its step is initialized as COMPLETE. Another step named hello-1 has been generated for instance 1. Once hello-1 has been deployed, the service will have transitioned from its previous configuration to the new target configuration, and the above deploy Plan will be in a COMPLETE state. Note: By default, pods can be scaled up but not scaled down. Decreasing the number of pods will result in a validation error when the Scheduler is restarted. As a safety measure, if you wish to allow scale-in of your pods, you must specify allow-decommission: true for each applicable pod.
Rollback
A special rollback operation is not defined. To roll back a given deployment, deploy the previous configuration as the new target.
Software Upgrade
Like rollback, a special software upgrade operation is not defined. To perform an upgrade, just specify a new target configuration. When performing an upgrade, you are probably creating a target configuration that refers to new URIs with new software to launch tasks. This target configuration change is rolled out like any other update.
API
View
You can view the deployment plan via a REST endpoint your scheduler provides. The plans shown in the examples above were accessed by:
$ curl -k -H "Authorization: token=$AUTH_TOKEN" http://<dcos_url>/service/hello-world/v1/plans/deploy
Interrupt
You can interrupt the execution of a plan by issuing a POST request to the appropriate endpoint:
$ curl -k -X POST -H "Authorization: token=$AUTH_TOKEN" http://<dcos_url>/service/hello-world/v1/plans/deploy/interrupt
Interrupting a plan stops any steps that were not being processed from being processed in the future. Any steps that were actively being processed at the time of an interrupt call will continue.
The interrupt may also be issued against a specific phase within the plan:
$ curl -k -X POST -H "Authorization: token=$AUTH_TOKEN" http://<dcos_url>/service/hello-world/v1/plans/deploy/interrupt?phase=data-nodes
Interrupting a phase of a plan only stops the steps within that phase, without affecting other phases.
Continue
Continue plan execution by issuing a POST request to the continue endpoint:
$ curl -k -X POST -H "Authorization: token=$AUTH_TOKEN" http://<dcos_url>/service/hello-world/v1/plans/deploy/continue
Continue may also be issued on a per-phase basis:
$ curl -k -X POST -H "Authorization: token=$AUTH_TOKEN" http://<dcos_url>/service/hello-world/v1/plans/deploy/continue?phase=data-nodes
Service Discovery
There are two service discovery options that are relevant to the SDK: mesos-dns and VIPs. Mesos-dns provides a stable, predictable address for individual Mesos tasks. VIPs provide a load balancing mechanism across multiple instances of a class of tasks.
Mesos-DNS
All tasks launched in DC/OS receive a DNS address. It is of the form:
<task-name>.<framework-name>.autoip.dcos.thisdcos.directory
So a service defined as follows:
name: "hello-world"
pods:
  hello:
    count: 1
    tasks:
      server:
        goal: RUNNING
        cmd: "echo hello >> hello-container-path/output && sleep 1000"
        cpus: 0.2
        memory: 256
        volume:
          path: "hello-container-path"
          type: ROOT
          size: 50
would generate a single task named “hello-0-server”. The framework’s name is “hello-world”. The Mesos-DNS address for this task would be “hello-0-server.hello-world.autoip.dcos.thisdcos.directory”. Tasks may also specify their own prefixes for the first component of their mesos-dns names using the discovery section in each task definition. In the following example, two tasks within the same pod share a prefix:
name: "hello-world"
pods:
  hello:
    count: 1
    resource-sets:
      pod-resources:
        cpus: 0.2
        memory: 256
        volume:
          path: "hello-container-path"
          type: ROOT
          size: 50
    tasks:
      init:
        goal: ONCE
        resource-set: pod-resources
        cmd: "echo init >> hello-container-path/output && sleep 1000"
        discovery:
          prefix: hello
      server:
        goal: RUNNING
        resource-set: pod-resources
        cmd: "echo hello >> hello-container-path/output && sleep 1000"
        discovery:
          prefix: hello
In this case, while running, both the init and server tasks would be addressable at “hello-0.hello-world.autoip.dcos.thisdcos.directory”, with the “-0” being added automatically to indicate which pod instance to route to. Tasks belonging to different pods may not share the same prefix, and YAML validation will fail if this is found to be the case.
Important: As with resource sets, only a single process at point in time may use a given prefix, meaning that init may not run at the same time as server. A complete service definition would have a deploy plan that ensures this.
VIP
You can also perform service discovery by defining named virtual IP addresses. VIPs load balance, so every task associated with the same prefix and external port pair will be part of a load-balanced set of tasks.
name: "hello-world"
pods:
  hello:
    count: 1
    tasks:
      server:
        goal: RUNNING
        cmd: "echo hello >> hello-container-path/output && sleep 1000"
        cpus: 0.2
        memory: 256
        ports:
            http:
                port: 8080
                advertise: true
                vip:
                    prefix: server-lb
                    port: 80
Defining a VIP is additional information that can be applied to a port. VIPs are defined by a prefix, an internal port, and an external port. The internal port in this example is 8080 and the external port is 80. The prefix is automatically expanded to become an address of the form:
<prefix>.<framework-name>.l4lb.thisdcos.directory
In the example above, a server task can be accessed through the address:
server-lb.hello-world.l4lb.thisdcos.directory:80
Virtual networks
The SDK allows pods to join virtual networks, with the dcos virtual network available by defualt. You can specify that a pod should join the virtual network by adding the following to your service spec YAML:
pods:
  pod-on-virtual-network:
    count: {{COUNT}}
    # join the 'dcos' virtual network
    networks:
      dcos:
    tasks:
      ...
  pod-on-host:
    count: {{COUNT}}
    tasks:
      ...
You can also pass arguments when invoking CNI plugins, by adding labels in your virtual network definition. These labels are are free-form key-value pairs that are passed in the format of key0:value0,key1:value1. Refer to Mesos CNI Configuration for more information about CNI labels. Here is a sample YAML definition with labels:
pods:
  pod-on-virtual-network:
    count: {{COUNT}}
    # join the 'dcos' virtual network
    networks:
      dcos:
        labels: "key0:val0, key1:val1"
    tasks:
      ...
  pod-on-host:
    count: {{COUNT}}
    tasks:
      ...
When a pod is on a virtual network such as the dcos:
- Every pod gets its own IP address and its own array of ports.
- Pods do not use the ports on the host machine.
- Pod IP addresses can be resolved with the DNS:
<task_name>.<service_name>.autoip.dcos.thisdcos.directory. - You can pass network labels to CNI plugins.
Specifying that pods join a virtual network has the following indirect effects:
- The
portsresource requirements in the service spec will be ignored as resource requirements, as each pod has their own dedicated IP namespace.- This was done so that you do not have to remove all of the port resource requirements just to deploy a service on the virtual network.
- A caveat of this is that the SDK does not allow the configuation of a pod to change from the virtual network to the host network or vice-versa.
Metrics
Default
Schedulers generate a set of default metrics. Metrics are reported in three main categories: offers, operations, and status messages.
Offers
- Received.
- Processed.
- Decline (long/short).
Offers are counted as received as soon as they are offered to the scheduler by Mesos. They are counted as processed after they have been compared against the current work the scheduler needs to do, and then either accepted or rejected.
Declined offers fall into two categories: those that are declined for a long time (e.g., 2 weeks) and those that are declined for a short time (e.g., 5 seconds). In general, offers are declined for a short time when the offer queue is full. They are declined for a long time when they fail to match any of the current work requirements.
The offers.process timer reports statistics about how long it takes the scheduler to process all offers in the offer queue.
Operations
Mesos has a set of operations that can be performed on offers. These include, for example, RESERVE and LAUNCH_GROUP.
The count of all operations is reported.
Status
Mesos has a set of TaskStatus messages that schedulers receive. These include, for example, TASK_RUNNING and TASK_FAILED.
The count of all TaskStatus messages is reported.
Reporting
The scheduler’s metrics are reported via three different mechanisms: JSON, prometheus and StatsD. The StatsD metrics are pushed to the address defined by the environment variables STATSD_UDP_HOST and STATSD_UDP_PORT. See the DC/OS Metrics documentation for more details.
The JSON representation of the metrics is available at the /v1/metrics endpoint`.
JSON
{
	"version": "3.1.3",
	"gauges": {},
	"counters": {
		"declines.long": {
			"count": 15
		},
		"offers.processed": {
			"count": 18
		},
		"offers.received": {
			"count": 18
		},
		"operation.create": {
			"count": 5
		},
		"operation.launch_group": {
			"count": 3
		},
		"operation.reserve": {
			"count": 20
		},
		"revives": {
			"count": 3
		},
		"task_status.task_running": {
			"count": 6
		}
	},
	"histograms": {},
	"meters": {},
	"timers": {
		"offers.process": {
			"count": 10,
			"max": 0.684745927,
			"mean": 0.15145255818999337,
			"min": 5.367950000000001E-4,
			"p50": 0.0035879090000000002,
			"p75": 0.40317217800000005,
			"p95": 0.684745927,
			"p98": 0.684745927,
			"p99": 0.684745927,
			"p999": 0.684745927,
			"stddev": 0.24017017290826104,
			"m15_rate": 0.5944843686231079,
			"m1_rate": 0.5250565015924039,
			"m5_rate": 0.583689104996544,
			"mean_rate": 0.3809369986002824,
			"duration_units": "seconds",
			"rate_units": "calls/second"
		}
	}
}
The Prometheus representation of the metrics is available at the /v1/metrics/prometheus endpoint.
Prometheus
# HELP declines_long Generated from Dropwizard metric import (metric=declines.long, type=com.codahale.metrics.Counter)
# TYPE declines_long gauge
declines_long 20.0
# HELP offers_processed Generated from Dropwizard metric import (metric=offers.processed, type=com.codahale.metrics.Counter)
# TYPE offers_processed gauge
offers_processed 24.0
# HELP offers_received Generated from Dropwizard metric import (metric=offers.received, type=com.codahale.metrics.Counter)
# TYPE offers_received gauge
offers_received 24.0
# HELP operation_create Generated from Dropwizard metric import (metric=operation.create, type=com.codahale.metrics.Counter)
# TYPE operation_create gauge
operation_create 5.0
# HELP operation_launch_group Generated from Dropwizard metric import (metric=operation.launch_group, type=com.codahale.metrics.Counter)
# TYPE operation_launch_group gauge
operation_launch_group 4.0
# HELP operation_reserve Generated from Dropwizard metric import (metric=operation.reserve, type=com.codahale.metrics.Counter)
# TYPE operation_reserve gauge
operation_reserve 20.0
# HELP revives Generated from Dropwizard metric import (metric=revives, type=com.codahale.metrics.Counter)
# TYPE revives gauge
revives 4.0
# HELP task_status_task_finished Generated from Dropwizard metric import (metric=task_status.task_finished, type=com.codahale.metrics.Counter)
# TYPE task_status_task_finished gauge
task_status_task_finished 1.0
# HELP task_status_task_running Generated from Dropwizard metric import (metric=task_status.task_running, type=com.codahale.metrics.Counter)
# TYPE task_status_task_running gauge
task_status_task_running 8.0
# HELP offers_process Generated from Dropwizard metric import (metric=offers.process, type=com.codahale.metrics.Timer)
# TYPE offers_process summary
offers_process{quantile="0.5",} 2.0609500000000002E-4
offers_process{quantile="0.75",} 2.2853200000000001E-4
offers_process{quantile="0.95",} 0.005792643
offers_process{quantile="0.98",} 0.005792643
offers_process{quantile="0.99",} 0.111950848
offers_process{quantile="0.999",} 0.396119612
offers_process_count 244.0
Custom Metrics
A service author may choose to expose custom metrics by using the metrics registry. The popular dropwizard metrics library is used. An instance of a MetricsRegistry can be acquired in the following way.
MetricsRegistry registry = Metrics.getRegistry();
Use of this registry will guarantee that metrics are reported on all the appropriate interfaces.
Secrets
Enterprise DC/OS provides a secrets store to enable access to sensitive data such as database passwords, private keys, and API tokens. DC/OS manages secure transportation of secret data, access control and authorization, and secure storage of secret content.
Note: The SDK supports secrets in Enterprise DC/OS 1.10 onwards (not in Enterprise DC/OS 1.9). Learn more about the secrets store.
The SDK allows secrets to be exposed to pods as a file and/or as an environment variable. The content of a secret is copied and made available within the pod.
You can reference the secret as a file if your service needs to read secrets from files mounted in the container. Referencing a file-based secret can be particularly useful for:
- Kerberos keytabs or other credential files.
- SSL certificates.
- Configuration files with sensitive data.
For the following example, a file with path data/somePath/Secret_FilePath1 relative to the sandbox will be created. Also, the value of the environment variable Secret_Environment_Key1 will be set to the content of this secret. Secrets are referenced with a path, i.e. secret-svc/SecretPath1, as shown below.
name: secret-svc/instance1
pods:
  pod-with-secret:
    count: {{COUNT}}
    # add secret file to pod's sandbox
    secrets:
      secret_name1:
        secret: secret-svc/Secret_Path1
        env-key: Secret_Environment_Key
        file: data/somePath/Secret_FilePath1
      secret_name2:
        secret: secret-svc/instance1/Secret_Path2
        file: data/somePath/Secret_FilePath2
      secret_name3:
        secret: secret-svc/Secret_Path3
        env-key: Secret_Environment_Key2
    tasks:
      ....
All tasks defined in the pod will have access to secret data. If the content of the secret is changed, the relevant pod needs to be restarted so that it can get updated content from the secret store.
env-key or file can be left empty. The secret file is a tmpfs file; it disappears when the executor exits. The secret content is copied securely by Mesos if it is referenced in the pod definition as shown above. You can make a secret available as an environment variable, as a file in the sandbox, or you can use both.
Note: Secrets are available only in Enterprise DC/OS, not in OSS DC/OS.
Refer to the Secrets Tutorial for an SDK-based example service using DC/OS secrets.
Authorization for Secrets
The path of a secret defines which service IDs can have access to it. You can think of secret paths as namespaces. Only services that are under the same namespace can read the content of the secret.
For the example given above, the secret with path secret-svc/Secret_Path1 can only be accessed by a services with ID /secret-svc or any service with ID under /secret-svc/. Servicess with IDs /secret-svc/dev1 and /secret-svc/instance2/dev2 all have access to this secret, because they are under /secret-svc/.
On the other hand, the secret with path secret-svc/instance1/Secret_Path2 cannot be accessed by a service with ID /secret-svc because it is not under this secret’s namespace, which is /secret-svc/instance1. secret-svc/instance1/Secret_Path2 can be accessed by a service with ID /secret-svc/instance1 or any service with ID under /secret-svc/instance1/, for example /secret-svc/instance1/dev3 and /secret-svc/instance1/someDir/dev4.
| Secret | Service ID | Can service access secret? |
|---|---|---|
secret-svc/Secret_Path1 |
/user |
No |
secret-svc/Secret_Path1 |
/user/dev1 |
No |
secret-svc/Secret_Path1 |
/secret-svc |
Yes |
secret-svc/Secret_Path1 |
/secret-svc/dev1 |
Yes |
secret-svc/Secret_Path1 |
/secret-svc/instance2/dev2 |
Yes |
secret-svc/Secret_Path1 |
/secret-svc/a/b/c/dev3 |
Yes |
secret-svc/instance1/Secret_Path2 |
/secret-svc/dev1 |
No |
secret-svc/instance1/Secret_Path2 |
/secret-svc/instance2/dev3 |
No |
secret-svc/instance1/Secret_Path2 |
/secret-svc/instance1 |
Yes |
secret-svc/instance1/Secret_Path2 |
/secret-svc/instance1/dev3 |
Yes |
secret-svc/instance1/Secret_Path2 |
/secret-svc/instance1/someDir/dev3 |
Yes |
Note: Absolute paths (paths with a leading slash) to secrets are not supported. The file path for a secret must be relative to the sandbox.
Below is a valid secret definition with a Docker image. The $MESOS_SANDBOX/etc/keys and $MESOS_SANDBOX/data/keys/keyset directories will be created if they do not exist.
- Supported:
etc/keys/Secret_FilePath1 - Not supported:
/etc/keys/Secret_FilePath1
name: secret-svc/instance2
pods:
  pod-with-image:
    count: {{COUNT}}
    image: ubuntu:14.04
    user: nobody
    secrets:
      secret_name4:
        secret: secret-svc/Secret_Path1
        env-key: Secret_Environment_Key
        file: etc/keys/Secret_FilePath1
      secret_name5:
        secret: secret-svc/instance1/Secret_Path2
        file: data/keys/keyset/Secret_FilePath2
    tasks:
      ....
Regions and Zones
Mesos allows agents to expose fault domain information in the form of a region and zone. A region is larger than a zone and should be thought of as containing zones. For example, a region could be a particular datacenter and the racks within that datacenter could be its zones. When this information is provided by Mesos, it is injected into each task’s environment. For example:
REGION: us-west-2
ZONE: us-west-2a
Services may choose to use this information to enable rack awareness. Users may then configure placement rules to ensure that their pods are appropriately placed within specific regions and zones, or distributed across those regions and zones. Apply placement constraints against regions and zones by referencing @region and @zone keys. For example:
[["@zone", "GROUP_BY", "2"]]
The placement rule above would apply the GROUP_BY operator to zones.
Regions (beta)
The SDK allows region-aware scheduling as a beta feature. Enable it by setting the environment variable ALLOW_REGION_AWARENESS to true. Once enabled, placement rules can be written that reference the @region key.
[["@region", "IS", "us-west-2"]]
Any placement rules that do not reference the @region key require placement in the local region.
TLS
This feature works only on Mesosphere DC/OS Enterprise and is not supported on Open Source DC/OS.
The SDK provides an automated way of provisioning X.509 certificates and private keys for tasks. These TLS artifacts can be consumed by tasks to create encrypted TLS connections.
One or more TLS artifacts can be requested by adding the transport-encryption key to the task level YAML definition.
name: "hello-world"
pods:
  hello:
    count: 1
    tasks:
      server:
        goal: RUNNING
        cmd: "./service-with-tls --private-key=server.key --certificate=server.crt --ca-bundle=server.ca"
        cpus: 0.2
        memory: 256
        transport-encryption:
          - name: server
            type: TLS
        ports:
            http:
                port: 8080
                vip:
                    prefix: server-lb
                    port: 80
Every item under transport-encryption must have a unique name. The type field defines the serialization format with which the private key and certificate will be delivered into the task sandbox. Currently, there are two supported formats - TLS and KEYSTORE. Each item will result in a unique private key and the corresponding certificate.
The TLS artifacts within a single task will be unique for a task instance and won’t be shared across all instances of the pod task. Different tasks can request TLS artficats with the same name, but each task will get unique private key and certificate, and they won’t get shared across different tasks.
In the above example, the $MESOS_SANDBOX directory would contain following files:
$MESOS_SANDBOX/
               ...
               server.key
               server.crt
               server.ca
               ...
Here, the file server.crt contains an end-entity certificate in the OpenSSL PEM format (if applicable, this file also includes corresponding intermediate CA certificates). The server.key contains the private key corresponding to the end-entity certificate, in the PKCS#8 PEM format. The file server.ca contains the root CA certificate in the OpenSSL PEM format.
Provisioning
TLS artifacts are provisioned by the scheduler based on the service configuration. Generated artifacts are stored as secrets in the default secrets store. The scheduler stores each artifact (private key, certificate, CA bundle, keystore, and truststore) as a separate secret under the task’s DCOS_SPACE path. This approach ensures that tasks launched by the scheduler will get access to all necessary secrets. If the secret exists for a single artifact, then it is not overwritten and the existing value is used. Currently there is no exposed automated way of regenerating TLS artifacts. The operator can delete secrets from DC/OS secret store which will trigger generating new TLS artifacts.
The scheduler will generate and store TLS artfiacts for both possible formats (TLS, KEYSTORE). Changing the format will not create a new private key.
Generated artifacts are stored as secrets with the following naming scheme:
[DCOS_SPACE]/[hash]__[pod-index-taskname]__[transport-encryption-name]__[artifact-type]
The [hash] represents a SHA1 hash of all Subject Alternative Names that the certificate contains concatenated by ; character. This hash will change every time if operator changes ports vip or discovery task configuration. See the certificate details section.
Example of secrets that would get created based on YAML configuration above:
hello-world/c099361a4cf931ed3a7532a6d7bf9194f35a981e__hello-0-server__server__certificate
hello-world/c099361a4cf931ed3a7532a6d7bf9194f35a981e__hello-0-server__server__private-key
hello-world/c099361a4cf931ed3a7532a6d7bf9194f35a981e__hello-0-server__server__root-ca-certificate
hello-world/c099361a4cf931ed3a7532a6d7bf9194f35a981e__hello-0-server__server__keystore
hello-world/c099361a4cf931ed3a7532a6d7bf9194f35a981e__hello-0-server__server__truststore
Lifetime of secrets containing the TLS artifacts
When a transport-encryption item is removed from the service configuration (i.e. YAML file), it is not removed from the secret store. If the same transport-encryption configuration is added back to the service configuration, the existing TLS artifact will be used.
The UninstallScheduler responsible for cleaning up service installation will try to remove all TLS artifact secrets previously provisioned by the scheduler.
Task artifacts access
Each task that requests one or more TLS artifacts will get artifacts delivered to the task sandbox directory ($MESOS_SANDBOX) as a file-based secret. This feature ensures that data aren’t stored on disk and are held only in memory on the virtual filesystem. The secret appears as a normal file that can be used by an application. A task will only get TLS artifacts that are declared in the service configuration file.
Private key and certificate details
The scheduler provisions the private key and X.509 certificate and exposes them to the task in various serialization formats.
Private key
The private key is generated by using Java KeyPairGenerator initialized with RSA algorithm. The RSA key is generated with 2048 bit size based on NIST recommnedations.
X.509 certificate
An X.509 end-entity certificate corresponding to the private key is generated with the help of the DC/OS certificate authority by sending it a certificate signing request (CSR, built from the public key). The returned end-entity certificate is signed with the private key corresponding to the signing CA certificate that the DC/OS CA is configured with. That signing CA certificate can either be a root CA certificate automatically created during DC/OS cluster installation or a user-provided (custom) CA certificate.
A certificate has the following subject information:
CN=[pod-index-task].[service-name]
O=Mesosphere, Inc
L=San Francisco
ST=CA
C=US
Additional X.509 Subject Alternative Names, based on the pod discovery and vip confiagurations, are encoded into the certificate. If no discovery or port exposed over VIP is configured, the single the certificate comes with a single SAN.
DNSName([pod-index-task].[service-name].autoip.dcos.thisdcos.directory)
Each VIP-exposed port creates in a new SAN entry:
DNSName([port-0-vip-prefix].[service-name].l4lb.thisdcos.directory)
DNSName([port-1-vip-prefix].[service-name].l4lb.thisdcos.directory)
Providing a custom prefix under the discovery replaces the default SAN DNSName([pod-index-task].[service-name].autoip.dcos.thisdcos.directory) with the configured name and pod index, i.e.:
DNSName([discovery-prefix-index].[service-name].autoip.dcos.thisdcos.directory)
This certificate configuration allows the client to run proper TLS hostname verification when the task is accessed by one of the internal DNS names.
Each certificate is valid for 10 years.
Artifacts format
TLS artifacts can be provided to a task in two different formats:
PEM
Standard PEM encoded certificate, private key and root CA certificate. Based on a file extension name it is possible to tell which artifact is in the file.
A certificate file with .crt extension contains an end-entity certificate with optional chain of certificates leading to the root CA certificate. The root CA certificate is not part of end-entity certificate file.
A .key file contains the PEM encoded private key.
A file with .crt extension contains the root CA certificate without the certificate chain.
Java Keystore
The Java Keystore (JKS) is a repository of various certificates and private keys. When a private key and certificate is requested, a task will get 2 JKS format files.
A .keystore is a JKS file that contains a private key with an end-entity certificate and a complete certificate chain, including the root CA certificate. The certificate is stored under the alias name default. The keystore and key are protected by the password notsecure.
A .truststore is a JKS file that contains the DC/OS root CA certificate stored as a trust certificate. The certificte is stored under alias dcos-root. The keystore is protected by notsecure password.
The password notsecure that protects both JKS files (containing an end-entity certificate with private key and root CA certificate) has been selected because most Java tools and libraries require a password. It is not to meant to provide any additional protection. Security of both files is achieved by using DC/OS secrets store with file-based in-memory secrets. No other schedulers or tasks can access TLS artifacts provisioned by a scheduler.
Installation requirements
To enable TLS support a Mesosphere DC/OS Enterprise cluster must be installed in permissive or strict security mode.
A scheduler must run with a service account that has permission to access:
-
DC/OS CA- requiresfullpermission todcos:adminrouter:ops:ca:rwresource -
Secrets store - requires
fullpermissiondcos:secrets:default:<service-name>/andfullpermission ondcos:secrets:list:default:<service-name>The secrets store authorizer supports only permissions on explicit secrets paths. Since SDK provisions many secrets for TLS artifacts it is necessary to give a
service accountbroaddcos:superuser.This is a known limitation and it will get addressed in the future releases of the DC/OS.
Testing
The SDK provides assistance for writing both unit and integration tests.
Unit tests
Unit tests enable you to make sure that changes to your dependencies do not result in breaking changes to your frameworks. The SDK uses the standard JUnit testing system. The hello-world framework provides some example unit tests.
Unit tests that follow the pattern described above will be automatically run on all pull requests, and test failures will block merges. Unit tests can be manually executed either through standard IDE test integrations or through standard gradle commands.
-
All tests:
gradlew check -
Individual framework:
gradlew check -p frameworks/<framework-name>
Integration tests
Within the context of the SDK, integration tests validate expected service behavior in a DC/OS cluster. The library that provides the majority of the functionality required to write such tests is called shakedown. Shakedown provides capabilities that make it easy to perform service operations such as install, uninstall, configuration update, software upgrade, rollback, and pod restart. As with unit tests, these tests are run against every pull request and failures blocks merges. The hello-world framework provides some example integration tests.
You can run integration tests manually using py.test. The
integration tests assume you have a running DC/OS cluster, and have
installed the
DC/OS CLI.
Here’s an example of running the tests for the helloworld framework:
$ tools/venvutil.py create venv
$ source venv/bin/activate
$ py.test frameworks/helloworld/
Advanced DC/OS Service Definition
ServiceSpec (YAML)
The most basic set of features present in the YAML representation of the ServiceSpec are presented above. The remaining features are introduced below.
Pods
You may specify the number of pod instances to be run for every pod. As a safety measure, after initial install, users can increase but not decrease this value. If you wish to allow scale-in of your pods, you must specify allow-decommission: true for each applicable pod:
name: "hello-world"
pods:
  hello:
    count: 3
    allow-decommission: true
    ...
You should only enable this option if it is safe for the pod’s tasks be destroyed without needing to perform additional rebalancing or drain operations beforehand.
Pods removed from a service specification entirely will be decommissioned. All instances of undefined pods will have their tasks killed and all their resources released back to the cluster. Note: If you instead wish to kill tasks without releasing their resources back to the cluster, you may do this using a custom deployment plan.
For example, updating a ServiceSpec from:
name: "hello-world"
pods:
  hello:
    count: 1
    allow-decommission: true
    tasks:
      server:
        goal: RUNNING
        cmd: "echo hello"
        cpus: 1.0
        memory: 256
  world:
    count: 1
    tasks:
      server:
        goal: RUNNING
        cmd: "echo world"
        cpus: 1.0
        memory: 256
to:
name: "hello-world"
pods:
  world:
    count: 1
    tasks:
      server:
        goal: RUNNING
        cmd: "echo world"
        cpus: 1.0
        memory: 256
would result in all hello-<index>-server tasks being killed and their resources unreserved. Note: In order for the pod to be removed, it must have specified allow-decommission: true before the removal. If you wish to decommission a pod which doesn’t currently allow decommissioning, two configuration updates must be performed: one to add allow-decommission: true to the pod specification and another to remove the pod specification.
Non-essential tasks
When multiple goal: RUNNING tasks are defined in a single pod and one of those tasks has exited, the default behavior is to relaunch all of the goal: RUNNING tasks in the pod. To change this behavior, tasks may be marked “non-essential” by specifying essential: false in their TaskSpec. When a non-essential task exits, it will be automatically relaunched without disturbing other tasks in the pod. For an example, see the following ServiceSpec:
name: "hello-world"
pods:
  hello:
    count: 1
    allow-decommission: true
    tasks:
      server:
        goal: RUNNING
        cmd: "echo hello"
        cpus: 1.0
        memory: 256
      monitor:
        goal: RUNNING
        cmd: "echo monitor"
        cpus: 1.0
        memory: 256
        essential: false
In this example, the monitor task is marked as non-essential, while the server task continues to be essential. If the monitor task exits, it will be automatically relaunched without disturbing the server task. However if the server task exits, then both the server task and the monitor task will both be relaunched.
This option is only relevant for pods containing multiple goal: RUNNING tasks.
Containers
Each pod runs inside a single container. The ServiceSpec specifies the following:
- We can specify the
imagethat we want to use, for example, a Docker image. The image is run in the Mesos Universal Container Runtime. - The
networksfield specifies the virtual networks to join. For a container to have its own IP address, it must join a virtual network. One example of a supported virtual network is thedcosoverlay network. - The
rlimitsfield allows you to set POSIX resource limits for every task that runs inside the container.
The example ServiceSpec below specifies:
- The
ubuntucontainer image. - The soft limit for number of open file descriptors for any task in the
hellopod as 1024, and the hard limit to 2048. - That the pod should join the
dcosvirtual network.
In the example below, we’re specifying that we want to run the ubuntu image, the soft limit for number of open file descriptors for any task in the “hello” pod is set to 1024, the hard limit to 2048 and we’re specifying that the pod joins the dcos virtual network:
name: "hello-world"
pods:
  hello:
    count: 1
    image: ubuntu
    networks:
      dcos:
    rlimits:
      RLIMIT_NOFILE:
        soft: 1024
        hard: 2048
    tasks:
      server:
        goal: RUNNING
        cmd: "echo hello"
        cpus: 1.0
        memory: 256
For a full list of which rlimits are supported, refer to the Mesos documentation on rlimits.
Virtual networks
The SDK supports having pods join virtual neworks (including the dcos overlay network). For an in-depth explanation of how virtual networks work on DC/OS see the documentation. When a pod joins a virtual network it gets its own IP address and has access to its own array of ports. Therefore when a pod specifies that it is joining dcos we ignore the ports resource requirements, because the pod will not consume the ports on the host machine. The DNS for pods on this virtual network is <task_name>.<framework_name>.autoip.dcos.thisdcos.directory. Note that this DNS will also work for pods on the host network. Because the ports resources are not used when a pod is on the virtual network, we do not allow a pod to be moved from a virtual network to the host network or vice-versa. This is to prevent potential starvation of the task when the host with the reserved resources for the task does not have the available ports required to launch the task.
Placement Rules
Pods specifications may be configured with placement rules which describe where and how those pods may be deployed in the cluster. This setting supports all Marathon-style placement operators, using the following format: ["field", "operator"[, "parameter"]]. If you require placement logic that isn’t offered by the default Marathon-style placement operators, you should consider using PlacementRules in Java.
We recommend exposing placement constraints as templated out configuration settings, so that they may be easily customized by end-users. For example, your YAML specification may contain the following:
name: "hello-world"
pods:
  hello:
    count: 3
    placement: '{{{HELLO_PLACEMENT}}}'
    tasks:
      server:
        goal: RUNNING
        cmd: "echo hello"
        cpus: 1.0
        memory: 256
In this example your configuration would expose a HELLO_PLACEMENT configuration setting with some default value. You may then provide a default value for that setting, such as [["hostname", "UNIQUE"]] to ensure that no two hello instances are on the same agent at a time, or [["rack_id", "LIKE", "rack-foo-.*"]] to ensure that hello instances are only placed on agents with a rack_id that starts with "rack-foo-". Multiple placement rules may be ANDed together by separating them with a comma, e.g. [["hostname", "UNIQUE"], ["rack_id", "LIKE", "rack-foo-.*"]].
Resource Sets
A Mesos task is always a process that consumes some resources. In the example below, the server task is a command that prints “hello” to a file while consuming 1.0 CPUs, 256 MB of memory, and 50 MB of disk space for its volume.
name: "hello-world"
pods:
  hello:
    count: 1
    tasks:
      server:
        goal: RUNNING
        cmd: "echo hello >> hello-container-path/output && sleep 1000"
        cpus: 1.0
        memory: 256
        volume:
          path: "hello-container-path"
          type: ROOT
          size: 50
An equivalent way to define the same task is as follows:
name: "hello-world"
pods:
  hello:
    count: 1
    resource-sets:
      hello-resources:
        cpus: 1.0
        memory: 256
        volume:
          path: "hello-container-path"
          type: ROOT
          size: 50
    tasks:
      server:
        goal: RUNNING
        cmd: "echo hello >> hello-container-path/output && sleep 1000"
        resource-set: hello-resources/
In this case, the resources are declared separately from the server task in a resource set named hello-resources. They are referenced by a resource-set element in the task definition. A task continues to be defined as the combination of a process to run and resources to consume. This alternate formulation provides you with increased flexibility: you can now define multiple processes that can consume the same resources.
Pods can also define volumes at the pod level, allowing volumes to be shared between every task in a pod. Although volumes defined on individual tasks are currently visible between tasks in a pod, this will change with the introduction of pods based on Mesos Task Groups. Once this change is made, pods will need to define volumes at the pod level if they are intended to be shared across tasks, as in the following example:
name: "hello-world"
pods:
  hello:
    count: 1
    volume:
      path: "shared-container-path"
      type: ROOT
      size: 50
    tasks:
      server:
        goal: RUNNING
        cmd: "echo hello >> shared-container-path/output && sleep 1000"
        cpus: 1.0
        memory: 256
Important: At any given point in time, only a single process may be consuming a given set of resources. Resources may never be shared simultaneously by multiple tasks. Any attempt to launch a task consuming an already consumed resource-set will result in the killing of the task which is currently running and the launch of the new task.
This alternative formulation of tasks is useful when several tasks should be sequenced in the same container and have a cumulative effect on data in a volume. For example, if you want to initialize something before running the long running server task, you could write the following:
name: "hello-world"
pods:
  hello:
    count: 1
    resource-sets:
      hello-resources:
        cpus: 1.0
        memory: 256
        volume:
          path: "hello-container-path"
          type: ROOT
          size: 50
    tasks:
      initialize:
        goal: ONCE
        cmd: "echo initialize >> hello-container-path/output"
        resource-set: hello-resources
      server:
        goal: RUNNING
        cmd: "echo hello >> hello-container-path/output && sleep 1000"
        resource-set: hello-resources
Both tasks now refer to the same resource set. However, since they cannot consume this resource simultaneously we must impose an ordering. We want to run the initialize task, allow it to finish, and then start the long running server task, which produces the following output in the hello-container-path/output file:
initialize
hello
Provide an ordering by specifying a custom deployment plan. The final YAML file would be:
name: "hello-world"
pods:
  hello:
    count: 1
    resource-sets:
      hello-resources:
        cpus: 1.0
        memory: 256
        volume:
          path: "hello-container-path"
          type: ROOT
          size: 50
    tasks:
      initialize:
        goal: ONCE
        cmd: "echo initialize >> hello-container-path/output"
        resource-set: hello-resources
      server:
        goal: RUNNING
        cmd: "echo hello >> hello-container-path/output && sleep 1000"
        resource-set: hello-resources
plans:
  deploy:
    strategy: serial
    phases:
      hello-deploy:
        strategy: serial
        pod: hello
        steps:
          - default: [[initialize], [server]]
The plan defined above, the instance of the hello pod with index 0 should first have the initialize task run, followed by the server task. Because they refer to the same resource set and their commands print to the same file in the same volume, the sequencing of tasks has a cumulative effect on the container context. For a fully featured practical example of this pattern, see the HDFS service here.
Sidecar Plans
You can include arbitrary additional plans beyond the deploy plan. These may be executed at runtime to perform, for example, maintenance operations like backup. Below we have an example describing how to declare a sidecar plan.
name: "hello-world"
pods:
  hello:
    count: 1
    resource-sets:
      hello-resources:
        cpus: 1
        memory: 256
      sidecar-resources:
        cpus: 0.1
        memory: 256
    tasks:
      server:
        goal: RUNNING
        cmd: "echo hello >> output && sleep $SLEEP_DURATION"
        resource-set: hello-resources
        env:
          SLEEP_DURATION: 1000
      sidecar:
        goal: ONCE
        cmd: "echo $PLAN_PARAMETER1 $PLAN_PARAMETER2 >> output"
        resource-set: sidecar-resources
plans:
  sidecar-example:
    strategy: serial
    phases:
      sidecar-deploy:
        strategy: parallel
        pod: hello
        steps:
          - default: [[sidecar]]
The command definition for the sidecar task includes environment variables, PLAN_PARAMETER1 and PLAN_PARAMETER2, that are not defined elsewhere in the service definition. You can supply these parameters when the plan is initiated. The parameters will be propagated to the environment of every task launched by the plan.
To initiate the plan, execute an HTTP POST request against the /v1/plans/sidecar-example/start endpoint with the header Content-Type: application/json set and a JSON body consisting of environment variable name/value pairs. For example:
$ curl -k -X POST -H "Authorization: token=$AUTH_TOKEN" -H "Content-Type: application/json" --data '{"PLAN_PARAMETER1": "sidecar", "PLAN_PARAMETER2": "plan"}' http://<dcos_url>/service/hello-world/v1/plans/sidecar-example/start
You can also use the DC/OS CLI:
$ dcos $FRAMEWORK_NAME plan start sidecar-example -p PLAN_PARAMETER1=sidecar -p PLAN_PARAMETER2=plan
When no parameters are specified, the body of the POST request must be an empty JSON object ({}). Supply default values with standard Bash syntax. In the above case, you can declare the default value of PLAN_PARAMETER1 to be sidecar by changing the task’s command string to echo ${PLAN_PARAMETER1:-sidecar} >> output.
Monitor sidecar plan progress like any other plan: by issuing GET requests against the /v1/plans/sidecar-example endpoint.
Because the sidecar task is defined inside the hello pod, it will run inside the hello pod when the sidecar-example plan is started. This gives it access to all the resources in the hello pod, including any persistent volumes that may be present. In this way, a backup plan could be constructed and executed on demand.
URIs
You can include an arbitrary list of URIs to download before launching a task or before launching a pod. The Mesos fetcher automatically extracts and caches the URIs. To attach URIs to the context of a task, modify the YAML as below:
name: "hello-world"
pods:
  hello:
    count: 1
    tasks:
      server:
        goal: RUNNING
        cmd: "echo hello"
        cpus: 1.0
        memory: 256
        uris:
          - https://foo.bar.com/package.tar.gz
          - https://foo.bar.com/bundle.tar.gz
To add URIs to a pod, modify the YAML as below:
name: "hello-world"
pods:
  hello:
    count: 1
    uris:
      - https://foo.bar.com/package.tar.gz
      - https://foo.bar.com/bundle.tar.gz
    tasks:
      server:
        goal: RUNNING
        cmd: "echo hello"
        cpus: 1.0
        memory: 256
URIs included in a pod are accessible to all its tasks.
Configuration Templates
It is common for a service to require configuration files to be present in the context of a task. The SDK provides a method for defining and placing task-specific configuration files. A configuration file is template that can be dynamically rendered by environment variables. Add a configuration file to a task in the following way:
name: "hello-world"
pods:
  hello:
    count: 1
    tasks:
      server:
        goal: RUNNING
        cmd: "echo hello && sleep 1000"
        cpus: 0.1
        memory: 256
        configs:
          config.xml:
            template: config.xml.mustache
            dest: etc/config.xml
The template content may be templated using the mustache format. Any templated parameters in the file may be automatically populated with environment variables from within the task, by including the bootstrap utility in your tasks. See Bootstrap Tool for more information. at the beginning of the task.
For example, say you had a container with the following environment variables:
PORT_FOO=1984
FRAMEWORK_NAME=mysvc
And a config.xml.mustache template like this:
<config>
  <port>{{PORT_FOO}}</port>
  <service>{{FRAMEWORK_NAME}}</service>
  <!-- ... -->
</config>
When the bootstrap helper is run, it would automatically create a populated version of that file in etc/config.xml:
<config>
  <port>1984</port>
  <game>mysvc</game>
  <!-- ... -->
<config>
To be clear, the config templating provided by the bootstrap tool may be applied to any text format, not just XML as in this example. This makes it a powerful tool for handling any config files your service may need. Read more about setting this up in the Bootstrap Tool section.
Task Environment
Task configuration is generally exposed using environment variables. A number of environment variables that describe the task and/or cluster environment are provided automatically, while the developer can manually specify others.
Included Values
The following environment values are automatically injected into all tasks as a convenience. These typically provide some additional context about the container.
TASK_NAME=hello-3-server
The name of the task, such as hello-3-server.
<task-name>=true
The name of the task as the environment variable, with a value of true. Useful in mustache templating.
POD_INSTANCE_INDEX=3
The index of the pod instance, starting at zero. For example a task named hello-3-server would have a POD_INSTANCE_INDEX of 3.
-
REGION=us-west-2/ZONE=us-west-2a
The Region and Zone of the machine running the task. For more information about these values, see Regions and Zones.
FRAMEWORK_NAME=/folder/servicename
The name of the service as configured by the user. May contain slashes if the service is in a folder.
FRAMEWORK_HOST=folderservicename.autoip.thisdcos.directory
The TLD for accessing tasks within the service. To address a given task, one could construct a hostname as <taskname>.FRAMEWORK_HOST. This varies according to the service name as configured by the user.
FRAMEWORK_VIP_HOST=folderservicename.l4lb.thisdcos.directory
The TLD for VIPs advertised by the service. To address a given VIP, one could construct a hostname as <vipname>.FRAMEWORK_VIP_HOST. This varies according to the service name as configured by the user.
SCHEDULER_API_HOSTNAME=api.folderservicename.marathon.l4lb.thisdcos.directory
The hostname where the Scheduler can be reached. Useful when tasks need to make API calls to a custom endpoint that’s being run by the Scheduler.
Specifying Values
You can define the environment of a task in a few different ways. In the YML ServiceSpec, it can be defined in the following way.
name: "hello-world"
pods:
  hello:
    count: 1
    tasks:
      server:
        goal: RUNNING
        cmd: "echo hello && sleep 1000"
        cpus: 0.1
        memory: 256
        env:
          FOO: bar
          BAZ: {{BAZ}}
As in any other case, environment variables may be templated values. Schedulers written using the SDK also detect particular formats of environment. To inject a common set of environment variables into the contexts of all tasks, you can add environment variables to the scheduler’s context in the form below:
TASKCFG_ALL_<KEY>: <VALUE>
For example:
TASKCFG_ALL_FOO: BAR → FOO: BAR
To inject environment variables into the contexts of all instances of a particular pod type, define environment variables of the form below to the scheduler’s context.
TASKCFG_<POD-NAME>_<KEY>: <VALUE>
For example:
TASKCFG_HELLO_BAZ: BAZ → BAZ: BAZ
Task Bootstrap
The cmd in each task defines what’s run for the lifetime of that task. A common problem when defining tasks is providing some sort of initial configuration, waiting for hosts to resolve, and other up-front work.
The bootstrap utility executable is available for running at the start of your tasks to perform these common task operations, including:
- Logging
env(useful for debugging) - Rendering any
configsprovided in the task definition and writing the result to the configureddests. - Waiting for the task’s own hostname to be resolvable, or optionally wait for other custom hostnames to be resolvable, before exiting
These operations may be enabled, disabled, and customized via bootstraps commandline arguments in your cmd. See the source code for more details on what specific options are available.
Including bootstrap in your tasks is a manual but straightforward operation. First, you should to add it to the package definition (resources.json and marathon.json.mustache), then include it in the service definition (svc.yml):
resources.json:
{
  "assets": {
    "uris": {
      "...": "...",
      "bootstrap-zip": "{{artifact-dir}}/bootstrap.zip",
      "...": "..."
    }
  }
}
marathon.json.mustache:
{
  "id": "{{service.name}}",
  "cpus": 1.0,
  "mem": 2048,
  "env": {
    "BOOTSTRAP_URI": "{{resource.assets.uris.bootstrap-zip}}",
    "...": "..."
  }
}
svc.yml:
name: "hello-world"
pods:
  hello:
    count: 1
    uris:
      - {{BOOTSTRAP_URI}} # fetch/unpack bootstrap.zip into this pod
    tasks:
      server:
        goal: RUNNING
        cmd: "./bootstrap && echo hello && sleep 1000" # run 'bootstrap' before 'hello'
        cpus: 0.1
        memory: 256
        configs:
          config.xml:
            template: "config.xml.mustache"
            dest: etc/config.xml
Now the bootstrap executable will automatically be run at the start of hello tasks. By default it will first print the env, then will handle rendering the config.xml.mustache template to etc/config.xml, then wait for the hello task’s hostname to be locally resolvable.
Health Checks
If a task is unhealthy, the scheduler will kill and restart it. You may define a health check for a task by adding a health-check parameter to its TaskSpec:
name: "hello-world"
pods:
  hello:
    count: 1
    tasks:
      server:
        goal: RUNNING
        cmd: "echo hello && sleep 1000"
        cpus: 0.1
        memory: 256
        health-check:
          cmd: "./check-up"
          interval: 5
          grace-period: 30
          max-consecutive-failures: 3
          delay: 0
          timeout: 10
The interval, grace-period, delay, and timeout elements are denominated in seconds. If the maximum consecutive number of failures is exceeded, the task will be killed.
Readiness Checks
Use a readiness check when a task must perform some initialization before subsequent steps run. By default, a step will be COMPLETE when its task reaches its goal state (RUNNING or COMPLETED), but if the task has a readiness check, its step won’t be COMPLETE until its readiness check passes. You may define a readiness check for a task by adding a readiness-check parameter to its TaskSpec:
name: "hello-world"
pods:
  hello:
    count: 1
    tasks:
      server:
        goal: RUNNING
        cmd: "echo hello && sleep 1000"
        cpus: 0.1
        memory: 256
        readiness-check:
          cmd: "./readiness-check"
          interval: 5
          delay: 0
          timeout: 10
The interval, delay, and timeout elements are denominated in seconds.
Volumes
Persistent volumes allow data to be stored on disks and survive.
name: "hello-world"
pods:
  hello:
    count: 3
    tasks:
      server:
        goal: RUNNING
        cmd: "echo hello >> hello-container-path/output && sleep $SLEEP_DURATION"
        cpus: 1.0
        memory: 256
        volume:
          path: "hello-container-path"
          type: ROOT
          size: 5000
The path is relative to the sandbox path if not preceded by a leading “/”. The sandbox path is always available in the environment variable MESOS_SANDBOX. The different between ROOT and MOUNT volumes is documented here. The PATH type is not currently supported.
Proxy Fallback
Applications may not work properly behind adminrouter. In that case, one may use Repoxy.