Compiling ArangoDB under Windows
Problem
I want to compile ArangoDB 3.0 and onwards under Windows.
Note: For this recipe you need at least ArangoDB 3.0; For ArangoDB version before 3.0 look at the old Compiling ArangoDB under Windows.
Solution
With ArangoDB 3.0 a complete cmake environment was introduced. This also streamlines the dependencies on windows. We sugest to use chocolatey.org to install most of the dependencies. For sure most projects offer their own setup & install packages, chocolatey offers a simplified way to install them with less userinteractions. You can even use chocolatey via the brand new ansibles 2.0 winrm facility to do unattended installions of some software on windows - the cool thing linux guys always told you about.
Ingredients
First install the choco package manager by pasting this tiny cmdlet into a command window (needs to be run with Administrator privileges; Right click start menu, Command Prompt (Admin)):
@powershell -NoProfile -ExecutionPolicy Bypass -Command "iex ((new-object net.webclient).DownloadString('https://chocolatey.org/install.ps1'))" && SET PATH=%PATH%;%ALLUSERSPROFILE%\chocolatey\bin
Visual Studio and its Compiler
Since choco currently fails to alter the environment for Microsoft Visual Studio, we suggest to download and install Visual Studio by hand. Currently Visual Studio 2015 is the only supported option.
You need to make sure that it installs the option "Programming Languages / C++", else cmake will fail to dectect it later on.
After it successfully installed, start it once, so it can finish its setup.
More dependencies
Now you can invoke the choco package manager for an unattended install of the dependencies (needs to be run with Administrator privileges again):
choco install -y cmake.portable nsis python2 procdump windbg wget nuget.commandline
Then we fetch the OpenSSL library via the nuget commandline client (doesn't need Administrator privileges):
nuget install openssl
Optional
If you intend to run the unittests or compile from git, you also need (needs to be run with Administrator privileges again):
choco install -y git winflexbison ruby
Close and reopen the Administrator command window in order to continue with the ruby devkit:
choco install -y ruby2.devkit
And manually install the requirements via the Gemfile fetched from the ArangoDB Git repository (needs to be run with Administrator privileges):
wget https://raw.githubusercontent.com/arangodb/arangodb/devel/UnitTests/HttpInterface/Gemfile
set PATH=%PATH%;C:\tools\DevKit2\bin;C:\tools\DevKit2\mingw\bin
gem install bundler
bundler
Note that the V8 build scripts and gyp aren't compatible with Python 3.x hence you need python2!
Building ArangoDB
Download and extract the release tarball from https://www.arangodb.com/download/
Or clone the github repository, and checkout the branch or tag you need (devel, 3.0)
git clone https://github.com/arangodb/arangodb.git -b devel
cd arangodb
Generate the Visual studio project files, and check back that cmake discovered all components on your system:
mkdir Build64
cd Build64
cmake -G "Visual Studio 14 Win64" ..
Note that in some cases cmake struggles to find the proper python interpreter (i.e. the cygwin one won't work). You can force overrule it by appending:
-DPYTHON_EXECUTABLE:FILEPATH=C:/tools/python2/python.exe
You can now load these in the Visual Studio IDE or use cmake to start the build:
cmake --build . --config RelWithDebInfo
The binaries need the ICU datafile icudt54l.dat, which is automatically copied into the directory containing the
executable.
For development, unittests and documentation: Cygwin (Optional)
The documentation and unittests still require a cygwin environment. Here the hints how to get it properly installed:
You need at least make from cygwin. Cygwin also offers a cmake. Do not install the cygwin cmake.
You should also issue these commands to generate user informations for the cygwin commands:
mkpasswd > /etc/passwd
mkgroup > /etc/group
Turning ACL off (noacl) for all mounts in cygwin fixes permissions troubles that may appear in the build:
# /etc/fstab
#
#    This file is read once by the first process in a Cygwin process tree.
#    To pick up changes, restart all Cygwin processes.  For a description
#    see https://cygwin.com/cygwin-ug-net/using.html#mount-table

# noacl = Ignore Access Control List and let Windows handle permissions
C:/cygwin64/bin  /usr/bin   ntfs      binary,auto,noacl           0  0
C:/cygwin64/lib  /usr/lib   ntfs      binary,auto,noacl           0  0
C:/cygwin64      /          ntfs      override,binary,auto,noacl  0  0
none             /cygdrive  cygdrive  binary,posix=0,user,noacl   0  0
Enable native symlinks for Cygwin and git
Cygwin will create proprietary files as placeholders by default instead of actually symlinking files. The placeholders later tell Cygwin where to resolve paths to. It does not intercept every access to the placeholders however, so that 3rd party scripts break. Windows Vista and above support real symlinks, and Cygwin can be configured to make use of it:
# use actual symlinks to prevent documentation build errors
# (requires elevated rights!)
export CYGWIN="winsymlinks:native"
Note that you must run Cygwin as administrator or change the Windows group
policies to allow user accounts to create symlinks (gpedit.msc if available).
BTW: You can create symlinks manually on Windows like:
mklink /H target/file.ext source/file.ext
mklink /D target/path source/path
mklink /J target/path source/path/for/junction
And in Cygwin:
ln -s source target
Making the ICU database publically available
If you intend to use the machine for development purposes, it may be more practical to copy it to a common place:
cp 3rdParty/V8/V8-5.0.71.39/third_party/icu/source/data/in/icudtl.dat /cygdrive/c/Windows/icudt54l.dat
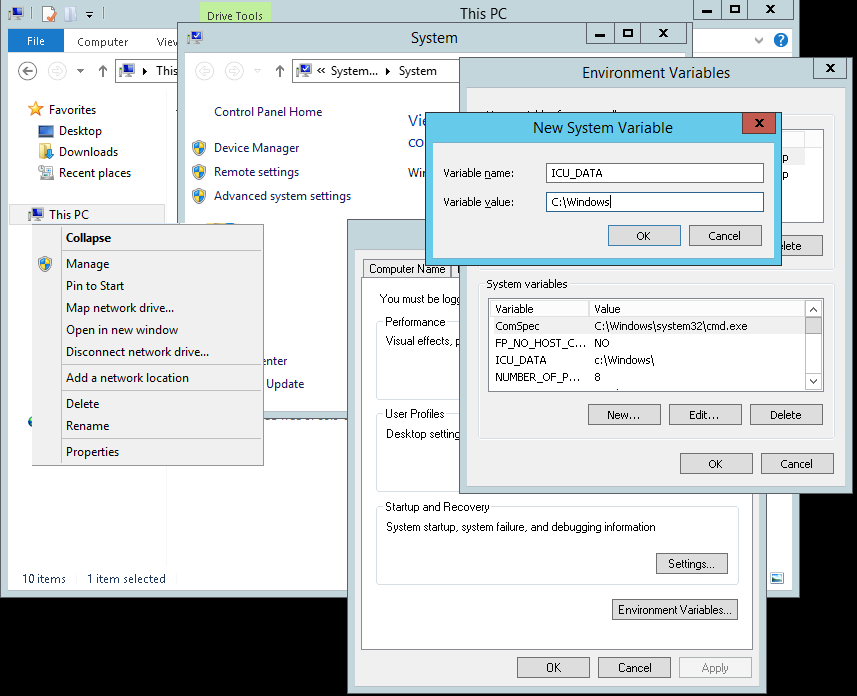
And configure your environment (yes this instruction remembers to the hitchhikers guide to the galaxy...) so that
ICU_DATA points to c:\\Windows. You do that by opening the explorer,
right click on This PC in the tree on the left, choose Properties in the opening window Advanced system settings,
in the Popup Environment Variables, another popup opens, in the System Variables part you click New,
And variable name: ICU_DATA to the value: c:\\Windows
Running Unitests (Optional)
You can then run the unittests in the cygwin shell like that:
build64/bin/RelWithDebInfo/arangosh.exe \
-c etc/relative/arangosh.conf \
--log.level warning \
--server.endpoint tcp://127.0.0.1:1024 \
--javascript.execute UnitTests/unittest.js \
  -- \
  all \
  --ruby c:/tools/ruby22/bin/ruby \
  --rspec c:/tools/ruby22/bin/rspec \
  --buildType RelWithDebInfo \
  --skipNondeterministic true \
  --skipTimeCritical true
  --skipBoost true \
  --skipGeo true
Documentation (Optional)
NodeJS (needs to be run with Administrator privileges again):
choco install -y nodejs
Gitbook:
npm install -g gitbook-cli
Markdown-pp:
git clone https://github.com/triAGENS/markdown-pp.git
cd markdown-pp
python setup.py install
Ditaa:
Download and install: http://ditaa.sourceforge.net/#download
Authors: Frank Celler, Wilfried Goesgens and Simran Brucherseifer.
Tags: #windows