The [fleXive] user account administration UI provides an administration interface to administer your user accounts, assign users to user groups assign roles and administer additional settings like account activation and language settings.
The following screen shows the user account editor when creating a new user.
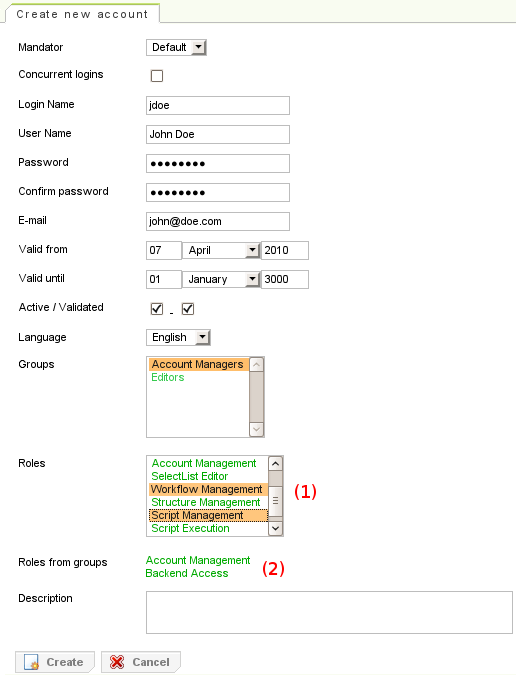
Roles are a key feature of the [fleXive] security concept. There are two ways to assign roles to a user.
- (1) Direct assignment
- (2) Inheritance through user group membership
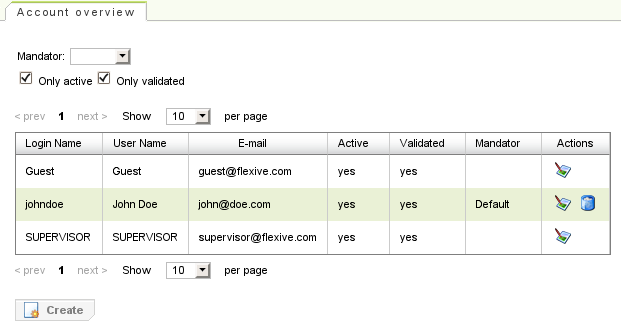
After creation, you will be redirected to the user account overview where you can edit and delete users.
The following screen shows the user group overview.
You can see the two system defined accounts:
- Guest
-
Everyone who is not logged in is treated as guest.
- SUPERVISOR
-
This user is in all roles and may operate on all mandators.
These two accounts cannot be removed.
By clicking the edit icon
 a user account may be edited and by clicking the delete icon
 a user account may be deleted.
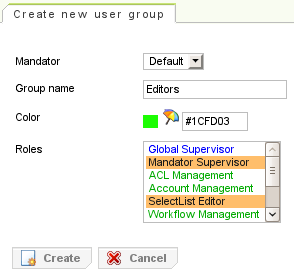
The user group editor allows you to create and edit user groups. You can specify a group name, a color and assign roles to the group.
After saving you will be redirected to the user group overview.
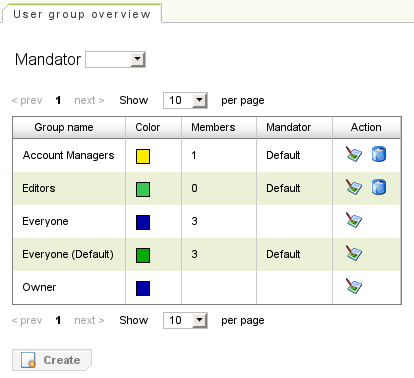
The following screen shows the user account overview. The default system user groups cannot be deleted:
- Everyone (Default)
-
For every mandator an according "Everyone" group is created automatically. In order to be able to distinguish the different "Everyone" groups, the mandator's name is shown in the brackets. The "Everyone(Default)" group contains every user of the mandator named Default .
- Everyone
-
System user group containing every user of every mandator.
- Owner
-
The system user group
Owneris used to assign ACLs and thereby grant permissions to content owners (i.e. users that created content).
By clicking the edit icon
 a user group may be edited and by clicking the delete icon
 a user group may be deleted.
This chapter explains the administration UI for mandators. Please see section Mandators in chapter Security for an explanation of the concept of mandators used in [fleXive].
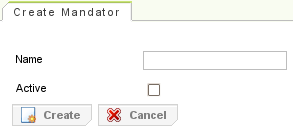
The following screen shows the mandator editor. You can specify a name for the mandator and set the activation flag.
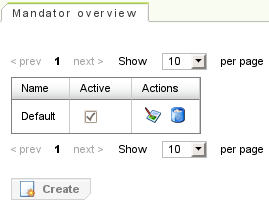
After creating a mandator, you will be redirected to the overview for mandators.
The ACL administration UI provides an ACL editor to edit and create ACLs and to set permissions for user groups in the permission matrix. ACLs are a key feature of the [fleXive] security concept.
The following screen shows the ACL editor in create mode.
You must specify
-
The mandator
-
The ACL's name
-
The ACL's label
-
A color
-
A category
Please see chapter ACL's - Access Control Lists for information about ACL categories in [fleXive].
The following categories are available:
-
An optional description
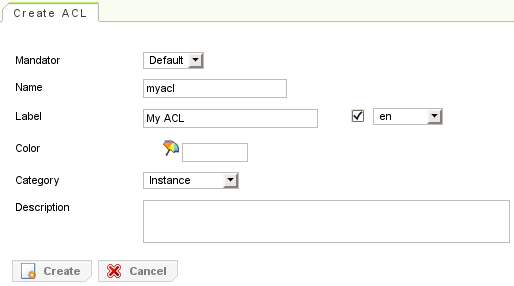
After pressing the "Create" button the permission matrix becomes available.
The permission matrix is available in the ACL editor for already created ACLs. Add rows to assign the ACL to user groups and toggle the checkboxes in the matrix to grant permissions. For deleting an assignment to a user group the delete icon needs to be clicked.
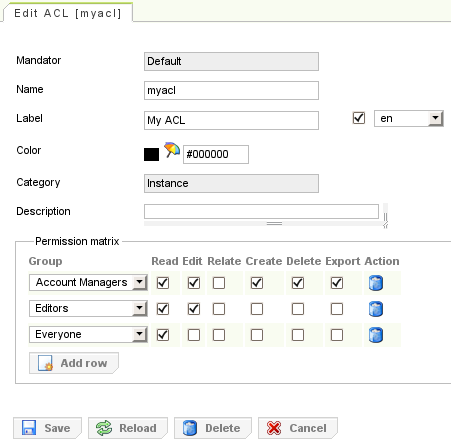
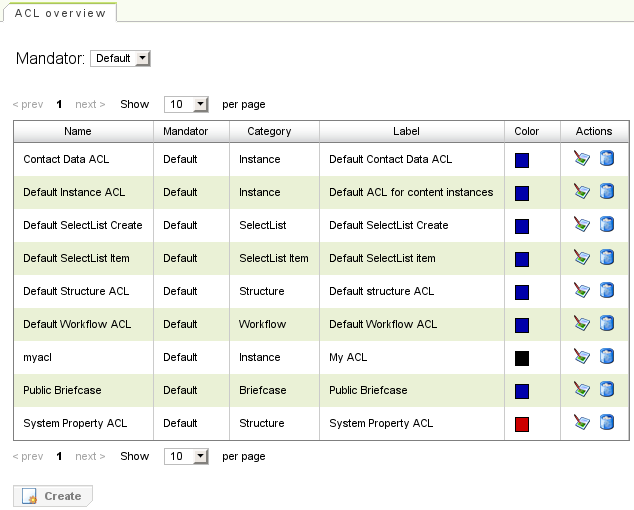
In this example the user group Everyone (a user group automatically containing every user) has read permissions on content instances using this ACL. Users that are a member of the user group Account Managers have read and edit permission on content instances using this ACL. (please note that Account Managers would already have read permission anyway due to their membership to user group Everyone but we added read permission here in case someone decides to remove group Everyone from this ACL at a later date and we still want to keep the read permission). Members of the user group Editors may additionally create, delete and export content instances using this ACL.
On the following screen you can see the default ACLs for each category and a user defined ACL (named myacl).
You can switch between different mandators with the select box on top of the list.
By clicking the edit icon
 an ACL be edited and by clicking the delete icon
 an ACL may be deleted.
The [fleXive] workflow administration UI allows you to define step definitions and workflows. Step definitions are used as steps in one or more workflows. You can define routes between these steps. See the core component chapter Workflow Engine for additional information about workflows in [fleXive].
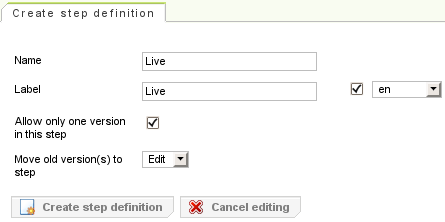
In order to create a step the step's name and label are required. You may decide to allow only one content version in the step. See unique target for more details about this concept.
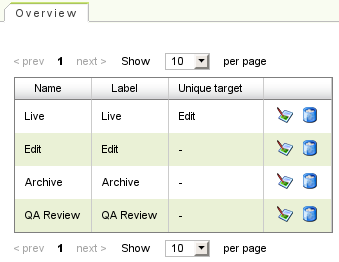
Existing workflow steps may be edited and deleted via the step definition overview.
In order to create a workflow a name is required and an optional description may be added.
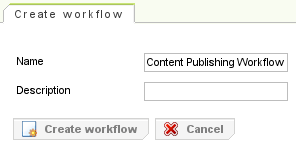
After the creation of a workflow, the workflow editor is opened automatically.
The basic elements of a workflow are:
-
Steps: Previously defined steps definitions may be used as steps in a workflow. Each step needs an ACL of category workflow assigned to it. See workflow ACL for details about ACL creation.
Routes: Routes define the possible transitions from one workflow step to another. Each route must have a user group assigned representing users who may perform this transition.
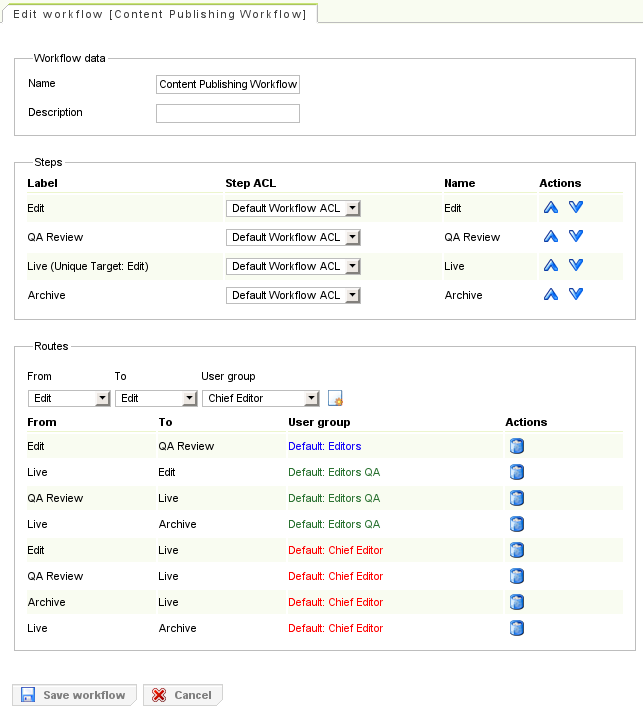
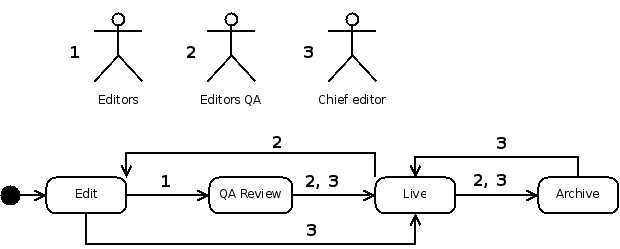
The following diagram illustrates the routes defined in the example workflow displayed on the screenshot.
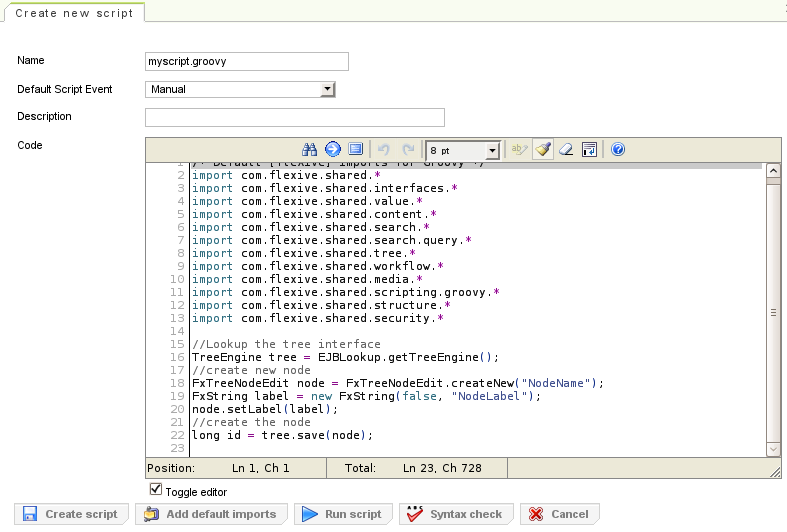
Before a script can be created a valid name is required. After a valid name has been provided in the "Name" text field, the script editor and the additional buttons become available. A script requires a script event and of course some code.
If the default script event is set to
Manual, the script can be directly
executed via the "Run script" button or via the
administration UI in the
script overview.
The "Syntax check" button is available for all Groovy scripts (checking for a .gy or .groovy extension. The "Add default imports" adds the most commonly used [fleXive] classes to the import statements of the script.
| List of available events | ||
|---|---|---|
|
|
|
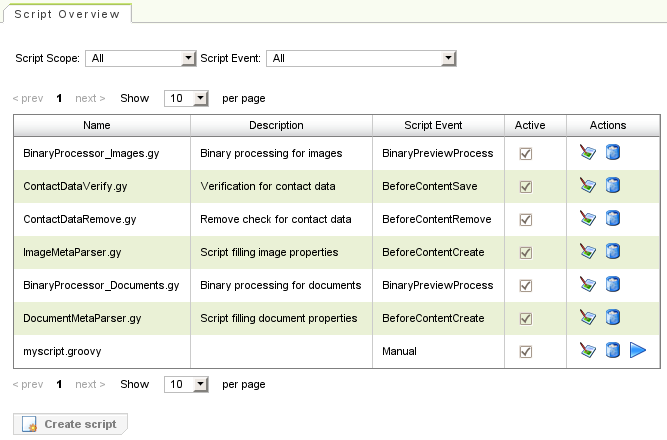
The following screen shows the script overview. You can see the script
myscript.groovy at the bottom of the table
, which can be executed manually via the administration UI,
and other scripts, bound to different
events.
By clicking the edit icon
 a script may be edited and by clicking the delete icon
 a script may be deleted.
The Run-Once script information GUI displays valuable information about the run-once scripts. The GUI is a good starting point for debugging run-once scripts as script execution success, script execution time and possible error-messages are displayed. A popup containing the full error message is opened by clicking on an error message in the tabular overview.

The following screen shows the [fleXive] Script console. It allows you to execute scripts directly at the EJB layer or at the Web layer.
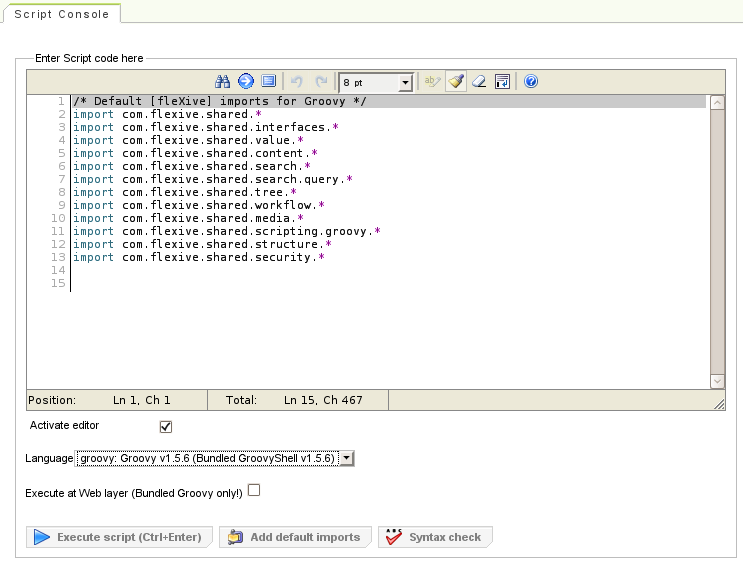
You can choose between the following languages and file extensions:
-
gy: Groovy v1.5.1 (Bundled GroovyShell v1.5.1) -
groovy: Groovy v1.5.1 (Bundled GroovyShell v1.5.1) -
js: ECMAScript v1.6 (Mozilla Rhino v1.6 release 2)
If you want to execute the script on the web layer, check the option
Execute at Web layer.
Mind that this feature is only available for bundled Groovy!
Buttons to add the most used [fleXive] imports and to check the syntax are
available as well.
The Groovy code in this example creates a new tree node in the
Edit tree
of the
Content Tree. The
node's name is
NodeName and its label NodeLabel.
You might want to copy paste the example and try it out. Don't forget to refresh the content tree to view the results!
import com.flexive.shared.EJBLookup;
import com.flexive.shared.interfaces.TreeEngine;
import com.flexive.shared.tree.FxTreeNodeEdit;
import com.flexive.shared.value.FxString;

//Lookup the tree interface
TreeEngine tree = EJBLookup.getTreeEngine();
//create new node
FxTreeNodeEdit node = FxTreeNodeEdit.createNew("NodeName");
FxString label = new FxString(false, "NodeLabel");
node.setLabel(label);
//create the node
long id = tree.save(node);
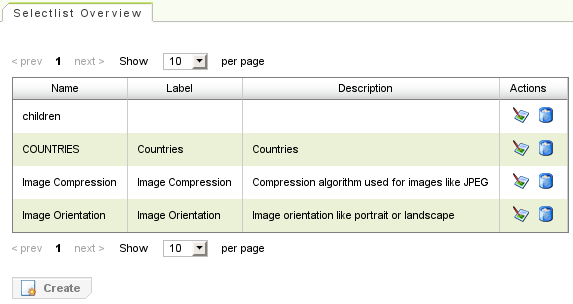
A select list requires a unique name, an ACL that controls the permissions for users regarding creating and deleting select list items (Create items ACL) and an ACL which is assigned to newly created select list items per default (ACL for new items).
Providing a label, description allowing dynamic item creation, specifying the breadcrumb separator and confining select item multi-selection to the same level is optional.
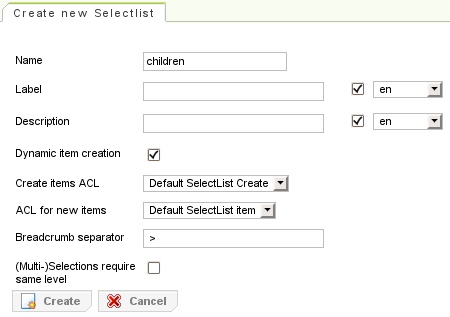
After the user presses the "Create" button the select list is created and new select items may be added.
A select list consists of select list items . The select list editor allows you to add and delete select list items. The user can only add items to select lists after it has been created.
A select list item requires a name, a label and an ACL of category
SelectList Item.
Additionally String data may be stored within the select item
a color may be selected to improve GUI display and already created select items
may be assigned as sub-elements of this select item. Select items are created by
pressing the "Create new item" button.
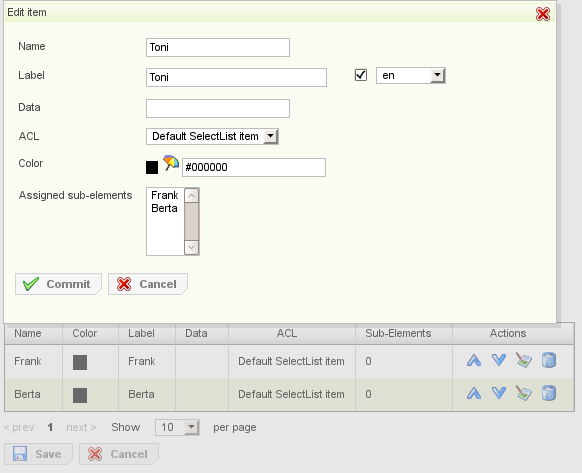
Existing select items may be modified (edit icon), repositioned within the select list (up and down arrows) and deleted.
The import and export of structures is already described in the section called “Structure export and import”. Additionally the Administration GUI provides the possibility to export and import whole divisions.
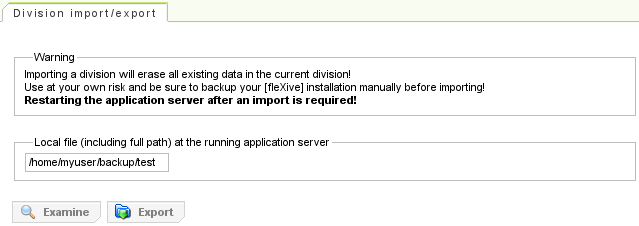
In order to export a division, a file name (including full path) has to be provided and the "Export" button needs to be pressed. The division export creates a .ZIP file using the given file name containing all division data. Note: If only a file name (without path) is specified, the file is created in the current working directory. After a successful division export the user feedback displays the the exact path of the export file.
In order to import a division, the file name of the export .ZIP file has to be specified and the "Examine" button has to be pressed. After pressing the "Examine" button information about the exported division is displayed.

Now the user can import the division by pressing the "Import" button.
The System administration contains on the one hand tools that display and allow to modify system settings and configuration and on the other hand tools that simply don't fit in anywhere else.
The available tools are described in the following sub-sections.
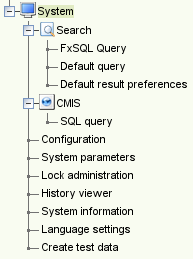
The search settings provide three tools:
-
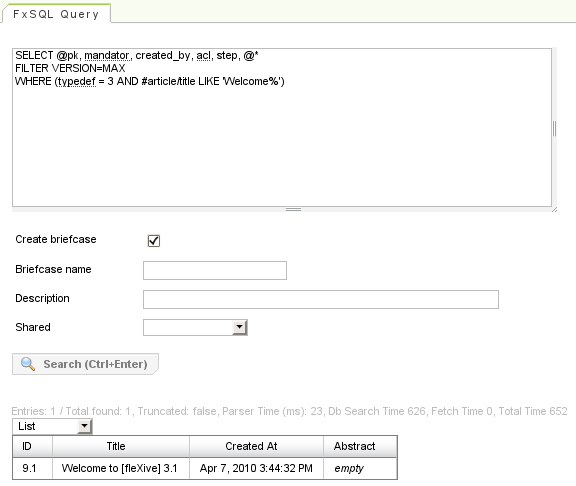
FxSQL Query GUI: In contrast to the visual query editor the FxSQL GUI contains a text input area where the user may submit FxSQL queries directly and optionally create briefcases.
FxSQL is a [fleXive] SQL (structured query language) dialect.
-
Default query: Allows the definition of a system-wide default query for [fleXive] administration GUI users using the query editor.
-
Default result preferences: Allows a fine grained control about what properties and in which order properties are displayed when searching for a content type.
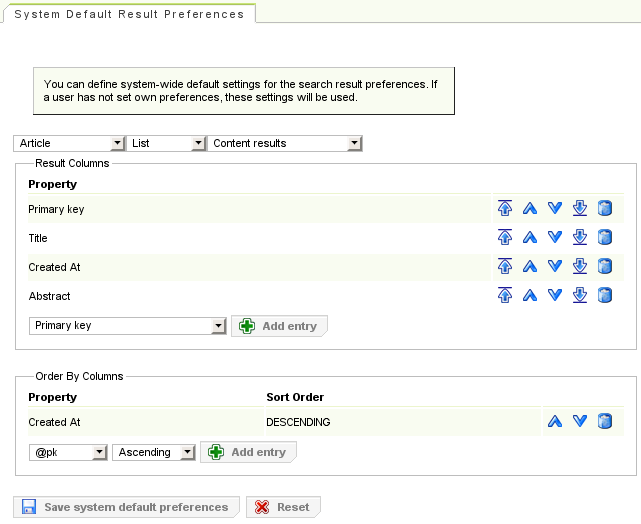
For every existing content type the properties that should be displayed in a result set can be selected. Via the "Add entry" button properties can be selected, and their position can be changed using the arrow icons. Properties can be removed from the result set again using the trash can icon.
Different property sets for different view types are supported. I.e. the user may choose to display certain properties in
Thumbnails> mode and different properties inListmode.Different property sets for different search locations are also supported. The search location is a parameter that can be supplied to a FxSQL search query in order to provide contextual information from which location the search was issued. In practice different search locations are used to display different property sets which can be customized:
-
Content results: Search location used by the [fleXive] administration GUI when searching for contents.
-
Browse references popup: Search location used by the [fleXive] content instance editor for displaying referenced contents.
-
Default location: Fallback search location which is used when the search location parameter is not set.
-
The System configuration allows the user to modify [fleXive] system settings.
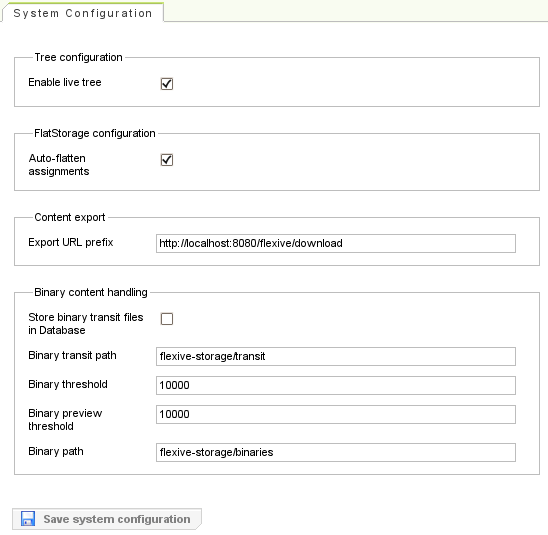
The configuration includes:
-
Enable live tree: if this option is disabled, the user cannot switch to the live tree in the content instance editor anymore. Note that the administration GUI needs to be reloaded via the browser in order for changes to take effect!.
-
Auto flatten assignments: automatically flatten assignments that can be stored in the flat storage (max. multiplicity <= 1).
-
Export URL prefix: path used by the export servlet.
-
Store binary transit files in Database: if enabled, binary files are stored directly in the database during file upload, instead of the file system.
-
Binary transit path: file system path to store binaries during file upload.
-
Binary threshold: threshold in bytes to store binary files on the file system (instead of directly in the database) if exceeded.
-
Binary preview threshold: threshold in bytes to store preview files on the file system (instead of directly in the database) if exceeded.
-
Binary path: path to store binary files on the file system.
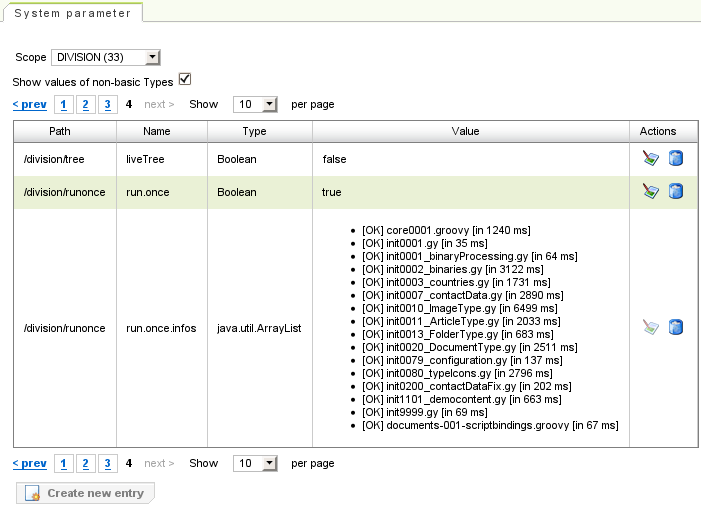
The system parameters GUI provides a generic view of all [fleXive] system parameters grouped by scope. Some parameters can intentionally not be edited as either specialized GUIs for editing exist in the administration GUI or they merely serve information purposes and don't impact system behavior.
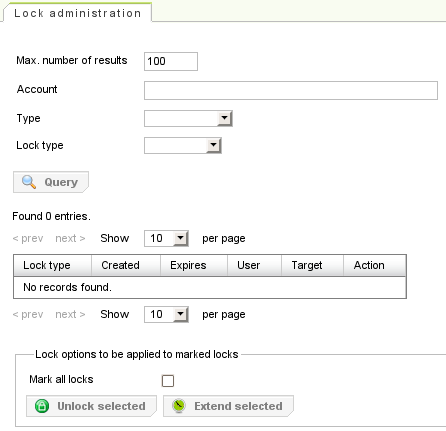
The lock administration provides the possibility to search the system for locked instances and to remove or extend the locks.
The search offers the following refinements:
-
Max. number of results: Limit to the maximum number of returned search results.
-
Account: The search results only contains locks belonging to the specified user account.
-
Type: The search result only contains locks of content instances of the specified type
-
Lock Type: The search result only contains locks of the selected lock type.
The locks within the search result can be selected to either remove (by pressing the "Unlock selected" button) or to extend (by pressing the "Extend selected" button) all selected locks.
The history viewer provides an interface to search for recorded history entries. The search can be refined to:
-
Max. number of results: Specifies the maximum number of retrieved search results.
-
Account: Refine the search query to a specific user account.
-
Start date: Refine the search query to history entries after the start date.
-
End date: Refine the search query to history entries before the end date.
-
Type: Refine the search query to contents of the given Type.
-
Content Id: Refine the search query to contents with the specified Id.
-
Category: Refine the search query to filter results according to the selected history entry category.
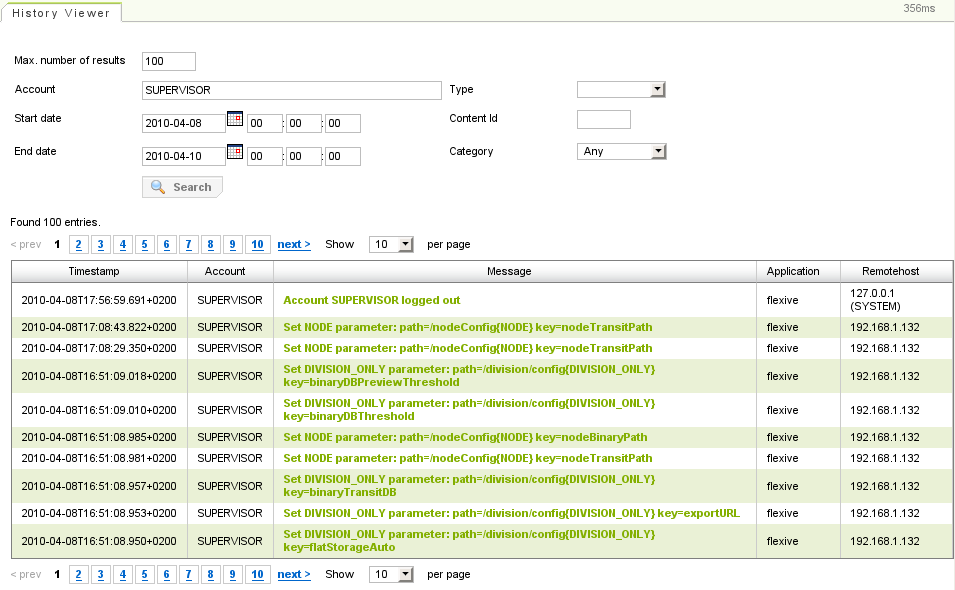
The query is submitted by pressing the "Search" button. The query result is displayed below within a result table.
Note
The user may click on entries in the "Message" column within the result table to receive more detailed information of the history event.
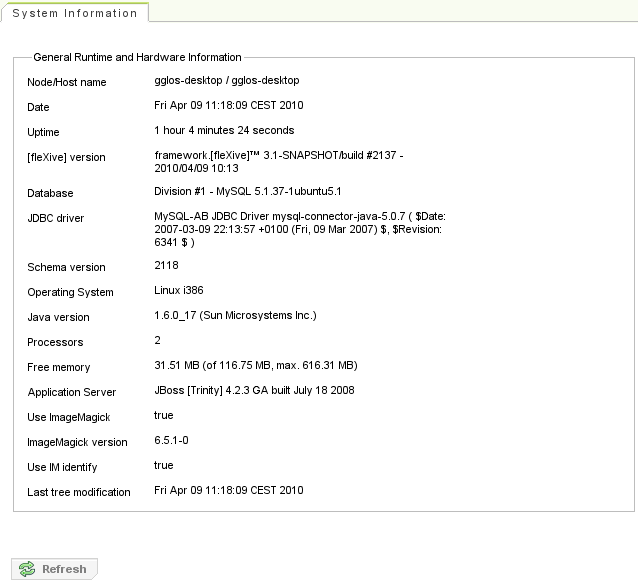
The system information provides general runtime and hardware information of the system [fleXive] is running on.
In the language settings editor you can manage available languages. Add a language from the list of disabled languages (by pressing the "+" icon), remove an available language (by pressing the "-" icon) or change the list's order. The language at the first position on the list becomes the default language.
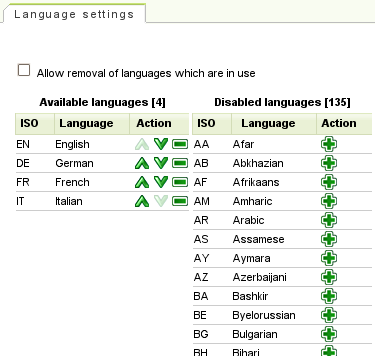
Check the
Allow removal of languages which are in use
option to be able to delete languages which are already in use by
content instances.
-
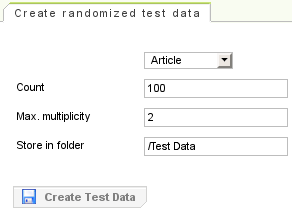
Type: random test data is created for content instances of the selected type.
-
Count: number of content instances to be created.
-
Max. multiplicity: Specifies the maximum multiplicity for properties that are assigned with a multiplicity > 1.
-
Sore in folder: Created instances will be stored in the content tree at the specified folder.