The structure editor allows you to define the structure or blueprints of content instances. In essence the structure of a content instance is defined by three main building blocks:
-
A type
-
The type's assigned groups
-
The type's assigned properties
The smallest building block is represented by property, which defines what data may be assigned to a content instance and who has access to that data. In order to make life easier, a specific set of properties can be grouped together into a group. A group can then be assigned to a different type later on, therefore saving you the trouble of manually assigning every single property to the type all over again. A more detailed explanation can be found in the chapter about structures.
Important
Please note that properties and groups on their own do not "belong to" types and also types do not "consist of" properties. Instead properties and groups need to be assigned to types. In fact the same property can be assigned to multiple types using different property assignments. In theory this means that creating a property and assigning it to a type is a two step process. First you create the property (choose the property name, data type, default value etc.) and secondly the property needs to be assigned to the type using a property assignment. In practice this is automatically handled by the structure editor but it is important to understand that a property is not equal to a property assignment. The property assignment acts as a "link" between the type and the actual property and there are various property settings which can be overridden and fine tuned by the property assignment. Similarly, if you remove a property or group from a type, it means that you really only remove the assignment so that this specific property or group is no longer assigned to the type anymore. Properties and groups that are no longer assigned to another type or another group will be automatically removed from the system.
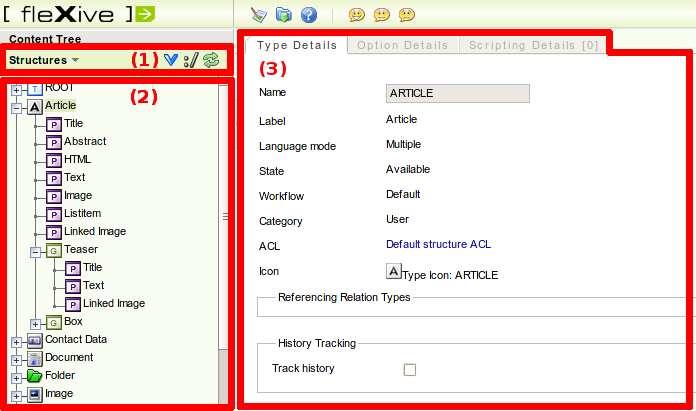
The structure editor GUI is reachable by clicking the tab (1) in the administration GUI. The GUI is separated into two parts: the structure tree (2) on the left half of the screen and the edit view (3) on the right half.
The structure tree consists of the following items:
-
 Content types: types with their mode set to "Content". Types are the blueprints of
content instances. All children (group assignments or property assignments)
are assigned to this specific type.
Content types: types with their mode set to "Content". Types are the blueprints of
content instances. All children (group assignments or property assignments)
are assigned to this specific type.
-
 Relation types: types with their mode set to "Relation". Relation Types define arbitrary
relations between types.
Relation types: types with their mode set to "Relation". Relation Types define arbitrary
relations between types.
-
 Group assignments/Groups: The structure editor allows to edit the group assignment
together with the group which is assigned by the group assignment.
Group assignments assign groups to types or other groups.
Possible children are group and property assignments. All children
are assigned to this specific group.
Group assignments/Groups: The structure editor allows to edit the group assignment
together with the group which is assigned by the group assignment.
Group assignments assign groups to types or other groups.
Possible children are group and property assignments. All children
are assigned to this specific group.
-
 Property assignments/Properties: Property assignments assign properties to groups or types.
The structure editor allows to edit the property assignment together with the property.
They act as the smallest building blocks and are therefore without any children.
Property assignments/Properties: Property assignments assign properties to groups or types.
The structure editor allows to edit the property assignment together with the property.
They act as the smallest building blocks and are therefore without any children.
-
 System internal property assignments: assignments of special system internal properties
that are common to all types and are intentionally not editable. For clarity reasons,
instead of displaying
those non editable properties for every type, they are only displayed once at the root
level.
System internal property assignments: assignments of special system internal properties
that are common to all types and are intentionally not editable. For clarity reasons,
instead of displaying
those non editable properties for every type, they are only displayed once at the root
level.
-
Double click: double clicking on an element in the structure tree opens the element in view mode on the right half of the screen. Double clicking on the [+] graphic icon to the left of a specific element expands the tree and shows the children of the specific element. Double clicking on the [-] graphic icon to the left of a specific element collapses the tree and hides the element's children.
-
Structure tree tab
-
Left clicking on "Structures" in the structure tree tab opens a drop down menu.
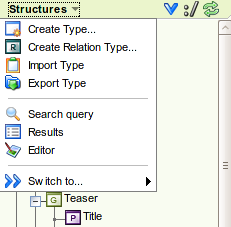
The following options are available:
-
Create a new content type (opens the type editor).
-
Create a new relation type (opens the type editor).
-
Import a type (opens the structure import GUI).
-
Export types (opens the structure export GUI).
-
Build a search query (opens the visual query editor).
-
View search results (opens the search results).
-
Open the content editor.
-
Switch to another section of the administration GUI.
-
-
Clicking on
 toggles between flat and hierarchical view. In flat view all types
are displayed on root level of the structure tree. In hierarchical
view derived types are shown as children of their parent types.
toggles between flat and hierarchical view. In flat view all types
are displayed on root level of the structure tree. In hierarchical
view derived types are shown as children of their parent types.
-
Clicking on
 toggles between the display of the label of structure elements
and the display of the alias (which is used in XPath notation)
in the structure tree.
toggles between the display of the label of structure elements
and the display of the alias (which is used in XPath notation)
in the structure tree.
-
-
Right click: right clicking on an element in the structure tree opens a context menu with possible actions. Depending on which element was right clicked different actions are possible:
-
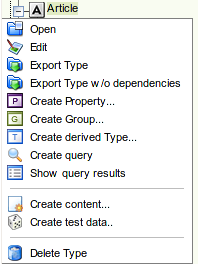
For types it is possible to:
-
Open the type in view mode (this action will open the type editor).
-
Open the type in edit mode (this action will open the type editor).
-
Export the type with or without. dependencies (this action will open the export GUI).
-
Create a new property that will be automatically assigned to this type (this action will open the property editor).
-
Create a new group that will be automatically assigned to this type (this action will open the group editor).
-
Create a derived type of this type (this action will open the type editor).
-
Create a search query containing this type as search parameter (this action will open the visual query editor).
-
View the search query results (this action will open the search results).
-
Create content for the selected type (this action will open instance editor).
-
Create content instances with random test data of the selected type (this action will open the test data generation GUI).
-
To delete the selected type.
-
-
For group assignments it is possible to:
-
Open the group assignment in view mode (this action will open the group editor).
-
Open the group assignment in edit mode (this action will open the group editor).
-
Create a new property or group that will automatically be assigned to the selected group assignment's group (this action will open the property/ group editor).
-
To copy the group assignment, so it can be pasted into another group or type.
-
To cut the group assignment, so it can be pasted into the same group or type at a different position.
-
To delete the selected group assignment.
-
-
For property assignments it is possible to:
-
Open the property assignment in view mode (this action will open the property editor).
-
Open the assignment in edit mode (this action will open the property editor).
-
Create a search query containing this property assignment itself as search parameter (this action will open the visual query editor).
-
Create a search query containing the property assignment's property as search parameter (this action will open the visual query editor).
-
To copy the group assignment, so it can be pasted into another group or type.
-
To cut the group assignment, so it can be pasted into the same group or type at a different position.
-
To delete the selected group assignment.
-
-
-
Cut & Paste: Assignments can be cut and pasted in order to
-
change the assignment's position within a type or group by cutting the assignment and pasting it at the desired position.
-
remove a property/group from one type by deleting the according property or group assignment while at the same time assigning the property/group to another type or group.
-
-
Copy & Paste: Assignments can be copied and pasted in order to
-
assign the selected assignment's property/group to another type or group. I.e. a new property/group assignment for the selected property is created and assigned to the specified type or group at the chosen position. By using copy & paste a property can be used within arbitrary types.
-
-
Pasting: To facilitate positioning various paste operations are provided:
-
Paste into: This is the default pasting operation for copied assignments. A copy of the selected assignment will be created and pasted into the chosen group or into the chosen type at the first position.
-
Paste into as: Works like "Paste into" but additionally prompts you specify a new alias so you can create a new assignment and paste it into an arbitrary type/group with a different alias.
-
Paste above and paste below: pastes an assignment directly above or below another assignment.
-
Paste above and paste below as: Works like "Paste above" and "Paste below" but additionally prompts you specify a new alias so you can create a new assignment and paste it into an arbitrary type/group with a different alias.
-
By default, double left clicking on a structure element in the structure tree opens an editor in view mode on the right half of the screen. In view mode it is not possible to edit the structure element, you can merely view its current settings.
The edit mode on the other hand enables you to edit structure elements and to save changes to the data base. You can switch to edit mode by choosing "Edit" from the context menu or by clicking choosing "Edit" in the context menu which is presented by left clicking on the structure element in the structure tree. Both view and edit mode provide three different sub editors:
-
The type editor for creating and editing types options and scripts assigned to that type.
-
The group editor for editing group assignments, editing and creating groups, their options and scripts.
-
The property editor for editing property assignments, editing and creating properties, their options and scripts.
Depending on which item is double clicked in the structure tree, or which item is selected for creation in the context menu of the structure tree, the according sub editors is opened.
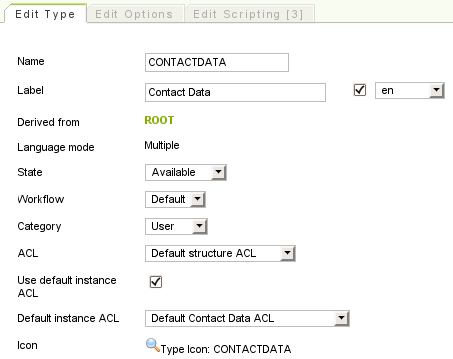
When editing an existing type, you will notice that the type's select box is disabled. Specifying a type's language mode is only allowed when the type is created. For types that are already stored in the database, content may also already exist which would become invalid if the language mode is changed.
Types with their mode set to are called relation types. For relation types a table is provided to add and remove relations. For adding a relation the user needs to set the source and destination type, together with the maximum multiplicities and click the button in the column. In order to set unlimited multiplicities simply enable or disable the according checkbox in the relation's table row. For specifying the multiplicities manually, first disable the checkbox and use the input field below the source or destination type which appears after disabling the checkbox. Relations can be removed again by clicking on the button in the column.
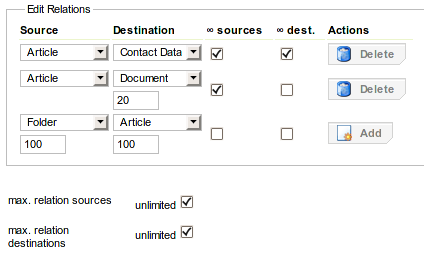
Also notice that by enabling the checkbox, by disabling the checkbox and for type relations by disabling the and "maxRelDest" checkboxes, input fields for setting the, , and the maximum number of relation sources and destinations become available that are hidden otherwise.
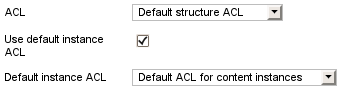
Types are protected by their structure ACL and may additionally be assigned multiple instance ACLs. If the type uses instance permissions it is possible to specify a default instance ACL, which will be used by default whenever a new content instance of this type is created.
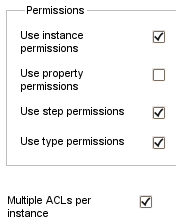
By editing the type's permissions you may adapt the permission checks to an arbitrary level of security:
-
Use type permissions: If enabled, the mandatory structure ACL assigned to the type is included in permission checks.
-
Use instance permissions: If enabled, the type also includes its assigned instance ACL(s) when performing permission checks, in addition to its (mandatory) structure ACL.
-
Use property permissions: If enabled, the ACL assigned to the type's properties is also taken into account when a content instance is accessed or modified. Using property permissions it is possible to restrict the access to single properties to arbitrary user groups. (For example imagine a type article with the properties text and comment where only the user group "editors" may change the article text but every user may add a comment).
-
Use step permissions: If enabled, the ACL assigned to the current workflow step of the content instance is included in permission checks.
-
Multiple ACLs per instance: if enabled, multiple instance ACLs can be assigned to an instance of this type.
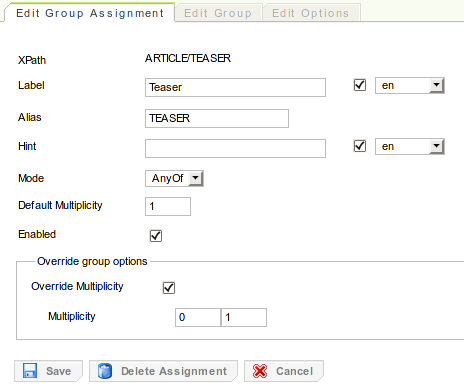
When editing an existing group assignment, you will notice three tabs:
-
The tab, which gives you access to the group assignment that is selected in the structure tree.
-
The tab, which gives you access to the actual group that is assigned by the selected group assignment.
-
The tab, which gives you access to the options of the group assignment and its group as well.
Note
When creating a new group, the tab will be hidden (as no group assignment may exist without a group), as well as the options of the group assignment in the tab. Upon pressing the "Create" button, the group is created and the according group assignment is automatically generated.
Note that assignments may override specific settings of their groups. For group assignments, if the checkbox in the tab is checked the group's multiplicity may be overridden by the group's assignment. I.e. the checkbox becomes available in the tab.
Also note that the group mode of a group assignment may not be changed if content instances for the group assignment already exist. If you want more information on groups and their specific settings please refer to the section called “Group parameters”.
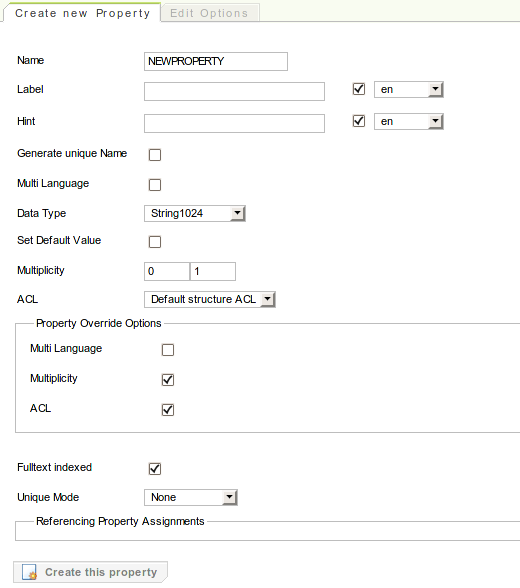
Similar to the group editor, the property editor provides four tabs:
-
The tab, which gives you access to the property assignment that is selected in the structure tree.
-
The tab, which gives you access to the actual property that is assigned by the selected property assignment.
-
The tab, which gives you access to the options of the property assignment and its property as well.
-
Additionally the tab, gives you access to the scripting editor which is described in the section called “The scripting editor”.
System internal property assignments
, together with their properties may not be edited (except by users with the role Supervisor).
This is why all input elements are deactivated. It is only allowed to edit their options.
Note
When creating a new property, the tab will be hidden (as no property assignment may exist without a property), as well as the options of the property assignment in the tab. Upon pressing the "Create" button, the property is created and the according property assignment is automatically generated.
Note that property assignments may override specific settings of their property. Whether a specific setting may be overwritten is controlled by the "Override property options" section in the tab and by the "Property override options" section in the tab respectively.
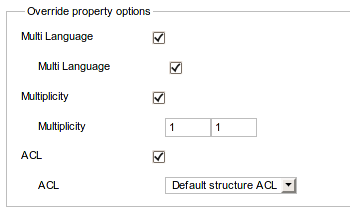
If you want more information on properties and their specific settings please refer to the section called “Property parameters”.
Generally speaking an option is just a pair of a key and a value. There are special structure options which trigger a special behavior. If you want more information on built-in options please refer to the section called “Property and group options”. The user may access the options by left clicking the tab.
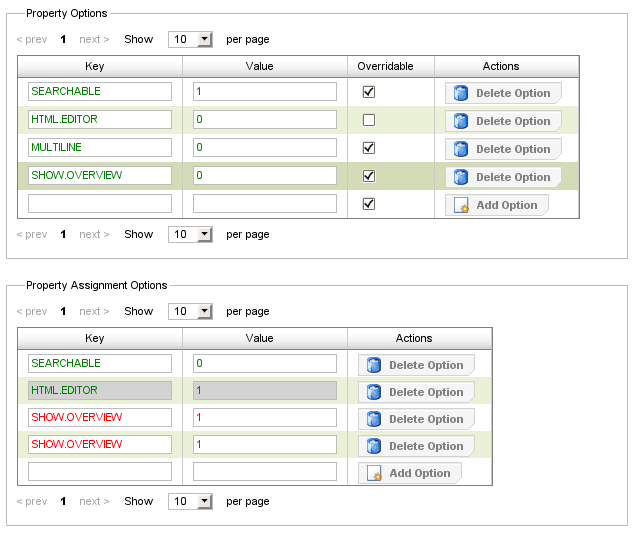
Generally assignment options may override property/group options if the overridable flag of the property/group option is enabled. In the image above, the property has four options with the keys "SEARCHABLE", "HTML.EDITOR", "MULTILINE" and "SHOW.OVERVIEW". The checkbox indicates that all options may be overriden by the assignment except HTML.EDITOR.
Options can be added by specifying a key, a value and the overridable flag and clicking the button which is located in the column of the table. An option can be deleted again by selecting the according row and pressing the button which is also located in the column of the table.
In order to facilitate the editing of options, visual helpers are provided:
-
Option is displayed in green: This is a valid option, for example "SEARCHABLE" in the property and assignment options table.
-
Option displayed with grey background: The assignment tries to override an option which is currently not overridable, i.e "HTML.EDITOR" in the assignment options table.
-
Option displayed in red: This is an invalid option. Either the option has no key, or the option has no value, the key already exists or the assignment tries to override an option with the same value. The key "SHOW.OVERVIEW" exists twice in the assignment options table, therefore making it invalid.
In order to update the visual helpers, the "Validate" button
 on the bottom left may be clicked.
Scripts can be assigned to a type or property assignment using the scripting editor, which is reachable by clicking on the "Scripting" tab. The number in brackets on the "Scripting" tab refers to the number of scripts that have already been assigned. Note that only users that are in the role of "Script Manager" may edit script assignments.
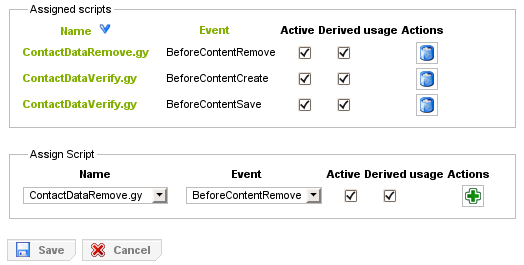
Via the editor it is possible to add, remove and edit existing script assignments. Clicking on a specific script name provides a shortcut to the script editor where the script code can be inspected or changed. In order to create a script assignment a script and a script event (which indicates when a script will be run) need to be chosen. Naturally, types and assignments provide different subsets of script events to choose from.
Additionally it is possible to activate and deactivate script assignments. For deactivated script assignments, script execution will be prevented. It is also possible to make script assignments available for derived usage in derived child types or property assignments. Derived script assignments in the derived type or assignment can not be directly edited in the scripting editor. Instead a link to the parent is provided, which opens the script assignment editor of the parent type where changes can be made and are in turn propagated to all derived children.
If you want more information on scripts and their specific settings please refer to the section called “Scripting Engine”.
In order to save changes the editors provide the
button
 located at the bottom left of of every tab. (if the editor is in edit mode). A shortcut to the button
Caution
Pressing the "Save" button persists all changes within the editor's tabs, meaning all changes that have been made to the assignment, to the property/group to the options, and to scripting, although only one tab is visible.
For deleting assignments and types, the editors provide the
button
 at the bottom right of the tab. A shortcut to the button can also be
found on top of the content frame.
at the bottom right of the tab. A shortcut to the button can also be
found on top of the content frame.
Note
By deleting an assignment, the property/group itself is not automatically deleted. Only if the property/group is not assigned to another group or type anymore , the property/group will be removed from the database.
Type definitions (together with their groups and properties) can be exported as groovy script which contains all necessary instructions to rebuild the exported type definition(s) from scratch. This script can later be run import the structures again. An export as XML structure is also supported. The export and import of type definitions between different [fleXive] distributions enables the export and import of content instances based on these type definitions.
The structure export GUI can be invoked via the context menu by right clicking on a type and choosing "Export Type" in the structure tree.
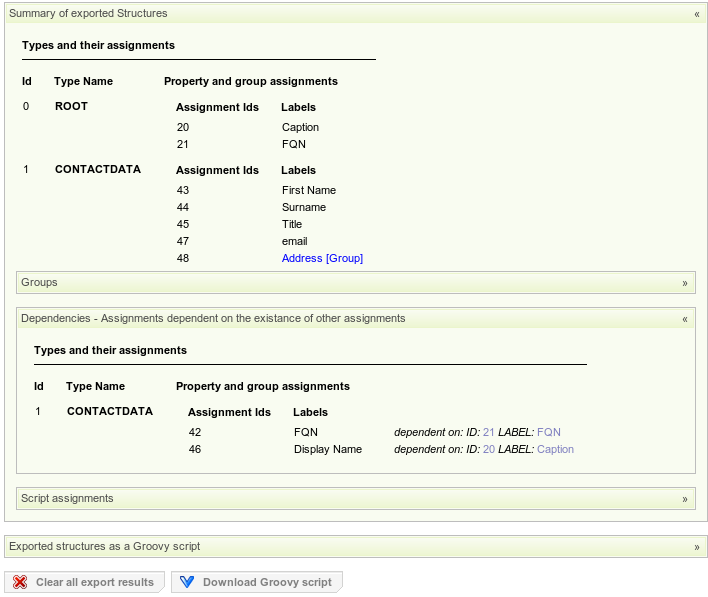
Per default the "Export Results" tab is active, showing the "Summary of exported Structures" and the "Exported structures as a Groovy script" panels.
The summary panel displays useful information about the structures to be exported and also contains the "Groups" panel showing the type's groups, the "Dependencies" panel, showing dependencies caused by derived assignments and the script assignments panel showing assigned scripts.
The "Exported structures as a Groovy script" panel provides various export options that influence the exported Groovy script together with a preview of the exported script.
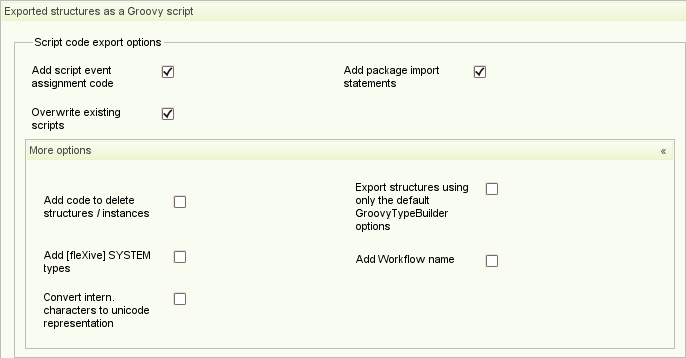
The export options include:
-
Add script event assignment code: If toggled, assigned scripts (script code and script assignments) are exported as well.
-
Add package import statements: If toggled needed package import statements are added at the beginning of the export script.
-
Overwrite existing scripts: If toggled exported scripts override the scripts of the target [fleXive] distribution if already present.
-
Add code to delete structures/instances: If toggled code is added to the beginning of the script that deletes the exported structures in the target [fleXive] distribution if they are already existing. This is useful to prevent errors that occur if the script contains structures that may already exist in the target [fleXive] distribution.
-
Export structures using only the default GroovyTypeBuilder options: If not toggled structures are exported using all structure information. This includes for example assignment and type options, labels, acl settings etc. If toggled, the exact structure information is discarded and types, properties assignments and groups are rebuilt using only the default options.
-
Add [fleXive] SYSTEM types: If toggled [fleXive] system internal types/system internal properties (for example the ROOT type together with system internal property dependencies) are exported as well.
-
Add Workflow name: If toggled also exports the assigned workflow name. Note that really only the workflow's name is exported, which means that the workflow must exist on the target flexive distribution.
-
Convert international characters to unicode representation: If toggled international characters are converted to their unicode representation. This is handy for systems which don't use UTF-8 per default.
The "Structure Export Tab" provides the possibility to export arbitrary type definitions as a batch in XML format or as Groovy Script.
The export options to choose from are similar to those described in the section called “Export Results Tab”. If the user chooses to export the selected type definitions as Groovy script the "Export Results" tab is opened and initialized with the specified type definitions. If the user chooses the XML export an XML is file provided for download.
The structure import GUI can be invoked via the "Structures" drop down menu in the menu bar of the structure tree.
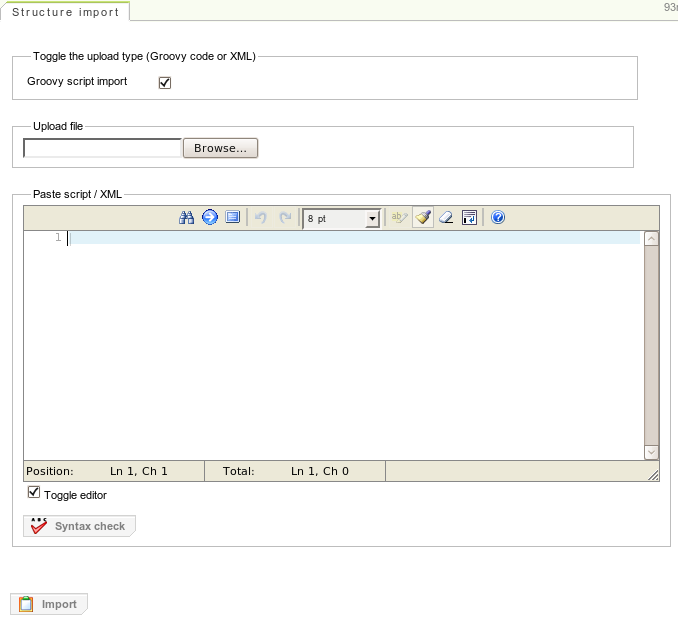
The GUI supports Groovy script import and XML import via a file upload or by pasting the code into the inline editor. After a file was chosen for the file upload or the code was pasted into the editor, the import process is triggered by pressing the "Import" button.