Contributed by Karol Harezlak
![]() The Visual Mobile Designer (VMD) is a graphical interface
within the NetBeans Mobility pack that enables you to design mobile applications using drag and drop
components. The VMD allows you to define the application flow and design your GUI using the components
supplied by the Mobility pack, or components you design yourself. The VMD contains many standard User
Interface (UI) components that you can use to create applications such as Lists, Alerts, Forms and
Images. It also includes custom components that simplify the creation of more complex features, such
as Wait Screens, Splash Screens, Table Items and more.
The Visual Mobile Designer (VMD) is a graphical interface
within the NetBeans Mobility pack that enables you to design mobile applications using drag and drop
components. The VMD allows you to define the application flow and design your GUI using the components
supplied by the Mobility pack, or components you design yourself. The VMD contains many standard User
Interface (UI) components that you can use to create applications such as Lists, Alerts, Forms and
Images. It also includes custom components that simplify the creation of more complex features, such
as Wait Screens, Splash Screens, Table Items and more.
File browser is a custom component that provides a user interface to work with device file system. It provides basic functionality to browse content of devices storage memory. This component utilizes The FileConnection API which is part of the JSR-75 specification for PDA Optional Packages for the Java ME Platform. JSR-75 is not a part of the MIDP 2.0 specification which is why this custom component can be used only with JSR-75 enabled devices.
This example shows you how to use the File Browser component in a mobile application for JSR-75 enabled devices. You'll learn the basic features of the the components, and how to browse content of device memory storage and display content of chosen text files.
Besides the File Browser custom component we'll use two other MIDP components: Splash Screen and TextBox.
Before you begin, you need to install the following software on your computer:
If you are new to the NetBeans Mobility Pack, you should start with the NetBeans 6.0 Mobility CLDC/MIDP Quick Start Guide before continuing.
Before we begin, you might want to see final result of the tutorial.
Take the following steps to install the FileBrowserExample application:
In the Emulator window, click the button underneath
"Launch."
The emulator displays a Splash Screen
component then File Browser, as shown: 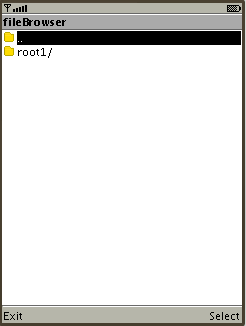
Now that you have seen the File Browser component in action, let's go back to the beginning and create this application. To create the application, do the following:
FileBrowserExample
in the Project Name field. Change the Project Location to a
directory on your system. From now on, let's refer to this
directory as $PROJECTHOME.
Click Finish.
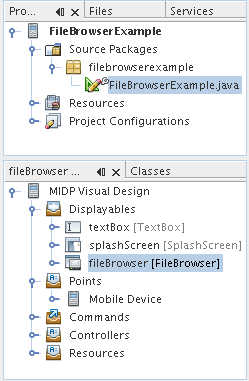
The project folder contains all of your
sources and project metadata, such as the project Ant script. The
application itself is displayed in the Flow Design window of the
Visual Mobile Designer.
FileBrowserExample
project in the Project Window, then choose File New File
(Ctrl-N) . Under Categories, select Java Classes. Under File Types,
select Java Package. Click Next.
filebrowserexample
in the Package Name field. Click Finish.
filebrowserexample
package in the Project window, then choose File New File
(Ctrl-N) . Under Categories, select MIDP. Under File Types, select
Visual MIDlet. Click Next.
Enter FileBrowserExample into MIDlet Name and MIDP
Class Name fields. Click Finish.
Click on slashScreen and, in the Properties Window, change value of property Text from "null" to the "File Browser Example"
Choose the Back Command from the Commands section of the Component Palette and drag and drop it into the textBox component.
In the Flow design window, click on the Start Point on the
Mobile Device and drag it to the spalshScreen component. In the same
manner, connect the components together as shown in the following
graphic.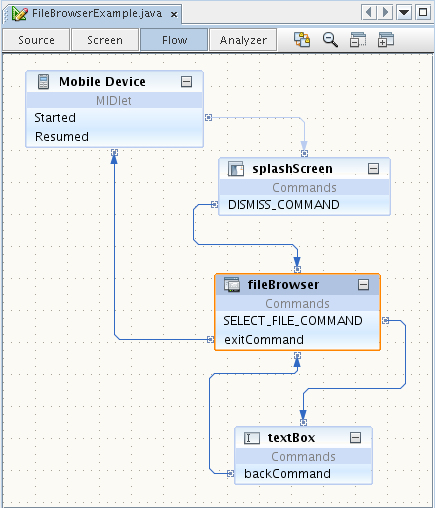
Insert the following code at the end of the source code. This method is responsible for reading the selected files:
    /**
    * Read file
    */
    private void readFile() {
        try {
            FileConnection textFile = fileBrowser.getSelectedFile();
            getTextBox().setString("");
            InputStream fis = textFile.openInputStream();
            byte[] b = new byte[1024];
            int length = fis.read(b, 0, 1024);
            fis.close();
            if (length > 0) {
                textBox.setString(new String(b, 0, length));
            }
        } catch (IOException ex) {
            ex.printStackTrace();
        }
    }
Find commandAction method in the source code:
Insert
readFile(); into pre-action section of the
FileBrowser.SELECT_FILE_COMMAND (right after: if
(command == FileBrowser.SELECT_FILE_COMMAND), where it says
//insert pre-action code here):
To add additional files to the WTK storage memory read the Sun Java Wireless Toolkit for CLDC User's Guide (section: 4.3.2.1 Persistent Storage) Using the Emulator Added files and folders are be visible using our File Browser application.
Press <F6> to Run the main project or select Run > Run Main Project.
The NetBeans IDE provides API Javadocs for the File Browser component, as well as other components you can use in the VMD. To read the Javadocs for the File Browser component:
Click org.netbeans.microedition.lcdui.pda to see links for the component information.