Contributed by Karol Harezlak
The Visual Mobile Designer (VMD) is a graphical interface within the NetBeans Mobility pack that enables you to design mobile applications using drag and drop components. The VMD allows you to define the application flow and design your GUI using the components supplied by the Mobility pack, or components you design yourself. The VMD contains many standard User Interface (UI) components that you can use to create applications such as Lists, Alerts, Forms and Images. It also includes custom components that simplify the creation of more complex features, such as Wait Screens, Splash Screens, Table Items and more.
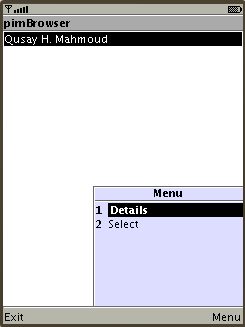
![]() The PIM Browser is a custom component that provides easy access to standard mobile devices functions
like calendar, address book or task list. You can use the PIM Browser component to enable mobile Java applications to access locally stored personal information databases. This component
utilizes The PIM (Personal Information Management) API which is a part of the JSR-75 specification's PDA Optional Packages
for the Java ME Platform. Because JSR-75 is not a part of the MIDP 2.0 specification, it is by definition a custom
component and can only be used with JSR-75 enabled devices.
The PIM Browser is a custom component that provides easy access to standard mobile devices functions
like calendar, address book or task list. You can use the PIM Browser component to enable mobile Java applications to access locally stored personal information databases. This component
utilizes The PIM (Personal Information Management) API which is a part of the JSR-75 specification's PDA Optional Packages
for the Java ME Platform. Because JSR-75 is not a part of the MIDP 2.0 specification, it is by definition a custom
component and can only be used with JSR-75 enabled devices.
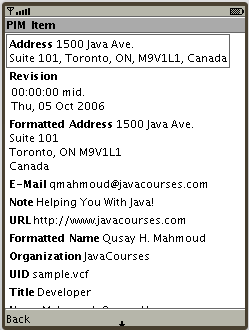
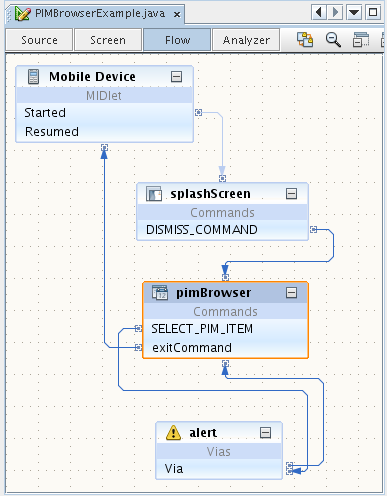
This example shows you how to use the PIM Browser component in a mobile application for JSR-75 capable devices. It demonstrates the basic features of the the component such as browsing the content of a device's contact database, Calendar or To Do List. In addition to the PIM Browser, we also need to use three other components: Splash Screen, TextBox and Alert.
Before you begin, you need to install the following software on your computer:
If you are new to the NetBeans Mobility Pack, you should start with NetBeans 6.0 Mobility CLDC/MIDP Quick Start Guide before continuing.
Before we begin, you might want to see final result of the tutorial.
Take the following steps to install the PIMBrowserExample application:

Now that you have seen the PIM Browser component in action, let's go back to the beginning and create this application. To create the application, do the following:
PIMBrowserExample
in the Project Name field. Change the Project Location to a
directory on your system. From now on let's refer to this
directory as $PROJECTHOME.
PIMBrowserExample
project in the Project Window, then choose File > New File
(Ctrl-N) . Under Categories, select Java Classes. Under File Types,
select Java Package. Click Next.
pimbrowserexample
in the Package Name field. Click Finish.
pimbrowserexample
package in the Project window, then choose File > New File
(Ctrl-N) . Under Categories, select MIDP. Under File Types, select
Visual MIDlet. Click Next.
PIMBrowserExample into MIDlet Name and MIDP
Class Name fields. Click Finish.
Copy the sample contact to the WTK folder $WTKHOME/appdb/DefaultColorPhone/pim/contacts/Contacts/. This folder is empty on "default", so it's necessary to copy at least one file(contact) to test PIM Browser example.
More information about WTK Persistent Storage is available at Sun Java Wireless Toolkit for CLDC User's Guide (section: 4.3.2.1 Persistent Storage) Using the Emulator
The NetBeans IDE provides API Javadocs for the PIM Browser component, as well as other components you can use in the VMD. To read the Javadocs for the PIM Browser component do the following:
org.netbeans.microedition.lcdui.pda to see links for the component information.