Visual Mobile Designer Custom Components: Login Screen
Contributed by Karol Harezlak
The Visual Mobile Designer (VMD) is a graphical interface within the NetBeans Mobility pack that enables you to design mobile applications using drag and drop components. The VMD allows you to define the application flow and design your GUI using the components supplied by the Mobility pack, or components you design yourself. The VMD contains many standard User Interface (UI) components that you can use to create applications such as Lists, Alerts, Forms and Images. It also includes custom components that simplify the creation of more complex features, such as Wait Screens, Splash Screens, Table Items and more.
 The Login Screen custom component provides a useful user interface
with standard elements such as Username Field, Password Field and Login
Button. You can use this custom component to create the login interface
for accessing protected features such as GSM banking.
The Login Screen custom component provides a useful user interface
with standard elements such as Username Field, Password Field and Login
Button. You can use this custom component to create the login interface
for accessing protected features such as GSM banking.
Application Overview
This example shows how to use the Login Screen custom component within a
client application and how to connect it to server resources using authenticated access. In addition to the NetBeans Mobility Project we also need to use a NetBeans Web
Project. To complete this tutorial it is necessary to know how to work
with NetBeans Web Projects and to have local or remote access to a web application server like
GlassFish or Tomcat.
If you are new to NetBeans Mobility or J2EE, you
should start with the NetBeans 6.0 Mobility CLDC/MIDP Quick Start Guide
and Introduction to Developing Web Applications before continuing.
Installing and Running the Sample Application
Before we begin you might want to see final result of the
tutorial.
Requirements
The following software must be installed on your computer to begin:
- NetBeans IDE 6.0 with Mobility
Pack and J2EE and Web support
- Java Standard Development Kit (JDK) version 6.0
- Remote or local access to a Web Application server
Take the following steps to install the LoginScreenExample
application:
- Download LoginScreenExample.zip
. This download contains project for NetBeans Mobility project.
- Download
LoginScreenServletExample.zip
. This download contains NetBeans Web project.
- Unzip the file.
- In the IDE, open both project by
chooseing File > Open Project and browse to the folder that
contains the unzipped files with projects.
- The Project Window should look
like the following:
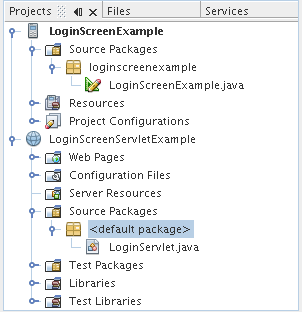
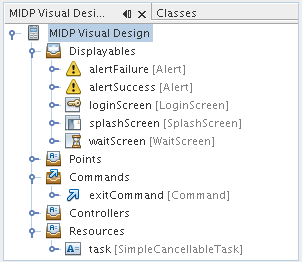
- The Navigator Window for Mobility
Project LoginScreenExample should look like the following:
- In the Projects window,
right-click the project LoginScreenServletExample node and choose
Run Project (or press F6 key). Make sure that your application
server works on the port 8080. Second step is to right-click the
project LoginScreenExample node and choose Run Project. As the
application runs, an emulator window opens and displays the
application running in the default device emulator.
- In the Emulator window, click the button underneath
"Launch."
The emulator displays a Splash Screen
component then Login Screen, as shown:
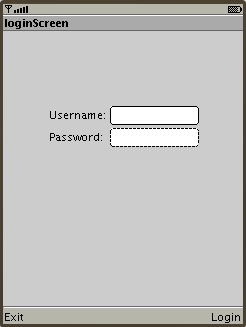
- Moving the cursor up and down allows you to
navigate between the Login and Password fields.
- Click on the Username field and type "john", then press the "OK" button in the emulator.
- Click on the Password field and type "peanuts", then press the "OK" button in the emulator.
- Click the button underneath "Login" to finish.
- If the application connects to the server, you'll
see the
alertSuccess component displayed on the screen with a "Login
Successful" message.
Creating an application with the Login Screen
Custom Component
Now that you have seen the Login Screen component in action, let's
go back to the beginning and create this application from scratch. In this
tutorial we are only going to create a Java ME client using NetBeans
Mobility pack. If you'd like to learn more about server side of this
application look at the LoginScreenServletExample project sources. To
create a Java ME client application do the following:
- Creating the
LoginScreenExample project
- Adding packages and a
visual MIDlet to the LoginScreenExample project
- Adding
components to the LoginScreenExample
- Adding
Commands to the Login Screen component
- Connecting the
Components to create an application flow
- Adding
additional source code
- Run the Project
Creating the
LoginScreenExample Project
- Choose File > New Project
(Ctrl-Shift-N). Under Categories, select Mobile. Under Projects,
select MIDP Application and click Next.
- Enter
LoginScreenExample
in the Project Name field. Change the Project Location to a
directory on your system. Let's refer to this
directory as $PROJECTHOME.
- Uncheck the Create Hello MIDlet
checkbox. Click Next.
- Leave the Sun Java Wireless Toolkit
as the selected Target Platform. Click Next, the Finish.
Note: The project folder contains all of your
sources and project metadata, such as the project Ant script. The
application is displayed in the Flow Design window of the
Visual Mobile Designer.
Adding Packages and a Visual
MIDlet to the LoginScreenExample Project
- Choose the
LoginScreenExample
project in the Project Window, then choose File > New File
(Ctrl-N) . Under Categories, select Java Classes. Under File Types,
select Java Package. Click Next.
- Enter
loginscreenexample
in the Package Name field. Click Finish.
- Choose the
loginscreenexample
package in the Project window, then choose File > New File
(Ctrl-N) . Under Categories, select MIDP. Under File Types, select
Visual MIDlet. Click Next.
- Enter
LoginScreenExample into MIDlet Name and
MIDP Class Name fields. Click Finish.
Adding Components to
the LoginScreenExample
- Switch your Visual MIDlet to the
Flow Designer window. Drag the following components from the
Component Palette and drop them in the Flow Designer:
- Splash Screen
- Wait Screen
- Login Screen
- Alert (two times)
- Click on splashScreen and, in the Properties Window, change
value of property Text from "null" to the "Login
Screen Example"
- Click on alert component and, in the Properties Window,
change value of the property Instance Name to the "alertError".
In similar way change property Instance Name of alert1 to the
"alertSuccess"
- Go back to the alertError component and, in the Properties
Window, change value of the property String to the "Error".
- Click on to the waitScreen component and, in the Properties
Window, change value of the property Text to the "Please
Wait...".
Adding Commands to the
LoginScreenExample
- Open the Flow Designer Window.
- Choose Exit Command from the
Commands section of the Component Palette. Drag and drop it into
Flow Designer Window (loginScreen component).
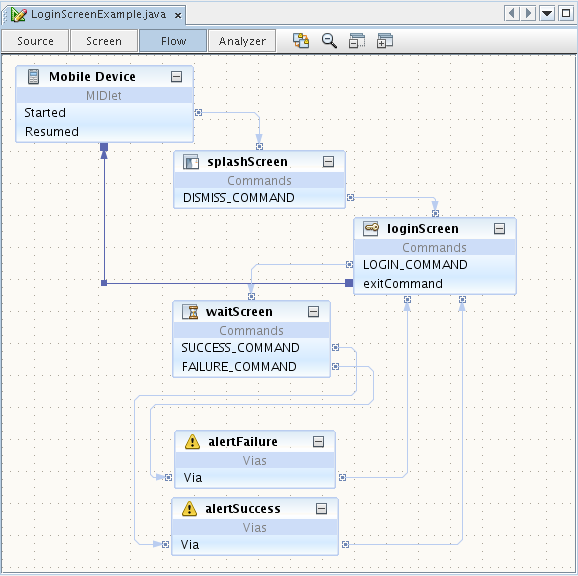
Connecting Components
- In the Flow design window, click on the Started text on the
Mobile Device and drag it to the splashScreen component. In the same
manner, connect the components together as shown in the following
graphic.
Adding additional source
code
- In the declaration section of the LoginScreenExample.java
source code add the following code:
private boolean login =
	false;
.
- At the end of the source code paste following code:
 private void login() throws IOException {
   //URL
   String url = "http://localhost:8080/LoginScreenExample/"
                + "?username=" + getLoginScreen().getUsername()
                + "&password=" + getLoginScreen().getPassword();
   //Clean up alertSuccess
   getAlertSuccess().setString("");
   //Connect to the server
   HttpConnection hc = (HttpConnection) Connector.open(url);
   //Authentication
   if (hc.getResponseCode() == HttpConnection.HTTP_OK) {
        login = true;
   }
   //Closing time...
   hc.close();
   //Take action based on login value
   if (login) {
        getAlertSuccess().setString("Login Succesfull");
   } else {
        getAlertSuccess().setString("Wrong Username or Password");
   }
   login = false;
 }
This code is responsible for sending a request with information about
the username and password to the server and receiving an answer if the login
process was successful. You can correct source code imports by pressing Ctrl+Shift+I.
Running the Project
Before running the client application make sure that the server side application is deployed and is running.
- To run the mobile
client application select Run > Run Main Project or press <F6> to Run the main project.
To Learn More about the Login Screen Component
The NetBeans IDE provides API Javadocs for the Login Screen
component, as well as other components you can use in the VMD. To
read the Javadocs for the Login Screen component:
- Choose Help > Javadocs References
> org.netbeans.microediton.lcdui The file is opened in a web browser.
- Click
 org.netbeans.microedition.lcdui to  see
	links for the component information.
Related Tutorials