Developer Guide to the BPEL Designer: Using Handlers
Contributed by Bob May, maintained by Irina Filippova
December 2007
Contents
Developer Guide to the BPEL Designer
Using Handlers
The following sections describe, in order of their appearance:
-
The circumstances under which you would use a specific handler.
-
The use of those elements within the context of the BPEL Designer.
In this release of the BPEL Designer, you can add Fault Handlers and Event Handlers to your BPEL process. Note that Compensation and Termination Handlers are not supported. See the BPEL Service Engine User's Guide for details about the supported BPEL 2.0 language constructs and related limitations.
Using a Fault Handler
When to Use
The BPEL language provides the capability to catch and manage exceptions using fault handlers. For example, exceptions occur when web services return different data than was expected. If faults are not handled, the entire BPEL process can be thrown into a faulted state. Therefore, to prevent the entire process from fault, you can add fault handlers to catch and manage exceptions within particular Scopes.
Each fault handler contains an activity that runs in case of an error. For example, a partner service is notified if an error has occurred. Fault handlers can be added to the entire process or to individual Scope elements.
You can attach one Fault Handler container to either the Process or the Scope elements. Inside the Fault Handlers container, you can create several Catch activities configured to catch specific kinds of faults, or one Catch All handler element to catch all the exceptions not caught by specific handlers.
Usage
-
Right-click the Scope or Process element and choose Add > Fault Handlers.
An empty container element appears.
-
Right-click the Fault Handler container and choose Add > Catch or Add > Catch All.
You may add as many specific Catch elements as you wish to the Fault Handlers group. You can add only one Catch All element per Fault Handlers container.
- Add an activity to the Catch or Catch All element that will be executed in case of a fault.
Catch Element
Use this element to intercept and deal with a specific kind of fault.
This element is used within an appropriate Fault Handlers container element.
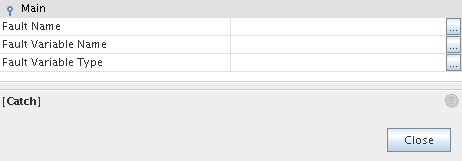
Catch Element Properties
The properties of the Catch element are defined in the Properties window. You can also right-click the element on the diagram and choose Properties. The available properties are:
-
Fault Name. Select the qname of the fault from the list of faults, which contains faults defined in the WSDL files.
-
Fault Variable Name. Specify the name of an existing BPEL variable that will contain the fault message.
-
Fault Variable Type. Specify the type of the variable.
Catch All Element
Use the Catch All element to intercept and deal with all faults that are not caught by an associated catch element.
The Catch All element is used within a fault handler window along with one or more Catch elements. It is defined within a Fault Handlers container element along with one or more Catch elements.
There are no properties for the Catch All element. Its behavior is pre-defined and requires no property configuration.
top
Using an Event Handler
When to Use
The entire BPEL process as well as each individual Scope can be associated with a set of Event Handlers that are invoked concurrently if the corresponding event occurs. The actions taken within an Event Handler can be any type of activity, such as Sequence or Flow. The only immediate child of an Event Handler is Scope, so when you drag an element from the Palette into an Event Handler, it is automatically wrapped in Scope.
There are
two types of events:
- Incoming messages, which correspond to a request/response or one-way operation in WSDL. These messages are specified using the On Event elements.
- Alarms, or timers, which invoke activities after the specified periods or when a deadline is reached. The times are specified using the On Alarm elements.
Usage
-
Right-click the Process element or any Scope and invoke the Add Event Handlers action. This does not add any particular Event Handler, it adds a container element to which you can then add specific Event Handlers.
-
Once you have added an Event Handlers container, you can right-click on the Event Handlers element to add an On Event or On Alarm branch. You may add as many specific On Event or On Alarm elements as you wish to the Event Handlers group.
On Event Element
The On Event element indicates that the specified event waits for a message to arrive. The interpretation of this tag and its attributes is very similar to a Receive activity.
Usage
-
Right-click the Event Handlers container and choose Add > On Event.
-
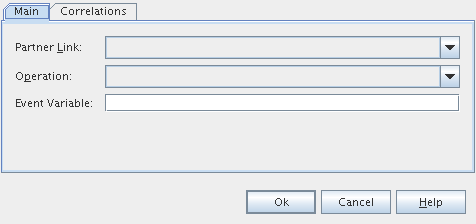
Double-clicking the On Event element opens a Property Editor where you can specify/change the following:
-
The partner link
-
The operation associated with the On Event element
-
The event variable
-
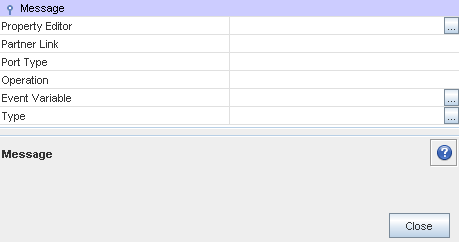
Right-clicking the On Event element and choosing Properties opens a Properties window where you can review and modify the properties of the element. In addition to the properties present in the Property Editor dialog box, the Properties window contains the Port Type field, which are filled in when you specify the partner link and operation, and the Type field, which is filled with the type of the specified even variable.
The Correlations tab in the On Event Property Editor dialog box enables you to examine or specify a correlation set.
The tab shows:
-
A correlation sets' name
-
The initiation of a correlator
You can add a correlation set by clicking the Add button. For more information, refer to Defining a Correlation Set and Adding a Correlation Set to an Element.
On Alarm Element
The On Alarm element specifies the deadline for or the duration of the nested Scope.
On Alarm Element Properties
The properties of the On Alarm element are defined in the Properties window, invoked by right-clicking the element on the diagram and choosing Properties. The available properties are:
-
Alarm Type is used to choose the type of alarm. The available options are:
- For. Sets the duration for the process to wait.
- Until. Specifies the deadline for the process.
- Repeat Every. Specifies the frequency of process initiation. It initiates the process each time
the specified duration period expires. The clock for the very first
duration starts when the associated scope starts.
- For + Repeat Every. Specifies the frequency of process initiation after the duration of a specified wait time. The process is initiated each time the duration period specified in the Repeat Every
field expires. The first alarm is fired when the period of
time specified in the For field expires.
- Until + Repeat Every. Specifies the frequency of process initiation based on the specified deadline. The process will be initiated each
time the duration period specified in the Repeat Every field
expires. The first alarm is fired when the deadline specified
in the Until field is reached.
-
The second (and third, where available) property is used to specify the duration or deadline for the selected alarm type.
top