If you are importing into an existing repository which already contains some projects, then the repository structure will already have been decided. If are importing data into a new repository then it is worth taking the time to think about how it will be organised. Read the section called “Repository Layout” for further advice.
This section describes the Subversion import command, which was designed for importing a directory hierarchy into the repository in one shot. Although it does the job, it has several shortcomings:
There is no way to select files and folders to include, aside from using the global ignore settings.
The folder imported does not become a working copy. You have to do a checkout to copy the files back from the server.
It is easy to import to the wrong folder level in the repository.
For these reasons we recommend that you do not use the import command at all but rather follow the two-step method described in the section called “Import in Place”. But since you are here, this is how the basic import works ...
Before you import your project into a repository you should:
Remove all files which are not needed to build the project (temporary files, files which are generated by a compiler e.g. *.obj, compiled binaries, ...)
Organize the files in folders and sub-folders. Although it is possible to rename/move files later it is highly recommended to get your project's structure straight before importing!
Now select the top-level folder of your project directory structure in the windows explorer and right click to open the context menu. Select the command → which brings up a dialog box:
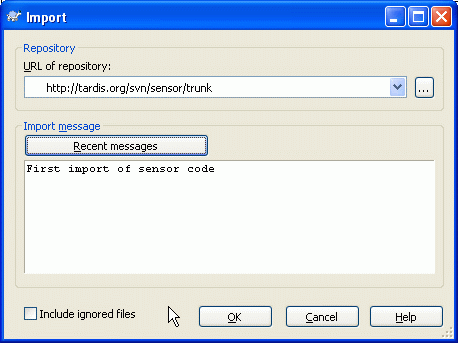
In this dialog you have to enter the URL of the repository location where you want to import your project. It is very important to realise that the local folder you are importing does not itself appear in the repository, only its content. For example if you have a structure:
C:\Projects\Widget\source
C:\Projects\Widget\doc
C:\Projects\Widget\images
and you import C:\Projects\Widget into
http://mydomain.com/svn/trunk
then you may be surprised to find that your subdirectories go
straight into trunk rather than being in a
Widget subdirectory. You need to specify the
subdirectory as part of the URL,
http://mydomain.com/svn/trunk/Widget-X.
Note that the import command will automatically create subdirectories
within the repository if they do not exist.
The import message is used as a log message.
By default, files and folders which match the global-ignore patterns are not imported. To override this behaviour you can use the Include ignored files checkbox. Refer to the section called “General Settings” for more information on setting a global ignore pattern.
As soon as you press TortoiseSVN imports the complete directory tree including all files into the repository. The project is now stored in the repository under version control. Please note that the folder you imported is NOT under version control! To get a version-controlled working copy you need to do a Checkout of the version you just imported. Or read on to find out how to import a folder in place.
Assuming you already have a repository, and you want to add a new folder structure to it, just follow these steps:
Use the repository browser to create a new project folder directly in the repository.
Checkout the new folder over the top of the folder you want to import. You will get a warning that the local folder is not empty. Now you have a versioned top level folder with unversioned content.
Use → on this versioned folder to add some or all of the content. You can add and remove files, set
svn:ignoreproperties on folders and make any other changes you need to.Commit the top level folder, and you have a new versioned tree, and a local working copy, created from your existing folder.
Sometimes you need to have a file under version control which contains user specific data. That means you have a file which every developer/user needs to modify to suit his/her local setup. But versioning such a file is difficult because every user would commit his/her changes every time to the repository.
In such cases we suggest to use template files. You create a file which contains all the data your developers will need, add that file to version control and let the developers check this file out. Then, each developer has to make a copy of that file and rename that copy. After that, modifying the copy is not a problem anymore.
As an example, you can have a look at TortoiseSVN's build script. It
calls a file named TortoiseVars.bat which
doesn't exist in the repository. Only the file
TortoiseVars.tmpl.
TortoiseVars.tmpl is the template file which
every developer has to create a copy from and rename that file
to TortoiseVars.bat. Inside that file, we added
comments so that the users will see which lines they have to edit
and change according to their local setup to get it working.
So as not to disturb the users, we also added the file
TortoiseVars.bat to the ignore list of its
parent folder, i.e. we've set the Subversion property
svn:ignore to include that filename.
That way it won't show up as unversioned on every commit.
Sometimes it is useful to construct a working copy that is made out
of a number of different checkouts. For example, you may want different
subdirectories to come from different locations in a repository, or
perhaps from different repositories altogether.
If you want every user to have the same layout, you can define the
svn:externals properties.
Let's say you check out a working copy of
/project1 to
D:\dev\project1.
Select the folder D:\dev\project1,
right click and choose
→
from the context menu.
The Properties Dialog comes up. Then go to the Subversion tab.
There, you can set properties. Click .
Select the svn:externals property from the
combobox and write in the edit box the repository URL in the format
name url
or if you want to specify a particular revision,
name -rREV url
You can add multiple external projects, 1 per line.
Note that URLs must be properly escaped or they will
not work. For example you must replace each space with
%20. Note that it is not possible to use
folder names with spaces in them.
Suppose that you have set these properties on
D:\dev\project1:
sounds   http://sounds.red-bean.com/repos
quick_graphs  http://graphics.red-bean.com/repos/fast%20graphics
skins/toolkit -r21 http://svn.red-bean.com/repos/skin-maker
Now click and commit your changes.
When you (or any other user) update your working copy, Subversion
will create a sub-folder
D:\dev\project1\sounds and checkout the sounds
project, another sub-folder D:\dev\project1\quick graphs
containing the graphics project, and finally a nested sub-folder
D:\dev\project1\skins\toolkit containing
revision 21 of the skin-maker project.
Tip
You should strongly consider using explicit revision numbers in all of your externals definitions, as described above. Doing so means that you get to decide when to pull down a different snapshot of external information, and exactly which snapshot to pull. Besides the common sense aspect of not being surprised by changes to third-party repositories that you might not have any control over, using explicit revision numbers also means that as you backdate your working copy to a previous revision, your externals definitions will also revert to the way they looked in that previous revision, which in turn means that the external working copies will be updated to match they way they looked back when your repository was at that previous revision. For software projects, this could be the difference between a successful and a failed build of an older snapshot of your complex code base.
If the external project is in the same repository, any changes you make there there will be included in the commit list when you commit your main project.
If the external project is in a different repository, any changes you make to the external project will be notified when you commit the main project, but you have to commit those external changes separately.
If you use absolute URLs in svn:externals
definitions and you have to relocate your working copy (i.e.,
if the URL of your repository changes), then your externals
won't change and might not work anymore.
To avoid such problems, Subversion clients version 1.5 and
higher support relative external URLs. Four different methods
of specifying a relative URL are supported.
In the following examples, assume we have two repositories: one at
http://example.com/svn/repos-1
and another at
http://example.com/svn/repos-2.
We have a checkout of
http://example.com/svn/repos-1/project/trunk
into C:\Working and the svn:externals
property is set on trunk.
- Relative to parent directory
These URLs always begin with the string
../for example:../../widgets/foo common/foo-widget
This will extract
http://example.com/svn/repos-1/widgets/foointoC:\Working\common\foo-widget.Note that the URL is relative to the URL of the directory with the
svn:externalsproperty, not to the directory where the external is written to disk.- Relative to repository root
These URLs always begin with the string
^/for example:^/widgets/foo common/foo-widget
This will extract
http://example.com/svn/repos-1/widgets/foointoC:\Working\common\foo-widget.You can easily refer to other repositories with the same
SVNParentPath(a common directory holding several repositories). For example:^/../repos-2/hammers/claw common/claw-hammer
This will extract
http://example.com/svn/repos-2/hammers/clawintoC:\Working\common\claw-hammer.- Relative to scheme
URLs beginning with the string
//copy only the scheme part of the URL. This is useful when the same hostname must the accessed with different schemes depending upon network location; e.g. clients in the intranet usehttp://while external clients usesvn+ssh://. For example://example.com/svn/repos-1/widgets/foo common/foo-widget
This will extract
http://example.com/svn/repos-1/widgets/fooorsvn+ssh://example.com/svn/repos-1/widgets/foodepending on which method was used to checkoutC:\Working.- Relative to the server's hostname
URLs beginning with the string
/copy the scheme and the hostname part of the URL, for example:/svn/repos-1/widgets/foo common/foo-widget
This will extract
http://example.com/svn/repos-1/widgets/foointoC:\Working\common\foo-widget. But if you checkout your working copy from another server atsvn+ssh://another.mirror.net/svn/repos-1/project1/trunkthen the external reference will extractsvn+ssh://another.mirror.net/svn/repos-1/widgets/foo.
If you need more information how TortoiseSVN handles Properties read the section called “Project Settings”.
To find out about different methods of accessing common sub-projects read the section called “Include a common sub-project”.