InstrumentationTestRunnerActivityInstrumentationTestCase2ActivityUnitTestCaseApplicationTestCaseProviderTestCase2ServiceTestCaseAndroid includes a powerful set of testing tools that extend the industry-standard JUnit test framework with features specific to the Android environment. Although you can test an Android application with JUnit, the Android tools allow you to write much more sophisticated tests for every aspect of your application, both at the unit and framework levels.
Key features of the Android testing environment include:
This document is an overview of the Android testing environment and the way you use it. The document assumes you have a basic knowledge of Android application programming and JUnit testing methodology.
At the heart of the Android testing environment is an instrumentation framework that your test application uses to precisely control the application under test. With instrumentation, you can set up mock system objects such as Contexts before the main application starts, control your application at various points of its lifecycle, send UI events to the application, and examine the application's state during its execution. The instrumentation framework accomplishes this by running both the main application and the test application in the same process.
Your test application is linked to the application under test by means of an
<instrumentation>
element in the test application's manifest file. The attributes of the element
specify the package name of the application under test and also tell Android how
to run the test application. Instrumentation is described in more detail in the
section Instrumentation Test
Runner.
The following diagram summarizes the Android testing environment:
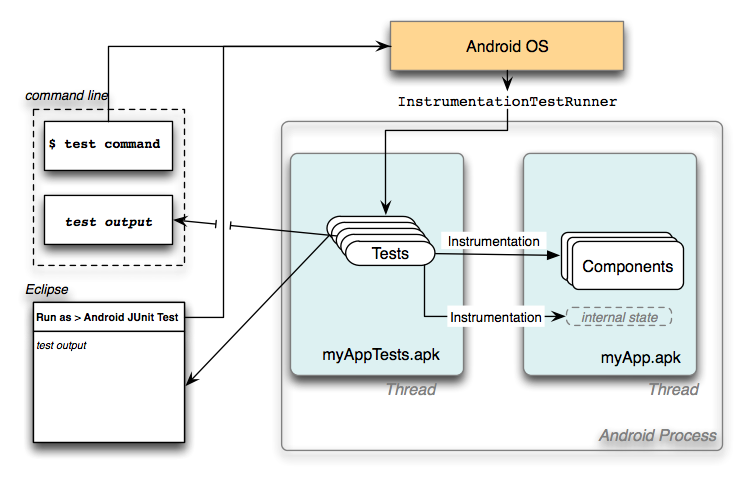
In Android, test applications are themselves Android applications, so you
write them in much the same way as the application you are testing. The SDK
tools help you create a main application project and its test project at the same
time. You can run Android tests within Eclipse with ADT or from the command
line. Eclipse with ADT provides an extensive set of tools for creating tests,
running them, and viewing their results. You can also use the adb
tool to run tests, or use a built-in Ant target.
To learn how to set up and run tests in Eclipse, please refer to Testing in Eclipse, with ADT. If you're not working in Eclipse, refer to Testing in Other IDEs.
If you want a step-by-step introduction to Android testing, try one of the testing tutorials:
For writing tests and test applications in the Java programming language, Android provides a testing API that is based in part on the JUnit test framework. Adding to that, Android includes a powerful instrumentation framework that lets your tests access the state and runtime objects of the application under tests.
The sections below describe the major components of the testing API available in Android.
Some of the classes in the testing API extend the JUnit TestCase but do not use the instrumentation framework. These classes
contain methods for accessing system objects such as the Context of the application under test. With this Context, you can look at its resources, files, databases,
and so forth. The base class is AndroidTestCase, but you usually use a subclass associated with a particular component.
The subclasses are:
ApplicationTestCase - A class for testing an entire application. It allows you to inject a mock Context into the application,
set up initial test parameters before the application starts, and examine the application after it finishes but before it is destroyed.
ProviderTestCase2 - A class for isolated testing of a single ContentProvider. Since it is restricted to using a
MockContentResolver for the provider, and it injects an IsolatedContext, your provider testing is isolated
from the rest of the OS.
ServiceTestCase - a class for isolated testing of a single Service. You can inject a mock Context or
mock Application (or both), or let Android provide you a full Context and a MockApplication.
The API for testing activities extends the JUnit TestCase class and also uses the instrumentation framework. With instrumentation,
Android can automate UI testing by sending events to the application under test, precisely control the start of an activity, and monitor the state of the
activity during its life cycle.
The base class is InstrumentationTestCase. All of its subclasses have the ability to send a keystroke or touch event to the UI of the application
under test. The subclasses can also inject a mock Intent.
The subclasses are:
ActivityTestCase - A base class for activity test classes.
SingleLaunchActivityTestCase - A convenience class for testing a single activity.
It invokes setUp() and tearDown() only
once, instead of once per method call. Use it when all of your test methods run against the same activity.
SyncBaseInstrumentation - A class that tests synchronization of a content provider. It uses instrumentation to cancel and disable
existing synchronizations before starting the test synchronization.
ActivityUnitTestCase - This class does an isolated test of a single activity. With it, you can inject a mock context or application, or both.
It is intended for doing unit tests of an activity, and is the activity equivalent of the test classes described in JUnit test case classes.
Unlike the other instrumentation classes, this test class cannot inject a mock Intent.
ActivityInstrumentationTestCase2 - This class tests a single activity within the normal system environment.
You cannot inject a mock Context, but you can inject mock Intents. Also, you can run a test method on the UI thread (the main thread of the application under test),
which allows you to send key and touch events to the application UI.
Android also extends the JUnit Assert class that is the basis of assert() calls in tests.
There are two extensions to this class, MoreAsserts and ViewAsserts:
MoreAsserts class contains more powerful assertions such as assertContainsRegex(String, String) that does regular expression matching.
ViewAsserts class contains useful assertions about Android Views, such as assertHasScreenCoordinates(View, View, int, int) that tests if a View has a particular X and Y
position on the visible screen. These asserts simplify testing of geometry and alignment in the UI.
Android has convenience classes for creating mock system objects such as applications, contexts, content resolvers, and resources. Android also provides
methods in some test classes for creating mock Intents. Use these mocks to facilitate dependency injection, since they are easier to use than creating their
real counterparts. These convenience classes are found in android.test and android.test.mock. They are:
IsolatedContext - Mocks a Context so that the application using it runs in isolation.
At the same time, it has enough stub code to satisfy OS code that tries to communicate with contexts. This class is useful in unit testing.
RenamingDelegatingContext - Delegates most context functions to an existing, normal context while changing the default file and database
names in the context. Use this to test file and database operations with a normal system context, using test names.
MockApplication, MockContentResolver, MockContext,
MockDialogInterface, MockPackageManager,
MockResources - Classes that create mock Android system objects for use in testing. They expose only those methods that are
useful in managing the object. The default implementations of these methods simply throw an Exception. You are expected to extend the classes and
override any methods that are called by the application under test.
Android provides a custom class for running tests with instrumentation called called
InstrumentationTestRunner. This class
controls of the application under test, runs the test application and the main application in the same process, and routes
test output to the appropriate place. Using instrumentation is key to the ability of InstrumentationTestRunner to control the entire test
environment at runtime. Notice that you use this test runner even if your test class does not itself use instrumentation.
When you run a test application, you first run a system utility called Activity Manager. Activity Manager uses the instrumentation framework to start and control the test runner, which in turn uses instrumentation to shut down any running instances of the main application, starts the test application, and then starts the main application in the same process. This allows various aspects of the test application to work directly with the main application.
If you are developing in Eclipse, the ADT plugin assists you in the setup of InstrumentationTestRunner or other test runners.
The plugin UI prompts you to specify the test runner class to use, as well as the package name of the application under test.
The plugin then adds an <instrumentation> element with appropriate attributes to the manifest file of the test application.
Eclipse with ADT automatically starts a test application under the control of Activity Manager using instrumentation,
and redirects the test output to the Eclipse window's JUnit view.
If you prefer working from the command line, you can use Ant and the android
tool to help you set up your test projects. To run tests with instrumentation, you can access the
Activity Manager through the Android Debug
Bridge (adb) tool and the output is directed to STDOUT.
The tests for an Android application are contained in a test application, which itself is an Android application. A test application resides in a separate Android project that has the same files and directories as a regular Android application. The test project is linked to the project of the application it tests (known as the application under test) by its manifest file.
Each test application contains one or more test case classes based on an Android class for a particular type of component. The test case class contains methods that define tests on some part of the application under test. When you run the test application, Android starts it, loads the application under test into the same process, and then invokes each method in the test case class.
The tools and procedures you use with testing depend on the development environment you are using. If you use Eclipse, then the ADT plug in for Eclipse provides tools that allow you to develop and run tests entirely within Eclipse. This is documented in the topic Testing in Eclipse, with ADT. If you use another development environment, then you use Android's command-line tools, as documented in the topic Testing in Other IDEs.
To start testing an Android application, you create a test project for it using Android tools. The tools create the project directory and the files and subdirectories needed. The tools also create a manifest file that links the application in the test project to the application under test. The procedure for creating a test project in Eclipse with ADT is documented in Testing in Eclipse, with ADT. The procedure for creating a test project for use with development tools other than Eclipse is documented in Testing in Other IDEs.
A test application contains one or more test case classes that extend an Android test case class. You choose a test case class based on the type of Android component you are testing and the tests you are doing. A test application can test different components, but each test case class is designed to test a single type of component. The Android test case classes are described in the section The Testing API.
Some Android components have more than one associated test case class. In this case, you choose among the available classes based on the type of tests you want to do. For activities,
for example, you have the choice of either ActivityInstrumentationTestCase2 or ActivityUnitTestCase.
ActivityInstrumentationTestCase2 is designed to do functional testing, so it tests activities in a normal system infrastructure. You can inject mocked Intents, but not
mocked Contexts. In general, you can't mock dependencies for the activity under test.
In comparison, ActivityUnitTestCase is designed for unit testing, so it tests activities in an isolated system infrastructure. You can inject mocked or wrappered dependencies for
the activity under test, particularly mocked Contexts. On the other hand, when you use this test case class the activity under test runs in isolation and can't interact with other activities.
As a rule of thumb, if you wanted to test an activity's interaction with the rest of Android, you would use ActivityInstrumentationTestCase2. If you wanted to do regression testing
on an activity, you would use ActivityUnitTestCase.
Each test case class provides methods that you use to set up the test environment and control the application under test. For example, all test case classes provide the JUnit setUp()
method that you can override to set up fixtures. In addition, you add methods to the class to define individual tests. Each method you add is run once each time you run the test application. If you override the setUp()
method, it runs before each of your methods. Similarly, the JUnit tearDown() method is run once after each of your methods.
The test case classes give you substantial control over starting and stopping components. For this reason, you have to specifically tell Android to start a component before you run tests against it. For example, you use the
getActivity() method to start the activity under test. You can call this method once during the entire test case, or once for each test method. You can even destroy the
activity under test by calling its finish() method and then restart it with getActivity() within a single test method.
To run your tests, you build your test project and then run the test application using the system utility Activity Manager with instrumentation. You provide to Activity Manager the name of the test runner (usually
InstrumentationTestRunner) you specified for your application; the name includes both your test application's package name and the test runner class name. Activity Manager loads and starts your
test application, kills any instances of the application under test, loads an instance of the application under test into the same process as the test application, and then passes control to the first test case
class in your test application. The test runner then takes control of the tests, running each of your test methods against the application under test until all the methods in all the classes have been run.
If you run a test within Eclipse with ADT, the output appears in a new JUnit view pane. If you run a test from the command line, the output goes to STDOUT.
In addition to the functional areas you would normally test, here are some areas of Android application testing that you should consider:
android.test.mock.
When possible, you should run these tests on an actual device. If this is not possible, you can use the Android Emulator with Android Virtual Devices configured for the hardware, screens, and versions you want to test.
The following sections have tips for testing the UI of your Android application, specifically to help you handle actions that run in the UI thread, touch screen and keyboard events, and home screen unlock during testing.
An application's activities run on the application's UI thread. Once the
UI is instantiated, for example in the activity's onCreate() method, then all
interactions with the UI must run in the UI thread. When you run the application normally, it
has access to the thread and does not have to do anything special.
This changes when you run tests against the application. With instrumentation-based classes,
you can invoke methods against the UI of the application under test. The other test classes don't allow this.
To run an entire test method on the UI thread, you can annotate the thread with @UIThreadTest.
Notice that this will run all of the method statements on the UI thread. Methods that do not interact with the UI
are not allowed; for example, you can't invoke Instrumentation.waitForIdleSync().
To run a subset of a test method on the UI thread, create an anonymous class of type
Runnable, put the statements you want in the run() method, and instantiate a new
instance of the class as a parameter to the method appActivity.runOnUiThread(), where
appActivity is the instance of the app you are testing.
For example, this code instantiates an activity to test, requests focus (a UI action) for the Spinner displayed
by the activity, and then sends a key to it. Notice that the calls to waitForIdleSync and sendKeys
aren't allowed to run on the UI thread:
  private MyActivity mActivity; // MyActivity is the class name of the app under test
  private Spinner mSpinner;

  ...

  protected void setUp() throws Exception {
      super.setUp();
      mInstrumentation = getInstrumentation();

      mActivity = getActivity(); // get a references to the app under test

      /*
       * Get a reference to the main widget of the app under test, a Spinner
       */
      mSpinner = (Spinner) mActivity.findViewById(com.android.demo.myactivity.R.id.Spinner01);

  ...

  public void aTest() {
      /*
       * request focus for the Spinner, so that the test can send key events to it
       * This request must be run on the UI thread. To do this, use the runOnUiThread method
       * and pass it a Runnable that contains a call to requestFocus on the Spinner.
       */
      mActivity.runOnUiThread(new Runnable() {
          public void run() {
              mSpinner.requestFocus();
          }
      });

      mInstrumentation.waitForIdleSync();

      this.sendKeys(KeyEvent.KEYCODE_DPAD_CENTER);
To control the emulator or a device with key events you send from your tests, you must turn off touch mode. If you do not do this, the key events are ignored.
To turn off touch mode, you invoke ActivityInstrumentationTestCase2.setActivityTouchMode(false)
before you call getActivity() to start the activity. You must invoke the method in a test method
that is not running on the UI thread. For this reason, you can't invoke the touch mode method
from a test method that is annotated with @UIThread. Instead, invoke the touch mode method from setUp().
You may find that UI tests don't work if the emulator's or device's home screen is disabled with the keyguard pattern.
This is because the application under test can't receive key events sent by sendKeys(). The best
way to avoid this is to start your emulator or device first and then disable the keyguard for the home screen.
You can also explicitly disable the keyguard. To do this,
you need to add a permission in the manifest file (AndroidManifest.xml) and
then disable the keyguard in your application under test. Note, though, that you either have to remove this before
you publish your application, or you have to disable it programmatically in the published app.
To add the the permission, add the element <uses-permission android:name="android.permission.DISABLE_KEYGUARD"/>
as a child of the <manifest> element. To disable the KeyGuard, add the following code
to the onCreate() method of activities you intend to test:
  mKeyGuardManager = (KeyguardManager) getSystemService(KEYGUARD_SERVICE);
  mLock = mKeyGuardManager.newKeyguardLock("activity_classname");
  mLock.disableKeyguard();
where activity_classname is the class name of the activity.
This section lists some of the common test failures you may encounter in UI testing, and their causes:
WrongThreadExceptionProblem:
For a failed test, the Failure Trace contains the following error message:
android.view.ViewRoot$CalledFromWrongThreadException: Only the original thread that created a view hierarchy can touch its views.
Probable Cause:
This error is common if you tried to send UI events to the UI thread from outside the UI thread. This commonly happens if you send UI events from the test application, but you don't use the@UIThread annotation or the runOnUiThread() method. The test method tried to interact with the UI outside the UI thread.
Suggested Resolution:
Run the interaction on the UI thread. Use a test class that provides instrumentation. See the previous section Testing on the UI Thread for more details.java.lang.RuntimeExceptionProblem:
For a failed test, the Failure Trace contains the following error message:
java.lang.RuntimeException: This method can not be called from the main application thread
Probable Cause:
This error is common if your test method is annotated with@UiThreadTest but then tries to
do something outside the UI thread or tries to invoke runOnUiThread().
Suggested Resolution:
Remove the@UiThreadTest annotation, remove the runOnUiThread() call, or re-factor your tests.