In an Android application, the user interface is built using View and
ViewGroup objects. There are many types of views and view groups, each of which
is a descendant of the View class.
View objects are the basic units of user interface expression on the Android platform. The View class serves as the base for subclasses called "widgets," which offer fully implemented UI objects, like text fields and buttons. The ViewGroup class serves as the base for subclasses called "layouts," which offer different kinds of layout architecture, like linear, tabular and relative.
A View object is a data structure whose properties store the layout parameters and content for a specific rectangular area of the screen. A View object handles its own measurement, layout, drawing, focus change, scrolling, and key/gesture interactions for the rectangular area of the screen in which it resides. As an object in the user interface, a View is also a point of interaction for the user and the receiver of the interaction events.
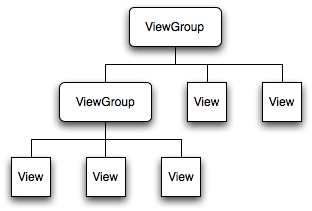
On the Android platform, you define an Activity's UI using a hierarchy of View and ViewGroup nodes, as shown in the diagram below. This hierarchy tree can be as simple or complex as you need it to be, and you can build it up using Android's set of predefined widgets and layouts, or with custom Views that you create yourself.
In order to attach the view hierarchy tree to the screen for rendering, your Activity must call the
setContentView()
For a more detailed discussion on how view hierarchies are measured and drawn, read How Android Draws Views.
The most common way to define your layout and express the view hierarchy is with an XML layout file. XML offers a human-readable structure for the layout, much like HTML. Each element in XML is either a View or ViewGroup object (or descendant thereof). View objects are leaves in the tree, ViewGroup objects are branches in the tree (see the View Hierarchy figure above).
The name of an XML element
is respective to the Java class that it represents. So a <TextView> element creates
a TextView in your UI, and a <LinearLayout> element creates
a LinearLayout view group. When you load a layout resource,
the Android system initializes these run-time objects, corresponding to the elements in your layout.
For example, a simple vertical layout with a text view and a button looks like this:
<?xml version="1.0" encoding="utf-8"?>
<LinearLayout xmlns:android="http://schemas.android.com/apk/res/android"
              android:layout_width="fill_parent"
              android:layout_height="fill_parent"
              android:orientation="vertical" >
    <TextView android:id="@+id/text"
              android:layout_width="wrap_content"
              android:layout_height="wrap_content"
              android:text="Hello, I am a TextView" />
    <Button android:id="@+id/button"
            android:layout_width="wrap_content"
            android:layout_height="wrap_content"
            android:text="Hello, I am a Button" />
</LinearLayout>
Notice that the LinearLayout element contains both the TextView and the Button. You can nest another LinearLayout (or other type of view group) inside here, to lengthen the view hierarchy and create a more complex layout.
For more on building a UI layout, read Declaring Layout.
Tip: You can also draw View and ViewGroups objects in Java code,
using the addView(View)
There are a variety of ways in which you can layout your views. Using more and different kinds of view groups, you can structure child views and view groups in an infinite number of ways. Some pre-defined view groups offered by Android (called layouts) include LinearLayout, RelativeLayout, TableLayout, GridLayout and others. Each offers a unique set of layout parameters that are used to define the positions of child views and layout structure.
To learn about some of the different kinds of view groups used for a layout, read Common Layout Objects.
A widget is a View object that serves as an interface for interaction with the user. Android provides a set of fully implemented widgets, like buttons, checkboxes, and text-entry fields, so you can quickly build your UI. Some widgets provided by Android are more complex, like a date picker, a clock, and zoom controls. But you're not limited to the kinds of widgets provided by the Android platform. If you'd like to do something more customized and create your own actionable elements, you can, by defining your own View object or by extending and combining existing widgets.
Read more in Building Custom Components.
For a list of the widgets provided by Android, see the android.widget package.
Once you've added some Views/widgets to the UI, you probably want to know about the user's interaction with them, so you can perform actions. To be informed of UI events, you need to do one of two things:
On<something>().
For example, View.OnClickListener (for handling "clicks" on a View),
View.OnTouchListener (for handling touch screen events in a View), and
View.OnKeyListener (for handling device key presses within a View). So if you want your View
to be notified when it is "clicked" (such as when a button is selected), implement OnClickListener and define
its onClick() callback method (where you perform the action upon click), and register it
to the View with setOnClickListener()onTouchEvent()onTrackballEvent()onKeyDown()Continue reading about handling user interaction with Views in the Handling UI Events document.
Application menus are another important part of an application's UI. Menus offers a reliable interface that reveals application functions and settings. The most common application menu is revealed by pressing the MENU key on the device. However, you can also add Context Menus, which may be revealed when the user presses and holds down on an item.
Menus are also structured using a View hierarchy, but you don't define this structure yourself. Instead,
you define the onCreateOptionsMenu()onCreateContextMenu()
Menus also handle their own events, so there's no need to register event listeners on the items in your menu.
When an item in your menu is selected, the onOptionsItemSelected()onContextItemSelected()
And just like your application layout, you have the option to declare the items for you menu in an XML file.
Read Creating Menus to learn more.
Once you've grappled the fundamentals of creating a user interface, you can explore some advanced features for creating a more complex application interface.
Sometimes you'll want to populate a view group with some information that can't be hard-coded, instead, you want to bind your view to an external source of data. To do this, you use an AdapterView as your view group and each child View is initialized and populated with data from the Adapter.
The AdapterView object is an implementation of ViewGroup that determines its child views based on a given Adapter object. The Adapter acts like a courier between your data source (perhaps an array of external strings) and the AdapterView, which displays it. There are several implementations of the Adapter class, for specific tasks, such as the CursorAdapter for reading database data from a Cursor, or an ArrayAdapter for reading from an arbitrary array.
To learn more about using an Adapter to populate your views, read Binding to Data with AdapterView.
Perhaps you're not satisfied with the look of the standard widgets. To revise them, you can create some of your own styles and themes.
Styles and themes are resources. Android provides some default style and theme resources that you can use, or you can declare your own custom style and theme resources.
Learn more about using styles and themes in the Applying Styles and Themes document.