The Android testing framework, an integral part of the development environment, provides an architecture and powerful tools that help you test every aspect of your application at every level from unit to framework.
The testing framework has these key features:
AndroidTestCase and then go on to use more sophisticated classes.
This document describes the fundamentals of the Android testing framework, including the structure of tests, the APIs that you use to develop tests, and the tools that you use to run tests and view results. The document assumes you have a basic knowledge of Android application programming and JUnit testing methodology.
The following diagram summarizes the testing framework:
Android's build and test tools assume that test projects are organized into a standard structure of tests, test case classes, test packages, and test projects.
Android testing is based on JUnit. In general, a JUnit test is a method whose statements test a part of the application under test. You organize test methods into classes called test cases (or test suites). Each test is an isolated test of an individual module in the application under test. Each class is a container for related test methods, although it often provides helper methods as well.
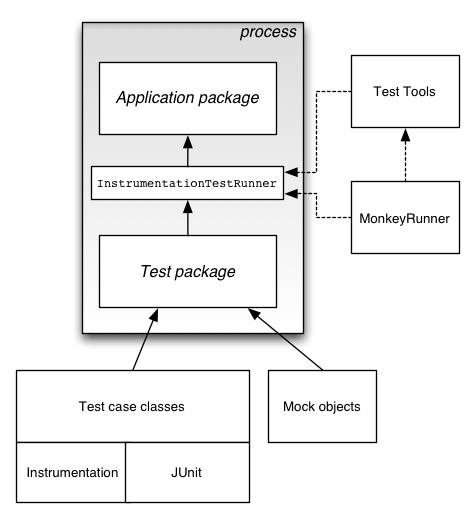
In JUnit, you build one or more test source files into a class file. Similarly, in Android you use the SDK's build tools to build one or more test source files into class files in an Android test package. In JUnit, you use a test runner to execute test classes. In Android, you use test tools to load the test package and the application under test, and the tools then execute an Android-specific test runner.
Tests, like Android applications, are organized into projects.
A test project is a directory or Eclipse project in which you create the source code, manifest file, and other files for a test package. The Android SDK contains tools for Eclipse with ADT and for the command line that create and update test projects for you. The tools create the directories you use for source code and resources and the manifest file for the test package. The command-line tools also create the Ant build files you need.
You should always use Android tools to create a test project. Among other benefits, the tools:
InstrumentationTestRunner as the test case runner. You must use
InstrumentationTestRunner (or a subclass) to run JUnit tests.
com.mydomain.myapp, then the
Android tools set the test package name to com.mydomain.myapp.test. This
helps you identify their relationship, while preventing conflicts within the system.
You can create a test project anywhere in your file system, but the best approach is to
add the test project so that its root directory tests/ is at the same level
as the src/ directory of the main application's project. This helps you find the
tests associated with an application. For example, if your application project's root directory
is MyProject, then you should use the following directory structure:
  MyProject/
      AndroidManifest.xml
      res/
          ... (resources for main application)
      src/
          ... (source code for main application) ...
      tests/
          AndroidManifest.xml
          res/
              ... (resources for tests)
          src/
              ... (source code for tests)
The Android testing API is based on the JUnit API and extended with a instrumentation framework and Android-specific testing classes.
You can use the JUnit TestCase class to do unit testing on
a plain Java object. TestCase is also the base class for
AndroidTestCase, which you can use to test Android-dependent objects.
Besides providing the JUnit framework, AndroidTestCase offers Android-specific setup,
teardown, and helper methods.
You use the JUnit Assert class to display test results.
The assert methods compare values you expect from a test to the actual results and
throw an exception if the comparison fails. Android also provides a class of assertions that
extend the possible types of comparisons, and another class of assertions for testing the UI.
These are described in more detail in the section
Assertion classes
To learn more about JUnit, you can read the documentation on the
junit.org home page.
Note that the Android testing API supports JUnit 3 code style, but not JUnit 4. Also, you must
use Android's instrumented test runner InstrumentationTestRunner to run
your test case classes. This test runner is described in the
section Running Tests.
Android instrumentation is a set of control methods or "hooks" in the Android system. These hooks control an Android component independently of its normal lifecycle. They also control how Android loads applications.
Normally, an Android component runs in a lifecycle determined by the system. For example, an
Activity object's lifecycle starts when the Activity is activated by an Intent. The object's
onCreate() method is called, followed by onResume(). When the user
starts another application, the onPause() method is called. If the Activity
code calls the finish() method, the onDestroy() method is called.
The Android framework API does not provide a way for your code to invoke these callback
methods directly, but you can do so using instrumentation.
Also, the system runs all the components of an application into the same process. You can allow some components, such as content providers, to run in a separate process, but you can't force an application to run in the same process as another application that is already running.
With Android instrumentation, though, you can invoke callback methods in your test code. This allows you to run through the lifecycle of a component step by step, as if you were debugging the component. The following test code snippet demonstrates how to use this to test that an Activity saves and restores its state:
    // Start the main activity of the application under test
    mActivity = getActivity();

    // Get a handle to the Activity object's main UI widget, a Spinner
    mSpinner = (Spinner)mActivity.findViewById(com.android.example.spinner.R.id.Spinner01);

    // Set the Spinner to a known position
    mActivity.setSpinnerPosition(TEST_STATE_DESTROY_POSITION);

    // Stop the activity - The onDestroy() method should save the state of the Spinner
    mActivity.finish();

    // Re-start the Activity - the onResume() method should restore the state of the Spinner
    mActivity = getActivity();

    // Get the Spinner's current position
    int currentPosition = mActivity.getSpinnerPosition();

    // Assert that the current position is the same as the starting position
    assertEquals(TEST_STATE_DESTROY_POSITION, currentPosition);
The key method used here is
getActivity(), which is a
part of the instrumentation API. The Activity under test is not started until you call this
method. You can set up the test fixture in advance, and then call this method to start the
Activity.
Also, instrumentation can load both a test package and the application under test into the same process. Since the application components and their tests are in the same process, the tests can invoke methods in the components, and modify and examine fields in the components.
Android provides several test case classes that extend TestCase and
Assert with Android-specific setup, teardown, and helper methods.
A useful general test case class, especially if you are
just starting out with Android testing, is AndroidTestCase. It extends
both TestCase and Assert. It provides the
JUnit-standard setUp() and tearDown() methods, as well as well as
all of JUnit's Assert methods. In addition, it provides methods for testing permissions, and a
method that guards against memory leaks by clearing out certain class references.
A key feature of the Android testing framework is its component-specific test case classes. These address specific component testing needs with methods for fixture setup and teardown and component lifecycle control. They also provide methods for setting up mock objects. These classes are described in the component-specific testing topics:
Android does not provide a separate test case class for BroadcastReceiver. Instead, test a BroadcastReceiver by testing the component that sends it Intent objects, to verify that the BroadcastReceiver responds correctly.
You use the ApplicationTestCase test case class to test the setup and
teardown of Application objects. These objects maintain the global state of
information that applies to all the components in an application package. The test case can
be useful in verifying that the <application> element in the manifest file is correctly
set up. Note, however, that this test case does not allow you to control testing of the
components within your application package.
If you want to use instrumentation methods in a test case class, you must use
InstrumentationTestCase or one of its subclasses. The
Activity test cases extend this base class with other functionality that
assists in Activity testing.
Because Android test case classes extend JUnit, you can use assertion methods to display the results of tests. An assertion method compares an actual value returned by a test to an expected value, and throws an AssertionException if the comparison test fails. Using assertions is more convenient than doing logging, and provides better test performance.
Besides the JUnit Assert class methods, the testing API also provides
the MoreAsserts and ViewAsserts classes:
MoreAsserts contains more powerful assertions such as
assertContainsRegex(String, String), which does regular expression
matching.
ViewAsserts contains useful assertions about Views. For example
it contains assertHasScreenCoordinates(View, View, int, int) that tests if a View
has a particular X and Y position on the visible screen. These asserts simplify testing of
geometry and alignment in the UI.
To facilitate dependency injection in testing, Android provides classes that create mock system
objects such as Context objects,
ContentProvider objects, ContentResolver
objects, and Service objects. Some test cases also provide mock
Intent objects. You use these mocks both to isolate tests
from the rest of the system and to facilitate dependency injection for testing. These classes
are found in the Java packages android.test and android.test.mock.
Mock objects isolate tests from a running system by stubbing out or overriding
normal operations. For example, a MockContentResolver
replaces the normal resolver framework with its own local framework, which is isolated
from the rest of the system. MockContentResolver also also stubs out the
notifyChange(Uri, ContentObserver, boolean) method
so that observer objects outside the test environment are not accidentally triggered.
Mock object classes also facilitate dependency injection by providing a subclass of the
normal object that is non-functional except for overrides you define. For example, the
MockResources object provides a subclass of
Resources in which all the methods throw Exceptions when called.
To use it, you override only those methods that must provide information.
These are the mock object classes available in Android:
MockApplication, MockContext,
MockContentProvider, MockCursor,
MockDialogInterface, MockPackageManager, and
MockResources provide a simple and useful mock strategy. They are
stubbed-out versions of the corresponding system object class, and all of their methods throw an
UnsupportedOperationException exception if called. To use them, you override
the methods you need in order to provide mock dependencies.
Note:
MockContentProvider
and MockCursor are new as of API level 8.
MockContentResolver provides isolated testing of content providers by
masking out the normal system resolver framework. Instead of looking in the system to find a
content provider given an authority string, MockContentResolver uses its own internal table. You
must explicitly add providers to this table using
addProvider(String, ContentProvider).
With this feature, you can associate a mock content provider with an authority. You can create
an instance of a real provider but use test data in it. You can even set the provider for an
authority to null. In effect, a MockContentResolver object isolates your test
from providers that contain real data. You can control the
function of the provider, and you can prevent your test from affecting real data.
Android provides two Context classes that are useful for testing:
IsolatedContext provides an isolated Context,
File, directory, and database operations that use this Context take place in a test area.
Though its functionality is limited, this Context has enough stub code to respond to
system calls.
This class allows you to test an application's data operations without affecting real data that may be present on the device.
RenamingDelegatingContext provides a Context in which
most functions are handled by an existing Context, but
file and database operations are handled by a IsolatedContext.
The isolated part uses a test directory and creates special file and directory names.
You can control the naming yourself, or let the constructor determine it automatically.
This object provides a quick way to set up an isolated area for data operations, while keeping normal functionality for all other Context operations.
Test cases are run by a test runner class that loads the test case class, set ups, runs, and tears down each test. An Android test runner must also be instrumented, so that the system utility for starting applications can control how the test package loads test cases and the application under test. You tell the Android platform which instrumented test runner to use by setting a value in the test package's manifest file.
InstrumentationTestRunner is the primary Android test runner class. It
extends the JUnit test runner framework and is also instrumented. It can run any of the test
case classes provided by Android and supports all possible types of testing.
You specify InstrumentationTestRunner or a subclass in your test package's
manifest file, in the
instrumentation element. Also, InstrumentationTestRunner code resides
in the shared library android.test.runner, which is not normally linked to
Android code. To include it, you must specify it in a
uses-library element.
You do not have to set up these elements yourself. Both Eclipse with ADT and the
android command-line tool construct them automatically and add them to your
test package's manifest file.
Note: If you use a test runner other than
InstrumentationTestRunner, you must change the <instrumentation>
element to point to the class you want to use.
To run InstrumentationTestRunner, you use internal system classes called by
Android tools. When you run a test in Eclipse with ADT, the classes are called automatically.
When you run a test from the command line, you run these classes with
Android Debug Bridge (adb).
The system classes load and start the test package, kill any processes that
are running an instance of the application under test, and then load a new instance of the
application under test. They then pass control to
InstrumentationTestRunner, which runs
each test case class in the test package. You can also control which test cases and
methods are run using settings in Eclipse with ADT, or using flags with the command-line tools.
Neither the system classes nor InstrumentationTestRunner run
the application under test. Instead, the test case does this directly. It either calls methods
in the application under test, or it calls its own methods that trigger lifecycle events in
the application under test. The application is under the complete control of the test case,
which allows it to set up the test environment (the test fixture) before running a test. This
is demonstrated in the previous code snippet that tests an
Activity that displays a Spinner widget.
To learn more about running tests, please read the topics Testing in Eclipse, with ADT or Testing in Other IDes.
The Android testing framework returns test results back to the tool that started the test.
If you run a test in Eclipse with ADT, the results are displayed in a new JUnit view pane. If
you run a test from the command line, the results are displayed in STDOUT. In
both cases, you see a test summary that displays the name of each test case and method that
was run. You also see all the assertion failures that occurred. These include pointers to the
line in the test code where the failure occurred. Assertion failures also list the expected
value and actual value.
The test results have a format that is specific to the IDE that you are using. The test results format for Eclipse with ADT is described in Testing in Eclipse, with ADT. The test results format for tests run from the command line is described in Testing in Other IDEs.
The SDK provides two tools for functional-level application testing:
monkeyrunner command-line
tool.
In the test environment, you work with both Android application package names and Java package identifiers. Both use the same naming format, but they represent substantially different entities. You need to know the difference to set up your tests correctly.
An Android package name is a unique system name for a .apk file, set by the
"android:package" attribute of the <manifest> element in the package's
manifest. The Android package name of your test package must be different from the
Android package name of the application under test. By default, Android tools create the
test package name by appending ".test" to the package name of the application under test.
The test package also uses an Android package name to target the application package it tests. This is set in the "android:targetPackage" attribute of the <instrumentation> element in the test package's manifest.
A Java package identifier applies to a source file. This package name reflects the directory path of the source file. It also affects the visibility of classes and members to each other.
Android tools that create test projects set up an Android test package name for you. From your input, the tools set up the test package name and the target package name for the application under test. For these tools to work, the application project must already exist.
By default, these tools set the Java package identifier for the test class to be the same
as the Android package identifier. You may want to change this if you want to expose
members in the application under test by giving them package visibility. If you do this,
change only the Java package identifier, not the Android package names, and change only the
test case source files. Do not change the Java package name of the generated
R.java class in your test package, because it will then conflict with the
R.java class in the application under test. Do not change the Android package name
of your test package to be the same as the application it tests, because then their names
will no longer be unique in the system.
The topic What To Test describes the key functionality you should test in an Android application, and the key situations that might affect that functionality.
Most unit testing is specific to the Android component you are testing. The topics Activity Testing, Content Provider Testing, and Service Testing each have a section entitled "What To Test" that lists possible testing areas.
When possible, you should run these tests on an actual device. If this is not possible, you can use the Android Emulator with Android Virtual Devices configured for the hardware, screens, and versions you want to test.
To learn how to set up and run tests in Eclipse, please refer to Testing in Eclipse, with ADT. If you're not working in Eclipse, refer to Testing in Other IDEs.
If you want a step-by-step introduction to Android testing, try one of the testing tutorials or sample test packages: