Noise Removal
From Audacity Manual
To use Noise Removal, you need a region in the waveform that contains only the noise you want to remove.
- Accessed by:
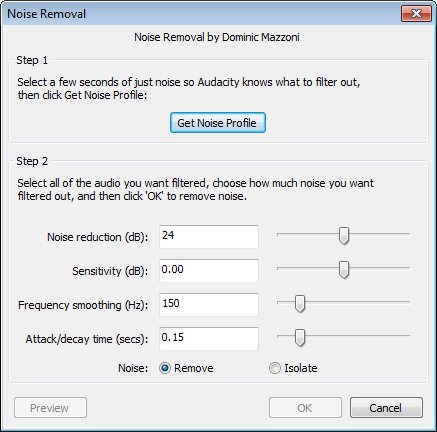

Step 1 - Get Noise Profile
This first step teaches Audacity about the noise you want to remove by identifying the noise floor of the different frequencies comprising the noise.
- Select a region of the waveform which contains only noise. This doesn't need to be very long, a second is enough. If there are very different types of noise in different places in the track, they are best dealt with by grabbing the profile for the first type, removing the noise for it, then grabbing the profile of the next type of noise and removing that.
- Click
- Click Get Noise Profile
Step 2 - Remove the Noise
- Select the region of waveform which you want to remove noise from, then set the Noise Removal parameters. This is often best done by trial and error, adjusting the sliders and using the Preview button to listen to a few seconds of audio after noise reduction.
- Click :
- Noise Reduction (dB): Controls the amount of volume reduction to be applied to the noise. Use the lowest value that reduces the noise to an acceptable level. Higher values than necessary may make the noise even quieter, but will result in distortion of the audio that remains.
- Sensitivity (dB): Controls how much of the audio will be considered as noise, by applying a gain to the noise thresholds obtained in Step 1. Moving the slider rightwards from zero will treat more audio as noise, which will then be reduced by the level set on the Noise Reduction slider. With light noise or noise that is very different to the audio, you may not need to adjust Sensitivity. For heavier noise or noise that is blended into the audio, move the Sensitivity slider rightwards from zero, and experiment by setting both this and the Noise Reduction slider to the lowest levels conducive with effective noise reduction. If you still get a little distortion, try adjusting the following two sliders.
- Frequency Smoothing (Hz): The larger this value the more that the effect considers different frequencies as "the same". If your noise is a single frequency such as mains hum or a high-pitched whistle, then keep this value small. If your noise is more like a hiss, then a larger value will generally be better.
- Attack/decay time (secs): How quickly noise removal reacts. Use a larger value if the background noise is pretty constant. Use a smaller value if it varies rapidly.
- Noise:
- Remove: Select this option to remove the noise from the selection
- Isolate: Select this option to leave just the noise - useful if you want to hear exactly what the Noise Removal effect is removing.
Tips
After creating a noise profile, CTRL + R or will apply Noise Removal.
Removing noise usually results in some distortion. This is normal and there's virtually nothing you can do about it. When there's only a little bit of noise, and the signal (that is, the voice or the music or whatever) is much louder than the noise, this effect works well and there's very little audible distortion. Unfortunately, when the noise is very loud, variable, or when the signal is not much louder than the noise the result may be too distorted.
If you are still having problems the following tips may help:
- Do any click removal, compression or other effects after doing noise removal, not before. It works best as close to the source of the noise as possible. One exception to this rule is applying the optional Notch Filter... to remove hum or whistle before tackling the hiss.
- Duplicate your source track before you apply noise removal, and adjust the relative volume of the two tracks to get the best sound quality.
- If your problem is mains hum or a high-pitched whistle, the use of a Notch Filter... may help. This page on the Audacity wiki outlines the steps. Apply this effect before applying Noise Removal.
For a more technical explanation of the algorithm used in Noise Removal, see this page on our main Wiki.