Items section.
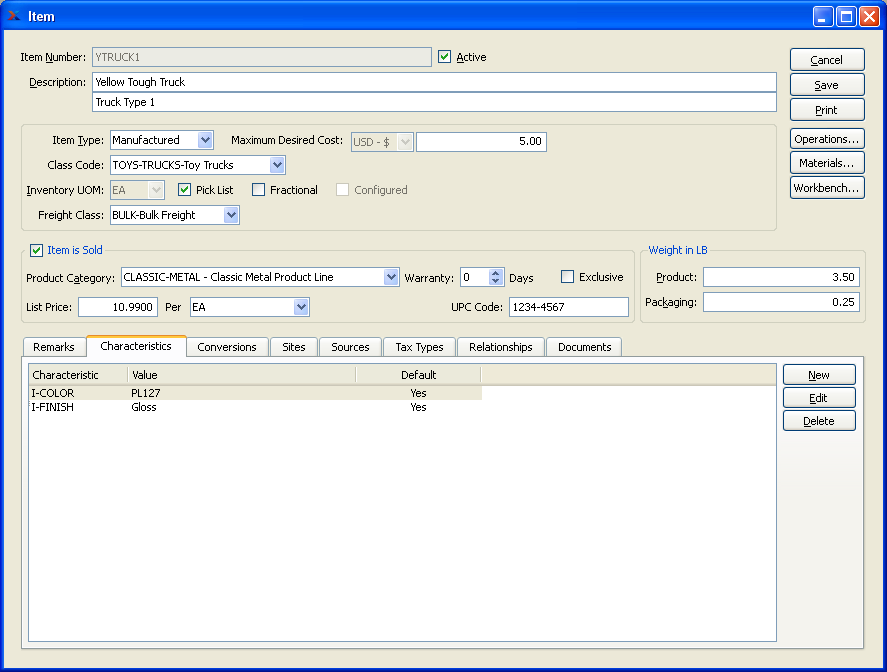
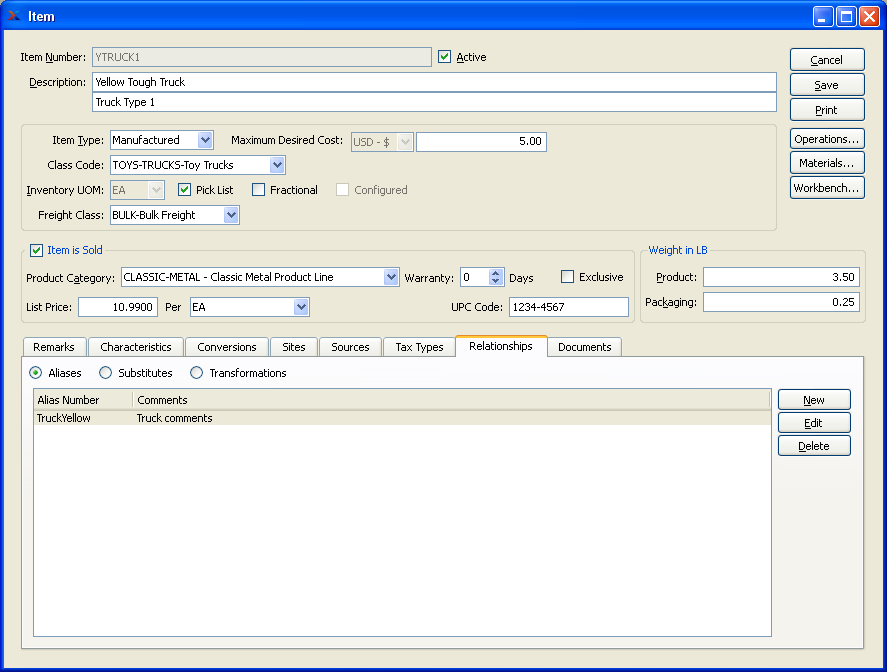
To enter a new Item into your system, select the "Enter New Item" option. The following screen will appear:

When creating a new Item, you are presented with the following options:
- Item Number
Enter a number to uniquely identify the Item. Duplicate Item Numbers will not be accepted.
- Active
Select if Item is active. Select this option if you intend to use the Item within the application. If you don"t select this option, the Item will be unavailable for use. To activate an inactive Item, simply open the Item master and mark the Item as active.
Note
An inactive Item may still be used in a Sales Order, Work Order, or Purchase Order if the Item was de-activated after the Order was created.
- Description #1
The Item master features two description lines. The first line is typically used for entering the name used to describe the Item. In printed reports or other printouts, the first line will appear on a separate line above the second line. However, the two lines will be concatenated (i.e., "joined together") when they are displayed on-screen within the application.
- Description #2
Use the second description line to provide additional information about the Item. The second line might include product, packaging, or any other descriptive information. In printed reports or other printouts, the second line will appear on a separate line below the first line. However, the two lines will be concatenated (i.e., "joined together") when they are displayed on-screen within the application.
Tip
Develop a logical, hierarchical numbering strategy before assigning Numbers to your Items. Using an hierarchical approach will greatly enhance your ability to display and search for information within the database. An hierarchical numbering scheme might look something like the following:
MB-26-1
MB-26-2
MB-26-3
In this case, similar Items have been assigned sequential Item Numbers. By extension, similar categories of Items may be identified by similar numbers.
- Item Type
Select one of the available Item Types:
- Purchased
Select if the Item is an Item you purchase. A Purchase Order is the normal supply order. However, you may enter a Work Order for this Item Type.
- Manufactured
Select if the Item is an Item you make. A Work Order is the normal supply order. However, you may enter a Purchase Order for this Item Type.
- Phantom
A transient subassembly containing component Items commonly used together during a manufacturing process. Phantom Items require a Bill of Materials, but not separate Work Orders. Since they are not stock Items, Material Requirements Planning (MRP) logic blows through phantom Items and only plans for their component Items. Phantom Items should be used to simplify complex Bills of Materials.
- Breeder
A logical Item from which Co-Products and By-Products are produced. An example use for a Breeder Item is the screening of raw gravel to produce different sizes of gravel. The Breeder Item's Bill of Materials (BOM) defines the inputs—in this case raw gravel—and the outputs are defined on its Breeder BOM (i.e., Small, Medium and Large gravel). A Work Order is created for the Breeder Item, but this Item is never stocked or produced; again, it is a logical Item. Instead, raw gravel is consumed by the Breeder's Work Order, along with labor, and the resulting quantities of Co-Products and By-Products are recorded.
- Co-Product
Co-Products are Items that you keep and which absorb Costs. They are produced during a manufacturing process. See "Breeder" Item Type above.
- By-Product
By-Products are things that you throw away and incur Costs doing so during a manufacturing process. See "Breeder" Item Type above.
- Reference
Select if the Item is an Item you sell—but you neither manufacture nor purchase it. Services are an example of Reference Item. The company sells consulting services, but it doesn't manufacture or purchase them. Reference Items may be configured. This means you can add List Prices to any Reference Item Characteristics. These Characteristic Prices are then added to the Base Price of Sales Order Items when the Characteristic is selected at Sales Order entry.
- Costing
A kind of pseudo-Item used solely to provide a costed value for a Costing Element. When a user-defined Costing Element is linked to a Costing Item, the Costing Element assumes the Costs associated with the Costing Item. For more information, see Section 6.6, “User-Defined Costing Elements”.
- Tooling
Select if the Item is an Item you make but do not sell. An example of a tooling Item would be an Item you must make in order to complete or support the building of sold Items.
- Outside Process
Select if the Item is an external process or service that is performed by someone outside your company. Outside Process Items are treated by the system in much the same way as purchased Items are. For example, Outside Process Items will be handled in the same was as purchased Items are when Material Requirements Planning (MRP) is run.
- Planning
An Item whose Bill of Materials (BOM) groups together other Items so that a Production Plan may be defined for the Planning Item—and then exploded down to the lower level Items during a Master Production Scheduling (MPS) run. Planning Items are frequently used to group together product families or product lines of MPS Items. MPS Items are typically top-level saleable Items. By grouping together MPS Items under a Planning Item, the family may be forecasted through with a Production Plan for the Planning Item, thereby simplifying the planning process. The system automatically sets the Planning System as "MPS" by default when a Planning Item is created.
- Job
Job Items are specifically for make-to-order scenarios where simplified production is required. Job Items cannot be maintained in Inventory. And they also have no concept of Standard Cost or Cost variances. All Costs for Job Items are Actual. The Work Orders which create Job Items can only be created via a Sales Order. The Costs for Job Item Work Orders are accumulated to WIP, and then transferred directly to Cost of Sales when the job is shipped. Production for a Job Item Work Order is posted when the linked Sales Order Item is issued to Shipping. BOM and BOO Items may be assigned to Job Items; however, they will not roll up to a Standard Cost for Job Items. Job Items may be configured. This means you can add List Prices to any Job Item Characteristics. These Characteristic Prices are then added to the Base Price of Sales Order Items when the Characteristic is selected at Sales Order entry.
- Kit
Kit Items automatically explode their Bill of Material (BOM) components on to Sales Orders for shipping. When Kit Items appear on Sales Orders and Return Authorizations, sub line numbers are generated for Kit components because Kit children are sub line items of the parent line item. Kit components are displayed as an indented tree on the Sales Order or Return Authorization—and they are view-only. Also, Kit components will appear on the Pick List report. Kit components may be issued to Shipping, whereas the parent Kit Item may not be. The automatic "Select for Billing" option takes effect for Kit Items when all Kit Items are shipped.
Note
The Cost of Sales (COS) Account for Kit Items is directed to the Sales Account Assignment mappings of the Kit's child Items―unless your system is configured to have the Kit components inherit the same COS Account used by the parent Kit Item. You can read more about configuring your system for COS inheritance for Kit Items here: Section 12.2, “Configure Inventory”.
- Maximum Desired Cost
This is an optional field to be used for entering the maximum Cost desired for the Item. The field is not used by the system for any calculations, and is provided for informational purposes only.
- Class Code
Specify a Class Code to associate with the Item.
- Inventory UOM
Specify the Item's primary Unit of Measure—or enter a free-form UOM. The Inventory (UOM) is the UOM in which Inventory is maintained. All Inventory transactions, sales transactions, and General Ledger transactions reflect movement in Inventory UOMs. The Inventory UOM is also the base reference for all UOM conversion ratios.
Note
Once transactions have been posted using an Item's Inventory UOM, you may no longer change the Inventory UOM for the Item.
- Pick List Item
Select if you want the Item to be included on Pick Lists when the Item is used. Pick Lists are printed lists showing the Work Order Material Requirements for a specified Work Order. You may decide not to include an Item on Pick Lists if the Item is insignificant or if it is not stored in a stock room but, for example, in a Work Center instead.
- Fractional
Select if the Item may be maintained in fractional quantities. If not selected, the system will assume the Item is maintained in its Inventory UOM, which is by definition a whole number. This means you may never use fractional quantities of the Item (e.g., in manufacturing or purchasing) unless this option is selected.
Tip
If you will ever use the Item in fractional quantities, then the "Fractional" option must be selected. If it is not selected, the system will never let you use fractional quantities of the Item.
- Configured
If the Item is a Job or Reference Item, then you will have the option to configure the Item for Assemble to Order (ATO) scenarios. This option will be disabled for all other Item Types. To learn more about product configuration, see our ATO Configurator Topic.
- Item is Sold
Select if the Item is an Item you sell. If not selected, the associated fields will be disabled.
- Product Category
Specify the Product Category if the Item is sold. All sold Items must be assigned a Product Category.
- List Price
Specify the List Price for the Item, based on the selling UOM (i.e., "Per" UOM). List Prices may also be created and modified in the Item Pricing section of the Sales module. Changes made to the List Price in either location will be updated system-wide.
- Per
Specify the selling Unit of Measure (UOM) for the Item. The List Price should be based on this selection. By default, the Inventory UOM will be used here. You will not be able to select a different UOM until you first manually create a selling UOM using the options found under the "UOM" tab on the Item master.
- Exclusive
Select if the Item is sold exclusively. If a sold Item is marked as Exclusive, it may only be sold to specified Customers or Customer Types. To link Exclusive Items to Customers, you would first include the Item on a Pricing Schedule—indicating relevant Prices and Quantity Breaks. You would then assign the Pricing Schedule to specified Customers or Customer Types, using the Pricing Schedule assignment functionality found in the Item Pricing section of the Sales module.
Note
Sold Items can be configured as Exclusive by default at the system level.
- Warranty
If the Item is sold with a warranty, specify the number of days the warranty extends for. The warranty period begins on the date the Item is sold and ends on the specified number of days afterward. Setting this option to "0" days indicates the Item does not come with a warranty.
Tip
The sold warranty should not be confused with the purchased warranty, which is defined at the Item Site level.
- UPC Code
Enter the Universal Product Code for the Item.
Note
Standard bar code formats supported by the system include the following: Code 3of9, Code 3of9 Extended, Code 128, UPC-A, UPC-E, EAN-8, EAN-13.
- Weight
Enter details related to the weight of the Item.
- Product
Specify the pre-packaging weight of the product.
- Packaging
Specify the weight of the product packaging.
- Remarks
Enter additional details related to the Item.
- Notes
This is a scrolling text field with word-wrapping for entering Notes related to the Item. Any Notes entered on this screen are for internal purposes only.
- Extended Description
The Extended Description field is for entering descriptive Item information, which may be printed on Sales and/or Purchasing documents. You would add the Extended Description to printed documents using the report writer. The report writer enables you to customize Forms to include data stored in the database. To enter an Extended Description of an Item, select the "Extended Description" option.
- Comments
To view system-generated Comments associated with an Item—or to add new Comments of your own—select the "Comments" option.
To the far right of the screen, the following buttons are available:
- CANCEL
Closes the screen without creating the Item, returning you to the application desktop.
- SAVE
Creates the Item and adds it to the master list of Items. Mac users may use COMMAND + S to save. After saving, the "Create New Item Sites" screen appears. If you select "YES," you will be directed to the screen for entering a new Item Site. If you select "No," the new Item will be added to Inventory, but no Item Site will be created for it. You may create an Item Site at a later time.
Runs the report associated with this screen.
- OPERATIONS
Select to open the Bill of Operations (BOO) for the specified Item. If no BOO exists, you will have the option to create a new BOO.
- MATERIALS
Select to open the Bill of Materials (BOM) for the specified Item. If no BOM exists, you will have the option to create a new BOO.
- WORKBENCH
Select to open the Item Availability Workbench for the specified Item.
Item Characteristics are user-defined definitions of an Item which may be used to provide additional layers of description to Items. For example, Item Characteristics might be used to specify "Season" or "Primary Vendor". These constitute static descriptions which are not processed by the application, but are useful for informational purposes. For configured Items (i.e., Job or Reference Items), Characteristics are used to store pricing information for the options available on configured Items. That pricing by Characteristic is then passed to Sales Order Line Items when particular configurations are sold.
Tip
Item Characteristics can be associated with Sales Order, Purchase Order, and Work Order Items.
To enter Characteristics associated with an Item, select the "Characteristics" tab. The following screen will appear:
- Characteristics
Display lists the Characteristic name and Value of Item Characteristics related to the Item.
To the far right of the screen, the following buttons are available:
- NEW
Opens screen for creating a new Item Characteristic.
- EDIT
Enables you to edit highlighted Item Characteristics. The edit screen is the same as that for creating a new Item Characteristic—except that when editing, the fields will contain Item Characteristic information. Double-clicking on an Item Characteristic will also bring you to the editing screen.
- DELETE
Highlight an Item Characteristic and then select this button to remove the Item Characteristic from the list.
To create a new Item Characteristic, select the NEW button. The following screen will appear:
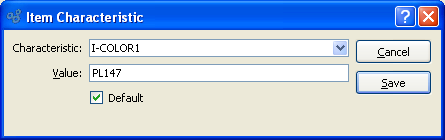
- Characteristic
Select a Characteristic from the list of Characteristics designated as being available for use as Item Characteristics.
- Value
Enter a value to associate with the Item Characteristic.
- List Price
This field will be available only for configured Items (i.e., Job or Reference Items). Characteristics are used to store pricing information for the options available on configured Items. That pricing by Characteristic is then passed to Sales Order Line Items when particular configurations are sold. The Price for configured Items may vary depending on the Characteristics selected at Sales Order entry time.
- Default
Select if the Value entered is the default Value for the specified Characteristic. The default Value will be presented initially wherever Item Characteristics are used.
To the far right of the screen, the following buttons are available:
- CANCEL
Closes the screen without creating the Item Characteristic, returning you to the previous screen.
- SAVE
Creates the Item Characteristic and adds it to the list of Item Characteristics.
In addition to the Inventory Unit of Measure (UOM), which is defined on the Item master, you also have the option to convert UOMs for an Item. The following alternate UOMs may be defined:
Alternate Capacity
Capacity
Material Issue
Selling
Unless you define an alternate UOM, an Item will always be stored and used in its Inventory UOM. For example, you must define a selling UOM if you want to enable an Item to be sold in a UOM other than the Inventory UOM. To enter Units of Measure associated with an Item, select the "UOM" tab. The following screen will appear:
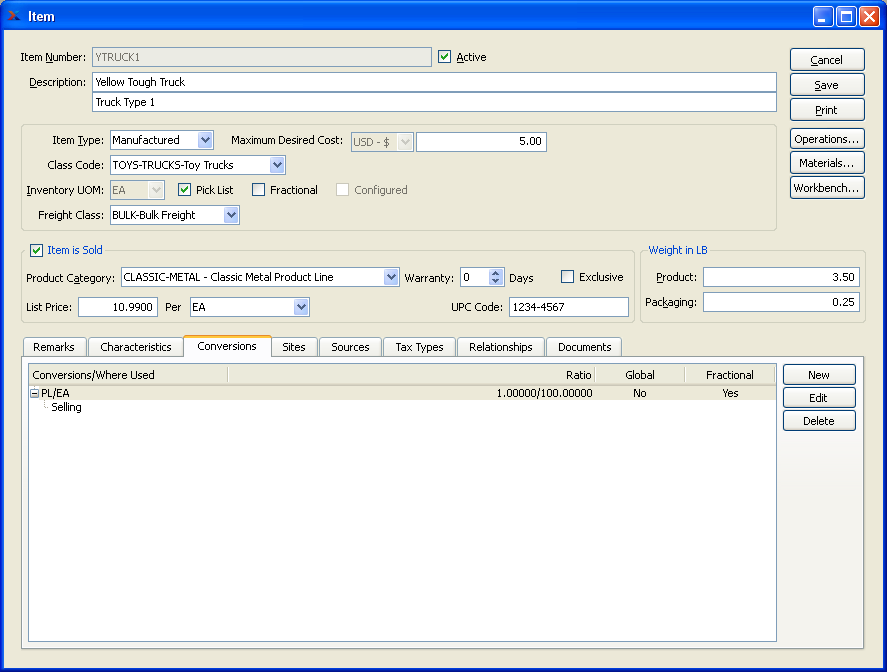
Item Conversions
- Conversions/Where Used
Display lists the UOM Conversions defined for the Item (if any) and where these conversions are used. Global conversion ratios are defined in Section 8.1.1.1, “Global Conversion Ratio”.
To the far right of the screen, the following buttons are available:
- NEW
Opens screen for creating a new Item UOM conversion.
- EDIT
Enables you to edit highlighted Item UOM conversions. The edit screen is the same as that for creating a new Item UOM conversion—except that when editing, the fields will contain Item UOM conversion information. Double-clicking on an Item UOM conversion will also bring you to the editing screen.
- DELETE
Highlight an Item UOM conversion and then select this button to remove the UOM conversion from the list.
To define an alternate Item UOM, select the NEW button. The following screen will appear:
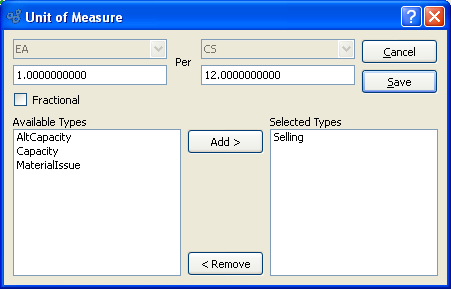
Unit of Measure Definition
When defining an alternate Item UOM, you are presented with the following options:
- Source UOM
By default the Inventory UOM will be displayed here. However, you may select an alternate UOM. If an alternate UOM is selected, then the per UOM will be the Inventory UOM.
- Value
Enter a value for the source UOM to be used in the conversion ratio for the alternate Item UOM.
Tip
By default, the Available Types list will be empty—until you specify either a source or per UOM. Once a source or per UOM is selected, the Available Types list will be populated with the available options. An Item may have multiple selling UOMs but only one of each of the other types.
- Per UOM
By default the Inventory UOM will be displayed here. However, you may select an alternate UOM. If an alternate UOM is selected, then the Source UOM will be the Inventory UOM.
- Value
Enter a value for the per UOM to be used in the conversion ratio for the alternate Item UOM.
- Fractional
Specify whether this alternate Item UOM may be maintained in fractional quantities. If not selected, transaction quantities using this alternate Item UOM may not be maintained in fractional quantities.
- Available Types
Once a source or per UOM has been specified, you may select one of the available UOM types. Once a UOM type has been used, you may not create a conversion ratio for it again—with the exception of the selling UOM, which may be defined multiple times for a single Item.
Tip
Double-clicking on an available UOM type will move it to the Selected Types list.
- Alternate Capacity
The Alt. Capacity UOM should be used to provide an alternate UOM for viewing Inventory details. For example, a Sales Manager may be satisfied looking at a group of Items normalized to their selling or Inventory UOM, but a Production Manager may need to look at the same Items normalized to a Production UOM—say, Cubic Feet (CuFt).
Note
The Alternate Capacity UOM has no impact on Bills of Materials. It is used solely for Capacity Planning and Sales Analysis purposes.
- Capacity
In Capacity Planning and Sales Analysis reports, the Capacity UOM enables you to make apples-to-apples comparisons of Items that use different Inventory UOMs. For example, let's say that Item A is a carton containing 24 Item B"s—and that you sell both Items. However, Item A and Item B use different Inventory UOMs. Item A is measured by the CASE (24), and Item B is measured by EACH. By utilizing the Capacity UOM, you have the ability to track total load and total sales for Item B—even though the Inventory UOM for Item A obscures the quantity of Item B's contained therein. If, when you query the database, you request data to be displayed in Capacity UOMs, then the system will normalize the quantities of Item A to EACH, allowing you to see the total quantity of Item Bs.
Note
The Capacity UOM has no impact on Bills of Materials. It is used solely for Capacity Planning and Sales Analysis purposes.
- Material Issue
The Material Issue UOM defines an alternate UOM for use when creating Bill of Materials (BOM) Items. On the BOM Item screen, you have the ability to select an issue UOM. This issue UOM is used whenever the specified component Item is issued to a Work Order. If you define a Material Issue UOM on the Item master, then that UOM will be available for selection whenever the Item is used in a BOM.
- Selling
If an Item is sold, its List Price will be based on the Selling UOM. While the Selling UOM may often mirror the Inventory UOM, in some scenarios the two UOMs will be different. For example, cans of soda may be stocked in Inventory as individual units (EACH), but sold by the case (CASE24). In this example, Inventory transactions will be recorded using the Inventory UOM (EACH), but all pricing—including List Price and Pricing Schedules—will reflect the Selling UOM (CASE24). An Item may also have multiple Selling UOMs, for example SIX-PACK, CASE24, PALLET, etc. You specify the Selling UOM you want to use at Sales Order entry time.
- Selected Types
Lists the UOM types you have selected for the specified UOM conversion ratio. You may add multiple different UOM types for each conversion ratio. However, if a UOM type (except the Selling UOM) has already been used in another conversion ratio, you may not be able to select it.
Tip
Double-clicking on a selected UOM type will remove it from the list, returning it to the Available Types list.
To the far right of the screen, the following buttons are available:
- CANCEL
Closes the screen without creating an alternate Item UOM(s), returning you to the previous screen.
- SAVE
Creates the alternate Item UOM(s) and makes it available throughout the system.
To view, add, or edit Item Sites associated with an Item, select the "Sites" tab. The following screen will appear:
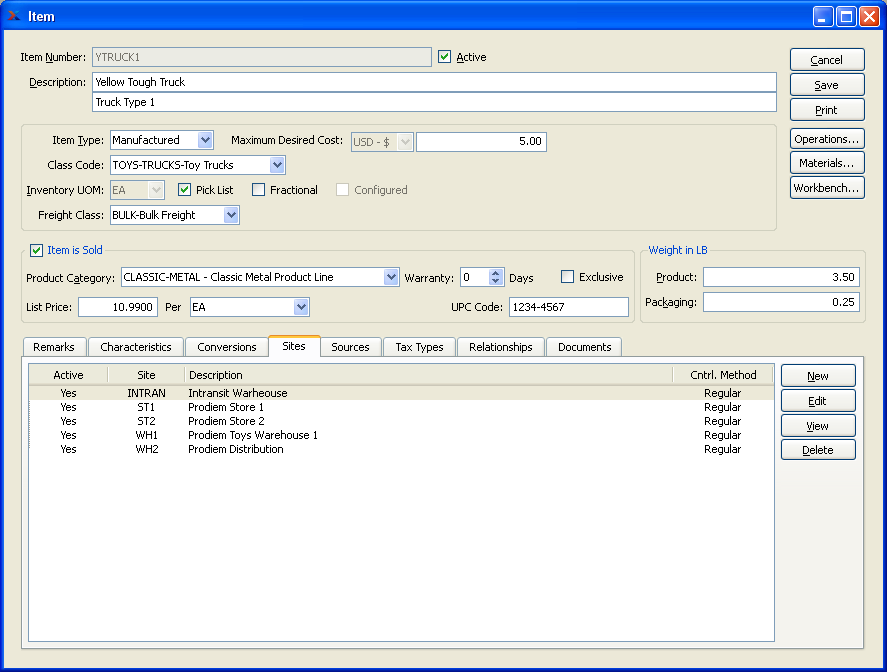
- Item Sites
Display lists Item Sites for the specified Item.
To the far right of the screen, the following buttons are available:
- NEW
Opens screen for creating a new Item Site. For more information, see Section 9.1, “Enter Item Site”.
- EDIT
Enables you to edit highlighted Item Sites. The edit screen is the same as that for creating a new Item Site—except that when editing, the fields will contain Item Site information. Double-clicking on an Item Site will also bring you to the editing screen.
- VIEW
Highlight an Item Site and then select this button to reach a read-only view of the "Edit" screen.
- DELETE
Highlight an Item Site and then select this button to remove the Item Site from the list.
To view the Vendor Item Sources for an Item select the "Sources" tab.
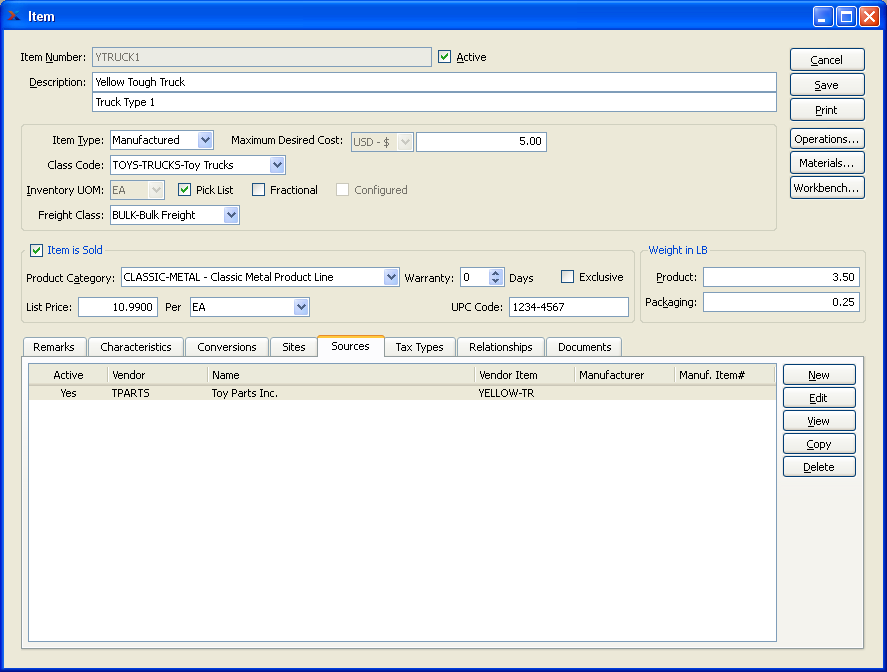
- Sources
Displays list of Item Sources and associated Vendors. You may also add new Item Sources for an Item on this screen. For additional documentation related to setting up Item Sources for an Item, see Section 7.1, “ Enter New Item Source”.
To the far right of the screen, the following buttons are available:
- NEW
Opens screen for creating a new Item Source.
- EDIT
Enables you to edit highlighted Item Source. The edit screen is the same as that for creating a new Item Source—except that when editing, the fields will contain Item Source information. Double-clicking on an Item Source will also bring you to the editing screen.
- VIEW
Highlight an Item Source and then select this button to reach a read-only view of the "Edit" screen.
- COPY
Allows you to copy and existing Item Source record.
- DELETE
Highlight an Item Source and then select this button to remove the Item Source from the list.
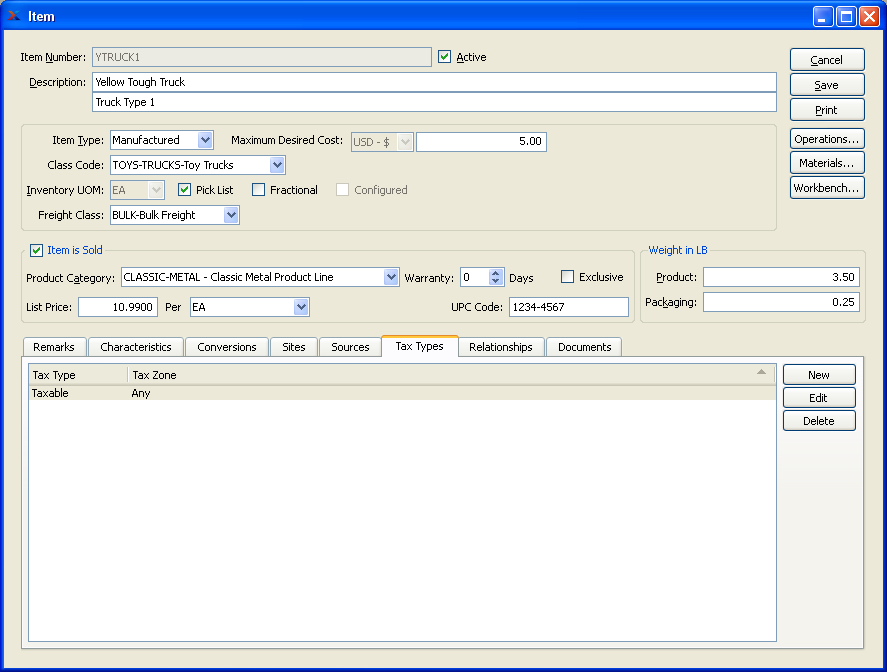
The Tax policy for an Item is determined by how its Tax Type settings are configured. To associate Tax Types with an Item, select the "Tax Types" tab. The following screen will appear:
Tip
To mark an Item as non-taxable, simply do not associate any Tax Types with the Item.
- Tax Types
Display lists Tax Types for the specified Item.
To the far right of the screen, the following buttons are available:
- NEW
Opens screen for creating a new Tax Type definition.
- EDIT
Enables you to edit highlighted Tax Type definitions. The edit screen is the same as that for creating a new Tax Type definition—except that when editing, the fields will contain Tax Type definition information. Double-clicking on a Tax Type definition will also bring you to the editing screen.
- DELETE
Highlight a Tax Type definition and then select this button to remove the Tax Type definition from the list.
To create a new Tax Type definition, select the NEW button. The following screen will appear:
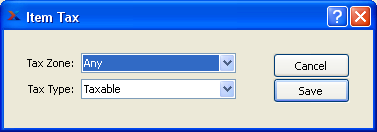
When creating a new Tax Type definition, you are presented with the following options:
Tip
Consider creating separate Tax Types for any groups or classes of Items which are taxed at different rates.
- Tax Types
Specify the Tax Type you want to associate with the specified Tax Zone. Tax Types provide a system for classifying goods and services into taxable categories. Creating a relationship between a Tax Zone and a Tax Type enables you to determine how Tax will be applied when processing transactions using the Item.
To the far right of the screen, the following buttons are available:
- CANCEL
Closes the screen without creating the Tax Type definition, returning you to the previous screen.
- SAVE
Creates the Tax Type definition and adds it to the list of Tax Type definitions.
Item Relationships are assigned to Items as a means for cross-referencing internal and external Item information. For example, a Customer may refer to an Item by a different Item Number than you do. To avoid confusion—and to simplify Item lookups—you can create an Item Alias linking the Customer's external Part Number to your own internal Item Number. The Item Alias acts as an alternate identifier. In this way, Items may be located using either internal or external Item information. To associate an Item Alias with an Item, select the "Relationships" tab. The following screen will appear:
When associating Alias relationships with an Item, you are presented with the following options:
- Alias
Display lists Item Alias numbers and related Comments.
To the far right of the screen, the following buttons are available:
- NEW
Opens screen for creating a new Item Alias.
Tip
Multiple Item Aliases can be assigned to a single Item, allowing you to cross-reference an Item using many different Item Numbers.
- EDIT
Enables you to edit highlighted Item Alias definitions. The edit screen is the same as that for creating a new Item Alias definition—except that when editing, the fields will contain Item Alias information. Double-clicking on an Item Alias definition will also bring you to the editing screen.
- DELETE
Highlight an Item Alias definition and then select this button to remove the Item Alias from the list.
To create an Item Alias, select the NEW button. The following screen will appear:
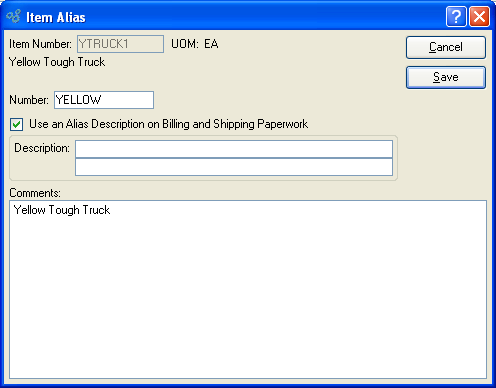
When creating a new Item Alias, you are presented with the following options:
- Item Number
Item Number entered into previous screen will be displayed.
- UOM
Inventory Unit of Measure.
- Number
This is the Alias number for the Item.
- Use an Alias Description on Billing and Shipping Paperwork
Billing and Shipping Paperwork: Select to include an Item Alias description on Billing and Shipping paperwork.
- Description
Enter a description of the Item Alias for inclusion on Billing and Shipping paperwork.
- Comments
This is a scrolling text field with word-wrapping for entering Comments related to the Item Alias. This field may be useful for explaining why an Item Alias was created (e.g., "Customer XYZ, Inc. refers to this Item Alias whenever they place an Order.").
To associate Item Substitutes with an Item, select the "Substitutes" button. The following options will appear:
To the far right of the screen, the following buttons are available:
- NEW
Opens screen for creating a new Item Substitute.
Tip
Multiple Item Substitutes can be assigned to a single Item, allowing you to cross-reference an Item using many different Item Numbers.
- EDIT
Enables you to edit highlighted Item Substitute definitions. The edit screen is the same as that for creating a new Item Substitute definition—except that when editing, the fields will contain Item Substitute information. Double-clicking on an Item Substitute definition will also bring you to the editing screen.
- DELETE
Highlight an Item Substitute definition and then select this button to remove the Item Substitute from the list.
Note
There is a difference between Item Substitutes and Substitutions defined in a Bill of Materials (BOM). The difference is that BOM-defined Substitutions may be implemented on the fly during Work Order processing—Item Substitutes cannot be.
To create a new Item Substitute, select the NEW button. The following screen will appear:
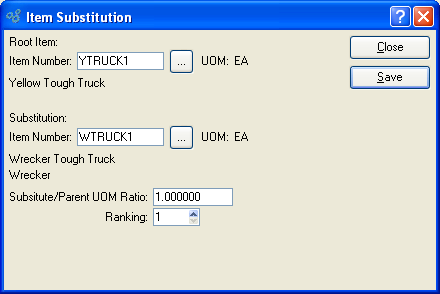
When creating a new Item Substitute, you are presented with the following options:
- Item Number (Root Item)
Item Number entered into previous screen will be displayed.
- UOM
Inventory Unit of Measure.
- Item Number (Substitution)
Enter the Item Number of the Substitute Item.
- UOM
Inventory Unit of Measure.
- Substitute/Parent UOM Ratio
Specifies the ratio between the Root Item's Inventory UOM and the Substitute Item's Inventory UOM.
- Ranking
Select a number using the arrow buttons, or manually enter a value up to a maximum of 9 to specify the rank of the Item Substitute. The ranking determines the order in which the Item Substitute will appear in the Substitute List accessed from the Maintain Work Order Materials screen. The Item Substitute having the highest rank will appear at the top of list, and so on in descending order. You may assign the same ranking to multiple Items, if this is appropriate.
To associate Transformation options for an Item, select the "Transformations" button. The following options will appear:
- Transformations
Display lists Items which may be chosen as target Items during Transformation transactions.
Note
You may only transform an Item if the source Item is located in the same Site as the target Item.
To the far right of the screen, the following buttons are available:
- NEW
Opens a searchable Item list showing Items which may be chosen as target Items during Transformation transactions.
- DELETE
Highlight a target Item and then select this button to remove the target Item from the list.
To associate documents with an Item, select the "Documents" tab. The following screen will appear:
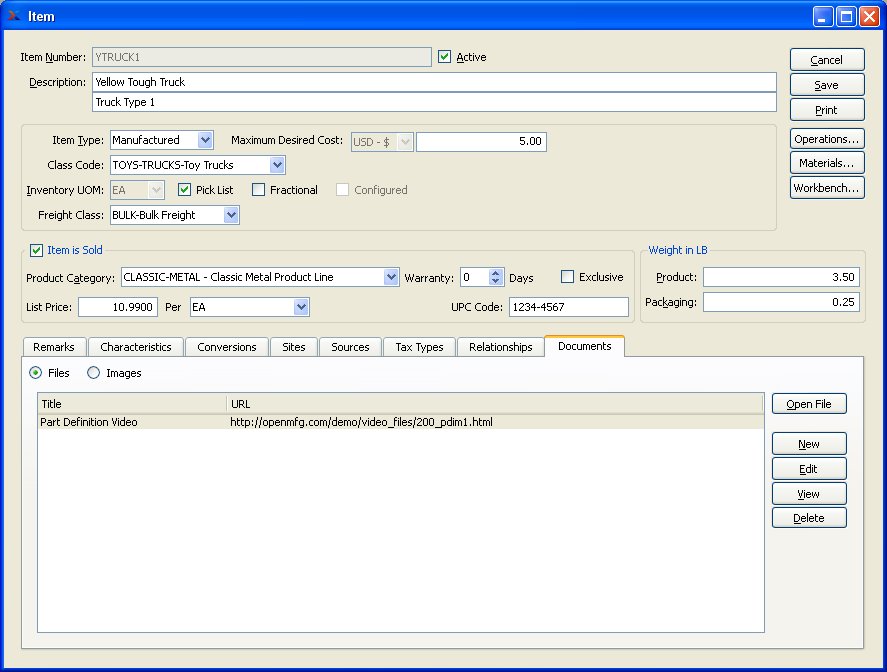
Item Documents
When associating documents with a record, you are presented with the following options:
- Files
Select to display the list of associated Files.
- Images
Select to display the list of associated Images.
To the far right of the screen, the following buttons are available:
- Files
Display lists the title and URL for any related Files.
- OPEN FILE
Highlight a File definition and then select this button to open the URL in a web browser.
- NEW
Opens screen for creating a new File.
- EDIT
Enables you to edit highlighted File definitions. The edit screen is the same as that for creating a new File definition—except that when editing, the fields will contain File definition information. Double-clicking on a File definition will also bring you to the editing screen.
- VIEW
Highlight a File definition and then select this button to reach a read-only view of the "Edit" screen.
- DELETE
Highlight a File definition and then select this button to remove the File definition from the list.
To specify a new File association, select the NEW button. The following screen will appear:
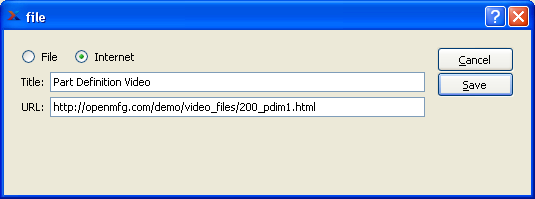
When creating a new File association, you are presented with the following options:
- File
Select radio button to add file URL from local source.
- Internet
Select radio button to add file URL from the Internet.
- Title
Enter a title to identify the File.
- URL
Enter the URL indicating where the File is located. This is the location where the File will be opened from when the user selects the OPEN button.
To the far right of the screen, the following buttons are available:
- CANCEL
Closes the screen without creating a File, returning you to the previous screen.
- SAVE
Creates the File and adds it to the list of Files.
To specify an association with an Image, select the "Images" option. The following screen will appear:
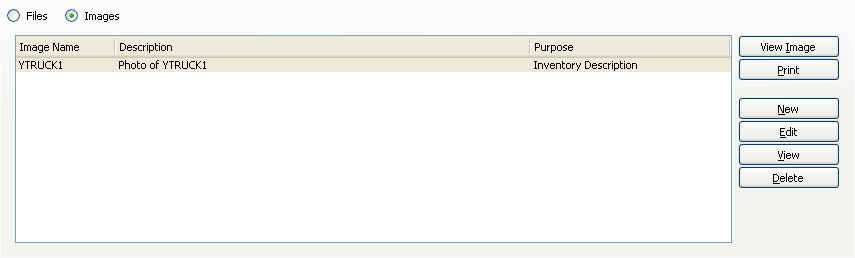
When associating Images, you are presented with the following options:
- VIEW IMAGE
Allows you the ability to preview the Image.
Runs the report associated with this screen.
- NEW
Opens master list of stored Item Images, allowing you to associate an Image with the Customer.
- EDIT
Enables you to edit highlighted Image definitions. The edit screen is the same as that for creating a new Image definition—except that when editing, the fields will contain Image information. Double-clicking on a Image definition will also bring you to the editing screen.
- VIEW
Highlight a Image and then select this button to reach a read-only view of the "Edit" screen.
- DELETE
Highlight a Image definition and then select this button to remove the Image from the list.
To specify an assignment for an Image, select the NEW button. The following screen will appear:
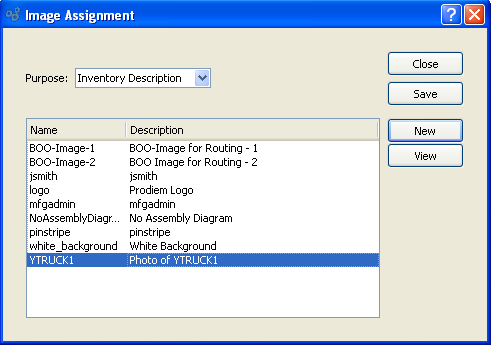
When assigning an image to a purpose, you are presented with the following options:
- Purpose
Select one of the available purposes an Image might serve:
- Inventory Description
Select if the Image describes Inventory.
- Product Description
Select if the Image describes a Product.
- Engineering Reference
Select if the Image serves as an engineering reference.
- Miscellaneous
Select if the Image is a miscellaneous Image.
Note
You may create multiple Image Assignments, but only one Image Assignment per purpose.
To the far right of the screen, the following buttons are available:
- CLOSE
Closes the screen, returning you to the previous screen.
- SAVE
Highlight an Image, then select the SAVE button to associate the Image with the specified item and purpose.
- NEW
Opens screen for adding a new Image to the master list of stored Images.
- VIEW
Allows user to view image.
To add a new Image to the master list of stored Images, select the NEW button. The following screen will appear:
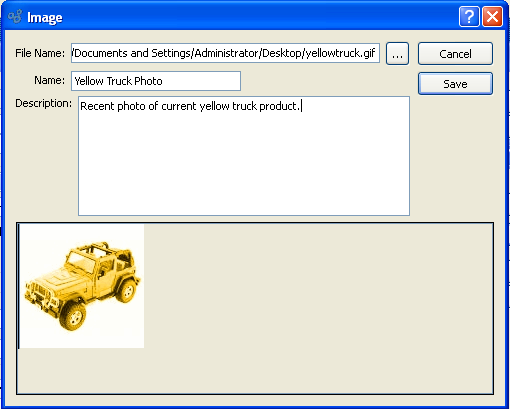
When adding a new Image to the master list of stored Images, you are presented with the following options:
- File Name
Enter the physical directory location of the Image. The browse button enables you to search your system for the physical directory location of the Image file. Once you locate the file, simply select it to have it entered into the "File Name" field.
- Name
Enter a unique name for the Image.
- Description
Enter a description to further identify the Image.
To the far right of the screen, the following buttons are available:
- CANCEL
Closes the screen without adding a new Image to the master list of stored Images.
- SAVE
Creates the Image and adds it to the master list of stored Images.
- Files
Display lists the title and URL for any Files related to the Item. To enter Files associated with an Item, select the "Files" radio button.
The Items master list provides a complete list of Items in Inventory. To access the master list of Items, select the "List Items" option. The following screen will appear:
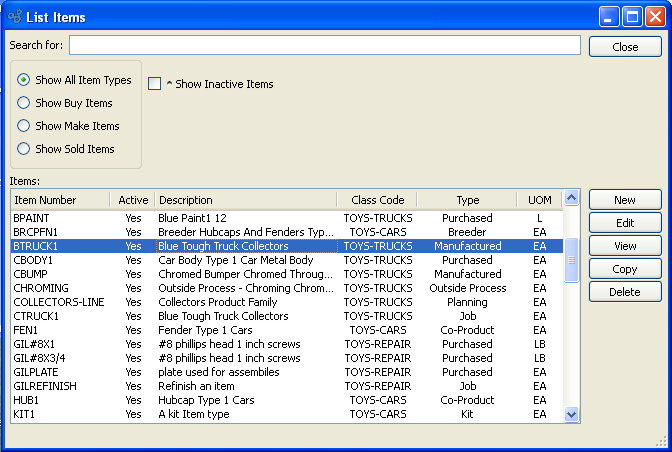
At the top of the screen is a "Search for" field. To search for an Item, begin typing in the search field. As you type, the Item list will automatically scroll toward the Item Number you are typing. You can also search for Items manually by scrolling through the list. Apply any combination of the following filters when searching for Items:
- Show Item Types
Select to display a list of all Items.
- Show Buy Items
Select to display a list of all purchased and outside process items.
- Show Make Items
Select to display a list of all manufactured, breeder, co-product, by-product, job, and kit Items.
- Show Sold Items
Select to display a list of all sold Items.
- Show Inactive Items
Select to show inactive Items as well as active Items, using the parameters specified above. By default, inactive Items are not displayed.
To the far right of the screen, the following buttons are available:
- CLOSE
Closes the screen, returning you to the application desktop.
- NEW
Opens screen for creating a new Item.
- EDIT
Enables you to edit highlighted Items. The edit screen is the same as that for creating a new Item—except that when editing, the fields will contain Item information. Double-clicking on an Item will also bring you to the editing screen.
- VIEW
Highlight an Item and then select this button to reach a read-only view of the "Edit" screen.
- COPY
Highlight an Item and then select this button to reach the "Copy Item" screen.
- DELETE
Highlight an Item and then select this button to remove the Item from the list.
To search for Items in Inventory, select the "Search for Items" option. The following screen will appear:
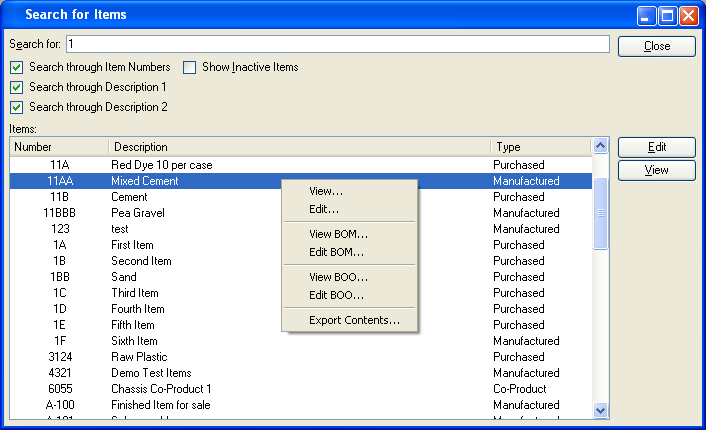
At the top of the screen is a "Search for" field. To search for an Item, enter any character or combination of characters you want to match. Apply any of the following filters when searching for Items. Hitting the TAB key activates the search operation.
Tip
The "Search for" field supports pattern matching with Regular Expressions.
- Search through Item Numbers
Select to search through Item Numbers.
- Search through Description 1
Select to search through first-line Item descriptions. The Item master provides two separate lines for describing an Item.
- Search through Description 2
Select to search through second-line Item descriptions. The Item master provides two separate lines for describing an Item.
- Show Inactive Items
Select to show inactive Items as well as active Items, using the parameters specified above. By default, inactive Items are not displayed.
To the far right of the screen, the following buttons are available:
- CLOSE
Closes the screen, returning you to the application desktop.
- EDIT
Enables you to edit highlighted Items. The edit screen is the same as that for creating a new Item—except that when editing, the fields will contain Item information. Double-clicking on an Item will also bring you to the editing screen.
- VIEW
Highlight an Item and then select this button to reach a read-only view of the "Edit" screen.
Note
Fewer right-click options will be available for Items which are neither manufactured nor purchased.
To make a copy of an Item, select the "Copy Item" option. The following screen will appear:

When copying an Item, you are presented with the following options:
- Item Number (Source Item)
Enter the Item Number of the Item you want to copy.
- UOM
Inventory Unit of Measure.
- Target Item Number
The target Item Number must be a unique Item Number new to the system.
- Copy Item Costs
Select if you want to copy the Item Costs for the source Item.
- Copy Bill of Materials
Select if you want to copy the source Item's Bill of Materials.
- Copy Bill of Operations
Select if you want to copy the source Item's Bill of Operations.
- Copy Used At Operation
Select if you want to include the "Used At" Operation information when copying a Source Item's Bill of Materials. If selected, the "Schedule w/ W/O Operation" information will also be copied.
To the far right of the screen, the following buttons are available:
- CANCEL
Closes the screen without executing the copy command, returning you to the application desktop.
- COPY
Copies all selected information from the target Item to a newly-created source Item.
The Item Availability Workbench is designed to consolidate on one screen the functions performed by personnel who manage and track Inventory. To access the Item Availability Workbench, select the "Item Availability Workbench" option. The following screen will appear:
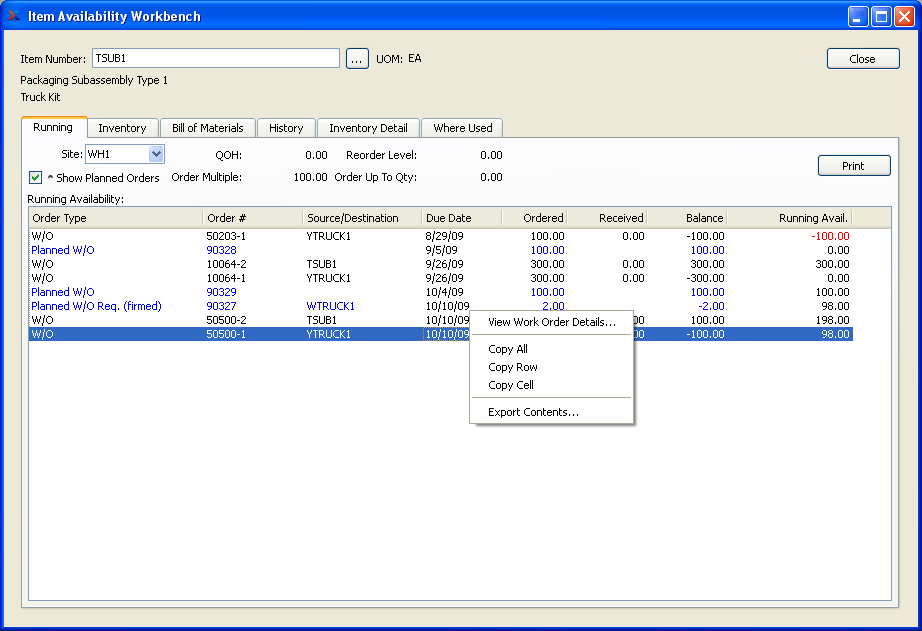
When displaying Running Availability, you are presented with the following options:
Note
When quantity appears in the "Ordered" column, this refers to quantity that is on order through either a Work Order or Purchase Order. In the case of Purchase Orders, the quantity will always be represented in the Inventory Unit of Measure (UOM)—regardless of the Vendor UOM used on the Purchase Order.
- Site
Specify Site whose Running Availability you want to display.
- Show Planned Orders
Select to show Planned Orders in the display. Planned Orders will display in blue type.
- QOH
Displays Quantity on Hand for specified Item.
- Order Multiple
Displays Order Multiple specifying the increments the Item must be ordered in. Order Multiple is maintained in the Item Site master.
- Reorder Level
Displays the Reorder Level specifying the minimum Quantity on Hand allowed before an Item must be reordered. Reorder Level is maintained in the Item Site master.
- Order Up To Qty
Indicates the quantity level that MRP Planned Replenishment Orders will order up to.
- Running Availability
Display lists Running Availability for the selected Item, using the specified parameters. Red lettering indicates the due date has passed or Running Availability has dropped below 0.
To the far right of the screen, the following buttons are available:
To view Inventory Availability for the specified Item, select the "Inventory" tab. The following screen will appear:
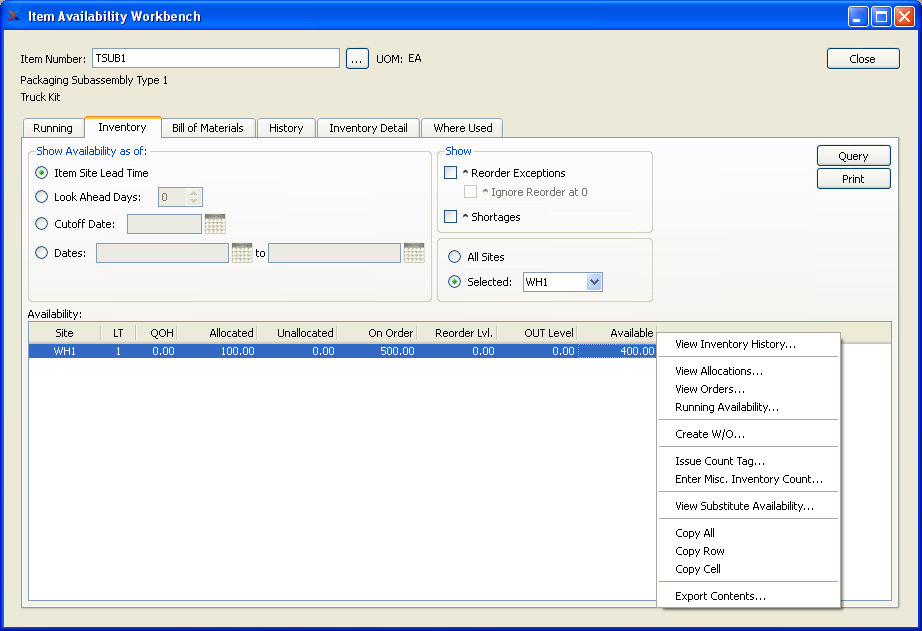
When displaying Inventory Availability by Item, you are presented with the following options:
- Item Number
Enter the Item Number of the Item whose Inventory Availability you want to display.
- UOM
Inventory Unit of Measure.
- Show Availability as of
Show Availability using one of the following criteria:
- Item Site Lead Time
Select to show projected Availability based on the Lead Time specified in the Item Site master.
- Look Ahead Days
Select a number using the arrow buttons, or manually enter a value up to a maximum of 1000. Future Availability for the specified Item will be displayed based on the value entered here.
- Cutoff Date
Display will show projected Inventory Availability as of date entered up to a maximum of 1000 days.
- Dates
Display will show projected Inventory Availability for the date range entered.
- Show Reorder Exceptions
Select to show Reorder Exceptions in display. Reorder Exceptions are an indication that an Item Site's projected Availability will drop below the Reorder Level for the Item Site.
- Ignore Reorder at 0
Select to ignore Reorder Exceptions in cases where both the Item Site Reorder Level and Planned Availability are equal to zero ("0"). If selected, Item Sites matching these criteria will not be displayed.
- Show Shortages
Select to only show Inventory shortages in display. Shortages are always shown in the report, if they exist. However, using this option simply separates shortages out so you can see only them. A shortage exists if Availability is less than zero, as in
QOH - Allocated + Ordered < 0
- All Sites
Select to display Inventory Availability for all Sites.
- Selected
Specify Site whose Inventory Availability you want to display.
- Availability
Display lists Inventory Availability by Item, using the specified parameters. If Planned Availability displays in the color orange, this means the actual or projected Quantity on Hand is at or below the Reorder Level. If the color is red, the current or projected Quantity on Hand is below 0.
Note
When quantity appears in the "On Order" column, this refers to quantity that is on order through either a Work Order or Purchase Order. In the case of Purchase Orders, the quantity will always be represented in the Inventory Unit of Measure (UOM)—regardless of the Vendor UOM used on the Purchase Order.
To the far right of the screen, the following buttons are available:
To view a Costed Indented Bill of Materials for the specified Item, select the "Costed Indented BOM" tab. The following screen will appear:
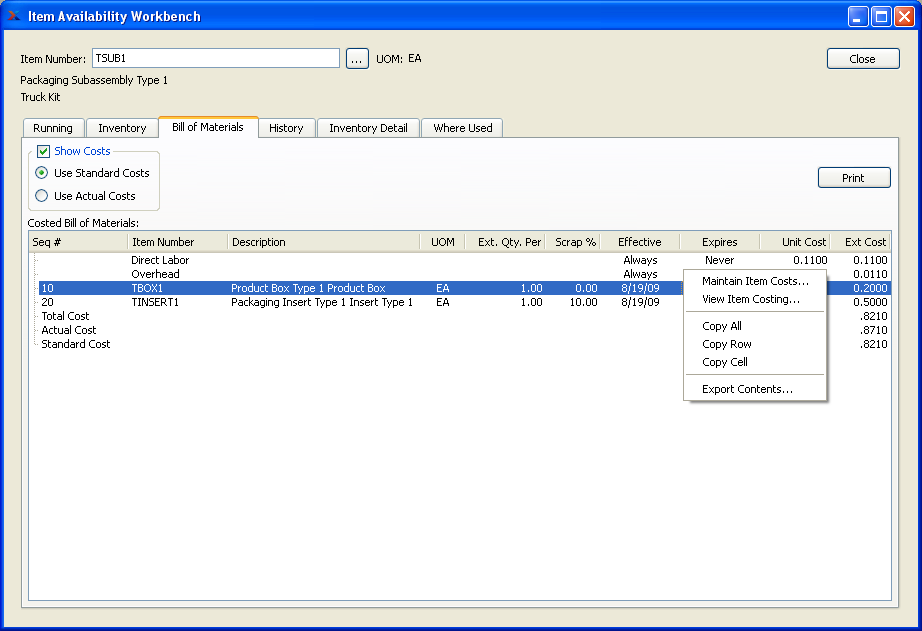
Tip
Costed Indented BOM information will be displayed only if the specified Item is a manufactured Item.
When displaying Costs for an indented Bill of Materials, you are presented with the following options:
- Item Number
Enter the Item Number of the manufactured Item whose associated Costs you would like to view using an indented Bill of Materials.
- UOM
Inventory Unit of Measure.
- Use Standard Costs
Select to display Standard Costs for component Items in the specified Item's Bill of Materials. Both the Unit Cost and Extended Cost for each component Item, expressed in terms of Standard Cost, will display—assuming Standard Costs have been defined for each component Item.
- Use Actual Costs
Select to display Actual Costs for component Items in the specified Item's Bill of Materials. Both the Unit Cost and Extended Cost for each component Item, expressed in terms of Actual Cost, will display—assuming Actual Costs have been defined for each component Item.
Note
In the Costed Indented Bill of Materials, the totals displayed on the screen are derived as follows:
- Total Cost
This total is pulled from the Extended Cost column. The total may vary, depending on whether "Use Standard Costs" or "Use Actual Costs" is selected.
- Actual Cost
This value represents the Actual Cost for the parent Item whose Costed Indented BOM is being displayed.
- Standard Cost
This value represents the Standard Cost for the parent Item whose Costed Indented BOM is being displayed.
- Costed Bill of Materials
Display lists Costed Indented Bill of Materials components, using the specified parameters. The difference between the indented view and the single level view is that the indented view displays all subcomponents if there is a manufactured component listed on the Bill of Materials. The Total Cost, Actual Cost, and Standard Cost will be calculated automatically at the bottom of the display.
To the far right of the display are the following buttons and display fields:
To view Inventory History for the specified Item, select the "History" tab. The following screen will appear:
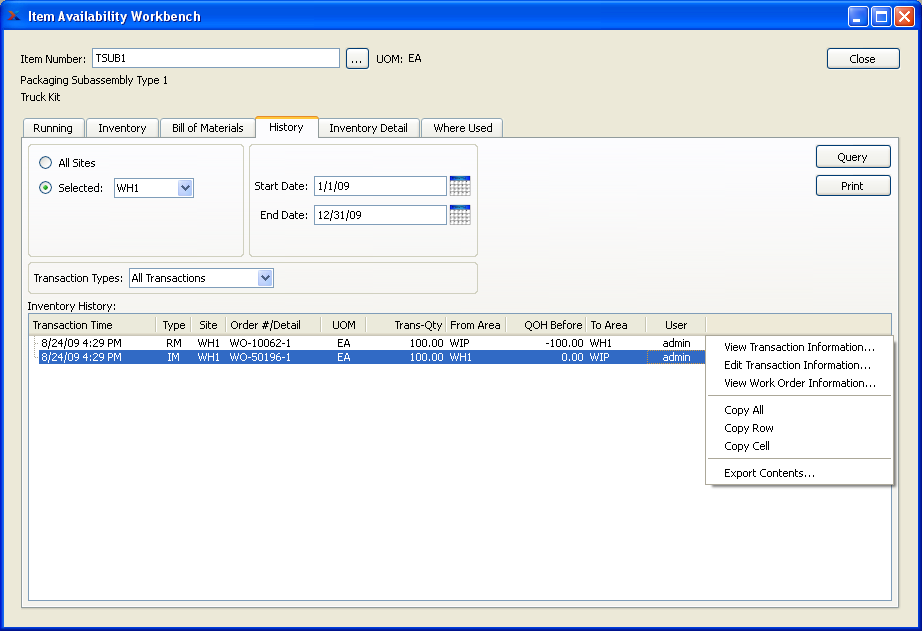
When displaying Inventory history by Item, you are presented with the following options:
- Item Number
Enter the Item Number of the Item whose Inventory history you want to display.
- UOM
Inventory Unit of Measure.
- Trans. Types
Select one of the available transaction types:
- All Transactions
Displays all Inventory transactions.
- Receipts
Displays receipts into Inventory from Manufacturing, purchases, or miscellaneous receipts.
- Issues
Displays issues from Inventory to Manufacturing.
- Shipments
Displays shipments to customers.
- Adjustments and Counts
Displays Inventory adjustments and counts.
- Transfers
Displays Inter-Site Transfers and Location and Lot/Serial Number reassignments.
- Scraps
Displays Scrap removed from Inventory.
Note
The system prefixes Order Numbers with letters indicating the Order type. For example, Work Orders are prefixed with "WO", Purchase Orders with "PO", and Sales Orders with "SO". These letters are for display purposes only and are not considered part of the Order Number.
- All Sites
Select to display Inventory history by Item for all Sites.
- Selected
Specify Site whose Inventory history by Item you want to display.
- Start Date
This is a required field. Inventory transactions conducted on and after this date will be displayed.
- End Date
This is a required field. Inventory transactions conducted on and before this date will be displayed.
- Inventory History
Display lists Inventory history by Item, using the specified parameters. This display is a nested list, with a plus ("+") sign located to the far left of the display next to each transaction that may be expanded to lower levels. By clicking your mouse on a plus sign, you reveal lower levels of information related to the Order. To the far right of the screen, the following buttons are available:
- CLOSE
Closes the screen, returning you to the application desktop.
- QUERY
Select to generate the display, using the specified parameters. Start date and end date must be entered for calculation to proceed. Results will be displayed in the "Inventory History" list.
Runs the report associated with this screen.
When editing transaction information, you may choose to exclude a transaction from Inventory analysis. Not including a transaction in this manner means the following Inventory analyses will ignore the transaction: Item Usage Statistics displays, Update Reorder Levels, and Update Order Up To Levels.
To view Lot/Serial and/or Location information for the specified Item, select the "Inventory Detail" tab. The following screen will appear:
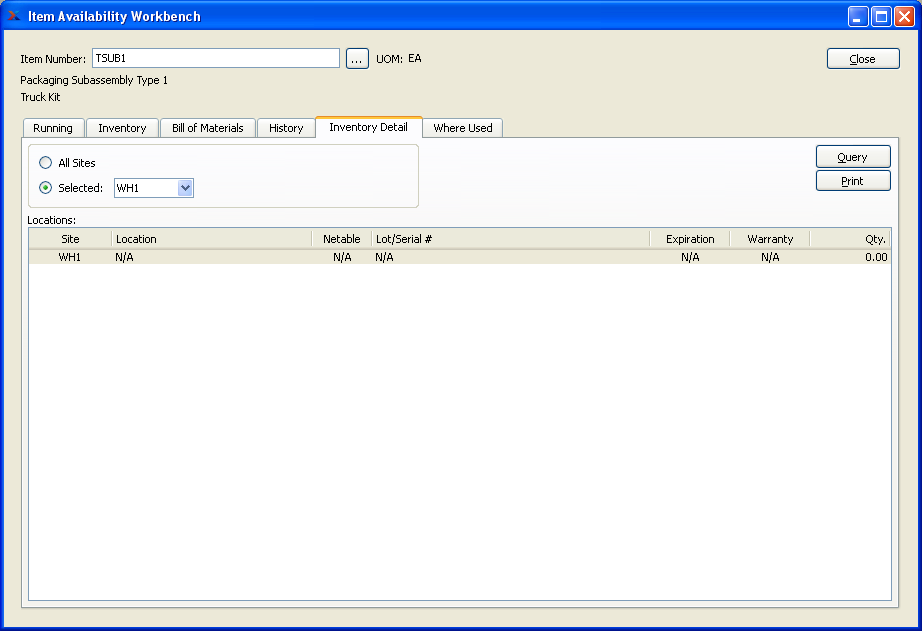
When displaying detailed Inventory information, you are presented with the following options:
- Item Number
Enter the Item Number of the Item whose detailed Location/Lot/Serial Number information you want to display.
- UOM
Inventory Unit of Measure.
- All Sites
Select to display detailed Location/Lot/Serial Number information for all Sites.
- Selected
Specify Site whose detailed Location/Lot/Serial Number information you want to display.
- Locations
Display lists Location/Lot/Serial Number detail, using the specified parameters. Items will display in red type if the quantity in question has expired.
To the far right of the screen, the following buttons are available:
To view where the specified Item is used for manufacturing, select the "Where Used" tab. The following screen will appear:
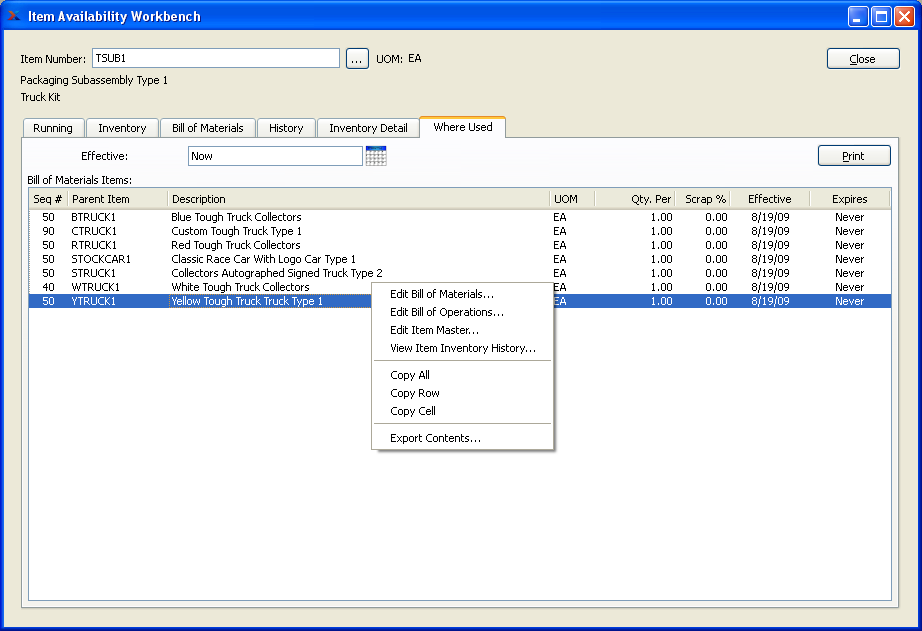
When displaying a single level Bill of Materials, you are presented with the following options:
- Item Number
Enter the Item Number of the manufactured Item you would like to view a single level Bill of Materials for.
- UOM
Inventory Unit of Measure.
- Show Expired Components
Select to cause expired components to be listed in the "Bill of Materials" display.
- Threshold Days
Select a number using the arrow buttons, or manually enter a value up to a maximum of 999. Components that have been expired from the Bill of Materials within the specified number of days will be included in the display.
- Show Future Components
Select to cause future components to be listed in the "Bill of Materials" display.
- Threshold Days
Select a number using the arrow buttons, or manually enter a value up to a maximum of 999. Components that will be added in future to the Bill of Materials within the specified number of days will be included in the display.
- Bill of Materials
Display lists single level Bill of Materials components, using the specified parameters.
To the far right of the screen, the following buttons are available:
Item Groups provide an alternate means for sorting Items into categories. The advantage to Item Groups is that a single Item may belong to multiple Item Groups. This is in contrast to Class Codes and Product Categories, in that single Items may belong to only one of each of these categories. To access the master list of Item Groups, select the "Items Groups" option. The following screen will appear:

The "Item Groups" screen displays an alphabetical list of all existing Item Groups and their description.
To the far right of the list, the following buttons are available:
- CLOSE
Closes the screen, returning you to the application desktop.
- NEW
Opens screen for creating a new Item Group.
- EDIT
Enables you to edit highlighted Item Groups. The edit screen is the same as that for creating a new Item Group—except that when editing, the fields will contain Item Group information. Double-clicking on an Item Group will also bring you to the editing screen.
- VIEW
Highlight an Item Group and then select this button to reach a read-only view of the "Edit" screen.
- DELETE
Highlight an Item Group and then select this button to remove the Class Code from the list.
To create a new Item Group, select the NEW button. The following screen will appear:

Tip
Create your Item Groups using a logical, hierarchical structure. This will make it easier to retrieve Item Group information in the future.
When creating a new Item Group, you are presented with the following options:
- Name
Enter a unique name for the Item Group.
- Description
Enter a description to further identify the Item Group.
- Member Items
Display lists member Items of the Item Group.
To the far right of the list, the following buttons are available:
- SAVE
Creates the Item Group and adds it to the master list of Item Groups.
- CLOSE
Closes the screen, returning you to the application desktop.
- NEW
Opens a searchable Item list. Select an Item from the list to have the Item added to the Item Group
- DELETE
Highlight an Item Group and then select this button to remove the Item Group from the list.
Images may be associated with Items in the Item master. To view Images associated with an Item, select the "Item Images" option. The following screen will appear:
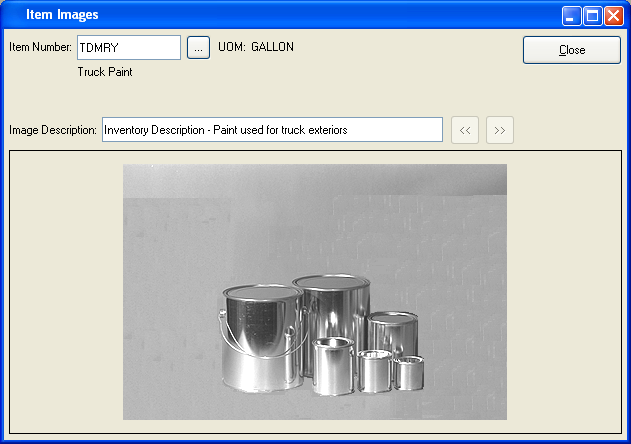
When viewing Item Images, you are presented with the following options:
- Item Number
Enter the Item Number of the Item whose associated Images you want to view.
Note
Images are associated with Items in a two-step process. First, an Image must be loaded into the database at the system level. Second, the link between Image and Item must be made using the Images tab found on the Item master.
- UOM
Inventory Unit of Measure.
- Image Description
A preview of the first Item Image will appear here. To view the next Image associated with the Item, select the forward arrow "\>\>" button. To view previous images, select the back arrow "<<" button.
To the far right of the screen, the following buttons are available:
- CLOSE
Closes the screen, returning you to the application desktop.