Label Tracks
From Audacity Manual
Features:
- Can annotate selected points or regions of audio with text labels
- The labels can be moved, modified or deleted.
- Labels define different points in an audio track, so they provide a convenient way to mark different songs in a recording then export them to differently named audio files using .

The Label Track Drop-down Menu

- Name
- Displays the "Track Name" dialog where you can give the track a new name. Useful in multi-track projects to provide a visual indication of the content of each track.
- Font
- Displays the "Label Track Font" dialog where you can set the font and font size of the labels. Note that this applies to all label tracks.
- Moving Tracks
- Tracks can be moved up and down using the menu items.
- Move Track Up: Moves track up.
- Move Track Down: Moves track down.
Creating Labels
Suppose that you have a recording of an interview and you want to annotate the questions and answers so you can easily jump directly to a particular question or answer later on. Initially, you may have something like the image below. Without any annotation it's almost impossible to tell them apart just looking at the waveform.

Here, we select the first question with the mouse (below). This may require listening to the audio several times to determine the exact boundaries of the selection.

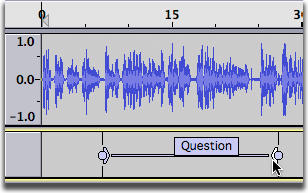
Now click on , or type its keyboard shortcut ( CTRL + B on Windows/Linux or CMND + B on the Mac). This creates a new label track and a blank label outlining the current selection (below).

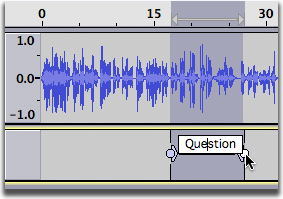
The cursor is automatically positioned inside the label, just type the name of the label then press Enter (pressing Enter allows you to use any current keyboard shortcuts normally--you could press Space to listen to the selection again if you wished). In the image below we've typed Question 1.

After this question comes the answer from the person being interviewed. We'll select this one by starting from the right side of the answer and dragging to the left. Note that a vertical yellow guide appears when we get to the edge of the first label, making it easy to line up the two labels (below). It's common for the next label to start exactly where the previous one ends, but it's not necessary.

Once again, click on to create the next label, then type its name and press ENTER.
In the following image, we've added even more labels.

And here is a complete label track with several labels

Alternative Method Using Point Labels
In the example above we used region labels to mark the interview segments. We could just as easily have used point labels.
For example, we could click in the audio track at the beginning of the first question then click on to create the point label.

Similarly, we could click in the audio track at the beginning of the first answer then click on to create the second point label.

Either method is equally valid. Region labels have the advantage that clicking in the label text selects the audio spanned by the region label, which may be useful in some situations.
Adding labels while playing or recording
You can also create point or region labels while playing or recording. To mark a point while playing or recording, use the command or its keyboard shortcut CTRL + M. This adds a point label at the current Audio Position indicated in Selection Toolbar.
To mark a region while playing or recording, click and drag the selection region while you are listening to the track, then use the same Add Label at Selection command (or CTRL + B shortcut) as when adding a region when the track is stopped.
Selecting a label
When you click inside a label to select it, the label is opened so its name can be edited, and the cursor point or region of audio the label corresponds to is restored. The cursor point or region will also be selected in any other currently selected audio tracks.

Use Tab on your keyboard to select forwards to the next label, and Shift + Tab to select backwards to the previous label. If no label is selected but the Label Track has focus (shown by the yellow border), Tab will select the first label then cycle forwards through the labels, and Shift + Tab will select the last label then cycle backwards through the labels.
Removing labels
- To remove labels without affecting other labels: Single-click in the text of an individual label, then press the DELETE or BACKSPACE key (as appropriate) on your keyboard until the text is removed. Once the label is empty of text, press DELETE or BACKSPACE once more to delete the label. You can also remove one or more labels without affecting other labels by selecting any region extending over (or at least touching) the label edges(s), then choose .
- To remove labels (or regions of label track), affecting the following label(s): You can remove labels or regions between labels by selecting over or between labels, then choose or . If you remove part of an area inside a region label, this will reduce the length of the label. Labels following to right of the removed labels will always move backwards according to the length of the removed selection.
When removing parts of the label track you may often want to remove the corresponding audio too, so that the remaining labels still relate to their original audio. To remove the audio region as well as the label region, either drag the selection upwards to include the audio track or enable Sync-Locked tracks.
You can also remove all labels at once by removing the label track entirely. To do this, click in the track and choose . Alternatively, click the close box in the upper-left corner of the label track.
Like everything in Audacity, any edits to label tracks can be undone by .
Editing labels
Changing the length and position of labels with the mouse
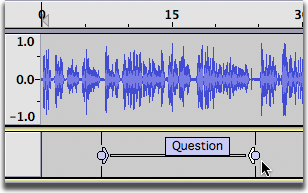
You can move a label by clicking and dragging its circle handle. You can change the length of a label by clicking and dragging its triangle handle.
Holding Shift while dragging reverses this behavior, so that dragging a circle handle changes the length of the label, and dragging a triangle handle moves the label. For example, this lets you resize a label by holding Shift while dragging its circle handle, then release Shift to move the resized label without having to move the mouse pointer to its triangle handle.
In the case where two labels meet you can adjust the junction point where they meet by clicking and dragging their shared circle handle.
Moving a point label
You can move a point label by clicking and dragging its circle handle:


Before After


Expanding a point label
You can expand a point label into a region label by clicking and dragging either of its triangle handles:

Before After


Moving and resizing a region label
You can move a region label by clicking and dragging either of its circle handles:
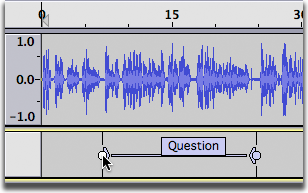
Before After


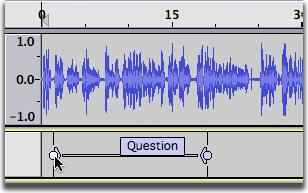
You can change the length of a region label by clicking and dragging one of its triangle handles:
Before After


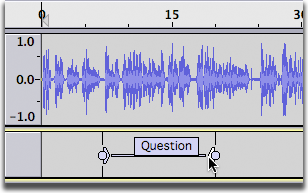
Adjusting the junction point where two labels meet
You can adjust the junction point where two labels meet by clicking and dragging their shared circle handle:


Before After


Moving a label when there is a selection
The illustration below shows what happens if you click in a label to select it, press Enter, then move the label.
Before After


Contrast this to what happens if you click in a label to select it, then move the label.
Before After


Using cut, copy and paste
Cutting and Pasting Region Labels
You can cut and paste region labels using and , but you have to make sure you don't select any audio, or you will end up cutting and pasting audio where you probably didn't intend.
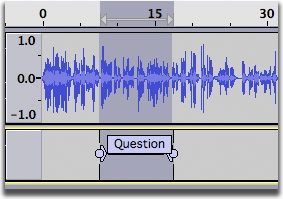
In the image below, the label was selected by clicking in it, then the audio track was unselected by shift-clicking in the Track Control Panel of the audio track (this can also be done with the keyboard by UP then ENTER). The label was then cut to the clipboard with :

To paste the label at a different point in the audio track, either a) click in the audio track at the point where you would like the label to begin then shift-click in the label track to select it; or b) click in the label track at the point where you would like the label to begin. The label can then be pasted to that spot using .

Cutting and Pasting Point Labels
You can also cut and paste point labels, but the procedure is tricky. In the image below, the point label is selected for editing as in the above example with a region label, but there is no selected region in the label track.

What happens next depends on the setting of the "Select all audio in project, if none selected" preference in Tracks Preferences:
- If that preference is not selected, will be disabled and pressing CTRL + X will do nothing.
- If that preference is selected and you do , all audio and labels in the project will be cut to the clipboard.
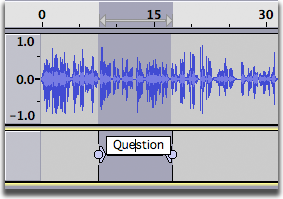
To cut and paste a point label to a different location, first select the text of the label as shown below. Note the difference in appearance of selected label text (the text is highlighted separately from the box) versus a selected label (where the entire label box is highlighted).

Do - the text of the label is cut to the clipboard, leaving a label with no text. Press DELETE to delete the label. Click in the new location for the label and do .

Using the Contextual Menu
There is a handy feature where you can select an area of text in a label then right-click to cut, copy or paste over (if there is text currently in the clipboard) that text. This allows you to click in another label, right-click, then paste that text in. So in our example you could select and copy "Question" and then paste it into the appropriate labels without having to type that word every time. The example below shows one way this can be used.
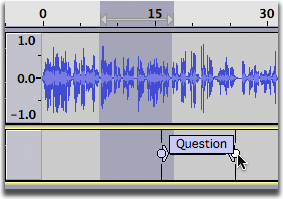
Click in a label, then select the label text. Note the difference in appearance of selected label text (as shown below - the text is highlighted separately from the box) versus a selected label (where the entire label box is highlighted). Right-click in the label:

Now select the range of audio corresponding to the second question and click on . Right click (control-click on a Mac) in the new label:

The text "Question" will be pasted into the label, and all you have to type is "2" to complete the label.
Labels Editor
launches a keyboard-accessible Labels Editor. This shows all the labels at once in a tabular view, similar to a spreadsheet:

You can use the Arrow keys on your keyboard to navigate easily left, right, up or down between the table cells. To open a cell for editing, use F2 or double-click.
Opening the Start Time or End Time cell for editing lets you use Left or Right arrow keys to move between selected time digits, then Up or Down arrow keys to increment the digits. Alternatively you can type the number wanted for the selected digit.

Selecting any cell in the row for that label selects that label for the required action button operation, and also moves the cursor or selection region to that label in the label track itself.
The action buttons let you insert a single label before or after the selected label, or remove that selected label. There are also buttons to export all the labels to a text file (irrespective of which labels are selected), and to import a labels file. The buttons for import and export are equivalent to the File Menu commands for importing and exporting labels described below.
Keeping labels synchronized with their audio
In many cases if you delete audio preceding a label you will want the label to move back so that it still relates to the audio it related to before the deletion. To achieve this, drag the selection down into the label track before deleting. Keyboard users can include the selection in the label track by pressing DOWN then ENTER. See Selecting using the keyboard.
To keep labels synchronized after deleting audio without having to select in the label track, enable Sync-Locked Tracks at . This feature define groups of Sync-Locked audio and/or label tracks, such that a length-changing action in one track of the group affects all the others in the group, whether they are selected or not. For example, enable Sync-Lock Tracks when you want to insert audio and move the labels along as well as the audio.
See the Sync-Locked Tracks page for more information.
Importing and Exporting Labels
Existing labels are saved whenever you create an Audacity project. Sometimes it may be useful to use these labels in another program, for example if somebody wanted to know the time where each piece of an interview starts or stops. Audacity exports labels in a very simple tab-delimited plain text format that looks like this:
0.450000     0.450000     point label

1.400000     3.100000     region label

4.150000     4.150000     Question 1

5.700000     5.700000     Answer 1

8.100000     8.100000     Question 2

9.800000     9.800000     Answer 2
The first column has the start time in seconds, the second column has the end time, and the third column has the name of the label. Start time and end time are identical if the label marks the cursor position rather than a selection region. Values are separated by tab characters (shown as five spaces in the above). The exported file is called "Label Track.txt" by default. It can be opened by any text editor, or by a spreadsheet program.
You can export labels using the Edit Labels editor window, or by choosing . Labels can be imported using the Edit Labels editor window, or by choosing .
If you use a Windows application to create the file, you may have to use "Save As" and look for a specific option that saves with UTF-8 encoding.