Audacity Selection
From Audacity Manual
Audacity's ability to select precise parts of a sound for editing makes it a very powerful editing tool.
Special characteristics of audio selection
In a word processor, most operations are performed by selecting a range of text (usually with the mouse), then choosing some option from a toolbar or menu, for example to cut the text, or make it bold. Audacity works much the same way; most operations are performed by selecting audio with the mouse and then applying some operation.
Audacity selections can be more complicated than word processor selections, though. In Audacity, the selection involves a set of selected tracks, and then a range of time within those selected tracks. This is because sometimes you might want to select multiple tracks so that any changes you make apply to all of them, but other times you might want to affect the tracks individually. In either case, you may or may not want the edits to apply to the whole time range of the tracks.
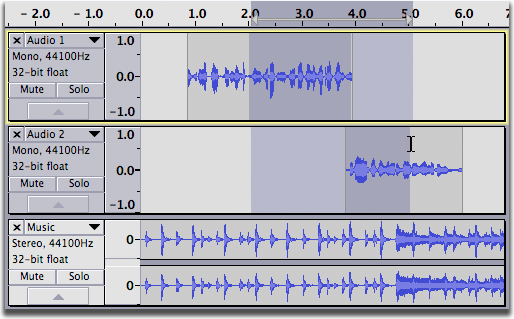
Normally, you select both the tracks and the time range simultaneously, by clicking and dragging. For example, to create the selection in the image below, make sure you're using Selection tool ![]() , click in the track just after 2.0 seconds in the first track, then drag rightwards to just after 5.0 seconds as displayed on the Timeline , then downwards so that the gray selection area now includes the second track:
, click in the track just after 2.0 seconds in the first track, then drag rightwards to just after 5.0 seconds as displayed on the Timeline , then downwards so that the gray selection area now includes the second track:
It's possible to change the selected time range and which tracks are selected independently. To change the selected time range, you have several options:
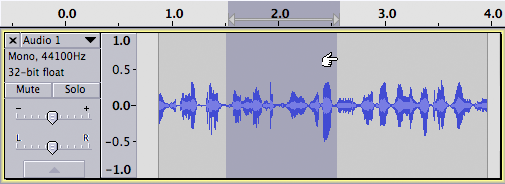
- Move the mouse pointer to one of the edges of the selection until it changes to the "finger with pointing hand". Click and drag to change that edge of the selection.
- Hold SHIFT while clicking near one of the edges of the selection to extend or contract the selection to the time point you clicked on.
- Hold SHIFT while pressing LEFT or RIGHT to extend the selection from the left or right edge respectively.
- Hold CTRL + SHIFT while pressing LEFT or RIGHT to contract the selection from the right or left edge respectively.
To change which tracks are selected without affecting the time range, you also have multiple options.
- Hold SHIFT while clicking on the Track Control Panel to the left of the waveform to toggle its selectedness.
- Hold SHIFT while pressing UP or DOWN to extend or contract the selection up or down tracks.
- Press UP or DOWN to change the focused track, then press the Enter key to toggle its selectedness.
Note that it is possible to have a time range selected but no tracks selected. In that case, you will only see the evidence of the selected time range in the Timeline.
Audio editing is different from text editing in another way, too. With audio, it usually isn't obvious from the waveform what you want to select, so you really want to listen just to the left and right edges of a selection to make sure you are editing the correct part. But if you are new to audio editing, don't worry. For now, you can just click and drag to create a selection on a single track, and press <Space> to listen to all of it. Come back here for more help when you start to work on more advanced projects and are having trouble selecting what you want.
There are several ways to select audio, some of which will be better for visually impaired users or those who have difficulty with the mouse. The following sections give details on the various ways you can make audio selections in Audacity, using either the mouse or the keyboard.
Let's examine the various ways to select audio...
Selecting regions using the mouse
The easiest way to select a region of audio is to click and drag. If it's not already selected, choose the Selection tool ![]() from Tools Toolbar, below:
from Tools Toolbar, below:
Now click the left mouse button anywhere inside of an audio track, and click and drag to the other edge of your selection, and release. Some tips:
- You can drag from left to right or from right to left, it doesn't matter.
- You can start your selection in one track, and end it in another track, and both tracks (plus the tracks in-between) will all end up selected.
- If you move the mouse past the left or right edge of the window while dragging, Audacity will scroll the window in that direction as long as the mouse button is down.
To extend or contract an existing selection, hold down the SHIFT key while left-clicking the mouse. The nearest edge of the selection will jump to the current mouse pointer location. This is really useful if you know exactly what you want to select but it doesn't easily fit on the screen at once:
- Click at one edge of the selection
- Scroll until the other edge is in view
- Shift-click to set the other edge of the selection.
You can also extend or contract a selection by hovering the mouse near the edge of a selection, then clicking and dragging. When you hover close enough to the edge of a selection, the mouse pointer changes to a hand with pointing finger, indicating you can now click and drag the selection:
Selecting tracks using the mouse
There are two very useful things you can do by clicking in the Track Control Panel to the left of a track - make sure that you click in a neutral area, not inside one of the buttons or sliders. See Audio Tracks for more about the Track Control Panel.
Clicking on a track's Track Control Panel will select the entire track. That's a very easy way to apply an effect to an entire track. If you want to select all tracks, you can alternatively choose Select All from the Edit menu.
There's another handy way to select an entire track or clip: just double-click inside it.
If you hold down the SHIFT key while left-clicking on a track's Track Control Panel, you can toggle the selectedness of that track. For example, if you want to select the first and third tracks only, you could choose and then shift-click on the middle track to deselect it while leaving the others selected.
If you deselect all tracks (by toggling selectedness off in all tracks or by clicking in the gray background underneath the bottom track in the project), any time region that was present will remain visible in the Timeline. This gives you a way to play this selection even though no tracks are selected.
Selecting using the keyboard
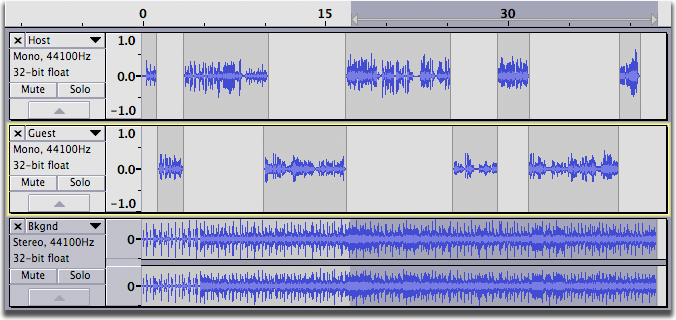
You can modify the selection entirely using the keyboard. The currently focused track is indicated with a glowing border, as you can see from the track called "Guest" in this image:
To change the focused track, just press Up Arrow or Down Arrow. In this image, we pressed down arrow to change focus to the "Bkgnd" track:
Once a track has focus, press Enter or Return to change it from being selected to not selected, or from not selected to selected.
Hold SHIFT while pressing UP or DOWN to extend or contract the selection up or down tracks.
To modify the selected time range:
- Hold SHIFT while pressing LEFT or RIGHT to extend the selection from the left or right edge respectively.
- Hold CTRL + SHIFT while pressing LEFT or RIGHT to contract the selection from the right or left edge respectively.
If you don't already have a selection, just a cursor, then pressing Left Arrow or Right Arrow will move the cursor. If you do have a selection, pressing the left arrow will take you to the beginning of the selection, and the right arrow will take you to the end.
Menu commands for selecting
The Edit Menu has several commands that are useful for selecting.
Edit > Select
commandAction All Select all tracks, including the entire content of audio tracks and note tracks. None Deselect all tracks, removing any selection they contain and setting the cursor at the start of the former selection region. Left at Playback Position Sets the left selection boundary at the current playback position, otherwise opens a dialog for moving the left selection boundary. Right at Playback Position Sets the right selection boundary at the current playback position, otherwise opens a dialog for moving the right selection boundary. Start to Cursor Select from the start of the track to the cursor position. Cursor to End Selection from the cursor position to the end of the track. Region Save Captures the currently selected time range or cursor position. Region Restore Restores the time range or cursor position from Region Save. In All Tracks Extend the current selection or cursor position up or down into all other tracks. In All Sync-Locked Tracks Extend the current selection or cursor position up or down into all other tracks which currently have the Sync-Lock icon.
Selecting while audio is playing
Sometimes the easiest way to select an exact portion of audio is to mark the selection boundaries while you're playing audio. To do this, press the [ key to mark the left edge of the audio, and the ] key to mark the right edge.
After you've done that, you'll definitely want to listen to the resulting selection to make sure it was right. Press Space to hear just the selection. There are additional keyboard shortcuts that let you listen to just the beginning or end of a selection - see Special Playback Keyboard Commands for details.
Selection Toolbar
One handy way to keep track of what you've selected and to make precise modifications is to use Selection Toolbar (shown above). For our purposes here, let's concentrate on the main purpose of the Toolbar, the Selection Start and End/Length boxes. By changing the radio button from "End" to "Length", you can display and control the length of the selection instead of the endpoint. Which one is useful for you depends on the circumstances: if you need a clip from a song that's exactly 30 seconds long, you may want to set the length to 30, and then modify the start until you have just what you want. Other times you may know the exact end time but need to figure out where to start, independent of the resulting length.
Selection Toolbar also displays and can move the cursor position without there being a region selected. To move the cursor to an exact position using Selection Toolbar, set the "Selection Start" and "End" boxes to the same value.
You can set the values displayed in the Selection Toolbar boxes using the mouse and/or keyboard. To change a particular digit in a box, click on it, or you can navigate to it using only the keyboard:
Key Action CTRL + F6 Move the focus to/from Selection Toolbar TAB Move between the Selection Toolbar controls LEFT / RIGHT Move cursor in a box or to/from End/Length UP / DOWN Increase or decrease the highlighted digit BACKSPACE Reset the last digit entered to zero
Once you have clicked on or navigated to a digit, it will highlight in white to show it is active. You can then increase/decrease its value using the mouse wheel or UP/DOWN, or type a new value over it:
After typing a value, the cursor automatically moves to the next digit along and selects it so that you can type the required values one after the other.
Selection Formats
By default, Selection Toolbar lets you enter values in units of hours, minutes and milliseconds. This is more than accurate enough for most purposes. However if you need for example to make a selection that is accurate to the nearest sample or is defined in CDDA or film frames, numerous other Selection Formats are available to represent time. To choose other formats, click on the triangle to right of any box, or select in or right-click over any of the digits in a box. This opens a context menu which lists the formats. Click to select the format required, then all three boxes will show the new format. For example, the image below shows the result after changing the format to samples:
For the technically minded, assuming the selection was exactly 30 seconds, Selection Toolbar above shows 1,323,000 samples because the sample rate of 44100 Hz means there are 44100 audio samples per second, so multiplying (44100) by the length in seconds (30) produces 1,323,000.
All the available Selection Formats are listed in the table below. It's okay if most of them don't mean anything to you. Most of them are intended for people using Audacity for very specific purposes, especially editing soundtracks for video, and those people will know which one they want.
Selection Format Example Notes seconds 005,408 seconds hh:mm:ss 01 h 30 m 08 s Hours, minutes, seconds dd:hh:mm:ss 00 days 01 h 30 m 08 s Days, hours, minutes, seconds hh:mm:ss + hundredths 01 h 30 m 08.51 s hh:mm:ss + milliseconds 01 h 30 m 08.512 s hh:mm:ss + samples 01 h 30 m 08 s + 22500 samples samples 238,514,850 samples hh:mm:ss + film frames (24 fps) 01 h 30 m 08 s + 12 frames film frames (24 fps) 129,804 frames hh:mm:ss + NTSC drop frames 01 h 30 m 08 s + 14 frames American video format hh:mm:ss + NTSC non-drop frames 01 h 30 m 03 s + 02 frames NTSC frames 162,092 frames hh:mm:ss + PAL frames (25 fps) 01 h 30 m 08 s + 12 frames European video format PAL frames (25 fps) 135,212 frames hh:mm:ss + CDDA frames (75 fps) 01 h 30 m 08 s + 37 frames CDDA frames (75 fps) 405,637 frames Audio CD frames
Snap-to Guides
Audacity makes it really easy to make a selection that starts or end at a natural boundary, like a label or clip boundary.
The current version of Audacity has support for a new type of snapping, in addition to the Snap To checkbox in the Selection Toolbar above. For the new snapping, when you take the following actions:
- Creating a selection with the mouse
- Modifying the selection boundaries
- Sliding / time-shifting a clip
the selection boundaries or the boundaries of the clip you're time-shifting will snap to the following locations:
- Time zero (0 on the Timeline)
- The start or end of any track or clip
- The start or end of any label
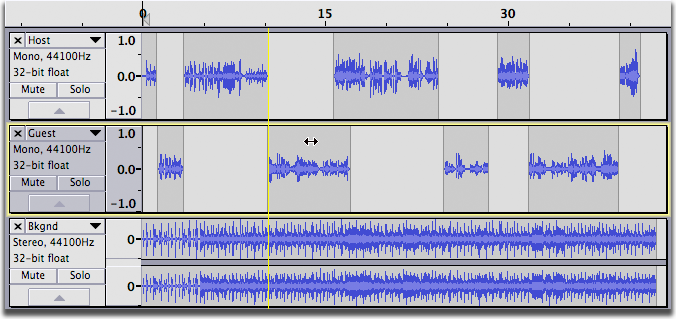
Whenever snapping is taking place, a yellow vertical line appears to indicate snapping is taking place. To err on the side of caution, if there is more than one logical place within a couple of pixels at which to snap, Audacity will not snap anywhere. In that case, zoom in.
In the image below, we're dragging a clip in the "Guest" track leftwards with the mouse. When the clip reaches the right-hand boundary of the clip above it, a yellow vertical guide line appears showing the position of the snap boundary through all the tracks. Now that the guide line has appeared, we can release the mouse and the dragged clip will be perfectly aligned with the one above:
A Snap Guide appears (the vertical yellow line) when the selection has snapped to the start or end of an audio clip from any of the tracks.
If there are two boundaries very close to one another and it's not obvious which one is better, Audacity will not snap to either. If you want to snap to one of them, zoom in so that you can clearly position the mouse closer to one than the other.
Label Tracks
A very useful way to recall particular selections is to label them in a label track. For more information, see Label Tracks.


