Edit Menu
From Audacity Manual
The Edit menu is divided into several sections.
Undo
Undoes the last editing operation you performed to your project. You can undo as many times as you want, all the way back to when you opened the window. To undo many operations, select History... from the View Menu. The name of this menu item will change to reflect what will be undone; if you just recorded some audio, the menu item name will be Undo Record.
Redo
Redoes any editing operations that were just undone. After you perform a new editing operation, you can no longer redo the operations that were undone.
Remove Audio or Labels
| You may hear a click at the edit points when you remove or paste audio. This can be caused by DC offset in the waveform or by poor selection of the edit points. See this Editing Frequently Asked Question for how to deal with this. |
Cut
Removes the selected audio data and/or labels and places these on the Audacity clipboard. Any audio data or labels to the right of the selection are shifted to the left. Only one item can be on the clipboard at a time, but it may include multiple audio or label tracks and multiple audio clips.


Delete
Removes the audio data and/or label that is currently selected without copying it to the Audacity clipboard.
Split Cut
Same as Cut, but none of the audio data or labels to right of the selection are shifted. This is therefore a useful command to remove one label of a group of labels without affecting the other labels (be sure to select only in the label track unless you want to cut the audio as well as the label).
A gap is thus left behind in the audio track which splits the existing audio clip into two clips that can be moved independently using Time Shift Tool.

Split Delete
Removes the selected audio and/or labels without placing these on the Audacity clipboard, but like Split Cut does not shift the following audio or labels. This is therefore a useful command to remove one label of a group of labels without affecting the other labels (be sure to select only in the label track unless you want to delete the audio as well as the label).
As with Split Cut the preceding and following audio are now separate clips that can be moved independently.
The following two commands affect the audio in the selection but do not affect any labels that are in the selection.
Silence Audio
Replaces the selected audio with silence.

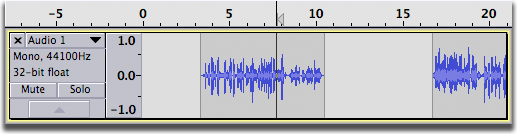
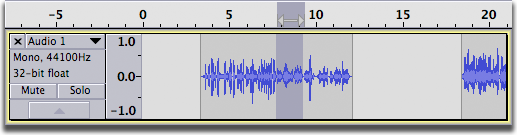
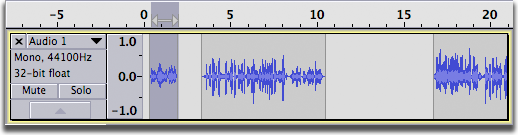
Trim Audio
Removes all audio from the current clip except the selected part, creating its own clip from the remaining audio. If there are other separate clips in the same track these are not removed or shifted unless trimming the entire length of a clip or clips (note in the "After" image below that the audio in the clip to the right is unaffected).


Clip Boundaries
Split
Splits the current clip into up to three clips at the selection boundaries. The audio before, within, and after the selection can now all be shifted independently


Split New
Does a Split Cut on the current selection in the current track, then creates a new track and pastes the selection into the new track.

Join
If you select an area that overlaps one or more clips, they are all joined into one large clip. Regions in-between clips become silence.


Detach at Silences
In a selection area that includes absolute silences, creates individual non-silent clips between the regions of silence. The silence becomes blank space between the clips.


Copy
Copies the selected audio data to the Audacity clipboard without removing it from the project.
Paste
Pastes audio which has been cut or copied to the Audacity clipboard, either inserting it into the selected track(s) at the cursor point, or replacing the current selection region(s).
- Pasting inside a clip, with "Editing clips can move other clips" checked:


When you select Paste and the cursor is outside a clip, and there is enough room for the audio that is on the clipboard, the audio on the clipboard can be inserted without any other clips being shifted over if "Editing clips can move other clips" is not checked. If "Editing clips can move other clips" is checked, the following audio will always be moved.
- Pasting outside a clip, with "Editing clips can move other clips" checked:


- Pasting outside a clip, with "Editing clips can move other clips" not checked:
-

Paste Text to New Label
Pastes the text on the system clipboard (or text from a label stored in the Audacity clipboard) at the cursor position in the currently selected label track. If there is no selection in the label track a point label is created. If a range is selected in the label track a range label is created.
The most recent text cut or copied to either clipboard is pasted. If you have copied or cut a label to the Audacity clipboard, the text of that label will be pasted. If you have cut or copied text to the system clipboard from an application other than Audacity, that text will be pasted.
If no label track is selected one is created, and a new label is created.
In the example below, the text "Question 1" was copied from a word processing document then the "Paste Text to New Label" command was executed.


Duplicate
Creates a new track containing only the current selection as a new clip. The new clip is at the same position on the Timeline as the original audio. This is essentially a shortcut method of performing copy, add new track and paste, except that the duplicated audio is not copied to the Audacity clipboard, so cannot be pasted anywhere else.

- You can do interesting things to your duplicates to create special effects. With two versions of the track to work with, you can silence a section, reverb another section, phase a third, filter another (in one track or the other) and see how that sounds.
Labeled Audio
The commands apply to all labeled audio regions that are fully inside a selection drawn in a label track. Region labels that are only partly within the selection will not be acted on.
- Region labels that touch each other without overlapping are treated as separate labeled regions.
- If two or more region labels overlap, they are treated as one labeled region.
- Labeled Audio Split also applies to point labels.
To enable the Labeled Audio commands in the Edit menu, the selection region must be drawn in the label track and must completely include one or more labels. If none of the audio tracks are included in the selection, the Labeled Audio commands apply to all audio tracks in the project. However if you include only certain audio tracks in the selection, the Labeled Audio commands will only affect those selected audio tracks.
The following commands are applied to the audio of all region labels that are fully inside the selection in the label track:
Cut, Split Cut, Copy
Delete, Split Delete, Silence Audio
Split, Join, Detach at Silences
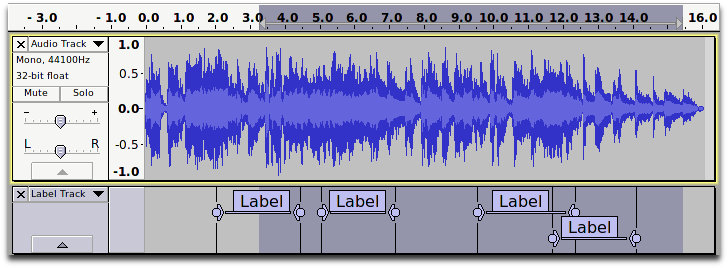
- The selection shown above was created by clicking and dragging in the label track. Applying the command results in this:
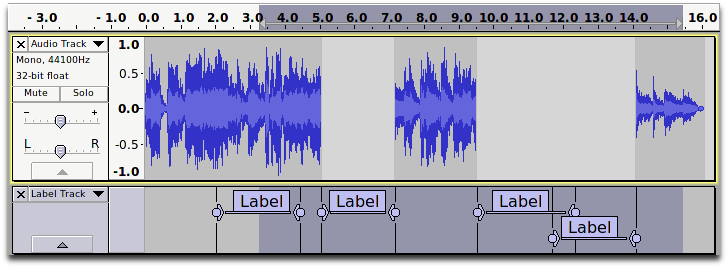
- Result: audio has been cut only in the regions where the labels are fully inside the selection. Part of the first label is outside the selection so its audio is not affected by the Split Cut operation. The final two labels overlap each other, so are treated as one label.


If the selection in the label track touches or extends over any point labels, the Split command is applied to the point labels.
Select
The items in this cascading menu provide quick ways of selecting ranges of audio.
All
Selects all of the audio in all of the tracks.
None
Deselects all of the audio in all of the tracks.
Left at Playback Position
When Audacity is playing or recording, sets the left boundary of a potential selection by moving the cursor to the current position of the green playback cursor (or red recording cursor). The selection can then be drawn by using "Right at Playback Position" (below).
Right at Playback Position
When Audacity is playing or recording, sets the right boundary of the selection, thus drawing the selection from the cursor position to the current position of the green playback cursor (or red recording cursor). This is a quick way to mark a selection for future editing while playing or recording.
Track Start to Cursor
Selects a region in the selected track(s) from the start of the track to the cursor position.
Cursor to Track End
Selects a region in the selected track(s) from the cursor position to the end of the track.
In All Tracks
Extends the current selection up and/or down into all tracks in the project.


In All Sync-Locked Tracks
Extends the current selection up and/or down into all sync-locked tracks in the currently selected track group.

Find Zero Crossings
Moves the edges of a selection region (or the cursor position) slightly so they are at a rising zero crossing point. This is a point where a line joining the audio samples rises from left to right and crosses the zero horizontal line. Cutting and pasting at a zero crossing helps avoid clicks by matching the height of the waveform at the join. Note: this feature does not necessarily find the nearest zero crossing to the current position. It aims to find the crossing where the average amplitude of samples in the vicinity is lowest.


Move Cursor
The items in this cascading menu provide quick ways to move the cursor.
To Selection Start
When there is a selection, moves the cursor to the start of the selection and removes the selection.
To Selection End
When there is a selection, moves the cursor to the end of the selection and removes the selection.
To Track Start
Moves the cursor to the start of the selected track.
To Track End
Moves the cursor to the end of the selected track.
Region Save
Saves the current selection region or cursor position as observed on the Timeline. Note this function does not save any actual audio data currently inside selection boundaries.
Region Restore
Restores the selection region or cursor position to the project at its saved Timeline position. If a region is restored, this is only explicitly placed inside those tracks which are currently selected.
Play Region
The items in this sub-menu allow you to lock and unlock the play region in the Timeline. See Play Regions in Playing and Recording.
Preferences...
Displays the Preferences dialog.