| Inkscape » Filter Effects » Pixel Manipulation Filter Primitives |    |
|---|
| Inkscape » Filter Effects » Pixel Manipulation Filter Primitives | |
|---|
These primitives move pixels or blend adjacent pixels.
The Convolve Matrix primitive uses neighboring pixels to modify the color of a pixel. How the pixel is changed is determined by an N×M matrix with one entry for each neighboring pixel.

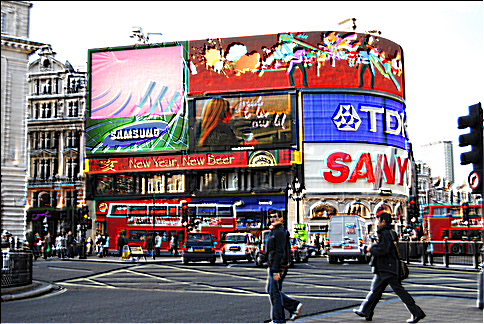
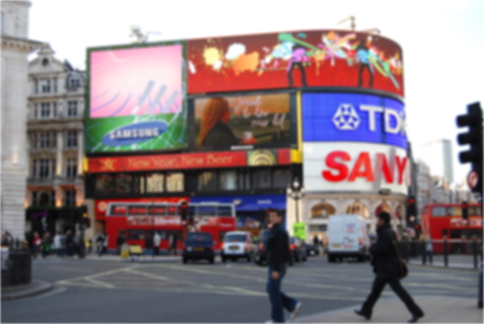
The following is an example of a “Gaussian Blur” that uses a 5×5 matrix around the center pixel. The Kernel is a integer representation of a 2-dimension Gaussian with a standard deviation of 1.4 pixels. It is normalized by the Divisor.[14]
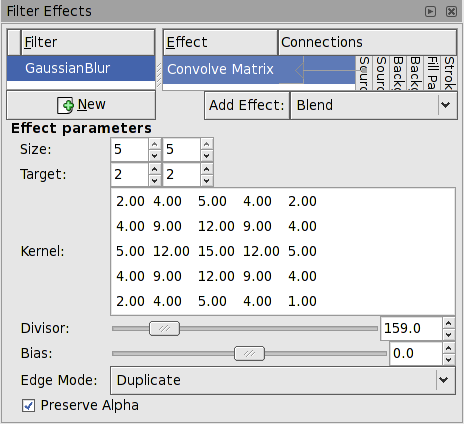
The parameters for the effect are:
The Convolve Matrix primitive is necessarily linked to evaluating pixels. By default, the pixel size is that of the display. This means that the resulting image is not resolution independent. The SVG standard provides ways to avoid this through the filterRes and kernelUnitLength attributes but Inkscape does not yet support them.
The above “Sharpen” filter is a bit extreme. This “Unsharp” filter is a bit more subtle.
Kernel:
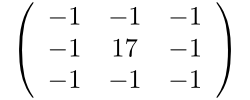
Divisor = 9.0, Bias = 0.0.

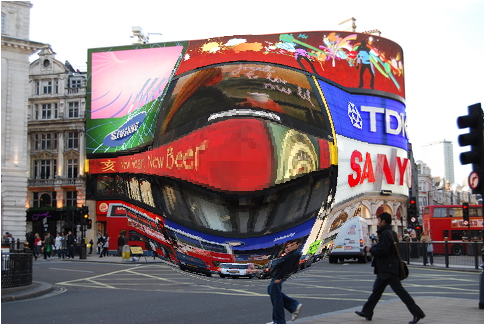
The Displacement Map primitive distorts one bitmap using another as input. A pixel in the source bitmap is translated to a new coordinate via the equations x' = scale × (CX(x,y)-0.5) and y' = scale × (CY(x,y)-0.5) where CX and CY are the any of the RGB components or Alpha, selectable by the X Channel and Y Channel attributes. The X Channel and Y Channel can be mapped with different colors.
The Displacement Map filter can be used to produce some interesting effects... but figuring out a correct map can be difficult. In the following examples, the x displacement is set to red and the y displacement is set to green. The olive green background corresponds to red and green values of 127... which corresponds (almost) to no displacement.

Magnify map (uniform gradients inside of circle).
|

Magnify.
|

Bubble map.
|
Bubble.
|

Twirl map.
|
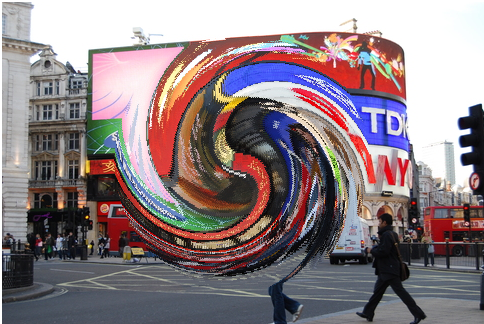
Twirl.
|

Ripple map.
|
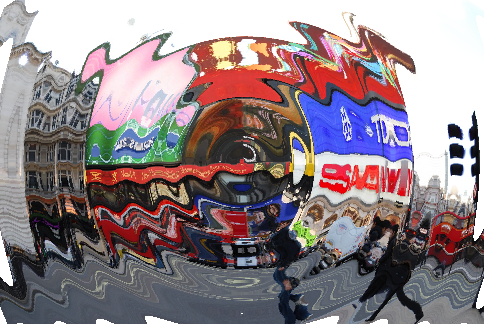
Ripple.
|
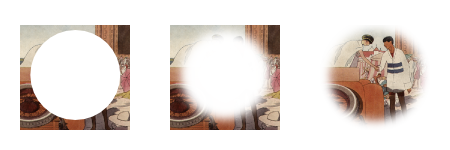
There are a couple of problems with the implementation of this filter in Inkscape v0.46. The first is that the implementation using a Background Image is buggy. This forces you to use an external image (via the Image filter) or use the output of another filter primitive as the displacement map. Another problem is the leakage of the image outside the intended area. This can be dealt with by setting the Filter Effects Region to the bounding box of the object.
See the Stereoscopic Picture example in the next section for another example of using this filter.
![[Note]](../images/admons/note.png) | Note |
|---|---|
Zero displacement? Not possible in the SVG standard. Color and Alpha are described by a byte (8 bits). This corresponds to a range of 0 to 255. A zero displacement would be a value halfway between 0 and 255, or 127.5. But these are integer numbers and you can't have a value of 127.5. Take your pick, 127 or 128. In most practical cases, the shift won't be noticable. |
The Gaussian Blur primitive blurs objects. Realistic highlights and reflections can be added to drawings as well as making objects out-of-focus. The primitive creates an output image by using a Gaussian weighted average of the input pixels around the location of each corresponding output pixel.
Internally, the amount of blur is defined in terms of the blur radius which for the mathematically inclined is just the standard deviation of the Gaussian. Technically, a Gaussian function extends to infinity. For practical reasons, the limit of an object's blur is two times the blur radius outside the bounding box at maximum blur.
The Gaussian Blur primitive is highly CPU
intensive. The output is a trade off between speed and
quality. One can set the Blur quality for the
screen display in the Inkscape Preferences dialog
( →
![]() Inkscape Preferences...
(Shift+Ctrl+P)) under the
Filter entry. Choosing a low-quality option
will affect blurring of thin objects the most. Bitmap export is
always done at the highest quality (and thus may be slow).
Inkscape Preferences...
(Shift+Ctrl+P)) under the
Filter entry. Choosing a low-quality option
will affect blurring of thin objects the most. Bitmap export is
always done at the highest quality (and thus may be slow).
A Gaussian Blur filter can be created through both the Filter Effects and the Fill and Stroke dialogs.
Using the Fill and Stroke dialog to create a blur is fast and easy. The dialog automatically creates the filter for you (and removes it if the blur is removed). In this dialog, the amount of blurring is defined in terms of a percentage. A blurring of 100% (the maximum blurring allowed) is equivalent to a blur radius of 1/8 of the bounding box perimeter (see above). For a square bounding box, this would be half of a side.
To apply a Gaussian Blur to an object, select the object and then adjust the blur with the Blur slider near the bottom of the dialog. Only a symmetric blur can be applied with this dialog.
![[Tip]](../images/admons/tip.png) | Tip |
|---|---|
Blurs created through the Fill and Stroke dialog depend on the
size of the blurred object. To get the exact same amount of blur
on different size objects, you can either use the
→
|

For more sophisticated use of the Gaussian Blur filter it is necessary to use the Filter Effects dialog. Through this dialog you can create asymmetric blurs as well as have precise control over the blur radius. You can also build more complicated filters as demonstrated in the Drop Shadow example earlier in this chapter.
As demonstrated in the introduction, Inkscape can be used to easily make an auto-updating drop shadow. However, prior to v0.46, the necessary Offset and Merge primitives were not available. Here is a work-around for Inkscape v0.45 that makes creating an auto-updating drop shadow easy:

Blurring an object with a Gradient softens the color transitions.
The Gaussian Blur primitive is applied to an object before any Clipping or Masking. This will give a sharp edge along the clipping path to a blurred object. If you wish the clipped edge to be blurred, put it in a Group by itself and then blur the Group. If you want a feathered edge to an object like a bitmap, create a white transparency mask with the edge blurred.

The Create Tiled Clones dialog has an option to vary the Blur Radius under the Blur and opacity tab.
The Morphology primitive “fattens” or “thins” an object. The Operator attribute can either be Dilate or Erode. The amount of change is controlled by the Radius attribute. It can have independent x and y values.
Note: Inkscape seems to under do the transform.

The Offset primitive shifts a graphic by the specified amounts in x and y. The classic example is the use of this primitive to create a shadow. See the Drop Shadow example earlier in this section.
This primitive has two parameters: Delta X, the offset in the horizontal direction and Delta Y the offset in the vertical direction. Note that the positive y direction is in the downward direction (as defined by the SVG standard).
If the specified offset is large, the filter region needs to be enlarged. You can increase the filter region under the Filter General Settings tab at the bottom of the Filter Effects dialog.
[14] Why define a “Gaussian Blur” using the Convolve Matrix filter when a Gaussian Blur filter exists? The Gaussian Blur filter is designed to blur on a large scale. The Convolve Matrix filter works on a short scale, reducing noise from neighboring pixels.
| |  | |
| Lighting Filters Primitives |  | Complex Examples |
© 2005-2008 Tavmjong Bah. | Get the book. |