There are few things about MetaBoss Design Studio which are worth mentioning before we begin
modelling with it. MetaBoss Design Studio is a specialised tool tailored
for modelling business systems consisting of databases, business logic tier, web services etc.
Because Design Studio is tailor made (in fact this is the rationale for having it in the first place)
it offers much higher productivity than the generic modelling tools. However, the drawback
is that you can not use Studio to model other things like frameworks or algorithms.
The most important productivity booster is the Modelling Assistant
feature. The Modelling Assistant allows designer to concentrate on really important parts of the model
by always watching over designer's shoulder and helping with routine and predictable tasks:
-
Create the directory where all our work will be located.
We use ${metaboss_home}/examples/AlmaMater, where the expression '${metaboss_home}' is a placeholder for the
path to the MetaBoss installation directory (eg. c:/MetaBoss_1.0)
Open the MetaBoss Design Studio by running the runstudio.bat or runstudio.sh from your
${metaboss_home}/bin directory. Note that if you wish for diagrams created by you to look similar to the
ones shown in this guide - you must ensure that the options "show edges captions", "show edges cardinality" and "show edges ends names" are
turned on. These and other diagram presentation options are located on the "Diagram" tab of the "Options" dialog box, which
you can reach via "Tools->Options" menu item.
From the Design Studio main menu, select "File->New Enterprise Model" menu item and choose ${metaboss_home}/examples/AlmaMater/Model/DesignStudio
as your new model directory. Note that you can create subdirectories from within model creation dialog or
outside the Design Studio using for example File Explorer.
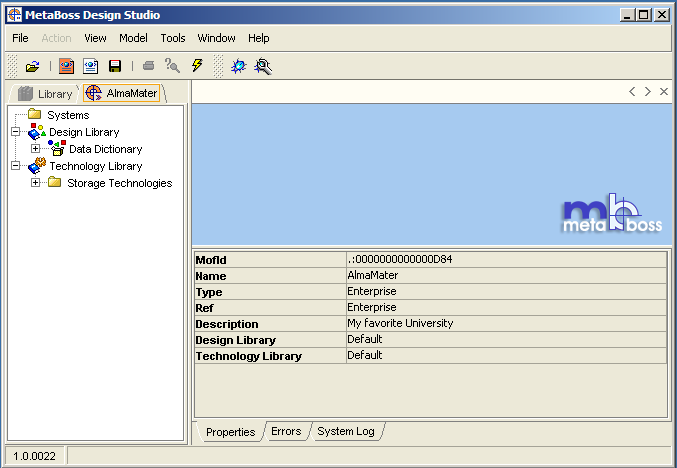
On the Enterprise properties page enter "AlmaMater" as the enterprise name and "My favorite University" as the description.
At this stage your screen should look something like this:
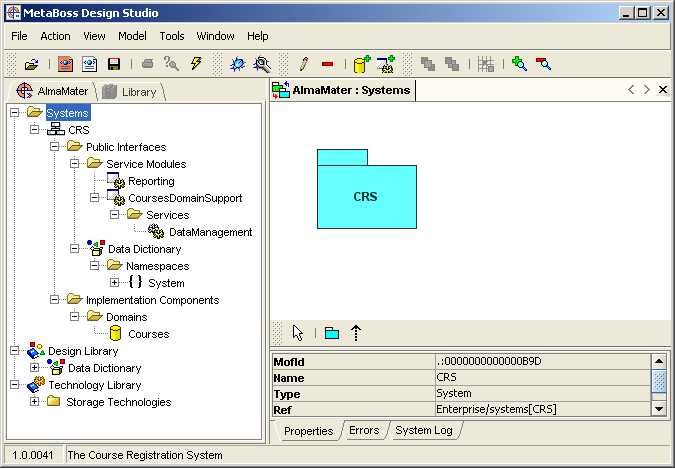
Select the Systems folder in the model tree at the left hand side and click the right mouse button.
Add new system either using "Add New System" menu option or by opening Enterprise Systems Diagram and
creating the system visually (We have done this visually via diagram). The name of our system is CRS and the description
is "The Course Registration System".
Select the CRS System folder in the model tree at the left hand side and click the right mouse button.
Add new service module using "Add New Servicemodule" menu option. The name of our Servicemodule is
"Reporting" and the description "The servicemodule provides the services used in building reports based on course registration information".
Select the CRS System folder in the model tree at the left hand side and click the right mouse button.
Add new domain using "Add New Domain" menu option. The name of our domain is
"Courses" and the description "The course registration information domain".
After this is done, your screen should look something like this:
Lets have a look at what Modelling Assistant has done. The 'CourseDomainSupport' Servicemodule and
'DataManagement' Service have been created automatically as soon we have
created the Domain (Look at the tree path Systems->CRS->Public Interfaces->Service Modules).
The 'DataManagement' Service is used for administering data in this domain via simple Create, Read, Update and Delete operations.
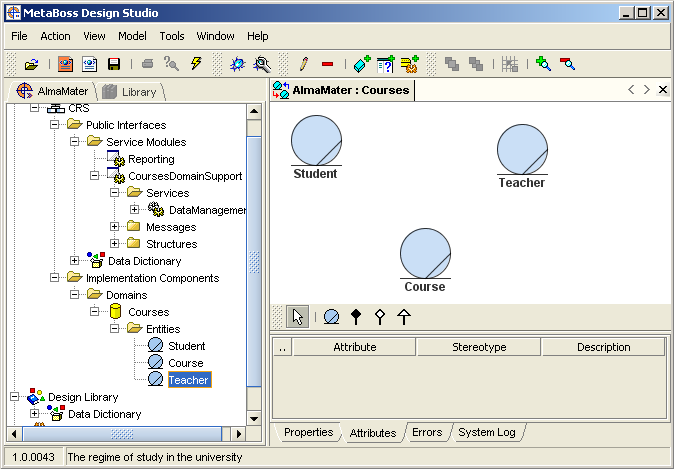
We will now create Entities.
Select the Courses domain node in the model tree at the left hand side and click the right mouse button.
Open the domain class diagram using "Open Domain Class Diagram" menu option. The diagram tool buttons are
located at the bottom left corner of the diagram area. Use the  "New Entity"
tool to create following three entities:
"New Entity"
tool to create following three entities:
| Entity name | Entity plural name | Entity description |
| Student | Students | The person enrolled in the university to learn things |
| Course | Courses | The regime of study in the university |
| Teacher | Teachers | The person employed by the university to teach things |
At this stage your screen should look something like this:
Lets have a look at what Modelling Assistant has done. A number of Data Types have been
created in the System Data Dictionary (The tree path is Systems->CRS->Public Interfaces->Data Dictionary->Namespaces->System->Namespaces->Course).
These data types are used in special entity attributes. The xxxxxxInstanceId data types (eg. StudentInstanceId or TeacherInstanceId) are
created for each and every entity. They represent the unique entity instance identifier - the automatically generated primary key.
The xxxxxxVersionId data types (eg. StudentVersionId or TeacherVersionId) are created for editable entities (all entities in this example are editable)
They identify the version of the data stored in the entity and used to guard against loss of data due to the
concurrent updates.
A number of Structures have been created in the CourseDomainSupport Servicemodule (The tree path is Systems->CRS->Public Interfaces->Service Modules->CourseDomainSupport->Structures).
These structures used to carry entity information in inputs to and outputs from operations. The xxxxxxKey structures
(eg. CourseKey or StudentKey) are used to carry the entity identifier information, that is all attributes which can be used to
unambiguously identify entity instance. This always includes the autogenerated instance identifier attribute and may in addition
include all attributes which are part of the 'natural' primary key, if of course the entity has one.'
The xxxxxxDetails structures (eg. CourseDetails or StudentDetails) are used to carry the whole entity information, that is all attributes
comprising the entity.
A number of Messages have been created in the CourseDomainSupport Servicemodule (The tree path is Systems->CRS->Public Interfaces->Service Modules->CourseDomainSupport->Messages).
These messages are used to indicate operation outcomes. The xxxxxxInstanceNotFoundError messages
(eg. CourseInstanceNotFoundError or StudentInstanceNotFoundError) are returned from operations in case when required
entity instance has not been found. The xxxxxxVersionMismatchError messages (eg. CourseVersionMismatchError or StudentVersionMismatchError)
are returned from operations in case when update attempt has failed due to concurrent update issues.
A number of Operations have been created in the DataManagement Servicemodule (The tree path is Systems->CRS->Public Interfaces->Service Modules->CourseDomainSupport->Services->DataManagement).
These operations are used to perform simple Create, Read, Update and Delete actions on entities. The Structures and Messages
described above are used in operation definitions.
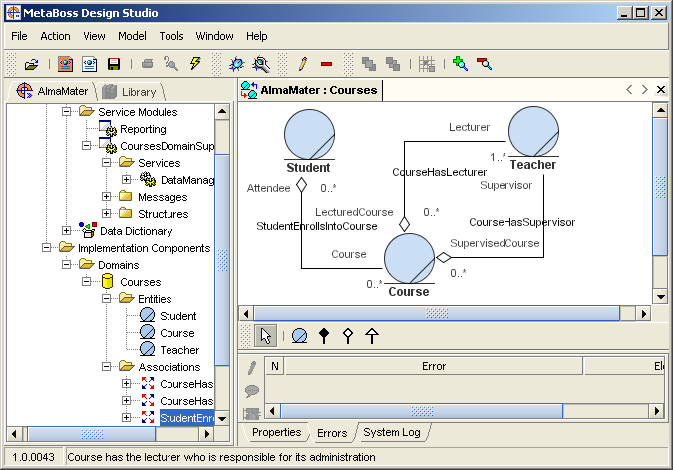
We will now define Associations between Entities.
Still in the domain class diagram, use the  "New Aggregation"
tool to create following three associations:
"New Aggregation"
tool to create following three associations:
| Association name | Association description | Association roles details |
| CourseHasSupervisor | Course has the Teacher who is responsible for its administration |
| Role A details: |
| Entity | Course |
| Name | SupervisedCourse |
| Plural Name | SupervisedCourses |
| Aggregation Type | Aggregation |
| Cardinality | ZeroToMany |
| Description | Zero or more Courses supervised by this Teacher |
| Role B details: |
| Entity | Teacher |
| Name | Supervisor |
| Plural Name | Supervisors |
| Aggregation Type | None |
| Cardinality | One |
| Description | One and only one Teacher responsible for this Course |
|
| CourseHasLecturer | Course is taught by Teachers |
| Role A details: |
| Entity | Course |
| Name | LecturedCourse |
| Plural Name | LecturedCourses |
| Aggregation Type | Aggregation |
| Cardinality | ZeroToMany |
| Description | Zero or more Courses lectured by this Teacher |
| Role B details: |
| Entity | Teacher |
| Name | Lecturer |
| Plural Name | Lecturers |
| Aggregation Type | None |
| Cardinality | OneToMany |
| Description | One or more Teachers who are lecturing the Course |
|
| StudentEnrollsIntoCourse | Students are enrolled in Courses |
| Role A details: |
| Entity | Student |
| Name | Attendee |
| Plural Name | Attendees |
| Aggregation Type | Aggregation |
| Cardinality | ZeroToMany |
| Description | Students who are attending the Course |
| Role B details: |
| Entity | Course |
| Name | Course |
| Plural Name | Courses |
| Aggregation Type | None |
| Cardinality | ZeroToMany |
| Description | Courses which the Student is enrolled into |
|
While creating above associations, the Modelling Assistant will probably report some constraint violation errors (Look at the
Errors tab at the bottom right part of the Design Studion screen). This is because some more complex constraints are not yet catered for
by Assistant's autocompletion feature (This is true as of MetaBoss release 1.0.0007). To fix these
errors just press "Attempt to Rectify Model" tool bar button. All of the constraint errors should go away after that.
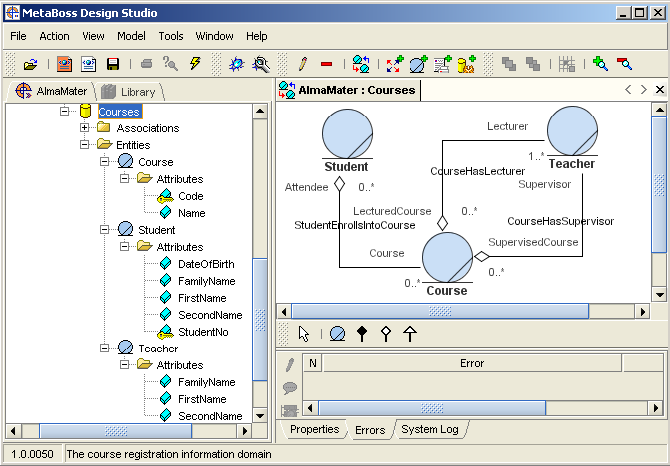
At this stage your screen should look something like this:
Lets have a quick look at what Modelling Assistant has done. The CourseDetails Structure
(the tree path is Systems->CRS->Public Interfaces->Service Modules->CoursesDomainSupport->Structures) now has
SupervisorInstanceId field. This is because the CourseHasSupervisor Association defines
that Course may have exactly one Supervisor. 'One' cardinality is a singular cardinality
(the only other singular cardinality is 'Zero or One'). Entity details structures always contain
identifiers of the associated entities for singular references (the reason is to save on extra service calls when
retrieving entity details information).
The new SupervisorForCourseCanNotBeEmpty message has been added
(the tree path is Systems->CRS->Public Interfaces->Service Modules->CoursesDomainSupport->Messages). This message
can be returned from the createCourse and updateCourse operations in case caller has not
specified valid Supervisor Identifier. This is because the CourseHasSupervisor Association defines
that Course may have exactly one Supervisor. 'One' cardinality is a mandatory cardinality
which makes it illegal to specify the empty association, hence the error message.
We will now create a couple of specialised primitive DataTypes which we need in addition to
the ones already provided in the Design Library. Select the Data Dictionary folder under the
Design Library (not the one under the CRS System) in the model tree at the left hand side
and click the right mouse button. Use "Add New DataType" menu option to create following Data Types:
| DataType name | Typetemplate Name | DataType description |
| StudentNumber | IntegerNumberField | The unique id number issued to each student |
| PersonName | StringField | The first name or family name of the the human being |
| CourseCode | StringField | The abbreviated name of the course |
For simplicity sake we will leave data types definition right here and will not define
any data validation properties. It is worth remembering though that it is possible to define
various validation rules such as min length, max length, valid character pattern etc.
We will now go back to our Entities and define their Attributes. There are few ways to add
attributes to the Entity. We suggest to select the entity node in the model tree at the left hand side
and use the "Add New Atribute" right mouse button menu. Add following attributes:
| Entity Name | Attribute |
| Name | Stereotype | DataType | Used for ordering | Description |
| Student | StudentNo | Mandatory | StudentNumber | No | The number uniquely identifying the student |
| FirstName | Mandatory | PersonName | No | Student's first name |
| SecondName | Optional | PersonName | No | Student's middle name |
| FamilyName | Mandatory | PersonName | Yes | Student's family name |
| DateOfBirth | Optional | DateField | Yes | Student's date of birth |
| Course | Code | Mandatory | CourseCode | Yes | The code uniquely identifying the course |
| Name | Mandatory | StringField | Yes | The name of the course |
| Teacher | FirstName | Mandatory | PersonName | No | Teacher's first name |
| SecondName | Optional | PersonName | No | Teacher's middle name |
| FamilyName | Mandatory | PersonName | Yes | Teacher's family name |
The next thing to do is to define natural primary keys for some entities.
This is done in the 'Primary Key' tab of the Entity Properties dialog (You can get to this dialog by doubleclicking on the
particular entity node in the model tree on the left hand side). Select Code attribute as the natural primary key
for the Course entity and the StudentNo attribute as the natural primary key for the Student entity.
At this stage your screen should look something like this (note the newly created entity attributes in the tree):
Let's have a quick look at what Modelling Assistant has done. The CourseDetails, StudentDetails and
TeacherDetails Structures (the tree path is Systems->CRS->Public Interfaces->Service Modules->CoursesDomainSupport->Structures) now have
fields corresponding to entity attributes we have just created. Entity details structures always contain all attributes
from the associated entities.
The CourseKey and StudentKey Structures (the tree path is Systems->CRS->Public Interfaces->Service Modules->Structures) now have
fields corresponding to the primary key attributes we have just nominated. Entity key structures always contain all attributes
which can be used to uniquely identify the entity instance. It allows to have alternatives when identifying the instance. Look for
example at getStudent operation (the tree path is Systems->CRS->Public Interfaces->Service Modules->CoursesDomainSupport->Services->DataManagement->Operations).
Caller has a choice to specify either StudentInstanceId - automatically generated instance identifier present in every entity,
or StudentNo - the real life unique student number which we have nominated as a natural primary key.
New error messages CourseCreationDuplicateKeyError and StudentCreationDuplicateKeyError have been created (the tree
path is Systems->CRS->Public Interfaces->Service Modules->CoursesDomainSupport->Messages). This is because the creation of entities
which have the natural primary key could potentially fail because the entity with the same key value already exist
(The xxxxxxInstanceId identifier is automatically generated and can never clash with the existing one). The fact that
this error can occur have also been reflected in createCourse and the createStudent operations (the tree path is Systems->CRS->Public Interfaces->Service Modules->CoursesDomainSupportServices->DataManagement->Operations) - they
now declare that they can return DuplicateKeyError.
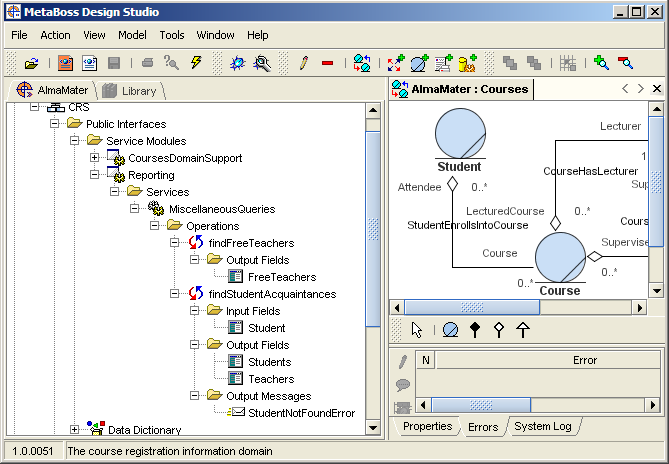
We will now go back to our Reporting Servicemodule and create some Services and Operations.
We only really missing a few operations since all simple Data Maintenance operations were defined
for us by Modelling Assistant. The ones we are missing are some fancy queries like
'Select all Teachers who are not involved with any Course' or
'Select all Teachers and Students who might fe familiar with the particular Student'.
Usually Operation definition refers to
DataTypes, Structures and Messages. These elements are used to define inputs to and outputs from the Operation
and therefore they must exist prior to defining Operation itself. Operations we are about to define
are no exception. However, the Modelling Assistant have already defined lots of
DataTypes, Structures and Messages that we will reuse.
Select 'Reporting' Servicemodule (the tree path is Systems->CRS->Public Interfaces->Service Modules->Reporting)
and use the "Add New Service" right mouse button menu to add the 'MiscellaneousQueries' Service with
description 'Various custom made queries'.
Select 'MiscellaneousQueries' Service we have just created and use the "Add New Operation" right mouse button menu
to add following operations (note that you will have to enter data on a number of tabs in the Operation details dialog box):
| Operation Name | Operation Details |
| findFreeTeachers |
| Transaction Policy | Supported |
| Description | Find Teachers who are not assigned to any Course. |
| Is Query | Yes |
| Input Fields |
None
|
| Output Fields |
| Name | FreeTeachers |
| DataType | (none) |
| StructureType | TeacherDetails |
| IsArray | Yes |
| Description | Details of Teachers who are not associated with any Course |
|
| Output Messages |
None
|
|
| findStudentAcquaintances |
| Transaction Policy | Supported |
| Description | Find all Students and Teachers who are familiar with the given Student. |
| Is Query | Yes |
| Input Fields |
| Name | Student |
| DataType | (none) |
| StructureType | StudentKey |
| IsArray | No |
| Description | Identifier of the Student to find acquaintances for |
|
| Output Fields |
| Name | Teachers |
| DataType | (none) |
| StructureType | TeacherDetails |
| IsArray | Yes |
| Description | Details of Teachers who are familiar with the given Student |
|
| Name | Students |
| DataType | (none) |
| StructureType | StudentDetails |
| IsArray | Yes |
| Description | Details of Students who are familiar with the given Student |
|
| Output Messages |
| Name | StudentNotFoundError |
| MessageType | StudentInstanceNotFoundError |
| IsArray | No |
| Description | Contains error message in case if specified Student does not exist. |
|
|
At this stage your screen should look something like this (note the newly created operations in the tree):
Congratulations ! We have completed the design of our system and are ready to do a system build.
Of course you should save the resulting model when prompted during closing down of the Design Studio
 "Attempt to Rectify Model"
button at the main toolbar and see what happens. The errors, which the Modelling Assistant was able to fix, will simply
disappear. The ones which it was unable to fix will stay (note that this situation should not occur in course of this example).
This is the situation where you'll have to read the error message and try to understand what it
means, or alternatively post the question to MetaBoss forum.
"Attempt to Rectify Model"
button at the main toolbar and see what happens. The errors, which the Modelling Assistant was able to fix, will simply
disappear. The ones which it was unable to fix will stay (note that this situation should not occur in course of this example).
This is the situation where you'll have to read the error message and try to understand what it
means, or alternatively post the question to MetaBoss forum.