
Contents
Host Operating System (Host). The operating system that is installed on your laptop or desktop that hosts virtual machines. Commonly referred to as host OS or host. In short, the machine where your Virtual Box is installed.
Guest Operating System (Guest). The operating system that is installed on your Virtual Box Virtual Machine. This virtual instance is independent of the host OS. Commonly referred to as guest OS or guest.
Node. In this context, refers specifically to servers. Each OpenStack server is a node.
Control Node. Hosts the database, Keystone (Middleware), and the servers for the scope of the current OpenStack deployment. Acts as the brains behind OpenStack and drives services such as authentication, database, and so on.
Compute Node. Has the required Hypervisor (Qemu/KVM) and is your Virtual Machine host.
Network Node. Provides Network-as-a-Service and virtual networks for OpenStack.
Using OpenSSH. After you set up the network interfaces file, you can switch to an SSH session by using an OpenSSH client to log in remotely to the required server node (Control, Network, Compute). Open a terminal on your host machine. Run the following command:
$ ssh-keygen -t rsa
Generating public/private rsa key pair.
Enter file in which to save the key (/u/kim/.ssh/id_rsa): [RETURN]
Enter passphrase (empty for no passphrase): <can be left empty>
Enter same passphrase again: <can be left empty>
Your identification has been saved in /home/user/.ssh/id_rsa.
Your public key has been saved in /home/user/.ssh/id_rsa.pub.
The key fingerprint is:
b7:18:ad:3b:0b:50:5c:e1:da:2d:6f:5b:65:82:94:c5 xyz@example
Extract the scripts locally by downloading and running the scripts tar file.
Currently, only */Scripts/ folders
content are being tested. Run the
~/Scripts/test_scripts.sh file to test all
scripts at once.
To test scripts
Set up the test environment
To use Virtual Box as test environment, you must attach the following network adapters:
Host-Only/ Bridged -- 10.10.10.51 (Guest) -- 10.10.10.xx (Host IP for Host-Only)
Host-Only/ Bridged -- 192.168.100.51 (Guest) -- 192.168.100.xx (Host IP for Host-Only)
Bridged/NAT -- DHCP -- These Scripts should be run without internet connection after Pre-Install.sh. The Templates/* should be changed to the required IP Addresses for custom networks.
Test scripts individually
Run the shell scripts in the
Scriptsfolder to verify they run correctly. Do not install Virtual Box, although it is recommended because your host machine might fail.To test the scripts, run them. Some scripts require input parameters. If you do not want to run them manually, run the
Scripts/test_scripts.shfile. Virtual Box guest add-ons are not required to test the scripts as units.Test the entire system
You must install Virtual Box, Ubuntu Server 12.04 or 13.04, and the Virtual Box guest add-ons.
To install Virtual Box guest add-ons, complete one of these steps:
Install the Virtual Box guest add-ons through ISO:
# apt-get install linux-headers-generic
# mount /dev/cdrom0/ /tmp/cdrom
#cd /tmp/cdrom/
# ./virtualbox
Install the Virtual Box guest add-ons through Ubuntu repositories:
# apt-get install linux-headers-generic
# apt-get --no-install-recommends install virtualbox-guest-additions
Getting Started
The following are the conventional methods of deploying OpenStack on Virtual Box for the sake of a test/sandbox or just to try out OpenStack on commodity hardware.
1. DevStack
2. Vagrant
But DevStack and Vagrant bring in some level of automated deployment as running the scripts will get your VirtualBox Instance configured as the required OpenStack deployment. We will be manually deploying OpenStack on VirtualBox Instance to get better view of how OpenStack works.
Prerequisite:
Well, its a daunting task to just cover all of OpenStack’s concepts let alone Virtualization and Networking. So some basic idea/knowledge on Virtualization, Networking and Linux is required. Even though I will try to keep the level as low as possible for making it easy for Linux Newbies as well as experts.
These Virtual Machines and Virtual Networks will be given equal privilege as a physical machine on a physical network.
Just for those who would want to do a deeper research or study, for more information you may refer the following links
OpenStack:OpenStack Official Documentation (docs.openstack.org)
Networking:Computer Networks (5th Edition) by Andrew S. Tanenbaum
VirtualBox:Virtual Box Manual (http://www.virtualbox.org/manual/UserManual.html)
Requirements :
Operating Systems - I recommend Ubuntu Server 12.04 LTS, Ubuntu Server 13.10 or Debian Wheezy
Note :Ubuntu 12.10 is not supporting OpenStack Grizzly Packages. Ubuntu team has decided not to package Grizzly Packages for Ubuntu 12.10.
Recommended Requirements.
| VT Enabled PC: | Intel ix or AMD QuadCore |
| 4 GB RAM: | DDR2/DDR3 |
Minimum Requirements.
| Non-VT PC's: | Intel Core 2 Duo or Amd Dual Core |
| 2GB Ram: | DDR2/DDR3 |
If you don't know whether your processor is VT enabled, you could check it by installing cpu checker
# apt-get install cpu-checker |
# kvm-ok |
If your device does not support VT it will show
INFO:Your CPU does not support KVM extensions
KVM acceleration can NOT be used
You will still be able to use Virtual Box but the instances will be very slow.
There are many ways to configure your OpenStack Setup, we will be deploying OpenStack Multi Node using OVS as the Network Plugin and QEMU/ KVM as the hypervisor.
Host Only Connections:
Host only connections provide an Internal network between your host and the Virtual Machine instances up and running on your host machine.This network is not traceable by other networks.
You may even use Bridged connection if you have a router/switch. I am assuming the worst case (one IP without any router), so that it is simple to get the required networks running without the hassle of IP tables.
The following are the host only connections that you will be setting up later on :
vboxnet0 - OpenStack Management Network - Host static IP 10.10.10.1
vboxnet1 - VM Conf.Network - Host Static IP 10.20.20.1
vboxnet2 - VM External Network Access (Host Machine) 192.168.100.1
Network Diagram :

Publicly editable image source at https://docs.google.com/drawings/d/1GX3FXmkz3c_tUDpZXUVMpyIxicWuHs5fNsHvYNjwNNk/edit?usp=sharing
Vboxnet0, Vboxnet1, Vboxnet2 - are virtual networks setup up by virtual box with your host machine. This is the way your host can communicate with the virtual machines. These networks are in turn used by virtual box VM’s for OpenStack networks, so that OpenStack’s services can communicate with each other.
Setup Your VM Environment
Before you can start configuring your Environment you need to download some of the following stuff:
Note:You cannot set up a amd64 VM on a x86 machine.
Note:You need a x86 image for VM's if kvm-ok fails, even though you are on amd64 machine.
Note: Even Though I'm using Ubuntu as Host, the same is applicable to Windows, Mac and other Linux Hosts.
If you have i5 or i7 2nd gen processor you can have VT technology inside VM's provided by VmWare. This means that your OpenStack nodes(Which are in turn VM's) will give positive result on KVM-OK. (I call it - Nesting of type-2 Hypervisors). Rest of the configurations remain same except for the UI and few other trivial differences.
Configure Virtual Networks
This section of the guide will help you setup your networks for your Virtual Machine.
Launch Virtual Box
Click on File>Preferences present on the menu bar of Virtual Box.
Select the Network tab.
On the right side you will see an option to add Host-Only networks.

Create three Host-Only Network Connections. As shown above.
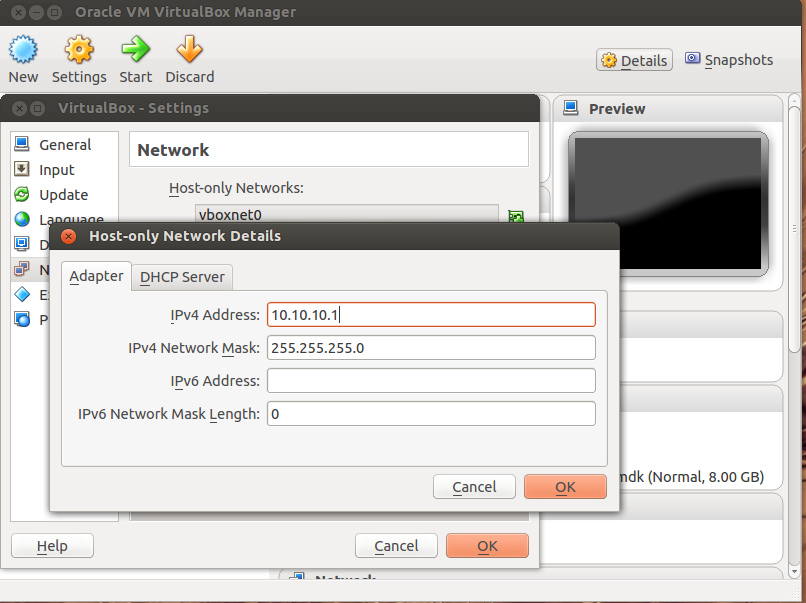
Edit the Host-Only Connections to have the following settings.
Vboxnet0
| Option | Value |
|---|---|
| IPv4 Address: | 10.10.10.1 |
| IPv4 Network Mask: | 255.255.255.0 |
| IPv6 Address: | Can be Left Blank |
| IPv6 Network Mask Length : | Can be Left Blank |
Vboxnet1
| Option | Value |
|---|---|
| IPv4 Address: | 10.20.20.1 |
| IPv4 Network Mask: | 255.255.255.0 |
| IPv6 Address: | Can be Left Blank |
| IPv6 Network Mask Length : | Can be Left Blank |

Vboxnet2
| Option | Value |
|---|---|
| IPv4 Address: | 192.168.100.1 |
| IPv4 Network Mask: | 255.255.255.0 |
| IPv6 Address: | Can be Left Blank |
| IPv6 Network Mask Length : | Can be Left Blank |

Install SSH and FTP
You may benefit by installing SSH and FTP so that you could use your remote shell to login into the machine and use your terminal which is more convenient that using the Virtual Machines tty through the Virtual Box's UI. You get a few added comforts like copy - paste commands into the remote terminal which is not possible directly on VM.
FTP is for transferring files to and fro ... you can also use SFTP or install FTPD on both HOST and VM's.
Installation of SSH and FTP with its configuration is out of scope of this GUIDE and I may put it up but it depends upon my free time. If someone wants to contribute to this - please do so.
Note:Please set up the Networks from inside the VM before trying to SSH and FTP into the machines. I would suggest setting it up at once just after the installation of the Server on VM's is over.
Install Your VM's Instances
During Installation of The Operating Systems you will be asked for Custom Software to Install , if you are confused or not sure about this, just skip this step by pressing Enter Key without selecting any of the given Options.
Warning - Please do not install any of the other packages except for which are mentioned below unless you know what you are doing. There is a good chance that you may end up getting unwanted errors, package conflicts ... due to the same.
Control Node:
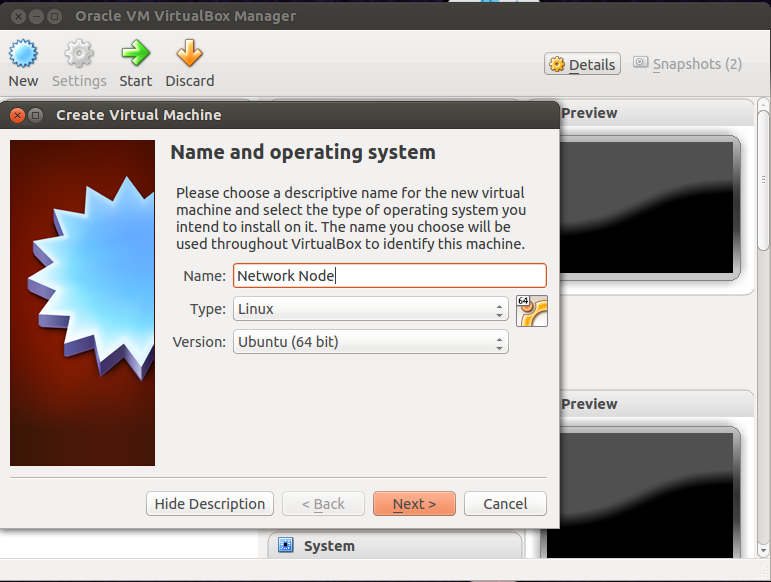
Create a new virtual machine. Select Ubuntu Server

Select the appropriate amount of RAM. For the control node, the minimum is 512 MB of RAM. For other settings, use the defaults. The hard disk size can be 8 GB as default.
Configure the networks
(Ignore the IP Address for now, you will set it up from inside the VM)
| Network Adapter | Host-Only Adapter Name | IP Address |
|---|---|---|
| eth0 | Vboxnet0 | 10.10.10.51 |
| eth1 | Vboxnet2 | 192.168.100.51 |
| eth2 | NAT | DHCP |
Adapter 1 (Vboxnet0)

Adapter 2 (Vboxnet2)

Adapter 3 (NAT)

Now Install Ubuntu Server 12.04 or 13.04 on this machine.
Note :Install SSH server when asked for Custom Software to Install. Rest of the packages are not required and may come in the way of OpenStack packages - like DNS servers etc. (not necessary). Unless you know what you are doing.
Network Node:
Create a new Virtual Machine,
Minimum RAM is 512 MB. Rest all can be left default. Minimum HDD space 8 GB.
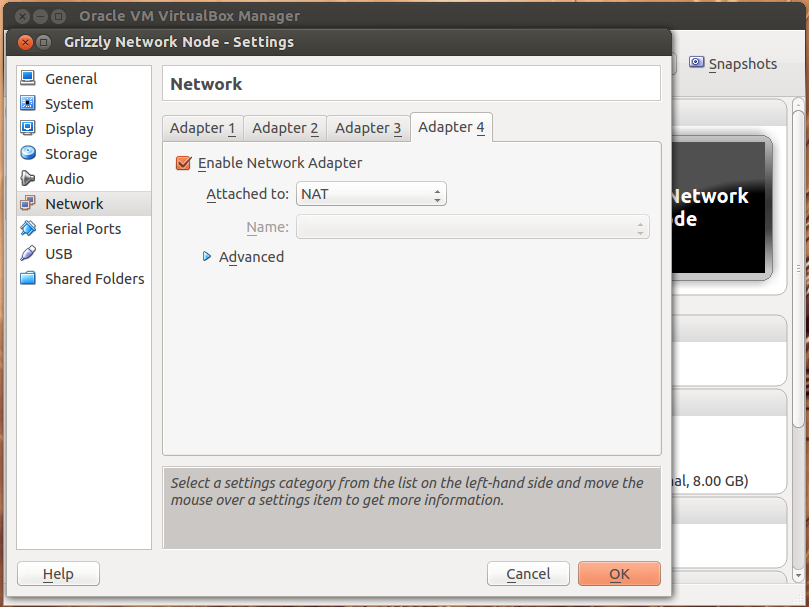
Configure the networks
(Ignore the IP Address for now, you will set it up from inside the VM)
| Network Adapter | Host-Only Adapter Name | IP Address |
|---|---|---|
| eth0 | Vboxnet0 | 10.10.10.52 |
| eth1 | Vboxnet1 | 10.20.20.52 |
| eth2 | Vboxnet2 | 192.168.100.51 |
| eth3 | NAT | DHCP |
Adapter 1 (Vboxnet0)

Adapter 2 (Vboxnet1)

Adapter 3 (Vboxnet2)

Adapter 4 (NAT)
Now Install Ubuntu Server 12.04 or 13.04 on this machine.
Note :Install SSH server when asked for Custom Software to Install. Rest of the packages are not required and may come in the way of OpenStack packages - like DNS servers etc. (not necessary). Unless you know what you are doing.
Compute Node:
Create a virtual machine with at least 1,000 MB RAM and 8 GB HDD. For other settings, use the defaults.

Configure the networks
(Ignore the IP Address for now, you will set it up from inside the VM)
| Network Adapter | Host-Only Adapter Name | IP Address |
|---|---|---|
| eth0 | Vboxnet0 | 10.10.10.53 |
| eth1 | Vboxnet1 | 10.20.20.53 |
| eth2 | NAT | DHCP |
Adapter 1 (Vboxnet0)

Adapter 2 (Vboxnet1)

Adapter 3 (NAT)

Now Install Ubuntu Server 12.04 or 13.04 on this machine.
Note :Install SSH server when asked for Custom Software to Install. Rest of the packages are not required and may come in the way of OpenStack packages - like DNS servers etc. (not necessary). Unless you know what you are doing.
Warnings/Advice :
Well there are a few warnings that I must give you out of experience due to common habits that most people may have :
Sometimes shutting down your Virtual Machine may lead to malfunctioning of OpenStack Services. Try not to direct shutdown your 3. In case your VM's don't get internet.
From your VM Instance, use ping command to see whether Internet is on.
$ ping www.google.com
If its not connected, restart networking service:
# service networking restart
# ping www.google.com
If this doesn't work, you need to check your network settings from Virtual Box, you may have left something or misconfigured it.
This should reconnect your network about 99% of the times. If you are really unlucky you must be having some other problems or your Internet connection itself is not functioning.
Note :There are known bugs with the ping under NAT. Although the latest versions of Virtual Box have better performance, sometimes ping may not work even if your Network is connected to internet.
Congrats, you are ready with the infrastructure for deploying OpenStack. Just make sure that you have installed Ubuntu Server on the above setup Virtual Box Instances. In the next section we will go through deploying OpenStack using the above created Virtual Box instances.
