
Contents
Compute uses the nova-scheduler service to determine how to
dispatch compute and volume requests. For example, the
nova-scheduler service determines which host a VM should launch
on. The term host in the context of filters means a physical node
that has a nova-compute
service running on it. You can configure the scheduler through a
variety of options.

Just as shown by above figure, nova-scheduler interacts with other components through queue and central database repo. For scheduling, queue is the essential communications hub.
All compute nodes (also known as hosts in terms of OpenStack) periodically publish their status, resources available and hardware capabilities to nova-scheduler through the queue. nova-scheduler then collects this data and uses it to make decisions when a request comes in.
By default, the compute scheduler is configured as a filter scheduler, as described in the next section. In the default configuration, this scheduler considers hosts that meet all the following criteria:
Are in the requested availability zone (AvailabilityZoneFilter).
Have sufficient RAM available (RamFilter).
Are capable of servicing the request (ComputeFilter).
Filter Scheduler
The Filter Scheduler supports filtering and weighting to make informed decisions on where a new instance should be created. This Scheduler supports only working with Compute Nodes.
Filtering

During its work, Filter Scheduler first makes a dictionary of unfiltered hosts, then filters them using filter properties and finally chooses hosts for the requested number of instances (each time it chooses the most weighed host and appends it to the list of selected hosts).
If it turns up, that it can’t find candidates for the next instance, it means that there are no more appropriate hosts where the instance could be scheduled.
If we speak about filtering and weighting, their work is quite flexible in the Filter Scheduler. There are a lot of filtering strategies for the Scheduler to support. Also you can even implement your own algorithm of filtering.
There are some standard filter classes to use (nova.scheduler.filters):
AllHostsFilter - frankly speaking, this filter does no operation. It passes all the available hosts.
ImagePropertiesFilter - filters hosts based on properties defined on the instance’s image. It passes hosts that can support the specified image properties contained in the instance.
AvailabilityZoneFilter - filters hosts by availability zone. It passes hosts matching the availability zone specified in the instance properties.
ComputeCapabilitiesFilter - checks that the capabilities provided by the host Compute service satisfy any extra specifications associated with the instance type. It passes hosts that can create the specified instance type.
The extra specifications can have a scope at the beginning of the key string of a key/value pair. The scope format is scope:key and can be nested, i.e. key_string := scope:key_string. Example like capabilities:cpu_info: features is valid scope format. A key string without any : is non-scope format. Each filter defines its valid scope, and not all filters accept non-scope format.
The extra specifications can have an operator at the beginning of the value string of a key/value pair. If there is no operator specified, then a default operator of s== is used. Valid operators are:
* = (equal to or greater than as a number; same as vcpus case)* == (equal to as a number)* != (not equal to as a number)* >= (greater than or equal to as a number)* <= (less than or equal to as a number)* s== (equal to as a string)* s!= (not equal to as a string)* s>= (greater than or equal to as a string)* s> (greater than as a string)* s<= (less than or equal to as a string)* s< (less than as a string)* <in> (substring)* <or> (find one of these)Examples are: ">= 5", "s== 2.1.0", "<in> gcc", and "<or> fpu <or> gpu"
class RamFilter(filters.BaseHostFilter):
  """Ram Filter with over subscription flag"""

  def host_passes(self, host_state, filter_properties):
  """Only return hosts with sufficient available RAM."""

    instance_type = filter_properties.get('instance_type')
    requested_ram = instance_type['memory_mb']
    free_ram_mb = host_state.free_ram_mb
    total_usable_ram_mb = host_state.total_usable_ram_mb
    used_ram_mb = total_usable_ram_mb - free_ram_mb
    return total_usable_ram_mb * FLAGS.ram_allocation_ratio - used_ram_mb >= requested_ram
Here ram_allocation_ratio means the virtual RAM to physical RAM allocation ratio (it is 1.5 by default). Really, nice and simple.
Next standard filter to describe is AvailabilityZoneFilter and it isn’t difficult too. This filter just looks at the availability zone of compute node and availability zone from the properties of the request. Each Compute service has its own availability zone. So deployment engineers have an option to run scheduler with availability zones support and can configure availability zones on each compute host. This classes method host_passes returns True if availability zone mentioned in request is the same on the current compute host.
The ImagePropertiesFilter filters hosts based on the architecture, hypervisor type, and virtual machine mode specified in the instance. E.g., an instance might require a host that supports the arm architecture on a qemu compute host. The ImagePropertiesFilter will only pass hosts that can satisfy this request. These instance properties are populated from properties define on the instance’s image. E.g. an image can be decorated with these properties using glance image-update img-uuid --property architecture=arm --property hypervisor_type=qemu Only hosts that satisfy these requirements will pass the ImagePropertiesFilter.
ComputeCapabilitiesFilter checks if the host satisfies any extra_specs specified on the instance type. The extra_specs can contain key/value pairs. The key for the filter is either non-scope format (i.e. no : contained), or scope format in capabilities scope (i.e. capabilities:xxx:yyy). One example of capabilities scope is capabilities:cpu_info:features, which will match host’s cpu features capabilities. The ComputeCapabilitiesFilter will only pass hosts whose capabilities satisfy the requested specifications. All hosts are passed if no extra_specs are specified.
ComputeFilter is quite simple and passes any host whose Compute service is enabled and operational.
Now we are going to IsolatedHostsFilter. There can be some special hosts reserved for specific images. These hosts are called isolated. So the images to run on the isolated hosts are also called isolated. This Scheduler checks if image_isolated flag named in instance specifications is the same that the host has.
Weights
Filter Scheduler uses so-called weights during its work.
The Filter Scheduler weights hosts based on the config option scheduler_weight_classes, this defaults to nova.scheduler.weights.all_weighers, which selects the only weigher available – the RamWeigher. Hosts are then weighted and sorted with the largest weight winning.
Filter Scheduler finds local list of acceptable hosts by repeated filtering and weighing. Each time it chooses a host, it virtually consumes resources on it, so subsequent selections can adjust accordingly. It is useful if the customer asks for the same large amount of instances, because weight is computed for each instance requested.
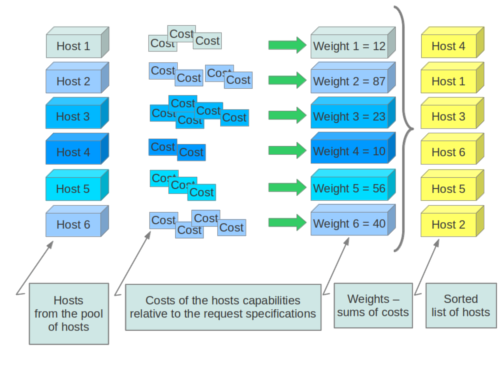
In the end Filter Scheduler sorts selected hosts by their weight and provisions instances on them.
The request flow for provisioning an instance goes like this:
The dashboard or CLI gets the user credentials and authenticates with the Identity Service via REST API.
The Identity Service authenticates the user with the user credentials, and then generates and sends back an auth-token which will be used for sending the request to other components through REST-call.
The dashboard or CLI converts the new instance request specified in launch instance or nova-boot form to a REST API request and sends it to
nova-api.nova-apireceives the request and sends a request to the Identity Service for validation of the auth-token and access permission.The Identity Service validates the token and sends updated authentication headers with roles and permissions.
nova-apichecks for conflicts withnova-database.nova-apicreates initial database entry for a new instance.nova-apisends the rpc.call request tonova-schedulerexpecting to get updated instance entry with host ID specified.nova-schedulerpicks up the request from the queue.nova-schedulerinteracts withnova-databaseto find an appropriate host via filtering and weighing.nova-schedulerreturns the updated instance entry with the appropriate host ID after filtering and weighing.nova-schedulersends the rpc.cast request tonova-computefor launching an instance on the appropriate host.nova-computepicks up the request from the queue.nova-computesends the rpc.call request tonova-conductorto fetch the instance information such as host ID and flavor (RAM, CPU, Disk).nova-conductorpicks up the request from the queue.nova-conductorinteracts withnova-database.nova-conductorreturns the instance information.nova-computepicks up the instance information from the queue.nova-computeperforms the REST call by passing the auth-token toglance-api. Then,nova-computeuses the Image ID to retrieve the Image URI from the Image Service, and loads the image from the image storage.glance-apivalidates the auth-token with keystone.nova-computegets the image metadata.nova-computeperforms the REST-call by passing the auth-token to Network API to allocate and configure the network so that the instance gets the IP address.neutron-servervalidates the auth-token with keystone.nova-computeretrieves the network info.nova-computeperforms the REST call by passing the auth-token to Volume API to attach volumes to the instance.cinder-apivalidates the auth-token with keystone.nova-computeretrieves the block storage info.nova-computegenerates data for the hypervisor driver and executes the request on the hypervisor (via libvirt or API).

Block Storage and OpenStack Compute
OpenStack provides two classes of block storage, "ephemeral" storage and persistent "volumes". Ephemeral storage exists only for the life of an instance, it will persist across reboots of the guest operating system but when the instance is deleted so is the associated storage. All instances have some ephemeral storage. Volumes are persistent virtualized block devices independent of any particular instance. Volumes may be attached to a single instance at a time, but may be detached or reattached to a different instance while retaining all data, much like a USB drive.
Ephemeral Storage
Ephemeral storage is associated with a single unique instance. Its size is defined by the flavor of the instance.
Data on ephemeral storage ceases to exist when the instance it is associated with is terminated. Rebooting the VM or restarting the host server, however, will not destroy ephemeral data. In the typical use case an instance's root filesystem is stored on ephemeral storage. This is often an unpleasant surprise for people unfamiliar with the cloud model of computing.
In addition to the ephemeral root volume all flavors except the smallest, m1.tiny, provide an additional ephemeral block device varying from 20G for the m1.small through 160G for the m1.xlarge by default - these sizes are configurable. This is presented as a raw block device with no partition table or filesystem. Cloud aware operating system images may discover, format, and mount this device. For example the cloud-init package included in Ubuntu's stock cloud images will format this space as an ext3 filesystem and mount it on /mnt. It is important to note this a feature of the guest operating system. OpenStack only provisions the raw storage.
Volume Storage
Volume storage is independent of any particular instance and is persistent. Volumes are user created and within quota and availability limits may be of any arbitrary size.
When first created volumes are raw block devices with no partition table and no filesystem. They must be attached to an instance to be partitioned and/or formatted. Once this is done they may be used much like an external disk drive. Volumes may attached to only one instance at a time, but may be detached and reattached to either the same or different instances.
It is possible to configure a volume so that it is bootable and provides a persistent virtual instance similar to traditional non-cloud based virtualization systems. In this use case the resulting instance may still have ephemeral storage depending on the flavor selected, but the root filesystem (and possibly others) will be on the persistent volume and thus state will be maintained even if the instance is shutdown. Details of this configuration are discussed in theOpenStack End User Guide.
Volumes do not provide concurrent access from multiple instances. For that you need either a traditional network filesystem like NFS or CIFS or a cluster filesystem such as GlusterFS. These may be built within an OpenStack cluster or provisioned outside of it, but are not features provided by the OpenStack software.
The OpenStack Block Storage service works via the interaction of a series of daemon processes named cinder-* that reside persistently on the host machine or machines. The binaries can all be run from a single node, or spread across multiple nodes. They can also be run on the same node as other OpenStack services.
The current services available in OpenStack Block Storage are:
cinder-api - The cinder-api service is a WSGI app that authenticates and routes requests throughout the Block Storage system. It supports the OpenStack API's only, although there is a translation that can be done via Nova's EC2 interface which calls in to the cinderclient.
cinder-scheduler - The cinder-scheduler is responsible for scheduling/routing requests to the appropriate volume service. As of Grizzly; depending upon your configuration this may be simple round-robin scheduling to the running volume services, or it can be more sophisticated through the use of the Filter Scheduler. The Filter Scheduler is the default in Grizzly and enables filter on things like Capacity, Availability Zone, Volume Types and Capabilities as well as custom filters.
cinder-volume - The cinder-volume service is responsible for managing Block Storage devices, specifically the back-end devices themselves.
cinder-backup - The cinder-backup service provides a means to back up a Cinder Volume to OpenStack Object Store (SWIFT).
Introduction to OpenStack Block Storage
OpenStack Block Storage provides persistent High Performance Block Storage resources that can be consumed by OpenStack Compute instances. This includes secondary attached storage similar to Amazon's Elastic Block Storage (EBS). In addition images can be written to a Block Storage device and specified for OpenStack Compute to use a bootable persistent instance.
There are some differences from Amazon's EBS that one should be aware of. OpenStack Block Storage is not a shared storage solution like NFS, but currently is designed so that the device is attached and in use by a single instance at a time.
Backend Storage Devices
OpenStack Block Storage requires some form of back-end storage that the service is built on. The default implementation is to use LVM on a local Volume Group named "cinder-volumes". In addition to the base driver implementation, OpenStack Block Storage also provides the means to add support for other storage devices to be utilized such as external Raid Arrays or other Storage appliances.
Users and Tenants (Projects)
The OpenStack Block Storage system is designed to be used by many different cloud computing consumers or customers, basically tenants on a shared system, using role-based access assignments. Roles control the actions that a user is allowed to perform. In the default configuration, most actions do not require a particular role, but this is configurable by the system administrator editing the appropriate policy.json file that maintains the rules. A user's access to particular volumes is limited by tenant, but the username and password are assigned per user. Key pairs granting access to a volume are enabled per user, but quotas to control resource consumption across available hardware resources are per tenant.
For tenants, quota controls are available to limit the:
Number of volumes which may be created
Number of snapshots which may be created
Total number of Giga Bytes allowed per tenant (shared between snapshots and volumes)
Volumes Snapshots and Backups
This introduction provides a high level overview of the two basic resources offered by the OpenStack Block Storage service. The first is Volumes and the second is Snapshots which are derived from Volumes.
Volumes
Volumes are allocated block storage resources that can be attached to instances as secondary storage or they can be used as the root store to boot instances. Volumes are persistent R/W Block Storage devices most commonly attached to the compute node via iSCSI.
Snapshots
A Snapshot in OpenStack Block Storage is a read-only point in time copy of a Volume. The Snapshot can be created from a Volume that is currently in use (via the use of '--force True') or in an available state. The Snapshot can then be used to create a new volume via create from snapshot.
Backups
A Backup is an archived copy of a Volume currently stored in Object Storage (Swift).
Managing Volumes
Cinder is the OpenStack service that allows you to give extra block level storage to your OpenStack Compute instances. You may recognize this as a similar offering from Amazon EC2 known as Elastic Block Storage (EBS). The default Cinder implementation is an iSCSI solution that employs the use of Logical Volume Manager (LVM) for Linux. Note that a volume may only be attached to one instance at a time. This is not a ‘shared storage’ solution like a SAN of NFS on which multiple servers can attach to. It's also important to note that Cinder also includes a number of drivers to allow you to use a number of other vendor's back-end storage devices in addition to or instead of the base LVM implementation.
Here is brief walk-through of a simple create/attach sequence, keep in mind this requires proper configuration of both OpenStack Compute via cinder.conf and OpenStack Block Storage via cinder.conf.
The volume is created via cinder create; which creates an LV into the volume group (VG) "cinder-volumes"
The volume is attached to an instance via nova volume-attach; which creates a unique iSCSI IQN that will be exposed to the compute node
The compute node which run the concerned instance has now an active ISCSI session; and a new local storage (usually a /dev/sdX disk)
libvirt uses that local storage as a storage for the instance; the instance get a new disk (usually a /dev/vdX disk)
Block Storage Capabilities
OpenStack provides persistent block level storage devices for use with OpenStack compute instances.
The block storage system manages the creation, attaching and detaching of the block devices to servers. Block storage volumes are fully integrated into OpenStack Compute and the Dashboard allowing for cloud users to manage their own storage needs.
In addition to using simple Linux server storage, it has unified storage support for numerous storage platforms including Ceph, NetApp, Nexenta, SolidFire, and Zadara.
Block storage is appropriate for performance sensitive scenarios such as database storage, expandable file systems, or providing a server with access to raw block level storage.
Snapshot management provides powerful functionality for backing up data stored on block storage volumes. Snapshots can be restored or used to create a new block storage volume.
